Table of Contents
Advertisement
Available languages
Available languages
Quick Links
IMPORTANT INSTRUCTIONS -
Models: LIN34M, LIN40M,
LIN46M, LIN58M
READ AND SAVE THESE INSTRUCTIONS
READ CAREFULLY BEFORE ATTEMPTING TO ASSEMBLE, INSTALL, OPERATE OR MAINTAIN THE PRODUCT DESCRIBED.
PROTECT YOURSELF AND OTHERS BY OBSERVING ALL SAFETY INFORMATION. FAILURE TO COMPLY WITH
INSTRUCTIONS COULD RESULT IN PERSONAL INJURY AND/OR PROPERTY DAMAGE!
GENERAL SAFETY INFORMATION
electric shock and injury to person, including the following:
WARNING:
TO REDUCE THE RISK OF FIRE, ELECTRIC SHOCK
AND INJURY TO PERSON, OBSERVE THE FOLLOWING:
a) Use this unit only in the manner intended by the manufacturer.If you
have questions, contact the manufacturer.
b) Before servicing or cleaning the unit, switch power off at
service panel and lock the service disconnecting means to
prevent power from being switched on accidentally. When the
service disconnecting means cannot be locked, securely fasten
a prominent warning device, such as a tag, to the service panel.
WARNING:
TO REDUCE THE RISK OF FIRE, ELECTRIC SHOCK
AND INJURY TO PERSON, OBSERVE THE FOLLOWING:
a) Installation work and electrical wiring must be done by qualified
person(s) in accordance with all applicable codes and standards,
including fire-related construction.
b) Sufficient air is needed for proper combustion and exhausting
of gases through the flue (chimney) of fuel burning equipment to
prevent back drafting. Follow the heating equipment manufacturer's
guideline and safety standards such as those published by the
National Fire Protection Association (NFPA) and the American
Society for Heating, Refrigeration, and Air Conditioning Engineers
(ASHRAE), and the local code authorities.
c) When cutting or drilling into wall or ceiling, do not damage electrical
wiring and other hidden utilities.
CAUTION:
TO REDUCE THE RISK OF FIRE AND TO PROPERLY
EXHAUST AIR, BE SURE TO DUCT AIR OUTSIDE - DO NOT VENT
EXHAUST AIR INTO SPACES WITHIN WALLS OR CEILINGS OR INTO
ATTICS, CRAWL SPACES, OR GARAGES.
d) Ducted fans must always be vented to the outdoors.
e) This unit must be grounded.
f) To avoid motor bearing damage and noisy and/or unbalanced
impellers, keep drywall spray, construction dust, etc. off power unit.
g) Read all instructions before installing or using exhaust fan.
6728024M New 8-10
OPERATING MANUAL
RETAIN INSTRUCTIONS FOR FUTURE REFERENCE.
When using electrical appliances, basic precautions
should always be followed to reduce the risk of fire,
SAVE THESE INSTRUCTIONS
WARNING:
NOT USE THIS FAN WITH ANY SOLID-STATE SPEED CONTROL DEVICE.
WARNING:
a) Never leave surface units unattended at high settings.
Boilovers cause smoking and greasy spillovers that may
ignite. Heat oils slowly on low or medium settings.
b) Always turn hood ON when cooking at high heat or when
flambéing food (ie. Crepes Suzette, Cherries Jubilee,
Peppercorn Beef Flambé).
c) Clean ventilating fans frequently. Grease should not be allowed
to accumulate on fan filter.
d) Use proper pan size. Always use cookware appropriate for
the size of the surface element.
WARNING:
THE EVENT OF A RANGE TOP GREASE FIRE, OBSERVE THE FOLLOWING:
a) SMOTHER FLAMES with a close-fitting lid, cookie sheet, or
metal tray, then turn off burner. BE CAREFUL TO PREVENT
BURNS. If the flames do not go out immediately, EVACUATE
AND CALL THE FIRE DEPARTMENT.
b) NEVER PICK UP A FLAMING PAN - You may be burned.
c) DO NOT USE WATER, including wet dishcloths or towels -
a violent steam explosion will result.
d) Use an extinguisher ONLY if:
I.
II. The fire is small and contained in the area where it started.
III. The fire department is being called.
IV. You can fight the fire with your back to an exit.
WARNING:
DUCTWORK.
www.airkinglimited.com
Outdoor Kitchen
TO REDUCE THE RISK OF FIRE, ELECTRIC SHOCK, DO
TO REDUCE THE RISK OF A RANGE TOP GREASE FIRE:
TO REDUCE THE RISK OF INJURY TO PERSONS IN
You know you have a Class ABC extinguisher, and you
already know how to operate it.
TO REDUCE THE RISK OF FIRE, USE ONLY METAL
Powered Liner
1 of 8
Advertisement
Table of Contents

Related Manuals for Air King LIN46M


Summary of Contents for Air King LIN46M
-
Page 1: General Safety Information
IMPORTANT INSTRUCTIONS - OPERATING MANUAL Models: LIN34M, LIN40M, Outdoor Kitchen Powered Liner LIN46M, LIN58M READ AND SAVE THESE INSTRUCTIONS READ CAREFULLY BEFORE ATTEMPTING TO ASSEMBLE, INSTALL, OPERATE OR MAINTAIN THE PRODUCT DESCRIBED. PROTECT YOURSELF AND OTHERS BY OBSERVING ALL SAFETY INFORMATION. FAILURE TO COMPLY WITH INSTRUCTIONS COULD RESULT IN PERSONAL INJURY AND/OR PROPERTY DAMAGE! RETAIN INSTRUCTIONS FOR FUTURE REFERENCE. -
Page 2: Installation Instructions
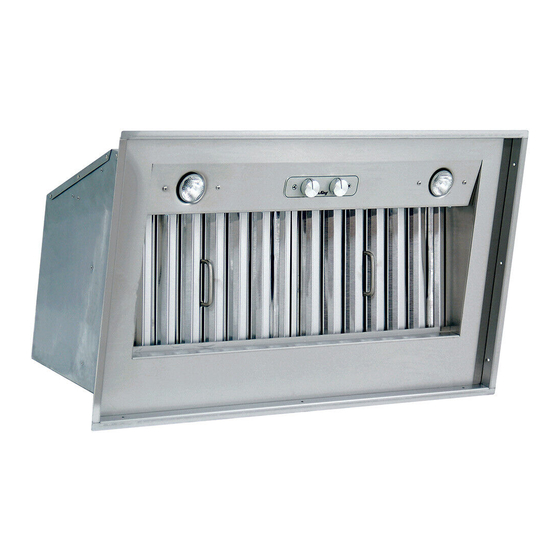
INSTALLATION INSTRUCTIONS NOTE: If additional support is required, install a 2" x .75" strip of wood (34" wide) between the back of the canopy (rear wall) and the hood. When installing the wood strip to the back of the canopy, locate studs in the wall to support the weight of the canopy. Center CAUTION: MAKE SURE POWER IS SWITCHED OFF AT SERVICE PANEL the wood strip 11.5" from the bottom of the canopy and attach the strip to at least two BEFORE STARTING INSTALLATION. studs in the rear wall (do not fasten the strip to drywall only). Lift unit up into position so that the bottom flanges are in solid contact with the bottom of the canopy or cabinet. Using NOTE: Outdoor Kitchen Professional Range Hoods are approved for use in covered wood screws and washers (not included) secure the hood to the wood strip through the outdoor kitchens only. Proper duct adapters, ducting, chimneys, roof/wall caps, etc. two keyholes in the back of the hood. Using the included wood mounting screws, secure must be utilized as called out in the following instructions. Do not install the hood in an the unit to the canopy or cabinet by driving the screws through the holes (Figure 3). uncovered area directly exposed to the elements. OPTIONAL ADDITIONAL SUPPORT SECTION 1 Preparing the Insert Canopy 1. Unpack hood from the carton and confirm that all pieces are present. In addition to Wood Washer the range hood you should have:... -
Page 3: Blower Switch
When there is access to the top of the unit, connect the ducting to the duct collar 3. Install the baffle filters by inserting the top of the filter into the top channel of the and secure in place using tape to seal all joints (Figure 5). hood, then slide the bottom of the filter into the bottom channel. The filters have a top and a bottom. The bottom of the filter will have small drain holes. These holes 4. When there is no access to the top of the hood, carefully pull down the metal duct must be facing down towards the grease trough to be effective (Figure 9). through the custom hood base hole. Slide this duct over the duct collar. Make sure the adapter/damper assembly enters the ducting. Seal the connection with duct tape. Top SECTION 5 Channel Wiring CAUTION: ALL ELECTRICAL CONNECTIONS MUST BE MADE IN Bottom ACCORDANCE WITH LOCAL CODES, ORDINANCES, OR NATIONAL ELECTRICAL Channel CODE. IF YOU ARE UNFAMILIAR WITH METHODS OF INSTALLING ELECTRICAL WIRING, SECURE THE SERVICES OF A QUALIFIED ELECTRICIAN. -
Page 4: Troubleshooting Guide
EVER, OR (II) REPLACMENT OR REPAIR OF ANY HOUSE FUSES, CIRCUIT BREAKERS OR RECEPTACLES. NOTWITHSTANDING ANYTHING TO THE CONTRARY, IN NO EVENT SHALL AIR KING’S LIABILITY UNDER ANY EXPRESS OR IMPLIED WARRANTY EXCEED THE PURCHASE PRICE OF THE PRODUCT AND ANY SUCH LIABILITY SHALL TERMINATE UPON THE EXPIRATION OF THE WARRANTY PERIOD. -
Page 5: Instructions Générales De Sécurité
INSTRUCTIONS IMPORTANTES – MODE D’EMPLOI Revêtement avec puissance Modèles : LIN34M, LIN40M, de cuisinières extérieures LIN46M, LIN58M professionnelles LIRE ET CONSERVER CES INSTRUCTIONS LIRE SOIGNEUSEMENT AVANT DE TENTER D’ASSEMBLER, INSTALLER, OPÉRER OU DE RÉPARER LE PRODUIT DÉCRIT. PROTÉGEZ VOUS-MÊME ET LES AUTRES EN OBSERVANT TOUTE L’INFORMATION DE SÉCURITÉ. FAILLIR À SE CONFORMER AUX INSTRUCTIONS PEUT RÉSULTER EN BLESSURE PERSONNELLE GRAVE ET/OU EN DOMMAGE À... - Page 6 INSTRUCTIONS POUR L’INSTALLATION arêtes du fond soient en plein contact avec le fond de l’armoire. Utilisant des vis en bois et des rondelles (non incluses) fixez la hotte à la bande en bois par les deux trous dans le AVERTISSEMENT : dos de la hotte. En utilisant les vis de support en bois incluses, fixez l'unité dans l’armoire VOUS ASSURER QUE L’ALIMENTATION EST en enfonçant les vis à l’intérieur des trous (Figure 3). COUPÉE AU PANNEAU DE SERVICE AVANT DE COMMENCER L’INSTALLATION. SUPPORT ADDITIONNEL FACULTATIF REMARQUE : Les hottes de cuisinières extérieures professionnelles sont approuvées pour l'usage dans les cuisines extérieures couvertes seulement. Vous devez utiliser les adaptateurs de conduits, conduits, cheminées et clapets appropriés selon les Armoire instructions suivantes. N'installez pas la hotte dans un endroit découvert directement exposé aux éléments. Rondelle Bande de SECTION 1 montage Préparation de l’insert en bois Bride...
- Page 7 SECTION 5 Câblage Canal du AVERTISSEMENT : haut TOUTES LES CONNEXIONS DOIVENT ÊTRE FAITES EN CONFORMITÉ AVEC LES CODES ÉLECTRIQUES LOCAUX OU NATIONAUX. SI VOUS N’ÊTES PAS FAMILIER AVEC LES MÉTHODES D’INSTALLATION DE CÂBLAGE Canal du ÉLECTRIQUE, RECOURREZ AUX SERVICES D’UN ÉLECTRICIEN QUALIFIÉ. 1. Enlever les deux vis du couvercle du compartiment Connecteur à fils de câblage pour obtenir l’accès au compartiment de...
-
Page 8: Guide De Dépannage
AN DE LA DATE DE L'ACHAT ORIGINAL OU JUSQU'À CE QUE L'ACHETEUR ORIGINAL DU PRODUIT VEND OU TRANSFÈRE LE PRODUIT, CELUI QUI SE PRODUIT EN PREMIER ET DANS AUCUN CAS AIR KING N’ASSUME AUCUNE RESPONSABILITÉ EXPRESSE OU TACITE POUR (I) DES DOMMAGES ACCIDENTELS OU INDIRECTS DE N’IMPORTE QUELLE CAUSE, OU (II) LE REPLACEMENT OU LA RÉPARATION DE TOUS FUSIBLES, DISJONCTEURS OU RÉCEPTACLES DE MAISON.