Table of Contents
Advertisement
AV RECEIVER
HT-RC440
Instruction Manual
Contents
Safety Information and Introduction ............2
Table of Contents ...........................................5
Connections .................................................11
Turning On & Basic Operations..................18
Advanced Operations ..................................37
Controlling Other Components...................51
Appendix .......................................................57
Internet Radio Guide
Remote Control Codes
E
n
Advertisement
Chapters
Table of Contents

Related Manuals for Onkyo HT-RC440


Summary of Contents for Onkyo HT-RC440
- Page 1 Contents AV RECEIVER Safety Information and Introduction ....2 HT-RC440 Table of Contents ...........5 Connections ..........11 Turning On & Basic Operations....18 Instruction Manual Advanced Operations ........37 Controlling Other Components....51 Appendix ............57 Internet Radio Guide Remote Control Codes...
-
Page 2: Safety Information And Introduction
Safety Information and Introduction 9. Do not defeat the safety purpose of the polarized or D. If the apparatus does not operate normally by grounding-type plug. A polarized plug has two blades following the operating instructions. Adjust only WARNING: with one wider than the other. A grounding type plug those controls that are covered by the operating TO REDUCE THE RISK OF FIRE OR ELECTRIC SHOCK, has two blades and a third grounding prong. -
Page 3: Precautions
If water or any other liquid gets inside water. Dry the unit immediately afterwards with a • Increase the separation between the equipment and this unit, have it checked by your Onkyo dealer. clean cloth. Don’t use abrasive cloths, thinners, receiver. -
Page 4: Supplied Accessories
• Remove expired batteries as soon as possible to prevent damage from leakage or corrosion. Thank you for purchasing an Onkyo AV Receiver. Please read this manual thoroughly before making connections and plugging in the unit. Following the instructions in this manual will enable you to obtain optimum performance and listening enjoyment from your new AV Receiver. -
Page 5: Table Of Contents
Turning Off ..............18 Controlling Other Components Playback ..............19 Playing the Connected Component ......19 iPod/iPhone Playback via Onkyo Dock ....51 Controlling Contents of USB or Network Devices ..20 Using the Onkyo Dock ..........51 Understanding Icons on the Display ......21 Controlling Your iPod/iPhone........ -
Page 6: Features
Miscellaneous • 6 HDMI Inputs and 1 Output • 40 FM/AM Presets Amplifier • Crossover Adjustment • Onkyo for System Control (40/50/60/70/80/90/100/120/150/200 Hz) • 4 Digital Inputs (2 Optical/2 Coaxial) • 80 Watts/Channel @ 8 ohms (FTC) • A/V Sync Control Function (up to 400 ms) •... -
Page 7: Front & Rear Panels
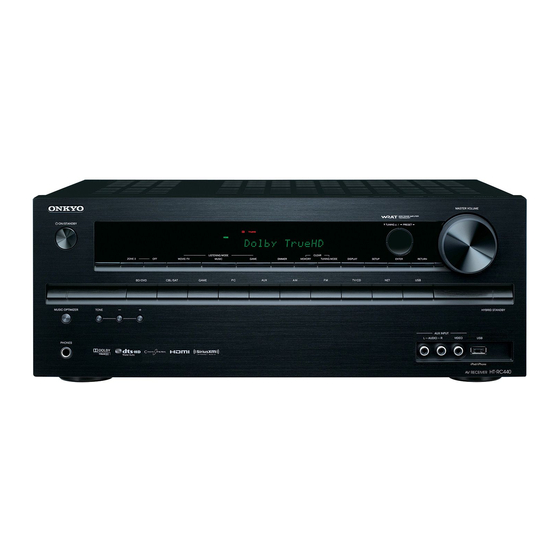
Safety Information and Introduction Front & Rear Panels Front Panel For detailed information, see the pages in parentheses. TUNING / , PRESET (26), cursor and ENTER buttons ON/STANDBY button (18) RETURN button ZONE 2, OFF buttons (50) MASTER VOLUME control (19) Remote control sensor (4) MUSIC OPTIMIZER button and indicator (35, 38) Display (8) -
Page 8: Display
Safety Information and Introduction Display For detailed information, see the pages in parentheses. Input indicators (66) Z2 (Zone 2) indicator (50) HDMI indicator (47) 3D indicator DIGITAL indicator This lights when a 3D input signal is detected. ARC indicator (48) Headphone indicator (36) USB indicator (21, 22) and cursor indicators (21) -
Page 9: Rear Panel
Safety Information and Introduction Rear Panel DIGITAL IN COAXIAL and OPTICAL jacks Composite video and analog audio jacks (BD/DVD IN, CBL/SAT IN, GAME IN, PC IN, COMPONENT VIDEO IN and OUT jacks TV/CD IN) ETHERNET port ZONE 2 LINE OUT jacks FM ANTENNA jack and AM ANTENNA terminal SUBWOOFER PRE OUT jack HDMI IN and OUT jacks... -
Page 10: Remote Controller
Receiver mode. RECEIVER). You can also use the remote controller to control Controlling the AV Receiver / buttons (26) Onkyo Blu-ray Disc/DVD player, CD player, and other components. D.TUN button (26) See “Entering Remote Control Codes” for more DISPLAY button details (➔... -
Page 11: Connections
Connections Connecting the AV Speaker Configuration Receiver The following table indicates the channels you should use Surround Surround depending on the number of speakers that you have. right left No matter how many speakers you use, a powered Connecting Your Speakers subwoofer is recommended for a really powerful and solid bass. - Page 12 Connections Speaker Connection Precautions • Don’t connect more than one cable to each speaker Using a Powered Subwoofer terminal. Doing so may damage the AV receiver. Read the following before connecting your speakers: • Don’t connect one speaker to several terminals. •...
-
Page 13: About Av Connections
Connections ■ • Push plugs in all the way to make Optical digital audio Right! About AV Connections good connections (loose connections Optical digital connections allow you to enjoy digital can cause noise or malfunctions). sound such as PCM , Dolby Digital or DTS. The audio Connecting AV components •... -
Page 14: Connecting Components With Hdmi
Connections Connecting Components with HDMI Satellite/cable set-top box, etc. Personal computer TV, projector, etc. Blu-ray Disc/DVD player Game console ■ See also: Audio Return Channel (ARC) function If your TV doesn’t support Audio Return Channel (ARC), you need to connect an optical digital cable together with the HDMI •... -
Page 15: Connecting Your Components
Connections Connecting Your Components Note The on-screen menus appear only on a TV that is connected to the HDMI OUT. If your TV is connected When USB input is selected, you can input video signals from to other video outputs, use the AV receiver’s display the AUX INPUT VIDEO jack. -
Page 16: Connecting Onkyo Ri Components
Connections Connecting Onkyo RI Components Make sure that each Onkyo component is connected with an analog audio cable (connection in the hookup examples) (➔ page 15). Make the connection (see the illustration). If you’re using an RI Dock, or cassette tape deck, change the Input Display (➔... -
Page 17: Connecting The Antennas
Connections Connecting the Antennas Connecting the Power Cord This section explains how to connect the supplied indoor FM antenna and AM loop antenna. Plug the power cord into an AC wall outlet. The AV receiver won’t pick up any radio signals without any antenna connected, so you must connect the antenna to use the tuner. -
Page 18: Turning On & Basic Operations
Turning On & Basic Operations Turning On/Off the AV Turning On Turning Off Receiver ON/STANDBY on the front panel. ON/STANDBY on the front panel. Press Press ON/STANDBY Press RECEIVER followed by RECEIVER on the Press RECEIVER followed by RECEIVER on the remote controller. -
Page 19: Playback
(➔ page • “Remote Playback” (➔ page • “Listening to AM/FM Radio” (➔ page • “iPod/iPhone Playback via Onkyo Dock” (➔ page • “Controlling Other Components” (➔ page To adjust the volume, use VOL / . Select a listening mode and enjoy! See also: •... -
Page 20: Controlling Contents Of Usb Or Network Devices
Turning On & Basic Operations TOP MENU Controlling Contents of USB or This button displays the top menu for each media or service. This button stops playback. Network Devices / and ENTER MODE These buttons navigate through the menus. You can switch between Standard Mode and Extended Press USB or NET first. -
Page 21: Understanding Icons On The Display
Turning On & Basic Operations Understanding Icons on the Display Playing an iPod/iPhone via USB • You can also use the / , ENTER and TUNING MODE buttons on the front panel. TUNING MODE allows you to This section describes icons that appear on the AV switch modes. -
Page 22: Playing A Usb Device
Artist Great Artist Album My Favorite address) of your unit on http://onkyo.vtuner.com/. You can then register your favorite radio programs. The ID# 0 : 11 / 2 : 00 is shown at the bottom of the “vTuner Internet Radio” top menu, and the AV receiver’s MAC address is shown on “Network”... -
Page 23: Registering Other Internet Radio
Turning On & Basic Operations Registering Other Internet Radio • If you want to add a new station directly from “My Favorites”, select an empty slot in the list and press MENU. Then, select You need to connect the AV receiver to your home “Create New Station”... -
Page 24: Playing Music Files On A Server
Turning On & Basic Operations Windows Media Player 11 Setup Playing Music Files on a Server Use / to select an item, and then press ENTER or to start playback. This section explains how to configure Windows Media Player 11 so that the AV receiver can play the music files You need to connect the AV receiver to your home stored on your computer. -
Page 25: Remote Playback
Turning On & Basic Operations Click “OK” to close the dialog box. Adjusting the Volume. Remote Playback This completes the Windows Media Player 12 You can adjust the volume by adjusting the volume configuration. bar in the “Remote playback” window. The default You need to connect the AV receiver to your home maximum volume level is 64. -
Page 26: Listening To Am/Fm Radio
Turning On & Basic Operations ■ Tuning into Radio Stations Manual tuning mode Listening to AM/FM Radio In manual tuning mode, FM stations will be in mono. ■ Auto tuning mode This section describes the procedure of using the Press TUNING MODE so that the AUTO indicator buttons on the front panel, unless otherwise specified. - Page 27 Turning On & Basic Operations ■ Presetting AM/FM Stations Deleting Presets You can store a combination of up to 40 of your favorite Select the preset that you want to delete. AM/FM radio stations as presets. See the previous section. While holding down MEMORY, press TUNING Tune into the AM/FM station that you want to store MODE.
-
Page 28: Using Basic Functions
Turning On & Basic Operations Using Basic Functions MOVIE/TV button This button selects the listening modes intended for use with movies and TV. Using the Listening Modes MUSIC button This button selects the listening modes intended for use Selecting Listening Modes with music. - Page 29 Turning On & Basic Operations About Listening Modes Input Source Speaker Layout The following audio formats are supported by the listening The illustration shows which speakers are activated in each The AV receiver’s listening modes can transform your modes. channel. See “Sp Config (Speaker Configuration)” for the listening room into a movie theater or concert hall, with speaker setup (➔...
- Page 30 Turning On & Basic Operations ■ Onkyo-Original DSP Listening Modes Listening Mode Description Input Speaker Source Layout Listening Mode Description Input Speaker T-D (Theater- With this mode you can enjoy a virtual Source Layout Dimensional) surround sound even with only two or three...
- Page 31 Turning On & Basic Operations ■ Listening Modes Listening Mode Description Input Speaker Source Layout Listening Mode Description Input Speaker In this mode, audio from the input source is Source Layout output without surround-sound processing. Direct In this mode, audio from the input source is D T S The speaker configuration (presence of output without surround-sound processing.
- Page 32 Turning On & Basic Operations Listening Mode Description Input Speaker Source Layout Neo:6 This mode expands any 2-channel source for up to 5.1-channel playback. It uses seven N e o N e o C i n e m a full-bandwidth channels of matrix decoding for matrix-encoded material, providing a N e o M u s i c...
-
Page 33: Using The Home Menu
Turning On & Basic Operations ■ Network Service preview thumbnail, and pressing ENTER will switch Using the Home Menu the AV receiver to that input source. The Home menu provides quick access to frequently used You need to connect the AV receiver to your home menus. -
Page 34: Using The Sleep Timer
Turning On & Basic Operations Using the Sleep Timer Setting the Display Brightness Displaying Source Information With the sleep timer, you can set the AV receiver to turn You can adjust the brightness of the AV receiver’s display. You can display various information about the current off automatically after a specified period. -
Page 35: Changing The Input Display
Muting the AV Receiver The Music Optimizer function enhances the sound quality You can temporarily mute the output of the AV receiver. When you connect an -capable Onkyo component, you of compressed music files. must configure the input display so that can work Press RECEIVER followed by MUTING. -
Page 36: Using Headphones
Turning On & Basic Operations Using Headphones Connect a pair of stereo headphones with a standard plug (1/4 inch or 6.3 mm) to the PHONES jack. While the headphones plug is inserted in the PHONES jack, indicator lights. Note • Always turn down the volume before connecting your headphones. -
Page 37: Advanced Operations
Advanced Operations ■ On-screen Setup Input Using the Quick Setup You can select input sources and view information on their assignments. With the AV receiver connected to a TV, there are two ways of changing the settings on-screen: using the Quick Use / to select an input source and view its Setup or the Setup Menu (HOME). -
Page 38: Using The Audio Settings Of Quick Setup
Advanced Operations Speaker Levels Turn this setting on to reduce the dynamic range of Dolby Using the Audio Settings of Quick Digital material so that you can still hear quiet parts even Setup ■ when listening at low volume levels—ideal for watching Subwoofer Level movies late at night when you don’t want to disturb –15 dB to 0 dB to +12 dB in 1 dB steps... -
Page 39: Using The Setup Menu (Home)
Advanced Operations CinemaFILTER Explanatory Notes Using the Setup Menu (HOME) ■ Cinema Filter Menu Sp Config Remote ■ Subwoofer indicator Turn this setting on to soften overly bright movie soundtracks, which are typically mixed for reproduction in RECEIVER a movie theater. Menu selection CinemaFILTER can be used with the following listening Setting target... -
Page 40: About The Hybrid Standby Indicator
Advanced Operations Menu item Setting target About the HYBRID STANDBY indicator Setup menu items Level Cal Left By way of optimized circuitry, this function reduces power (➔ page Center Menu item Setting target consumption when the AV receiver is in standby mode. Right HDMI Input BD/DVD... -
Page 41: Hdmi Input
Advanced Operations HDMI Input Component (Component Video Input) Note • If no video component is connected to HDMI output (even if the HDMI input is assigned), the AV receiver selects the video “Setup” “Setup” source based on the setting of “Component (Component Video Input)”. -
Page 42: Digital Audio (Digital Audio Input)
Advanced Operations ■ Center , Surround Digital Audio (Digital Audio Input) Sp Config (Speaker Configuration) Small: Large: “Setup” “Setup” Select based on the cone diameter. None Menu Digital Audio Menu Sp Config Note If the “Front” setting is set to “Small”, the “Large” option If you connect a component to a digital audio input, you This section explains how to specify which speakers are cannot be selected. -
Page 43: Sp Distance (Speaker Distance)
Advanced Operations Sp Distance (Speaker Distance) Level Cal (Level Calibration) Note • For a more accurate setting, look up the frequency response in the manuals supplied with your speakers and set accordingly. “Setup” “Setup” • Choose a higher crossover frequency if you want more sound from your subwoofer. -
Page 44: Audio Adjust
Advanced Operations Dolby Audio Adjust ■ ■ PL II Music (2ch Input) Neo:6 Music “Setup” These settings apply to only 2-channel stereo sources. Center Image Panorama 0 to 2 to 5 Menu Audio Adjust With this setting, you can specify by how much the front left and right channel output is attenuated in order to create With the Audio Adjust functions and settings, you can the center channel. -
Page 45: Source Setup
Advanced Operations Preset Name For Input Selector Audio Selector Source Setup ■ ■ Name Audio Selector “Setup” - - -, Blu-ray, DVD, HD DVD, VCR, DVR, Tivo, ARC: CableSTB, SAT STB, PS3, Wii, Xbox, PC, TV, CD, The audio signal from your TV tuner can be sent to Items can be set individually for each input selector. -
Page 46: Hardware
30 minutes with no audio Normally, the AV receiver detects the signal format When several Onkyo components are used in the same and no video signal input. automatically. However, if you experience either of the room, their remote ID codes may overlap. -
Page 47: Hdmi Setup
Advanced Operations ■ Audio TV Out • When the source equipment is connected with the HDMI Setup connection, it may malfunction if “HDMI Ctrl (RIHD)” is set to “On”. ■ “Setup” This preference determines whether the incoming audio HDMI Through signal is output from the HDMI output. -
Page 48: Network Setup
Advanced Operations ■ ■ Audio Return Ch (ARC) InstaPrevue Network Setup These settings apply to “InstaPrevue” of the Home menu and specify the preview display of HDMI Auto: (➔ page video streams. The audio signal from your TV tuner can be sent to “Setup”... - Page 49 Advanced Operations ■ ■ DHCP Network Standby Enable Disable This setting determines whether or not the AV receiver This setting enables or disables control over the network. uses DHCP to automatically configure its IP Address, When enabled, the NET indicator will be dimly-lit while Subnet Mask, Gateway, and DNS Server settings.
-
Page 50: Zone 2
Advanced Operations Zone 2 Controlling Zone 2 Components Press ZONE2, then point the remote controller at ■ the AV receiver and press RECEIVER. In addition to the main listening room, you can also enjoy Operating on the AV receiver Zone 2 turns on, the Z2 indicator lights on the AV playback in another room, or as we call Zone 2. -
Page 51: Controlling Other Components
Dock. comfort of your sofa. You can even use the AV receiver’s For the latest information on the Onkyo Dock iPod Alarm remote controller to operate your iPod/iPhone. components, see the Onkyo web site at: If you use the Alarm function on your iPod to start http://www.onkyo.com... -
Page 52: Controlling Your Ipod/Iphone
). In this case, make an connection and DS-A2 RI Dock. enter the remote control code 81993 (with This button does not turn the Onkyo DS-A2 or DS-A2X RI ■ Dock on or off. Also, your iPod/iPhone may not respond the With the RI Control... -
Page 53: Controlling Other Components
• Except for RECEIVER, TV, and the multi zone button, assigned. If the sequence is not successfully assigned, remote control codes from any category can be assigned for BD/DVD Onkyo Blu-ray Disc player (➔ page the remote indicator will flash once slowly. -
Page 54: Remote Control Codes For Onkyo Components Connected Via Ri
Controlling Apple TV Controlling Onkyo components without While holding down RECEIVER, press and hold If you want to control an Onkyo component by pointing the By programming the supplied remote controller with the down HOME until the remote indicator lights... - Page 55 Controlling Other Components ■ Controlling a Blu-ray Disc/DVD Player, HD TV operation Press the appropriate REMOTE DVD Player or DVD Recorder Available buttons MODE button first. Number: 1 to 9, 0 , INPUT, TV VOL / , BD/DVD is preprogrammed with the remote control code MUTING Number: +10 for controlling a component that supports the...
- Page 56 Controlling Other Components ■ ■ DVD player/DVD recorder operation Satellite receiver/Cable receiver operation Press the appropriate REMOTE Available buttons Available buttons MODE button first. TOP MENU GUIDE Number: 1 to 9, 0 SOURCE Number: +10 DISPLAY / / / / / / ENTER ENTER MUTING...
-
Page 57: Appendix
If you can’t resolve the issue yourself, try resetting the ■ Make sure that the inputs and outputs of all 14-16 AV receiver before contacting your Onkyo dealer. Can’t turn on the AV receiver components are connected properly. To reset the AV receiver to its factory defaults, turn it Make sure that the power cord is properly plugged —... - Page 58 Appendix ■ Only the front speakers produce sound Depending on the input signal, some listening modes 28-32 With some CD and LD players, you won’t be able to — cannot be selected. playback DTS material properly even though your When the Stereo or Mono listening mode is selected, player is connected to a digital input on the AV only the front speakers and subwoofer produce ■...
- Page 59 Move the AV receiver away from your TV or — connected. computer. If it’s an Onkyo component, make sure that the cable and analog audio cable are connected properly. If the video source is connected to a component video Listen to the station in mono.
- Page 60 Appendix ■ There’s no video Zone 2 USB Device Playback Make sure that your iPod/iPhone model’s TV OUT — ■ ■ There’s no sound Can’t access the music files on a USB device setting is set to On. Make sure the correct input is selected on your TV or —...
- Page 61 AV receiver’s display. Then, release both buttons. “Off”. Onkyo is not responsible for damages (such as CD rental To turn the setting off, repeat the above process so that – The “Network Standby” setting is set to “On”.
-
Page 62: Firmware Update
Onkyo recommends that you back up your important music files beforehand. • If you connect a USB hard disk drive to the USB port, Onkyo recommends that you use its AC adapter to power it. • USB hubs and USB devices with hub functions are not supported. - Page 63 Contact your ISP. turn on again. Others Retry the update procedure from the beginning. Congratulations! You now have the latest firmware If the error persists, please contact Onkyo installed on your Onkyo AV receiver. (➔ page 65) and provide the error Support code.
- Page 64 USB device, remove it first. version. Note Download the firmware file from the Onkyo web Select “Update” and press ENTER. • Never unplug or turn off the AV receiver during the update site. The file name is as follows: The update process will begin.
- Page 65 AC power cord and try again. Please contact an Onkyo distributor referring to Onkyo SUPPORT site. http://www.intl.onkyo.com/support/firmware/index.html The above-mentioned information is subject to change without prior notice. Visit the Onkyo web site for the latest update. En-65...
-
Page 66: Connection Tips And Video Signal Path
Appendix Connection Tips and Video Connection Formats Audio Connection Formats Video Signal Path Audio components can be connected by using any of the Video components can be connected by using any one of following audio connection formats: analog, optical, the following video connection formats: composite video, The AV receiver supports several connection formats for coaxial, or HDMI. -
Page 67: Using An Rihd-Compatible Tv, Player, Or Recorder
HDMI, is the name of the system control function found on • The AV receiver will enter standby mode when the power • Sharp TV of the TV is turned to standby. Onkyo components. The AV receiver can be used with ■ CEC (Consumer Electronics Control), which allows Players/Recorders •... - Page 68 Appendix ■ How to connect and setup Change each item in the “HDMI Setup” menu Operate with the remote controller. according to the following settings: (➔ page 55). For buttons that can be operated Confirm the connection and settings. • HDMI Ctrl (RIHD): On Note 1.
-
Page 69: About Hdmi
Appendix About HDMI Supported Audio Formats About Copyright Protection • 2-channel linear PCM (32–192 kHz, 16/20/24 bit) The AV receiver supports HDCP (High-bandwidth Digital Designed to meet the increased demands of digital TV, Content Protection) , a copy-protection system for digital HDMI (High Definition Multimedia Interface) is a new •... -
Page 70: Network/Usb Features
Appendix Network/USB Features Consult your ISP if you have any problems with your Internet Network Requirements connection. • The AV receiver uses DHCP to configure its network settings ■ Ethernet Network automatically. If you want to configure these settings manually, Connecting to the Network For the best results, a 100Base-TX switched Ethernet see “Network Setup”... - Page 71 • Protected WMA music files on an MP3 player cannot be played. Web browser: Microsoft Internet Explorer 6 or • Onkyo accepts no responsibility whatsoever for the loss or Netscape 7.1 damage to data stored on a USB device when that device is used ■...
- Page 72 Appendix ■ WAV (.wav or .WAV) Supported Audio File Formats About DLNA WAV files contain uncompressed PCM digital audio. For server playback and playback from a USB device, the The Digital Living Network Alliance is an international, • Sampling rates of 8 kHz, 11.025 kHz, 12 kHz, 16 kHz, AV receiver supports the following music file formats.
-
Page 73: License And Trademark Information
Pro Logic and the double-D symbol are trademarks of Dolby Laboratories. Apple TV is a trademark of Apple Inc., registered in the U.S. and other countries. Music Optimizer™ is a trademark of Onkyo Corporation. “DLNA ® , the DLNA Logo and DLNA CERTIFIED™ are trademarks, service marks, or certification marks of the Digital Living Network Alliance.”... -
Page 74: Specifications
Appendix ■ Specifications Tuner Section Audio Inputs Digital Optical: 2 FM Tuning Frequency Range Amplifier Section Coaxial: 2 87.5 MHz - 107.9 MHz Analog BD/DVD, CBL/SAT, GAME, PC, TV/CD, AM Tuning Frequency Range Rated Output Power 530 kHz - 1710 kHz ■... - Page 75 Appendix Memo En-75...
- Page 76 1301, 555 Tower, No.555 West NanJin Road, Jin an, Shanghai, China 200041, Tel: 86-21-52131366 Fax: 86-21-52130396 http://www.cn.onkyo.com/ Y1205-1 SN 29401316EN (C) Copyright 2012 Onkyo Sound & Vision Corporation Japan. All rights reserved. * 2 9 4 0 1 3 1 6 E N *...
- Page 77 Using Internet Radio Using Internet Radio Using Multiple Accounts Pandora ® internet radio –Getting Started (U.S. only) ..........2 The AV receiver supports multiple user accounts, which means you can freely switch between several logins. Common Procedures in Internet Radio After registering user accounts, login is performed from Menu the “Users”...
-
Page 78: Pandora ® Internet Radio -Getting Started (U.s. Only)
If you are tired of a song, you can put the song to sleep Onkyo receiver and press enter to begin listening to and Pandora will not play it for one month. -
Page 79: Using Rhapsody (U.s. Only)
You can play tracks from Genres, Top Artists, Top have one yet, you can create a new account at Albums, Top Tracks, New Releases, and Staff Picks. Enabled buttons: www.rhapsody.com/onkyo Rhapsody Channels: RANDOM, REPEAT If you have an existing Rhapsody account, select Listen to radio channels programmed by Rhapsody’s... -
Page 80: Using The Siriusxm Internet Radio (North American Only)
“Sign In”. Enter your user name and SiriusXM Internet Radio subscriptions are sold separately Your Onkyo AV receiver includes a free trial of SiriusXM password in the next keyboard screen, or in Web and are governed by the Sirius Terms and Conditions (see Internet Radio. -
Page 81: Using Last.fm Internet Radio
Last.fm is a music service that learns what you love... Tracks”, “Library” and “Neighbours”. If you have the existing Last.fm account, you can sign Your new Onkyo AV receiver is very clever. If you have a Account Info: in to your account to select “Sign in to your free Last.fm account, it will keep track of all the songs... -
Page 82: Using Slacker Personal Radio
Using Internet Radio You can control the tracks with the buttons on the Using Slacker Personal Radio remote control. If you do not have an account, create one on the Enabled buttons: Slacker website (www.slacker.com) with your ■ Menu Items computer. -
Page 83: Using Mp3Tunes
Using Internet Radio Playing Contents on the AV Receiver Using MP3tunes Use / to select a track and press ENTER or to start playback. Listen to your music collection on your home stereo in A playback screen appears. complete digital fidelity without a personal computer plus •... - Page 84 Utilisation d’une webradio Utilisation d’une Utilisation de plusieurs comptes Pandora ® internet Radio –Pour commencer webradio (États-Unis uniquement)......2 L’ampli-tuner AV prend en charge plusieurs comptes utilisateur, ce qui signifie que vous pouvez librement commuter entre plusieurs connexions. Après avoir Procédures courantes dans le menu de Utilisation de Rhapsody (Etats-Unis enregistré...
-
Page 85: Pandora ® Internet Radio -Pour Commencer (États-Unis Uniquement)
Don’t play the song for a month : la création de votre compte et de vos stations, vous pouvez retourner à votre récepteur Onkyo et appuyez Si vous en avez assez d’une chanson, vous pouvez sur entrée pour écouter votre webradio Pandora mettre la chanson «... -
Page 86: Utilisation De Rhapsody (Etats-Unis Uniquement)
RANDOM, REPEAT compte, vous pouvez en créer un à partir de meilleures pistes, des nouveautés et des sélections du www.rhapsody.com/onkyo Remarque personnel. Si vous possédez déjà un compte Rhapsody, • Sur les canaux Rhapsody, certaines touches ne fonctionnent Rhapsody Channels : sélectionnez «... -
Page 87: Utilisation De Siriusxm Internet Radio (Amérique Du Nord Uniquement)
Si vous possédez déjà un compte SIRIUS, vous Les abonnements SiriusXM Internet Radio sont vendus Votre ampli-tuner AV Onkyo comprend un essai gratuit de pouvez y accéder en sélectionnant « Sign In ». séparément et sont subordonnés par les conditions Sirius SiriusXM Internet Radio. -
Page 88: Utilisation De La Webradio Last.fm
Account Info : vous y connecter pour sélectionner « Sign in to your Votre nouvel ampli-tuner AV Onkyo est très intelligent. Si account ». Saisissez votre nom utilisateur et votre mot Vérifiez les informations de votre compte. vous avez un compte Last.fm gratuit, il garde une trace de de passe dans l’écran clavier suivant. -
Page 89: Utilisation De Slacker Personal Radio
Utilisation d’une webradio Vous pouvez contrôlez les pistes avec les touches sur Utilisation de Slacker Personal Radio la télécommande. Si vous ne possédez pas de compte, créez-en un à Boutons activés : partir du site Web de Slacker (www.slacker.com) à ■... - Page 90 Uso de Internet Radio Uso de Internet Radio Uso de múltiples cuentas Pandora ® Internet Radio –Primeros pasos (solo EE.UU.) ..........2 El receptor de AV permite múltiples cuentas de usuario, lo que quiere decir que se puede cambiar libremente Procedimientos comunes en el menú...
-
Page 91: Pandora ® Internet Radio -Primeros Pasos (Solo Ee.uu.)
Don’t play the song for a month: receptor Onkyo y pulsar Enter para empezar a Si se cansa de una canción, puede “silenciarla” de PANDORA, el logotipo de PANDORA logo, y la imagen escuchar su radio por Internet personalizada de modo que Pandora no la reproduzca durante un mes. -
Page 92: Uso De Rhapsody (Sólo Ee.uu.)
Puede controlar las pistas con los botones del mando a todavía no tiene una, puede crear una nueva en distancia. Puede reproducir canciones por géneros, artistas www.rhapsody.com/onkyo principales, álbumes principales o canciones Botones activados: Si ya tiene una cuenta Rhapsody, seleccione “Sign in principales, novedades, selección del sitio. -
Page 93: Uso De Siriusxm Internet Radio (Solo Norteamérica)
Las suscripciones a SiriusXM Internet Radio se venden por seleccionando “Sign In”. Escriba su nombre de Su receptor de AV Onkyo incluye una prueba gratuita de separado y se rigen por las condiciones de Sirius (consulte usuario y contraseña en la pantalla de teclado que SiriusXM Internet Radio. -
Page 94: Uso De Last.fm Internet Radio
Si se suscribe podrá disfrutar de lo mejor de Last.fm Radio Consejo se reproduce. sin anuncios en su receptor de AV Onkyo sin necesidad de • Si desea utilizar múltiples cuentas de usuario, consulte “Uso Ban this track: un ordenador. -
Page 95: Uso De Slacker Personal Radio
Uso de Internet Radio Puede controlar las pistas con los botones del Uso de Slacker Personal Radio mando a distancia. Si no tiene una cuenta, cree una en el sitio web de Botones activados: Slacker (www.slacker.com) con su ordenador. ■ Elementos del menú... - Page 96 Y1203-2 SN 29401189B (C) Copyright 2012 Onkyo Sound & Vision Corporation Japan. All rights reserved. * 2 9 4 0 1 1 8 9 B *...
- Page 97 Using Internet Radio Using Internet Radio Using Multiple Accounts Using Last.fm Internet Radio ......2 The AV receiver supports multiple user accounts, which means you can freely switch between several logins. Common Procedures in Internet Radio After registering user accounts, login is performed from Menu the “Users”...
- Page 98 Last.fm is a music service that learns what you love... Tracks”, “Library” and “Neighbours”. If you have the existing Last.fm account, you can sign Your new Onkyo AV receiver is very clever. If you have a Account Info: in to your account to select “Sign in to your free Last.fm account, it will keep track of all the songs...
- Page 99 Internetradio verwenden Internetradio verwenden Verwendung mehrerer Konten Verwendung von Last.fm Internet Radio ..2 Der AV-Receiver unterstützt mehrere Nutzerkonten, was bedeutet, dass Sie frei zwischen mehreren Logins Allgemeine Verfahren bei den umschalten können. Nach der Anmeldung der Internetradio-Menüs Nutzerkonten wird das Login vom „Users“ Bildschirm aus vorgenommen.
- Page 100 Sender wiedergeben („Your Library“, „Your Die aktuellen Nutzungspreise und umfassende Infos sind Neighbourhood“ und „Your Recommendations“). unter www.last.fm/subscribe erhältlich Y1112-1 SN 29401229 (C) Copyright 2012 Onkyo Sound & Vision Corporation Japan. All rights reserved. * 2 9 4 0 1 2 2 9 *...
- Page 101 Remote Control Codes Remote Control Codes While holding down the REMOTE MODE button to which you want to assign a code, press and hold down [DISPLAY] (about 3 seconds). The REMOTE MODE button/Remote indicator lights. On Integra products, button names are capitalized. For example, “Remote Mode” button and “Display”...
- Page 102 Remote Control Codes Codes de télécommande Códigos de control remoto Tout en maintenant enfoncé le bouton REMOTE MODE auquel vous souhaitez Manteniendo pulsado el botón REMOTE MODE para el cual desea introducir un associer un code, pressez et maintenez enfoncé le bouton [DISPLAY] (pendant código, pulse y mantenga presionado el botón [DISPLAY] (aproximadamente 3 environ 3 secondes).
- Page 103 Remote Control Codes Codici del telecomando Fernbedienungscodes Tenendo premuto il tasto REMOTE MODE al quale si desidera assegnare il Halten Sie die REMOTE MODE-Taste gedruckt, fur die Sie den Code eingeben codice, premere e tenere premuto [DISPLAY] (per circa 3 secondi). mochten, und drucken Sie (ca.
- Page 104 Remote Control Codes Afstandsbedieningscodes Fjärrstyrningskoder Houd terwijl u de REMOTE MODE toets ingedrukt houdt waarvoor u een code Håll ned knappen för det REMOTE MODE som du vill tilldela en kod samtidigt wilt toewijzen de [DISPLAY] toets ingedrukt (ongeveer 3 seconden). som du trycker och håller ned [DISPLAY] (i cirka 3 sekunder).
- Page 105 Remote Control Codes 遥控代码 按住想指定编码的 REMOTE MODE (遥控模式)按钮的同时,按住 [DISPLAY (显示)] (大约 3 秒钟) 。 REMOTE MODE (遥控模式)按钮 / 遥控指示灯亮起。 Integra 产品上的按钮名称单词首字母大写。例如, “Remote Mode (遥控模 式) ”按钮和 “Display (显示) ”按钮。 注意: • [RECEIVER (接收机)] 和多区域按钮不能输入遥控编码。 • • 只能为 [TV (电视)] 输入电视遥控编码。 •...
- Page 106 Remote Control Codes Dedicated Onkyo Receiver Cable Set Top Box Cable Set Top Box Cable/PVR Combination Default 62503 mio TV 02802 Toshiba 01509 Samsung 01877 Zone 2 62506 Motorola 01376, 00858, 01562, 01582 Scientific Atlanta 01877, 01982 01982, 01998, 02378...
- Page 107 Aiwa 70157 Marantz 40029 Memorex 70032 Technics 70029, 70303 Arcam 70157 Myryad 40029 Meridian 70157 Thorens 70157 Atoll Electronique 70157 Onkyo 42157 Micromega 70157 Thule Audio 70157 Audio Research 70157 Optimus 40027 Miro 70000 Traxdata 70626 Audiolab 70157 Philips 40029...
- Page 108 01251, 01334, 01626 Boston 01251 DigiQuest 01300, 01457, 01631 00775 Receiver Boxer 01458 Digisky 01457 Gold Box 00853 Onkyo 52503 British Sky 00847, 01175, 01662 DigitalBox 01100, 01631 Gold Vision 01631 Broadcasting Digiwave 01631 GoldMaster 01334 Satellite Set Top Box...
- Page 109 Remote Control Codes Satellite Set Top Box Satellite Set Top Box Satellite Set Top Box Satellite Set Top Box Hama 01567 Leiko 01626 Pace 00847, 00853, 00887, Sat Industrie 01611 01175, 01323, 01356, Hanseatic 01100 Lemon 01334 SAT+ 01409 01423, 01662, 01693, Hirschmann 00173 Lenoxx...
- Page 110 Remote Control Codes Satellite Set Top Box Satellite Set Top Box SAT/PVR Combination SAT/PVR Combination Star 00887 00642 BskyB 01175, 01662 Schneider 01206 Stream System 01300 00879, 01356 Bush 01645 Sedea Electronique 01206 Strong 00853, 00879, 01284, United 01251, 01626, 02418 Canal Satellite 02657 01175, 01662, 01693,...
- Page 111 Remote Control Codes Television Television Television Television Akai 10178, 10556, 10037, Basic Line 10556, 10037, 10668, Casio 10037 Dick Smith 10698 10714, 10715, 10208, 11037 Electronics Cathay 10037 11675 Baur 10037, 10195, 10512 Digatron 10037 10037 Akiba 10037 Beaumark 10178 Digihome 11667 Centrum...
- Page 112 Remote Control Codes Television Television Television Television Erres 10037 Genesis 10037 Hisense 10556, 10508, 10208, 10037 11363, 12098 10171 Genexxa 10037 11709 Hitachi 10150, 10178, 10037, 10037 10171, 11864, 11886 Jinfeng 10208 10634, 11037, 10508, Euroman 10037 Godrej 11585 Jinxing 10556, 10037, 10698 10499, 10578, 11576, Europa...
- Page 113 10037, 10714, 10668, Medion 10556, 10037, 10714, Naiko 10037 Onix 10698 11037, 12001 10668, 11037, 10698, Nakimura 10037 Onkyo 11807, 13100, 13500 10512, 11248, 11585, Linsar 11585 National 10508, 10208 11667, 11709 11667, 12001, 12719 Local India TV 10208 10178, 10653, 10508,...
- Page 114 Remote Control Codes Television Television Television Television Phoenix 10037 Reflex 10037, 10668, 11037 Sei-Sinudyne 10037 SunBriteTV 11610 Phonola 10556, 10037 Relisys 11585 Serie Dorada 10178 Sungoo 11248 Pioneer 10037, 10698, 10512, Remotec 10171, 10037 Shanghai 10208 Sunny 10037 11457, 11636, 12171 Reoc 10714 Sharp...
- Page 115 Remote Control Codes Television Television Television Technosonic 10556, 10625, 10499, Toyoda 11709 11365, 12098 Humax 20739 11324 TRANS-continents 10556, 10037, 10668, Walker 11667 Panasonic 20614, 20616 Techvision 11709 11037 Waltham 10037, 10668, 11037 Philips 20739 Techwood 11037, 11667 Transonic 10037, 10698, 10512, Wansa 12098 ReplayTV...
- Page 116 Alba 30539, 30713 30741 Dynex 32596 30503, 30539, 30623, Ambiance 33052 30741, 31602 30867, 31597, 31602, Dyon 33052 Amstrad 30713 Onkyo 30503, 30627, 31612, 32855 eBench 31152 32147, 30571, 31634 Anthem 32820 Kendo 30713 Elfunk 30713 Oppo 30575, 32545 Aristona...
- Page 117 32414, 32432, 33444 Vizio 32563 Pioneer 30631, 32860 Skantic 30539, 30713 Momitsu 33052 Vtrek 32587 30646 SM Electronic 31152 Onkyo 32147, 32900, 32910, Waltham 30713 30522 33100, 33101, 33500, Smart 30713 Wellington 30713 33501 Samsung 30490, 31635 Sony 30533, 30864, 31033,...
- Page 118 HD-DVD Odys 12719 Integra 32901, 33104 33504 Panasonic 12170 30741 Philips 11454, 10556, 11394, 30539 Microsoft 32083 Powerpoint 10698 Onkyo 32901, 33104 33504 Prosonic 12001 Xbox 32083 Pvision 12001 TV/DVD Combination 12746, 12932 Akai 11675 Schaub Lorenz 12001 Black Diamond...
- Page 119 Remote Control Codes Memo...
- Page 120 Y1112-1 SN 29401094 (C) Copyright 2012 ONKYO SOUND & VISION CORPORATION Japan. All rights reserved. * 2 9 4 0 1 0 9 4 *...