Table of Contents
Advertisement
Advertisement
Table of Contents

Related Manuals for Asus P5G41T-M LX2 BR


Summary of Contents for Asus P5G41T-M LX2 BR
- Page 1 P5G41T-M LX2/BR...
- Page 2 Product warranty or service will not be extended if: (1) the product is repaired, modified or altered, unless such repair, modification of alteration is authorized in writing by ASUS; or (2) the serial number of the product is defaced or missing.
-
Page 3: Table Of Contents
ASUS Express Gate ............. 1-16 Chapter 2: BIOS information Managing and updating your BIOS ..........2-1 2.1.1 ASUS Update utility ............2-1 2.1.2 ASUS EZ Flash 2 ............2-2 2.1.3 ASUS CrashFree BIOS ........... 2-3 BIOS setup program ..............2-3... - Page 4 Boot menu .................. 2-12 2.6.1 Boot Device Priority ............2-12 2.6.2 Boot Settings Configuration .......... 2-12 2.6.3 Security ................. 2-13 Tools menu ................. 2-14 2.7.1 ASUS EZ Flash 2 ............2-14 2.7.2 Express Gate ..............2-14 Exit menu ..................2-15...
-
Page 5: Notices
Complying with the REACH (Registration, Evaluation, Authorisation, and Restriction of Chemicals) regulatory framework, we published the chemical substances in our products at ASUS REACH website at http://green.asus.com/english/REACH.htm. DO NOT throw the motherboard in municipal waste. This product has been designed to enable proper reuse of parts and recycling. -
Page 6: Safety Information
Safety information Electrical safety • To prevent electric shock hazard, disconnect the power cable from the electric outlet before relocating the system. • When adding or removing devices to or from the system, ensure that the power cables for the devices are unplugged before the signal cables are connected. If possible, disconnect all power cables from the existing system before you add a device. -
Page 7: Conventions Used In This Guide
Refer to the following sources for additional information and for product and software updates. ASUS websites The ASUS website provides updated information on ASUS hardware and software products. Refer to the ASUS contact information. Optional documentation Your product package may include optional documentation, such as warranty flyers, that may have been added by your dealer. -
Page 8: P5G41T-M Lx2/Br Specifications Summary
- 2 x 240-pin DIMM sockets support unbuffered non-ECC 1066/800 MHz DDR3 memory modules - Supports up to 8GB system memory * Refer to www.asus.com for the latest Memory QVL (Qualified Vendors Lists). ** When you install a total memory of 4GB or more,... - Page 9 1 x Chassis fan connector 1 x 24-pin EATX power connector 1 x 4-pin ATX 12V power connector 1 x Chassis intrusion connector ASUS unique features ASUS CrashFree BIOS 3 ASUS Q-Fan ASUS EZ Flash 2 ASUS MyLogo 2 ASUS Express Gate BIOS 8Mb Flash ROM, AMI BIOS, PnP, DMI 2.0, WfM 2.0,...
-
Page 10: Chapter 1: Product Introduction
Chapter 1 Product introduction Thank you for buying an ASUS P5G41T-M LX2/BR motherboard! ® Before you start installing the motherboard, and hardware devices on it, check the items in your motherboard package. Refer to page ix for the list of accessories. -
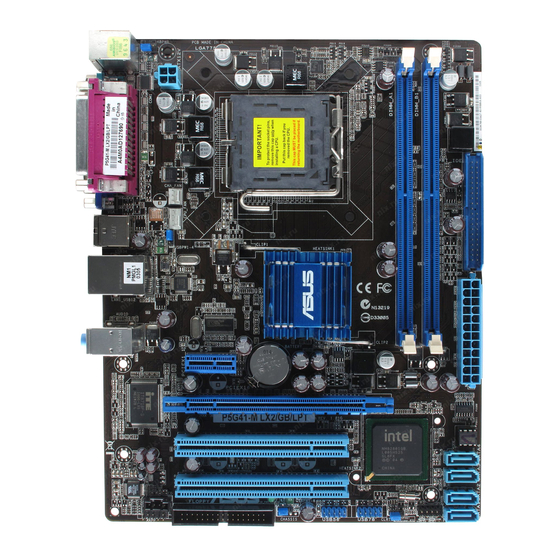
Page 11: Motherboard Overview
Motherboard overview 1.2.1 Motherboard layout Ensure that you install the motherboard into the chassis in the correct orientation. The edge with external ports goes to the rear part of the chassis. 19.1cm(7.5in) KBMS KBPWR ATX12V PRI_IDE LGA775 CHA_FAN CPU_FAN USB34 Place this side towards the rear of the chassis. -
Page 12: Central Processing Unit (Cpu)
Contact your retailer immediately if the PnP cap is missing, or if you see any damage to the PnP cap/socket contacts/motherboard components. ASUS will shoulder the cost of repair only if the damage is shipment/transit-related. • Keep the cap after installing the motherboard. ASUS will process Return Merchandise Authorization (RMA) requests only if the motherboard comes with the cap on the LGA775 socket. -
Page 13: Memory Configurations
• A*: Supports one module inserted into either slot as Single-channel memory configuration. • B*: Supports one pair of modules inserted into both slots as one pair of dual-channel memory configuration. Visit the ASUS website at www.asus.com for the latest QVL. Chapter 1: Product introduction... -
Page 14: Expansion Slots
This motherboard supports PCI Express x1 network cards, SCSI cards, and other cards that comply with the PCI Express specifications. 1.5.5 PCI Express x16 slot This motherboard supports a PCI Express x16 graphics card that complies with the PCI Express specifications. ASUS P5G41T-M LX2/BR... -
Page 15: Jumpers
Jumpers Clear RTC RAM (3-pin CLRTC) This jumper allows you to clear the Real Time Clock (RTC) RAM in CMOS. You can clear the CMOS memory of date, time, and system setup parameters by erasing the CMOS RTC RAM data. The onboard button cell battery powers the RAM data in CMOS, which include system setup information such as system passwords. - Page 16 Set these jumpers to +5VSB to wake up the computer from S3 and S4 sleep modes (no power to CPU, DRAM in slow refresh, power supply in reduced power mode). USBPW1-4 +5VSB (Default) USBPW5-8 P5G41T-M LX2/BR +5VSB (Default) P5G41T-M LX2/BR USB Device Wake-Up ASUS P5G41T-M LX2/BR...
-
Page 17: Connectors
Connectors 1.7.1 Rear panel ports PS/2 mouse port (green). This port is for a PS/2 mouse. Parallel port. This 25-pin port connects to a parallel printer, a scanner, or other devices. LAN (RJ-45) port. This port allows connection to a Local Area Network (LAN) through a network hub. -
Page 18: Internal Connectors
The system may become unstable or may not boot up if the power is inadequate. • If you are uncertain about the minimum power supply requirement for your system, refer to the Recommended Power Supply Wattage Calculator at http://support.asus. com/PowerSupplyCalculator/PSCalculator.aspx?SLanguage=en-us for details. ASUS P5G41T-M LX2/BR... - Page 19 DO NOT forget to connect the fan cables to the fan connectors. Insufficient air flow inside the system may damage the motherboard components. These are not jumpers! Do not place jumper caps on the fan connectors! Only the 4-pin CPU fan supports the ASUS Q-Fan feature. CHA_FAN Rotation...
- Page 20 Optical drive audio connector (4-pin CD) These connectors allow you to receive stereo audio input from sound sources such as a CD-ROM, TV tuner, or MPEG card. P5G41T-M LX2/BR P5G41T-M LX2/BR Internal audio connector 1-11 ASUS P5G41T-M LX2/BR...
- Page 21 USB connectors (10-1 pin USB56, USB78) These connectors are for USB 2.0 ports. Connect the USB module cable to any of these connectors, then install the module to a slot opening at the back of the system chassis. These USB connectors comply with USB 2.0 specification that supports up to 480Mbps connection speed.
- Page 22 By default, the pins labeled “Chassis Signal” and “GND” are shorted with a jumper cap. Remove the jumper caps only when you intend to use the chassis intrusion detection feature. CHASSIS P5G41T-M LX2/BR P5G41T-M LX2/BR Chassis intrusion connector 1-13 ASUS P5G41T-M LX2/BR...
-
Page 23: System Panel Connector
System panel connector (10-1 pin F_PANEL) This connector supports several chassis-mounted functions. F_PANEL PWR LED PWR BTN PIN 1 P5G41T-M LX2/BR HD LED RESET P5G41T-M LX2/BR System panel connector • System power LED (2-pin PLED) This 2-pin connector is for the system power LED. Connect the chassis power LED cable to this connector. -
Page 24: Software Support
The contents of the Support DVD are subject to change at any time without notice. Visit the ASUS website at www.asus.com for updates. To run the Support DVD Place the Support DVD to the optical drive. -
Page 25: Asus Express Gate
1.8.3 ASUS Express Gate ASUS Express Gate is an instant-on environment that gives you quick access to the Internet. Eight seconds after powering on your computer, you can instantly surf the Internet, use Skype or other Express Gate applications without entering the Windows ®... - Page 26 <Ctrl> + <Alt> + <Print Screen> Save screen snapshots to file When you are using ASUS Express Gate for the first time, launch an application from the splash screen, a first-time wizard will appear and guide you through basic Express Gate configurations including language, date, and time.
-
Page 27: Using The Launchbar
Launches the Web Browser for quick access to the Internet. You can view PDF files from the web pages or your USB storage device. ASUS Express Gate supports file uploading from SATA HDDs, ODDs, and USB drives. It supports file downloading to USB drives only. - Page 28 Left-click this icon to launch the File Manager window. Right-click it to eject the removable storage device / USB drive. Exits ASUS Express Gate. Click Yes to enter the operating system you installed on the hard disk drive. Powers off the computer.
- Page 29 JPEG, GIF, BMP, and PNG formats are supported. Refer to the online Help for details. ASUS Express Gate supports SATA devices connected to motherboard chipset-controlled onboard SATA ports only. All onboard extended SATA ports and external SATA ports are NOT supported.
- Page 30 2.7.2 Express Gate for details. BIOS SETUP UTILITY Main Advanced Power Boot Tools Exit Press ENTER to run ASUS EZ Flash 2 the utility to select and update BIOS. Express Gate [Auto] This utility supports Enter OS Timer [10 Seconds] 1.FAT 12/16/32 (r/w)
-
Page 31: Chapter 2: Bios Information
BIOS in the future. Copy the original motherboard BIOS using the ASUS Update utility. 2.1.1 ASUS Update utility The ASUS Update is a utility that allows you to manage, save, and update the motherboard BIOS in Windows environment. ®... -
Page 32: Asus Ez Flash 2
Follow the onscreen instructions to complete the updating process. 2.1.2 ASUS EZ Flash 2 The ASUS EZ Flash 2 feature allows you to update the BIOS without using an OS-based utility. Before you start using this utility, download the latest BIOS file from the ASUS website at www.asus.com. -
Page 33: Asus Crashfree Bios
2.1.3 ASUS CrashFree BIOS The ASUS CrashFree BIOS is an auto recovery tool that allows you to restore the BIOS file when it fails or gets corrupted during the updating process. You can restore a corrupted BIOS file using the motherboard support DVD or a removable device that contains the updated BIOS file. -
Page 34: Main Menu
• The BIOS setup screens shown in this section are for reference purposes only, and may not exactly match what you see on your screen. • Visit the ASUS website at www.asus.com to download the latest BIOS file for this motherboard. -
Page 35: Storage Configuration
Sets Serial ATA, Parallel ATA or both as native mode. Configuration options: [S-ATA] [S-ATA+P-ATA] [P-ATA]. IDE Detect Time Out (Sec) [35] Selects the time out value for detecting ATA/ATAPI devices. Configuration options: [0] [5] [10] [15] [20] [25] [30] [35] ASUS P5G41T-M LX2/BR... -
Page 36: System Information
2.3.5 System Information This menu gives you an overview of the general system specifications. The BIOS automatically detects the items in this menu. BIOS Information Displays the auto-detected BIOS information. Processor Displays the auto-detected CPU specification. System Memory Displays the auto-detected system memory. Advanced menu The Advanced menu items allow you to change the settings for the CPU and other system devices. -
Page 37: Cpu Configuration
® ® [Enabled], you can adjust the system power settings in the operating system to use the EIST feature. Set this item to [Disabled] if you do not want to use the EIST. Configuration options: [Enabled] [Disabled] ASUS P5G41T-M LX2/BR... -
Page 38: Chipset
2.4.2 Chipset The Chipset menu allows you to change the advanced chipset settings. Select an item then press <Enter> to display the submenu. North Bridge Configuration Memory Remap Feature [Enabled] Enables or disables the remapping of overlapped PCI memory above the total physical memory. -
Page 39: Onboard Devices Configuration
Allows you to set the maximum time that the BIOS waits for the USB storage device to initialize. Configuration options: [10 Sec] [20 Sec] [30 Sec] [40 Sec] Emulation Type [Auto] Allows you to select the emulation type. Configuration options: [Auto] [Floppy] [Forced FDD] [Hard Disk] [CDROM] ASUS P5G41T-M LX2/BR... -
Page 40: Pci Pnp
2.4.5 PCI PnP The PCI PnP menu items allow you to change the advanced settings for PCI/PnP devices. The menu includes setting IRQ and DMA channel resources for either PCI/PnP or legacy ISA devices, and setting the memory size block for legacy ISA devices. Take caution when changing the settings of the PCI PnP menu items. -
Page 41: Apm Configuration
VCORE Voltage, 3.3V Voltage, 5V Voltage, 12V Voltage [xxxV] or [Ignored] The onboard hardware monitor automatically detects the voltage output through the onboard voltage regulators. CPU Q-Fan Function [Disabled] Enables or disables the CPU Q-Fan function. Configuration options: [Disabled] [Enabled] ASUS P5G41T-M LX2/BR 2-11... -
Page 42: Boot Menu
Configuration options: [Removable Dev.] [Hard Drive] [ATAPI CD-ROM] [Disabled] • To select the boot device during system startup, press <F8> when ASUS Logo appears. • To access Windows OS in Safe Mode, do any of the following: ®... -
Page 43: Security
In the password box, key in a password containing up to six letters or numbers, or both, then press <Enter>. Confirm the password when prompted. The message Password Installed appears after you set your password successfully. To change the user password, follow the same steps in setting a user password. ASUS P5G41T-M LX2/BR 2-13... -
Page 44: Tools Menu
2.7.1 ASUS EZ Flash 2 Allows you to run ASUS EZ Flash 2. When you press <Enter>, a confirmation message appears. Use the left/right arrow key to select between [Yes] or [No], then press <Enter> to confirm your choice. See section 2.1.2 ASUS EZ Flash 2 for details. -
Page 45: Exit Menu
Pressing <Esc> does not immediately exit this menu. Select one of the options from this Select Screen Select Item Select Item menu or <F10> from the legend bar to exit. Change Option Enter Go to Sub-screen General Help General Help Save and Exit Save and Exit Exit Exit ASUS P5G41T-M LX2/BR 2-15...