Table of Contents
Advertisement
MA-Ozone_052803
version:
Introduction . . . . . . . . . . . . . . . . . . . . . . . . . . . . . . . . . . . . . . . . . . . . .2
M-Audio Ozone Overview . . . . . . . . . . . . . . . . . . . . . . . . . . . . . . . . . .2
What's in the Box . . . . . . . . . . . . . . . . . . . . . . . . . . . . . . . . . . . . . . . . .3
Guide to Getting Started . . . . . . . . . . . . . . . . . . . . . . . . . . . . . . . . . . .4
M-Audio Ozone Panel Features . . . . . . . . . . . . . . . . . . . . . . . . . . . . . .4
Top Panel . . . . . . . . . . . . . . . . . . . . . . . . . . . . . . . . . . . . . . . . . . . .4
Rear Panel . . . . . . . . . . . . . . . . . . . . . . . . . . . . . . . . . . . . . . . . . . .6
Driver Installation for Windows . . . . . . . . . . . . . . . . . . . . . . . . . . .7
Windows XP: . . . . . . . . . . . . . . . . . . . . . . . . . . . . . . . . . . . . . .8
Windows 2000: . . . . . . . . . . . . . . . . . . . . . . . . . . . . . . . . . . . .12
Windows ME: . . . . . . . . . . . . . . . . . . . . . . . . . . . . . . . . . . . . .16
Windows 98SE: . . . . . . . . . . . . . . . . . . . . . . . . . . . . . . . . . . . .18
M-Audio Ozone and the Windows Sound System . . . . . . . . . .23
Macintosh Driver Installation . . . . . . . . . . . . . . . . . . . . . . . . . . . .23
OMS Installation . . . . . . . . . . . . . . . . . . . . . . . . . . . . . . . . . . .24
M-Audio Ozone Driver Installation . . . . . . . . . . . . . . . . . . . . .24
OMS Configuration (Mac OS9 only) . . . . . . . . . . . . . . . . . . . .25
M-Audio Ozone and the Mac OS 9 Sound Manager . . . . . . . .27
M-Audio Ozone and Mac OS X . . . . . . . . . . . . . . . . . . . . . . . .27
The M-Audio Ozone Control Panel . . . . . . . . . . . . . . . . . . . . . . . . . .28
Application Software Setup . . . . . . . . . . . . . . . . . . . . . . . . . . . . . . . . .30
M-Audio Ozone Hardware Installation . . . . . . . . . . . . . . . . . . . . . . . .31
M-Audio Ozone Audio Setup and Control . . . . . . . . . . . . . . . . . . . . .31
Using the Mic and Instrument Inputs . . . . . . . . . . . . . . . . . . . . . .33
Setting Input Gain . . . . . . . . . . . . . . . . . . . . . . . . . . . . . . . . . .34
Phantom Power . . . . . . . . . . . . . . . . . . . . . . . . . . . . . . . . . . . . . .34
Using the Aux Inputs . . . . . . . . . . . . . . . . . . . . . . . . . . . . . . . . . .35
M-Audio Ozone MIDI Setup and Control . . . . . . . . . . . . . . . . . . . . . .37
MIDI Functions In Standalone Mode . . . . . . . . . . . . . . . . . . . .39
Utilizing the Programming Assignment Keys . . . . . . . . . . . . . . .39
Technical Support & Contact Information . . . . . . . . . . . . . . . . . . . . . .44
M-Audio Ozone Warranty Information . . . . . . . . . . . . . . . . . . . . . . . .45
M-Audio Ozone Technical Specifications . . . . . . . . . . . . . . . . . . . . . . .46
Appendix B - M-Audio Ozone Block Diagram . . . . . . . . . . . . . . . . . .48
M-Audio Ozone
User's Guide
. . . . . . . . . . . . . . . . . . . . . . . . . . . . . . . . . .2
. . . . . . . . . . . . . . . . . . . . . . . . . . .7
. . . . . . . . . . . . . . . . . . . . . . . . . . . . . . . . .36
. . . . . . . . . . . . . . . . . . . .47
Advertisement
Table of Contents

Related Manuals for M-Audio M-Audio Ozone


Summary of Contents for M-Audio M-Audio Ozone
-
Page 1: Table Of Contents
........2 M-Audio Ozone Overview ........2 What’s in the Box . -
Page 2: Introduction
You may use your M-Audio Ozone in conjunction with a USB-equipped PC or Macintosh computer and appropriate music software to enter a full range of MIDI note and controller information, as well as record and play back your voice, guitar, or external sound modules. -
Page 3: What's In The Box
MIDI messages directly from you computer to your sound modules. In addition to its MIDI controller features, the M-Audio Ozone is a powerful audio interface.The Mic and Instrument inputs allow you to record vocals, guitars or anything else into your audio program or soft-sampler. -
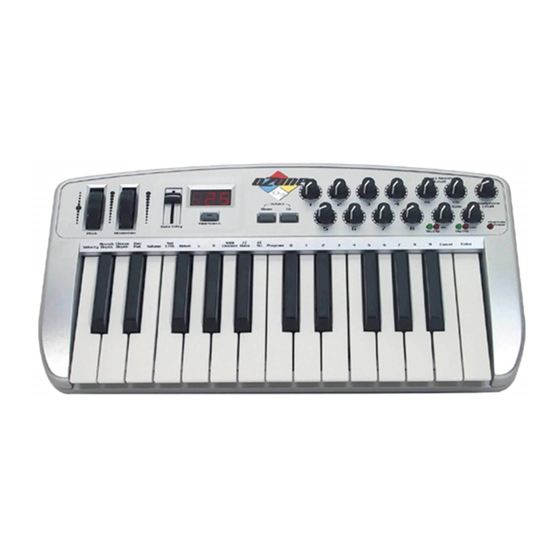
Page 4: Guide To Getting Started
Guide to Getting Started Here is an outline of the steps needed to begin using your M-Audio Ozone on either a Mac or a PC: 1. Install the Driver (see “Software Installation”). 2. Attach the M-Audio Ozone to your computer (see “Hardware Installation”). - Page 5 7. Mic/Inst. Gain:These knobs control the preamp gain of the Mic In (Ch 1) and Instrument In (Ch 2). This level is sent to the USB output for computer recording, and also to the M-Audio Ozone Output 1 & 2 when the Direct Monitor level controls are used.
-
Page 6: Rear Panel
Ozone to the computer’s USB port using a standard USB cable (included). 4. MIDI Out Jack, USB:This standard MIDI jack receives its source from the computer when software’s set to M-Audio Ozone MIDI Out - & is used to send MIDI messages to other MIDI instruments (such as a sound module). -
Page 7: M-Audio Ozone Driver Installation
MIDI interface accessible to an application program. On the included driver disk, M-Audio supplies the audio and MIDI drivers that enable you to use M-Audio Ozone with Windows, Mac OS9 or Mac OSX. These M-Audio Ozone drivers are supplied on the dual format CD included. -
Page 8: Windows Xp
2. Now navigate to your CD-ROM drive. Browse the the Ozone Folder and double-click the EXE driver. 3. The first window reminds you to verify that the M-Audio Ozone is disconnected from the USB bus before continuing, and that you have closed all other Windows applications.Then click “Next”... - Page 9 6. Another “Digital Signature Not Found” Window will appear. Click “Continue Anyway” to continue. 7. An M-Audio Setup Window will appear next. Make sure both the “Enable Digital CD” and “Enable DMA Transfer Mode” boxes are checked, then click “Next.”...
- Page 10 8. An M-Audio Setup Window will appear to confirm a successful setup. Click “Next” to complete installation of the M-Audio Ozone. 9. Windows will prompt you to restart the computer. Make sure that “Yes, restart my computer now,” is checked and then click “Finish” to restart.
- Page 11 12. Another Windows Logo Testing window will appear. Click “Continue Anyway” to continue. 13. The next window informs you that the wizard has finished installing the software. Press “Finish” to continue. 14. Another Windows Logo Testing window will appear. Click “Continue Anyway”...
-
Page 12: Windows 2000
Microsoft download section at www.microsoft.com. Note: Windows 2000 comes installed with DirectX version 7.You must have DirectX version 8.1 in order to install the M-Audio Ozone. The M-Audio Ozone installer will automatically check for the correct version of DirectX and install the latest Direct X update. This update will be skipped if you already have DirectX version 8.1 (or higher) in... - Page 13 on your computer. Proceed with the DirectX installation by clicking, "Next.” 2. Verify that you wish to continue installing DirectX 8.1 by clicking "Yes.” 3. Verify that you have read the license agreement and agree to the terms. Click, "Yes," to continue. 4.
- Page 14 5. This is the first setup window for installing the M-Audio Ozone drivers after the installer has confirmed that you have DirectX version 8.1 (or higher) installed on your system. Make sure your M-Audio Ozone is powered off and that no other Windows programs are running, then click,“Next,”...
- Page 15 8. An M-Audio Setup Window will come up, confirming a successful setup. Click, “Next,” to successfully install the M-Audio Ozone. 9. Windows will prompt you to restart the computer. Make sure that “Yes, restart my computer now,” is checked and then click,“Finish,” to restart 10.
-
Page 16: Windows Me
Windows ME: Note: Windows ME comes installed with DirectX version 7.You must have DirectX version 8.1 in order to install the M-Audio Ozone. The M-Audio Ozone installer will automatically check for the correct version of DirectX and install the latest Direct X update. This update will be skipped if you already have DirectX version 8.1 (or higher) in your system. - Page 17 4. Windows will need to restart your machine to complete the Direct X 8.1 installation. Click, "OK," to restart your system. 5. This is the first setup window for installing the M-Audio Ozone drivers after the installer has confirmed that you have DirectX version 8.1 (or higher) installed on your system.
-
Page 18: Windows 98Se
7. An M-Audio Setup Window will come up confirming a successful setup. Click, “Next,” to successfully install the M-Audio Ozone. Windows will prompt you to restart the computer. Make sure that “Yes, restart my computer now,” is checked and then click, “Finish,” to restart.When you are completely restarted and at your desktop, power... - Page 19 installation (if you have not previously installed this update). Click “Next” to install DirectX 8.1. 4. Click next to verify that you would like to install Microsoft DirectX 8.1. 5. The next window shows the Microsoft DirectX 8.1 license agreement. Click “Yes”...
- Page 20 7. After restart, the next window reminds you to verify that the M-Audio Ozone is disconnected from the USB bus before continuing, and that you have closed all other Windows applications. Do so now, then click “Next” to continue. 8. An M-Audio Setup Window will appear next. Make sure both “Enable Digital CD”...
- Page 21 “Finish” to restart. 11. After Windows has completely restarted, turn on your device using the power button on the back of the M-Audio Ozone.A window will then prompt you to click “Next” to continue. 12. The next window will prompt you to search for the best driver. Click...
- Page 22 13. The next window defaults to browse to a specified location. Click “Next” to continue. 14. In the next window, click “Next” to install the recommended driver. 15. The next window prompts you that the driver will now be installed. Click “Next.”...
-
Page 23: M-Audio Ozone And The Windows Sound System
Opcode and is required to run the M-Audio Ozone on the Macintosh in OS 9. OMS is available on the M- Audio Ozone drivers page of our website, or can be installed from the Driver CD. -
Page 24: Oms Installation
ASIO compliant. After installation of the M-Audio Ozone drivers in either OS 9 or OS X, you must copy the M-Audio Ozone’s ASIO driver directly into your music program’s ASIO folder. -
Page 25: Oms Configuration (Mac Os9 Only)
Go to the Chooser under the Apple Menu, and make sure AppleTalk is turned off (this is recommended, although OMS will sense that it is on and prompt you to turn it off). If you are installing your M-Audio Ozone’s driver and configuring OMS for the first time, follow these instructions to configure OMS. - Page 26 IMPORTANT: If the USB cable is not correctly hooked up to the M-Audio Ozone, setup will fail. 5. “OMS Driver Setup” shows the M-Audio Ozone in a list when OMS successfully finds the driver. Click “OK.” OMS will now define (shows “Identifying”) the M-Audio Ozone output port.
-
Page 27: M-Audio Ozone And The Mac Os 9 Sound Manager
3. Close the Apple Sound Control Panel. M-Audio Ozone and Mac OS X Mac OS X will allow you to select the M-Audio Ozone as the system’s audio output device.To change your Mac’s audio output setting to use the M-Audio Ozone:... -
Page 28: The M-Audio Ozone Control Panel
Macintosh OS X. (Please note that the functionality is similar in all versions of the M-Audio Ozone Control Panel, so please read on regardless of your OS). Let’s take a look at each element in the Panel. If you decide to make... - Page 29 Latency: The amount of time it takes for audio to be converted to digital information, processed by the system, and converted from digital back to an analog audio signal is referred to as “Latency.” The M-Audio Ozone’s audio driver plays a role in that latency, so overall latency can be affected by your setting in the M-Audio Ozone Panel.
-
Page 30: Application Software Setup
MIDI input and output devices. If the M-Audio Ozone drivers are properly installed, then the port selection in this case will be the M-Audio Ozone In-1 (“Port 1” on Mac) in the input column, and then M-Audio Ozone Out-1 (or Port 1) in the output column. -
Page 31: M-Audio Ozone Hardware Installation
M-Audio Ozone audio driver is set to “M-Audio Ozone ASIO.” Within your music application, when you assign an audio track to receive its input from the M-Audio Ozone Channel 1 or Channel 2—whether it’s the Mic In and Instrument In, or when using the Aux Inputs in “Record”... - Page 32 The Aux Input accepts a stereo signal via a TRS cable. You may need to purchase a cable that converts a pair of stereo outputs (individual RCA or 1/4” TS) into a single 1/4” TRS connector to plug into the M-Audio Ozone’s Aux Input.Your M-Audio dealer should have a cable like this, often called an “insert cable.”...
-
Page 33: Using The Mic And Instrument Inputs
Using the Mic and Instrument Inputs Channel 1 of the M-Audio Ozone gives you a high gain, low noise microphone preamp. It provides a low impedance microphone input on an XLR connector with optional phantom power. A dynamic, condenser, or any other type of low impedance microphone will interface easily with the M-Audio Ozone’s Mic Input. -
Page 34: Setting Input Gain
Setting Input Gain The M-Audio Ozone provides up to 60dB of gain on the Channel 1 Mic In and 40dB of gain on the Channel 2 Instrument In. Microphones typically emit a low signal level, requiring a "pre-amp" such as the M-Audio Ozone provides. -
Page 35: Using The Aux Inputs
Using the Aux Inputs The M-Audio Ozone has a pair of “Aux Input” line inputs, both on a single 1/4” TRS jack. It is designed so that a single connector contains both the left and right input from a stereo source, such as a synthesizer, drum machine, or CD player. -
Page 36: Using Direct Monitor
Monitor/Record switch to Record (the “in” position), then plug in your stereo source using an insert cable. Once you have set up the M-Audio Ozone to Record from the Aux Input, you will have to set up tracks in your music program for recording. -
Page 37: M-Audio Ozone Midi Setup And Control
Monitor switch on the M-Audio Ozone rear panel, and switch it to the “Mono” position. In Mac OS X (only), when your M-Audio Ozone is connected to your computer’s USB port and recognized by the system, this section will indicate a “Connected to M-Audio Ozone” status. - Page 38 In the following setup, the M-Audio Ozone is being used as a MIDI controller as well as a MIDI interface, inputting MIDI data to the computer and its application software, and outputting MIDI to a sound module from which sounds will be produced. The M-Audio Ozone as a controller may also send MIDI information to any installed software synthesizer, outputting the audio from the M-Audio Ozone’s audio outputs.
-
Page 39: Midi Functions In Standalone Mode
To transmit MIDI data from your keyboard to other professional MIDI instruments, purchase a standard MIDI cable and use it to connect the MIDI OUT jack of your M-Audio Ozone labeled “Keyboard” to the MIDI IN jack of the other instrument. - Page 40 MIDI transmit channel of the M-Audio Ozone, set the octave or pitch of the keyboard, and program the eight rotary controllers. DATA ENTRY Assignments: Pressing the MIDI/SELECT button then...
- Page 41 Enter. This channel assignment will apply only to the controller knob that you are programming. 5. You can select up to five banks of presets for the M-Audio Ozone’s keyboard, P1-P5, by pressing the MIDI/SELECT button. This is most effective for stand-alone mode, not for all soft-synth presets.
- Page 42 MIDI/SELECT button to finish your choice. Presets: The M-Audio Ozone can save five Presets in memory.This allows you to assign 8 controller values to the faders and knobs in one Preset, and then assign 8 different values to those same faders and knobs.
- Page 43 M-Audio Ozone Preset Chart...
-
Page 44: Technical Support & Contact Information
(626-445-8495, 9-5 PST M-F), by fax (626-445-7564) or by e-mail (techsupt@m-audio.com). If you have questions, comments or suggestions about this product, or any M-Audio product, we invite you to contact us directly at: M-AUDIO U.S. M-AUDIO U.K. 45 E. Saint Joseph St. -
Page 45: M-Audio Ozone Warranty Information
In the event any repair is required, shipment to and from M-AUDIO and a nominal handling charge shall be borne by the purchaser. In the event that repair is required, a Return Authorization number must be obtained from M-AUDIO. -
Page 46: M-Audio Ozone Technical Specifications
M-Audio Ozone Technical Specifications General • Supports 24-bit or 16-bit audio input or output • Supports the following sampling frequencies (Hz): 8000, 11025, 12000, 16000, 22050, 24000, 32000, 44100, 48000, 88200, 96000 • (Note: Because of USB bandwidth and device hardware constraints, there are limitations on what combinations of bit width and sampling frequency can be used in full-duplex mode (i.e.-input and output active... -
Page 47: Appendix A - Midi Controller Information
Appendix A - MIDI Controller Information... -
Page 48: Appendix B - M-Audio Ozone Block Diagram
Appendix B - M-Audio Ozone Block Diagram...