Table of Contents
Advertisement
Available languages
Available languages
Quick Links
Advertisement
Table of Contents

Related Manuals for M-Audio O2


Summary of Contents for M-Audio O2
-
Page 2: Table Of Contents
Alimentación y conexión a través del bus USB ......................................64 Windows XP y Mac OS X ................................................64 Prestaciones y funciones del M-Audio O ........................................64 Programación y edición con el M-Audio O ........................................67 Programación básica ................................................. 68 Descripción de los mensajes MIDI ............................................73 Resolución de problemas... - Page 3 Cosa c’è dentro la scatola? ..............................................83 Alimentazione e connessione tramite USB ........................................83 Windows XP e Mac OSX ................................................84 Funzioni e caratteristiche della tastiera M-Audio O ....................................84 Programmazione della M-Audio O ........................................... 86 Spiegazione dei messaggi MIDI ............................................91 Risoluzione dei problemi ................................................
-
Page 4: English
2. Plug in the USB cable provided with the M-Audio O to a free USB port on your computer. 3. Plug in the other end of the USB cable to the USB input on the M-Audio O The single USB cable not only powers the M-Audio O but also sends MIDI data to and from your computer system. -
Page 5: Windows Xp And Mac Os X
Windows XP and Mac OS X If you are using Windows XP or Mac OS X, you may simply switch the power position to “on.” Because the M-Audio O keyboard is class compliant, it will work with out any further installation. - Page 6 MIDI signals. If you are using a MIDI sound module or connecting to another piece of MIDI equipment, you will need to make sure that both your M-Audio keyboard and the receiving unit are set to the same MIDI channel. The Global MIDI Channel affects the keyboard, Program, and Bank Changes, plus whatever controllers have been set to respond to the global setting.
-
Page 7: Programming And Editing The M-Audio O
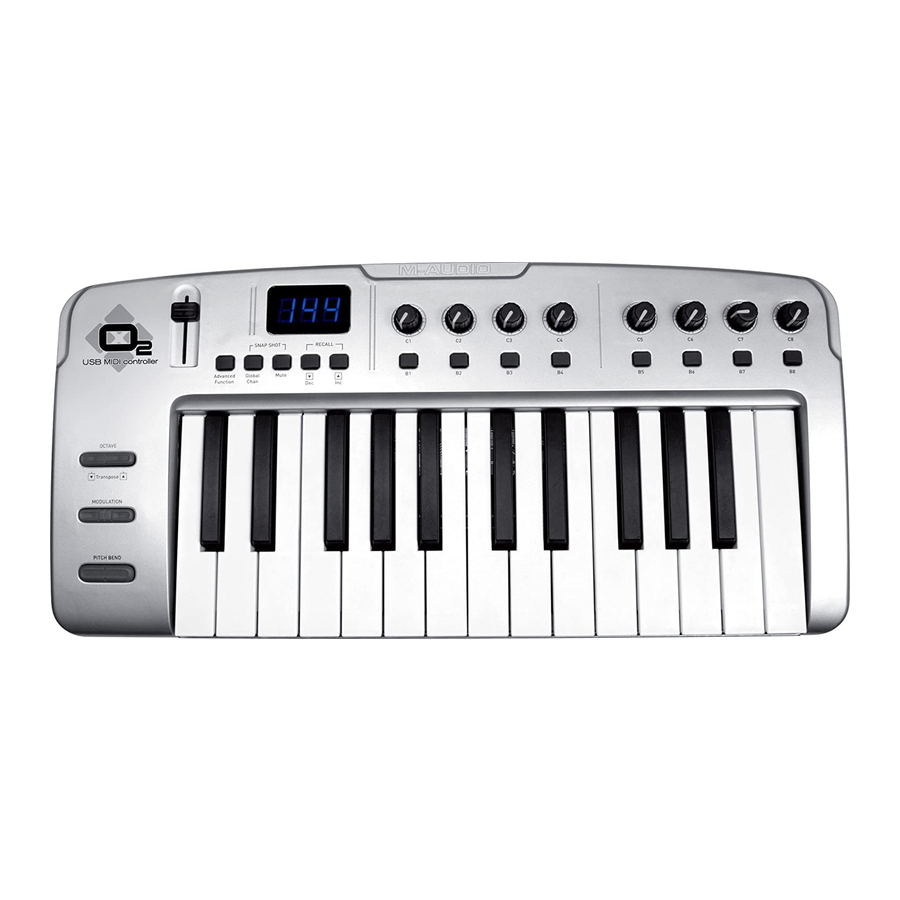
Foot Switch Any polarity foot switch (not included) can be plugged in to the foot switch input on your M-Audio O keyboard. The keyboard will automatically detect the correct polarity upon powering on. If you want to reverse the polarity, make sure the pedal is pressed when you switch on your keyboard. - Page 8 The Fader and Rotary Knobs: MIDI CC Description Data 2 Data 3 0-119 Standard MIDI CCs 120-127 Channel Mode Messages Pitch Bend Sensitivity Channel Fine Tune Channel Coarse Tune Channel Pressure RPN Coarse RPN LSB RPN MSB RPN Fine RPN LSB RPN MSB NRPN Coarse NRPN LSB...
- Page 9 As you create custom setups, be sure you store your changes to a memory location before recalling any other setups. Selecting a Controller for Editing To assign a MIDI CC to one of the M-Audio O ’s controllers, it needs to be selected for editing.
- Page 10 Setting Toggle Values for the Buttons The 8 assignable buttons and the pedal can each be assigned to toggle between two values. This is how: Press the ADVANCED FUNCTION button, followed by the DATA 2 (MIN) key. 2. Type in the Minimum desired toggle number using the numerical data entry keys or the Preset +/- buttons. 3.
- Page 11 Many data sheets for synths make use of NRPN messages and will give the MSB and LSB values that should be entered for DATA 3 and DATA 2 (See Appendix F). Some manuals may only give the hex values, but the M-Audio O requires the decimal value be entered.
- Page 12 The Device ID for a SysEx message assigned to a controller cannot be changed using the DEV ID key. This key is used for varying the global Device ID of the M-Audio O For more information please reference the “SysEx Messages” and “Device ID” sections later in the manual.
-
Page 13: Midi Messages Explained
The LED display will show “USB,” indicating that the MIDI Out port is now set to transmit data from the USB port. Program Mode will automatically cancel. When MIDI Out from USB Mode is NOT active, the MIDI Out port will mirror the data that is sent via USB from the M-Audio O controller. To disengage MIDI Out from USB Mode: Press the ADVANCED FUNCTION button. -
Page 14: General Trouble-Shooting
It should be noted that a SysEx message is not transmitted on any specified channel. All SysEx messages contain a Device ID, which is used to single out devices to respond to the SysEx message. All other devices are ignored. If you are using a SysEx message on the M-Audio O , the Global Channel is ignored. -
Page 15: Contact M-Audio
Contact M-Audio If you have any questions, comments or suggestions about this or any M-Audio product, we invite you to contact us by using the following information: M-AUDIO U.S. M-AUDIO Deutschland (Germany) 5795 Martin Road, Irwindale, CA 91706-6211, U.S.A. Kuhallmand 34, D-74613 Ohringen, Germany... -
Page 16: Technical Info
Technical Info Modifications not authorized by the manufacturer may void users authority to operate this device. Note: This equipment has been tested and found to comply with the limits for a Class B digital device, pursuant to Part 15 of the FCC Rules. These limits are designed to provide reasonable protection against harmful interference in a residential installation. -
Page 17: Appendices
Appendices Appendix A - MIDI IMPLEMENTATION CHART Function Transmitted Received Remarks Basic :Default 1-16 Channel: Changed 1-16 :Default --------- Mode :Messages :Altered ********* Note 0-127 Number: True Voice ********* Velocity: Note ON : Note OFF After : Keys Touch :Ch’s Pitch Bend Control 0-119... - Page 18 Appendix B - Assignable MIDI CC’s on the M-Audio O B1 - The Fader and rotary Controllers: MIDI CC Description Data Lsb (Press Twice) Data Msb (Press Twice) 0-119 Standard MIDI CC’s 120-127 Channel Mode Messages Pitch Bend Sensitivity Channel Fine Tune...
- Page 19 The Buttons and Pedal: Program MIDI CC Description Data Lsb (Press Twice) Data Msb (Press Twice) (Press Twice) 0-119 Standard MIDI CC’s Toggle value 2 Toggle value 1 120-127 Channel Mode Messages Toggle value 2 Toggle value 1 Pitch Bend Range Sensitivity value Channel Fine Tune Tuning amount...
- Page 20 Appendix C - Hexadecimal Conversion Chart Hexadecimal to Decimal Conversion Chart Hexadecimal Decimal Hexadecimal Decimal Hexadecimal Decimal Value Value Value Value Value Value...
- Page 21 Appendix D - Useful MIDI data General MIDI Instruments Piano Bass Reed Synth Effects 0 Acoustic Grand Piano 32 Acoustic Bass 64 Soprano Sax 96 SFX Rain 1 Bright Acoustic Piano 33 Fingered Bass 65 Alto Sax 97 SFX Soundtrack 2 Electric grand Piano 34 Electric Picked Bass 66 Tenor Sax...
- Page 22 Appendix E - Standard MIDI Controller numbers (MIDI CC's) Bank Select Controller 46 Tremelo Depth Modulation Controller 47 Chorus Depth Breath Control Gen Purpose 1 LSB Celeste (De-tune) Controller 3 Gen Purpose 2 LSB Phaser Depth Foot Control Gen Purpose 3 LSB Data Increment Porta Time Gen Purpose 4 LSB...
- Page 23 Appendix F - Roland GS and Yamaha XG NRPN Support to Roland JV/XP NRPN NRPN Data Data CC99 CC98 CC06 CC38 00-7F n/a (-64 - 0 - +63) Vibrato Rate (relative change) 00-7F n/a (-64 - 0 - +63) Vibrato Depth (relative change) 00-7F n/a (-64 - 0 - +63) Vibrato Delay (relative change) 00-7F...
-
Page 24: Français
. Le M-Audio O suit les traces du précurseur des contrôleurs mobiles USB MIDI — l’Oxygen8. Assez compact pour être glissé dans un sac qui contient votre ordinateur portable, le M-Audio O ultra-mince convient parfaitement à la création de rythmes de basse, à la programmation de séquences de batterie, au déclenchement d’effets et au peaufinage des paramètres de studios virtuels —... -
Page 25: Windows Xp Et Mac Os X
Windows XP et Mac OS X Si vous utilisez Windows XP ou Mac OS X, il vous suffit de mettre l’appareil en position ”on”. Comme le clavier M-Audio O s’accommode facilement à cette norme, aucune autre installation n’est nécessaire. Caractéristiques et fonctions du M-Audio O Si l’installation s’est déroulée correctement, veuillez lire les pages qui suivent afin de mieux comprendre le fonctionnement de votre O... - Page 26 Vous pouvez également organiser et sauvegarder vos préréglages sur votre ordinateur, à l’aide du logiciel Enigma. Ce logiciel peut être téléchargé gratuitement depuis www.m-audio.fr. Il vous suffit d’enregistrer votre appareil M-Audio et de suivre les indications à l’écran. Envoi d’un instantané (Snap Shot) Appuyez simultanément sur les boutons GLOBAL CHAN et MUTE afin d’envoyer un instantané...
-
Page 27: Programmation Et Édition Du M-Audio O
édition” de ce manuel pour plus de précisions. Pédale Toute pédale à polarité (non incluse) peut être reliée à l’entrée de pédale de votre clavier M-Audio O . Le clavier détecte automatiquement la polarité correcte dès que vous l’allumez. Pour inverser la polarité, assurez-vous que la pédale est enfoncée quand vous allumez votre clavier. - Page 28 L’atténuateur et les sélecteurs rotatifs Knobs: MIDI CC Description Data 2 Data 3 0-119 Standard MIDI CCs 120-127 Channel Mode Messages Pitch Bend Sensitivity Channel Fine Tune Channel Coarse Tune Channel Pressure RPN Coarse RPN LSB RPN MSB RPN Fine RPN LSB RPN MSB NRPN Coarse...
- Page 29 Le choix d’un contrôleur pour l’édition Pour assigner un CC MIDI à l’un des contrôleurs du M-Audio O , il faut tout d’abord le sélectionner pour l’édition : Appuyez sur le bouton ADVANCED FUNCTION, puis sur la touche CTRL SEL.
- Page 30 Réglage des 2 positions des interrupteurs à bascule Les 8 boutons programmables et la pédale peuvent être réglés de façon à basculer entre deux positions. Voici comment : Appuyez sur le bouton ADVANCED FUNCTION puis sur la touche DATA 2 (MIN). 2.
- Page 31 Nombre de fiches techniques de synthés utilisent les messages NRPN et fournissent la liste des valeurs MSB et LSB à entrer pour DATA 3 et DATA 2 (voir l’annexe F). Certains manuels ne donnent que les valeurs hex, mais le M-Audio O accepte seulement les valeurs décimales.
- Page 32 Attribution de l’ID d’unité Appuyez sur le bouton ADVANCED FUNCTION puis sur la touche DEV ID pour attribuer un ID d’unité à votre M-Audio O . L’ID d’unité par défaut est 127 lors d’un vidage mémoire;...
-
Page 33: Signification Des Messages Midi
. Pour désactiver le mode MIDI Out from USB Mode : Appuyez sur le bouton ADVANCED FUNCTION. 2. Appuyez sur la touche MIDI OUT. Le témoin DEL affiche maintenant ‘Int’, ce qui indique que le clavier du M-Audio O transmet des données des touches et des contrôleurs du M-Audio O Réinitialisation des réglages en usine... -
Page 34: Dépannage
à la place. Ceci est confirmé par l’affichage d’un nombre à 3 chiffres sur le témoin DEL, et non d’un nombre à 2 chiffres précédé d’un “c”. Les ID d’unités s’échelonnent de 00 à 127. La valeur 127 est la valeur par défaut de l’unité M-Audio O . Cette valeur transmet le message SysEx à... -
Page 35: Garantie
Merci d’enregistrer votre nouveau produit M-Audio. Le faire immédiatement permet à la fois de vous donner une couverture de garantie complète et d’aider M-Audio à développer et à fabriquer les produits de la plus grande qualité qui soit. Enregistrez-vous en ligne à www. -
Page 36: Annexes
Annexes Annexe A – FONCTIONNEMENT DU MIDI Function Transmitted Received Remarks Basic :Default 1-16 Channel: Changed 1-16 :Default --------- Mode :Messages :Altered ********* Note 0-127 Number: True Voice ********* Velocity: Note ON : Note OFF After : Keys Touch :Ch’s Pitch Bend Control 0-119... - Page 37 Annexe B - CC MIDI programmables sur M-Audio O B1 – L’atténuateur et les sélecteurs rotatifs MIDI CC Description Data Lsb (Press Twice) Data Msb (Press Twice) 0-119 Standard MIDI CC’s 120-127 Channel Mode Messages Pitch Bend Sensitivity Channel Fine Tune...
- Page 38 B2-Boutons et pédale Program MIDI CC Description Data Lsb (Press Twice) Data Msb (Press Twice) (Press Twice) 0-119 Standard MIDI CC’s Toggle value 2 Toggle value 1 120-127 Channel Mode Messages Toggle value 2 Toggle value 1 Pitch Bend Range Sensitivity value Channel Fine Tune Tuning amount...
- Page 39 Annexe C – Tableau d’équivalences hexadécimales Tableau d’équivalence des unités hexadécimales/décimales Hexadecimal Decimal Hexadecimal Decimal Hexadecimal Decimal Value Value Value Value Value Value...
- Page 40 Annexe D – Renseignements utiles Principaux instruments MIDI Piano Bass Reed Synth Effects 0 Acoustic Grand Piano 32 Acoustic Bass 64 Soprano Sax 96 SFX Rain 1 Bright Acoustic Piano 33 Fingered Bass 65 Alto Sax 97 SFX Soundtrack 2 Electric grand Piano 34 Electric Picked Bass 66 Tenor Sax 98 SFX Crystal...
- Page 41 Annexe E - Chiffres standard des contrôleurs MIDI (MIDI CC) Bank Select Controller 46 Tremelo Depth Modulation Controller 47 Chorus Depth Breath Control Gen Purpose 1 LSB Celeste (De-tune) Controller 3 Gen Purpose 2 LSB Phaser Depth Foot Control Gen Purpose 3 LSB Data Increment Porta Time Gen Purpose 4 LSB...
- Page 42 Annexe F - Roland GS et Yamaha XG NRPN Support to Roland JV/XP NRPN NRPN Data Data CC99 CC98 CC06 CC38 00-7F n/a (-64 - 0 - +63) Vibrato Rate (relative change) 00-7F n/a (-64 - 0 - +63) Vibrato Depth (relative change) 00-7F n/a (-64 - 0 - +63) Vibrato Delay (relative change) 00-7F...
-
Page 44: Deutsch
< USB-Anschlusskabel Stromversorgung und Anschluss über USB Sie können O2 entweder über den USB-Anschluss Ihres Computers oder über ein externes Netzteil mit Strom versorgen. Zur Vermeidung von Störungen verwenden Sie bitte nur eine der beiden Optionen. Der Ein/Aus-Schalter an der Rückseite des Gerätes muss auf "Off" stehen. -
Page 45: Windows Xp Und Mac Osx
Windows XP und Mac OSX Mit Windows XP und Mac OS X können Sie O2 sofort in Betrieb nehmen und auf "On" setzen, da keine extra Treiber installiert werden müssen. M-Audio O Merkmale und Funktionen Bitte nehmen Sie sich nach der Installation des Keyboards etwas Zeit für die folgenden Seiten, auf denen wir Ihnen wertvolle Erläuterungen zur Funktionsweise von O anbieten. - Page 46 Mit der Enigma-Software haben Sie die Möglichkeit, Ihre Presets über Ihren Computer zu verwalten und zu speichern. Eine kostenlose Version von Enigma finden Sie auf den Webseiten von M-Audio: www.m-audio.com. Folgen Sie einfach den Anweisungen nach der Registrierung der Software.
-
Page 47: Programmieren Und Bearbeiten Mit O
Anschluss von O2anstecken. Die Pedalfunktion und Polarität werden automatisch beim Einschalten des Keyboards erkannt. Wenn Sie die Polarität des Pedals ändern wollen, betätigen Sie es, während Sie das Keyboard einschalten. Die Pedalfunktion dient dazu, den gespielten Ton zu verlängern, ohne dass die Hände vom Keyboard genommen werden müssen. O2 ist genau für diese Funktion ausgelegt. - Page 48 Fader und Drehregler: MIDI- Controller- Beschreibung Data 2 Data 3 Nummern Standard-MIDI-Controller- 0-119 Max. Min. Nummern (CC) 120-127 Channel Mode Messages Max. Min. Pitch Bend Sensitivity Channel Fine Tune Channel Coarse Tune Channel Pressure RPN Coarse RPN LSB RPN MSB RPN Fine RPN LSB RPN MSB...
- Page 49 Auswahl eines Controllers zur Bearbeitung Bevor Sie den einzelnen Controllern von O2 eine bestimmte MIDI-CC zuweisen, müssen Sie die Controller für die Bearbeitung auswählen. Drücken Sie hierzu die ADVANCED FUNCTION-Taste und dann die für den Befehl CTRL SEL gekennzeichnete Keyboardtaste.
- Page 50 Gleichermaßen können Sie den Datenbereich der Drehregler, des Faders, des Pitchrads und des Modulationsrads definieren. Die Buttons und das Fußpedal können für aufsteigende und absteigende Werte innerhalb eines Datenbereichs programmiert werden. Gehen Sie hierbei wie folgt vor: Drücken Sie die ADVANCED FUNCTION-Taste und dann die für den Befehl CTRL ASGN gekennzeichnete Keyboardtaste. 2.
- Page 51 In den meisten Datenblättern für NRPN-fähige Synthesizer sind die für MSB und LSB zu verwendenden Wert bereits ausgewiesen (siehe Anhang F). In bestimmten Handbüchern sind jedoch lediglich die Hexadezimalwerte angegeben. Beachten Sie bitte, dass Sie für O2 die entsprechenden Dezimalwerte eingeben müssen! Für die Umrechnung der Hex-Werte in Dez-Werte können Sie beispielsweise den Windows- Rechner nutzen.
- Page 52 Rückübertragung an das Keyboard können Sie den Speicherauszug problemlos abrufen. Zuweisung einer Geräte-ID Über die ADVANCED FUNCTION-Taste und die DEV ID-Taste können Sie O2 eine Geräte-ID zuweisen. Die Standard-ID des Keyboards ist "127". Mit dieser Einstellung können Sie Speicherauszüge an alle weiteren O2-Keyboards, unabhängig von deren jeweiliger Geräte-ID, adressieren.
-
Page 53: Midi-Befehle
O2 als USB-MIDI-Interface Über den "MIDI Out From USB"-Modus können Sie O2 als USB-MIDI-Interface einsetzen. In diesem Modus werden die am MIDI-Ausgang von O2 ausgehenden Daten über USB übertragen. Wenn Sie O2 in Ihrem Sequenzer als USB-Ausgabe-Gerät einstellen und den "MIDI Out From USB"-Modus aktivieren, werden alle Daten des Sequenzers über den MIDI-Ausgang von O2 geroutet. -
Page 54: Allgemeine Fehlerbehebung
Geräte-ID. In diesem Falle wird im LED-Bereich anstelle des Buchstabens "c", gefolgt einer 2-stelligen Ziffer, eine 3-stellige Ziffer angezeigt. Die Geräte-IDs bewegen sich zwischen 00 und 127.O2 ist werkseitig für die Geräte-ID "127" programmiert. Mit dieser Einstellung können Sie problemlos SysEx-Meldungen an andere Geräte übertragen. -
Page 55: Kontaktinformation
Produkte finden Sie unter www.m-audio.com/warranty. Produktregistrierung Vielen Dank, dass Sie Ihr neues M-Audio-Produkt registriert haben! Mit der Registrierung sind Sie zur vollumfänglichen Inanspruchnahme der Produktgarantie berechtigt. Außerdem tragen Sie dazu bei, dass M-Audio auch weiterhin Produkte entwickeln kann, die höchsten Qualitätsansprüchen gerecht werden. -
Page 56: Technische Informationen
Störungen des Gerätes führen. In diesen Fällen, ziehen Sie den Netzstecker des Gerätes und stecken sie ihn erneut in die Steckdose, um die Störung zu beheben. Hinweis: Ihre M-AUDIO O wurde daraufhin getestet, die FCC-Standards FÜR DEN GEBRAUCH ZUHAUSE ODER IM BÜRO zu erfüllen. Vom Hersteller nicht zugelassene Veränderungen an diesem Gerät, können die Nutzungserlaubnis des Eigentümers unwirksam machen. - Page 57 Anhang A – MIDI IMPLEMENTATION CHART Function Transmitted Received Remarks Basic :Default 1-16 Channel: Changed 1-16 :Default --------- Mode :Messages :Altered ********* Note 0-127 Number: True Voice ********* Velocity: Note ON : Note OFF After : Keys Touch :Ch’s Pitch Bend Control 0-119 Change...
- Page 58 Anhang B - Standard MIDI-CCs für O2 B1 - Fader und Drehregler: MIDI CC Description Data Lsb (Press Twice) Data Msb (Press Twice) 0-119 Standard MIDI CC’s 120-127 Channel Mode Messages Pitch Bend Sensitivity Channel Fine Tune Channel Coarse Tune...
- Page 59 B2 - Buttons und Pedal: Program MIDI CC Description Data Lsb (Press Twice) Data Msb (Press Twice) (Press Twice) 0-119 Standard MIDI CC’s Toggle value 2 Toggle value 1 120-127 Channel Mode Messages Toggle value 2 Toggle value 1 Pitch Bend Range Sensitivity value Channel Fine Tune Tuning amount...
- Page 60 Anhang C – Hexadezimalumrechnung Umrechnung von Hexadezimalwerten in Dezimalwerte Hexadecimal Decimal Hexadecimal Decimal Hexadecimal Decimal Value Value Value Value Value Value...
- Page 61 Anhang D – Nützliche MIDI-Daten MIDI-Instrumente Piano Bass Holzblasinstrumente Synth-Effekte 32 Kontrabass 0 Flügel 64 Sopran-Saxophon 96 SFX Regen 33 Elektrischer Bass 1 Konzertflügel 65 Alt-Saxophon 97 SFX Soundtrack (Fingered) 2 E-Piano 66 Tenor-Saxophon 98 SFX Kristall 34 Elektrischer Bass (Schlag) 3 Bar-Piano 67 Bariton-Saxophon 99 SFX Atmosphäre...
- Page 62 Anhang E – Standard-MIDI-Controller-Nummern (MIDI-CC) Bank Select Controller 47 Celeste (De-tune) Modulation Gen Purpose 1 LSB Phaser Depth Breath Control Gen Purpose 2 LSB Data Increment Controller 3 Gen Purpose 3 LSB Data Decrement Foot Control Gen Purpose 4 LSB Non-Reg Param LSB Porta Time Controller 52...
- Page 63 Anhang F - Roland GS und Yamaha XG: NRPN-Support für Roland JV/XP NRPN NRPN Data Data CC99 CC98 CC06 CC38 00-7F n/a (-64 - 0 - +63) Vibrato Rate (relative change) 00-7F n/a (-64 - 0 - +63) Vibrato Depth (relative change) 00-7F n/a (-64 - 0 - +63) Vibrato Delay (relative change) 00-7F...
-
Page 64: Español
MIDI USB portátil con el que empezó todo, el legendario Oxygen8. Con un tamaño tan reducido que incluso cabe en la bolsa de transporte de su computadora portátil, el estilizado M-Audio O resulta perfecto para lanzar líneas de bajo, programar patrones de batería, disparar efectos y ajustar los parámetros de su estudio virtual, todo ello en cualquier momento y lugar. -
Page 65: Qué Hay Dentro De La Caja
Windows XP y Mac OS X Si utiliza Windows XP o Mac OS X, sólo tiene que ajustar la posición del conmutador de encendido a “on”. Dado que el teclado M-Audio O ofrece soporte nativo para estos sistemas, funcionará sin necesidad de otras instalaciones. - Page 66 También puede organizar y almacenar los presets en su computadora mediante el software Enigma. Este software está disponible como descarga gratuita en www.m-audio.com. Sólo tiene que registrar su producto M-Audio y seguir las instrucciones de la página. Envío de un Snap Shot Para enviar un Snap Shot (Instantánea) de las asignaciones actuales de los controladores y sus valores, pulse los botones GLOBAL CHAN y...
- Page 67 3. Pulse la tecla ENTER para aceptar el nuevo canal y abandonar el modo Program. Octava El rango del teclado puede ser desplazado hacia arriba o hacia abajo para proporcionarle acceso a 11 octavas en el M-Audio O Pulse “OCTAVE +” para desplazar el rango del teclado una octava hacia arriba.
-
Page 68: Programación Y Edición Con El M-Audio O
Programación y edición con el M-Audio O Introducción a las opciones de programación Todos los controladores del M-Audio O pueden enviar mensajes MIDI CC, RPN/NRPN, GM 1 y 2 y SysEx. También es posible asignarlos a canales MIDI individuales. Los números MIDI CC (controlador MIDI continuo) forman parte del protocolo MIDI estándar y se utilizan normalmente para controlar los cambios en tiempo real de parámetros de dispositivos musicales. -
Page 69: Programación Básica
No olvide guardar los cambios en una localización de memoria antes de recuperar otras configuraciones. Selección de un controlador para la edición Para asignar un controlador MIDI continuo a uno de los controladores del M-Audio O , primero debe seleccionarlo para la edición. - Page 70 Mueva un fader o un controlador rotativo. Sólo tiene que mover el controlador, botón asignable o pedal para que quede seleccionado para la edición. Asignación de MIDI CCs Una vez seleccionado el controlador que desea editar, puede cambiar el número MIDI CC asignado tal como le explicamos a continuación: Pulse el botón ADVANCED FUNCTION y toque la tecla CTRL ASGN.
- Page 71 Este método conmutará el botón cada vez que lo pulse. También tiene la posibilidad de configurar el botón para que envíe un valor cuando lo pulse, y otro cuando lo suelte. Para ello: Pulse el botón ADVANCED FUNCTION, y a continuación toque la tecla DATA 1. 2.
- Page 72 DATA 3 y DATA 2 (vea el Apéndice F). Es posible que algunos manuales sólo proporcionen los valores en formato hexadecimal, pero el M-Audio O requiere la introducción del valor decimal. Para convertir valores hexadecimales a decimales utilice la calculadora de Windows: seleccione el modo Científica, marque la casilla Hex e introduzca el valor hexadecimal que desee convertir.
- Page 73 127, lo cual significa que al realizar un volcado de memoria cualquier teclado del mismo modelo podrá recibir el volcado, independientemente de su ID de dispositivo. Si una ID de dispositivo tiene asignado un valor distinto de 127, el volcado de memoria se realizará únicamente en un M-Audio O con la misma ID de dispositivo.
-
Page 74: Descripción De Los Mensajes Midi
ID de dispositivo. Observe que en el LED aparece un número de tres dígitos, y no un número de dos dígitos precedido por una “c”. Los valores de ID de dispositivo van de 00 a 127.El valor de ID de dispositivo por defecto para el M-Audio O es 127. Con esta asignación, el teclado transmite el mensaje SysEx a todos los dispositivos. -
Page 75: Resolución De Problemas
He aquí las respuestas a algunas preguntas frecuentes relacionadas con su teclado O Problema 1: Mi hardware M-Audio ha dejado de funcionar de repente, cuando hasta ahora lo he estado utilizando sin problemas. Solución 1: Apague la unidad durante unos 10 segundos. A continuación, reinicie la computadora e inténtelo de nuevo. Si el problema persiste, quizá... -
Page 76: Información Sobre La Garantía
Condiciones de la garantía M-Audio garantiza este producto contra defectos de materiales y mano de obra, en condiciones de uso normales y siempre que su propietario sea el comprador original y haya registrado el producto. Consulte www.m-audio.com/warrantypara más información acerca de las condiciones y limitaciones específicas aplicables a su producto. -
Page 77: Apéndices
Apéndices Apéndice A - TABLA DE IMPLEMENTACIÓN MIDI Función Transmitido Recibido Comentarios Basic :Default 1-16 Channel: Changed 1-16 :Default --------- Mode :Messages :Altered ********* Note 0-127 Number: True Voice ********* Velocity: Note ON : Note OFF After : Keys Touch :Ch’s Pitch Bend Control 0-119... - Page 78 Apéndice B - MIDI CCs asignables en el M-Audio B1 - El fader y los controladores rotativos: MIDI CC Description Data Lsb (Press Twice) Data Msb (Press Twice) 0-119 Standard MIDI CC’s 120-127 Channel Mode Messages Pitch Bend Sensitivity Channel Fine Tune...
- Page 79 B2 - Botones y pedal: Program MIDI CC Description Data Lsb (Press Twice) Data Msb (Press Twice) (Press Twice) 0-119 Standard MIDI CC’s Toggle value 2 Toggle value 1 120-127 Channel Mode Messages Toggle value 2 Toggle value 1 Pitch Bend Range Sensitivity value Channel Fine Tune Tuning amount...
- Page 80 Apéndice C – Tabla de conversión hexadecimal Tabla de conversión de formato hexadecimal a decimal Hexadecimal Decimal Hexadecimal Decimal Hexadecimal Decimal Value Value Value Value Value Value...
- Page 81 Apéndice D - Datos MIDI útiles Instrumentos General MIDI Piano Bajo Caña Efectos sintéticos 32 Bajo acústico 0 Piano acústico de cola 33 Bajo eléctrico (pulsado 64 Saxo soprano 96 SFX Lluvia 1 Piano horizontal con los dedos) 65 Saxo alto 97 SFX Banda sonora 2 Piano eléctrico 34 Bajo eléctrico (pulsado...
- Page 82 Apéndice E - Números de controladores MIDI estándar continuos (MIDI CCs) Bank Select Controller 46 Tremelo Depth Modulation Controller 47 Chorus Depth Breath Control Gen Purpose 1 LSB Celeste (De-tune) Controller 3 Gen Purpose 2 LSB Phaser Depth Foot Control Gen Purpose 3 LSB Data Increment Porta Time...
- Page 83 Apéndice F - Compatibilidad de NRPN de Roland GS y Yamaha XG con la serie Roland JV/XP NRPN NRPN Data Data CC99 CC98 CC06 CC38 00-7F n/a (-64 - 0 - +63) Frecuencia de vibrato (cambio relativo) 00-7F n/a (-64 - 0 - +63) Intensidad de vibrato (cambio relativo) 00-7F n/a (-64 - 0 - +63) Retardo de vibrato (cambio relativo) 00-7F...
-
Page 84: Italiano
M-Audio. La tastiera O segue le orme del primo controller MIDI USB mobile in assoluto — il modello Oxygen8. Di ridotte dimensioni per un facile trasporto in una borsa insieme al laptop, la tastiera dalla linea sottile M-Audio O è... -
Page 85: Windows Xp E Mac Osx
Prova della M-Audio O con il software Si consiglia di verificare che l’applicazione software comunichi correttamente con la tastiera M-Audio O . La maggior parte delle applicazioni software dispone di un indicatore di ingresso MIDI. Per verificare che i dati vengano ricevuti, premere un tasto qualsiasi della tastiera. - Page 86 3. Premere il tasto ENTER per accettare il nuovo canale e uscire da Program Mode. Ottava La tastiera è in grado di spostarsi in su o in giù per fornire accesso a 11 ottave sulla M-Audio O Premere “OCTAVE +” per spostare la tastiera in su di ciascuna ottava.
-
Page 87: Programmazione Della M-Audio O
Programmazione della M-Audio O Programmazione alle opzioni di programmazione Ciascuno dei controller della M-Audio O può inviare messaggi CC MIDI, RPN/NRPN, GM 1 e 2 e SysEx. I controller possono inoltre essere assegnati a singoli canali MIDI. I numeri di CC MIDI (controller continui) fanno parte della specifica MIDI standard e vengono utilizzati generalmente per controllare i cambi in tempo reale dei parametri nell’apparecchiatura musicale MIDI. - Page 88 I fader e i controlli rotativi: MIDI CC Descrizione Data 2 Data 3 0-119 Standard MIDI CCs 120-127 Channel Mode Messages Pitch Bend Sensitivity Channel Fine Tune Channel Coarse Tune Channel Pressure RPN Coarse RPN LSB RPN MSB RPN Fine RPN LSB RPN MSB NRPN Coarse...
- Page 89 Ricordarsi di memorizzare le modifiche in una posizione di memoria prima di richiamare qualsiasi altro setup. Selezione di un controller per la programmazione Per assegnare un CC MIDI a uno dei controller della M-Audio O , questo deve essere selezionato per la programmazione.
- Page 90 Impostazione di valori di commutazione dei pulsanti A ciascuno degli 8 pulsanti assegnabili è possibile assegnare la commutazione tra due valori. Ecco come: Premere il pulsante ADVANCED FUNCTION, seguito dal tasto DATA 2 (MIN). 2. Digitare il numero di commutazione minimo mediante i tasti di immissione dei dati numerici o i pulsanti Recall +/-. 3.
- Page 91 Molte schede tecniche di sintetizzatori utilizzano messaggi NRPN e attribuiscono a MSB e LSB valori che occorre immettere per DATA 3 e DATA 2 (Vedere Appendice F). Alcuni manuali forniscono solo i valori esadecimali, ma la M-Audio O richiede l’immissione del valore decimale.
-
Page 92: Spiegazione Dei Messaggi Midi
Il display LED visualizza la dicitura “USB”, indicando che la porta MIDI Out è ora impostata per trasmettere i dati dal flusso USB. Program Mode si annulla automaticamente. Quando la modalità MIDI Out from USB NON è attiva, la porta di uscita MIDI rispecchia i dati inviati tramite USB dal controller della M-Audio . Per disattivare la modalità MIDI Out from USB: Premere il pulsante ADVANCED FUNCTION. -
Page 93: Risoluzione Dei Problemi
Dispositivo. Ciò è indicato dal fatto che il display LED visualizza un numero a 3 cifre e non uno a 2 cifre preceduto da una “c.” Gli ID Dispositivo vanno da 00 a 127, 127 è l’impostazione del numero di dispositivo predefinito sulla M-Audio O . -
Page 94: Contattare M-Audio
Condizioni di garanzia M-Audio garantisce che i prodotti sono esenti da difetti nei materiali e nella manodopera in condizioni di utilizzo normale e la garanzia è valida a condizione che essi siano in possesso dell’utente originale registrato. Consultate www.m-audio.com/warrantyper le condizioni e le limitazioni che si applicano al vostro specifico prodotto. -
Page 95: Appendices
essere determinata accendendola e spegnendola , si suggerisce all’utente di provare a correggere il problema adottando una o più delle seguenti misure: < Riorientare o riposizionare l’antenna ricevente. < Aumentare la distanza tra l’apparecchiatura e il ricevitore. < Collegare l’apparecchiatura in una presa di corrente di un circuito diverso da quello in cui è collegato il ricevitore. <... - Page 96 Appendice B - CC MIDI assegnabili sulla M-Audio O B1 - I fader e i controller rotativi: MIDI CC Descrizione Data LSB (premere due volte) Data MSB (premere due volte) 0-119 Standard MIDI CC’s 120-127 Channel Mode Messages Pitch Bend Sensitivity...
- Page 97 B2 - Pulsanti e pedale: Program Data LSB Data MSB MIDI CC Descrizione (premere due volte) (premere due volte) (premere due volte) 0-119 Standard MIDI CC’s Toggle value 2 Toggle value 1 120-127 Channel Mode Messages Toggle value 2 Toggle value 1 Pitch Bend Range Sensitivity value Channel Fine Tune...
- Page 98 Appendice C - Tabella di conversione esadecimale Schema di conversione da esadecimale a decimale Esadecimale Decimale Esadecimale Decimale Esadecimale Decimale Valore Valore Valore Valore Valore Valore...
- Page 99 Appendice D - Dati MIDI utili Strumenti MIDI generali Piani Bassi Strumenti ad ancia Effetti sintetizzati 0 Pianoforte verticale 32 Basso acustico 64 Sassofono soprano 96 SFX Pioggia 1 Pianoforte a coda 33 Basso elettrico pizzicato 65 Sassofono alto 97 SFX Colonna sonora 2 Pianoforte a coda elettrico 34 Basso elettrico a plettro 66 Sassofono tenore...
- Page 100 Numeri note MIDI Ottava (n) Numeri note...
- Page 101 Appendice E - Numeri controller MIDI standard (CC MIDI) Bank Select Controller 46 Tremelo Depth Modulation Controller 47 Chorus Depth Breath Control Gen Purpose 1 LSB Celeste (De-tune) Controller 3 Gen Purpose 2 LSB Phaser Depth Foot Control Gen Purpose 3 LSB Data Increment Porta Time Gen Purpose 4 LSB...
- Page 102 Appendice F - Roland GS e supporto Yamaha XG NRPN a Roland JV/XP NRPN NRPN Data Data CC99 CC98 CC06 CC38 08 00-7F n/a (-64 - 0 - +63) Velocità Vibrato (cambio relativo) 09 00-7F n/a (-64 - 0 - +63) Profondità Vibrato (cambio relativo) 0A 00-7F n/a (-64 - 0 - +63) Ritardo Vibrato (cambio relativo) 20 00-7F n/a (-64 - 0 - +63) Freq.
-
Page 104: M-Audio O
日本語 はじめに この度は、 M-Audio O をお買い上げ頂きまして誠に有難うございます。 M-Audio初のUSB MIDIコントローラであるOxygen8の流れを汲んだM-Audio は、 より洗練されたデザインに機能を充実させ更にパワーアップしました。 ノートブックコンピュータと共に余裕でバッグに収納できるスリムライン。 ベースパ ートを演奏したり、 ドラムパターンをプログラムしたり、 エフェクトをかけたり、 バーチャルスタジオとしてパラメータを微調整したり、 様々なシーンをいつでもど こでも簡単に演出します。 ハー フアクションベロシティセンシティブフルサイズ25鍵盤、 アサイン可能なノブ8系統、 アサイン可能なボタン8系統などリアルタイム・ コントロール機能が満 載でライブ演奏やプログラミングに最適です。 USBバス電源に対応しUSBケーブル1本あればUSB MIDIインター フェイスとしてモバイルな音楽環境を実現し ます。 Windows XP、 Mac OS Xクラスコンプライアントなためドライバのインストールは不要、 接続すればすぐにご使用頂けます。 また、 Enigmaライブラリアンソフトウェアをダウンロードして頂けば、 データを無制限に保存可能など機能を拡張できます。 Enigmaライブラリアンソフトウェ アの詳細は、 本マニュアルのEnigmaの項を参照して下さい。 www.m-audio.com でEnigmaのユーザー登録/無償ダウンロードができます。 M-Audio O の特徴... -
Page 105: Windows Xp と Mac Os X
Windows XP と Mac OS X Windows XPやMac OS Xをお使いの場合、 電源スイッチをオンにするだけでお使いいただけます。 M-Audio O キーボードはクラスコンプライアントであるた め、 特にドライバのインストールの作業をすることなく動作します。 M-Audio O の特徴と機能 インストールが完了した後、 以下のページをよくお読みになりO の操作方法のご理解にお役立て下さい。 プログラムモード まずプログラムモードについて説明します。 ADVANCED FUNCTIONボタンを押すとM-Audio O はプログラムモードになり様々な高度な機能にアクセスできます。 プログラムモードでは、 M-Audio O キーボードの鍵盤で機能を選択する設定になっています。 O で設定するMIDIコマンドはO キーボード鍵盤上部のパネルに 記載されています。 プログラムモードでは、 O キーボードの2オクターブを数値データの入力に使います。 Preset(プリセット) 「+」 「−」 ボタンはプログラムモードで割当てた数値を増減させることができます。 プログラムモードで数値を入力する場合、 LEDに数値が表示されます。 数値を入力すると、 それにつれて表示が変更されます。 M-Audio O がプログラムモード中の時は、 LEDディスプレイの右端に小さな丸印が現れます。 また、 GLOBAL CHANボタンを押しても、 プログラムモードになります。 グローバルMIDIチャンネルでは新規のチャンネルを設定する時に数値を入力するため... - Page 106 注意:プリセットを初期設定に戻すと、 メモリに保存したプログラムの変更は失われます。 Enigmaライブラリアンソフトウェアを使えば、 コンピュータでプリセットの編集や保存をすることができます。 www.m-audio.comで無償ダウンロード可能で す。 ユーザー登録を完了し、 手順に従ってダウンロードして下さい。 スナップショットの送信 GLOBAL CHANとMUTEボタンを同時に押すと、 スナップショット機能により現在のコントローラにアサインされているデータや数値が送信されます。 スナップショットを送信すると各コントローラに関するデータは、 コントローラがアサインされているチャンネルに送信されます。 スナップショット機能は、 受信機器をキーボード上のフェーダやロータリーコントローラと同期させるのに最適です。 この機能はクリエイティブなツールとして、 使い方によっては驚くようなサウンドもたらします。 この機能では、 曲の開始時にコントロールパラメータの設定にも使われます。 曲の好みのエフェクトレベルに合わせてコントローラの値を設定した場合、 スナッ プショットを記録して、 その曲がいつも正しいエフェクトレベルで再生されるように設定することができます。 シーケンサを記録モードにして、 スナップショット ボタンを押します。 コントローラのミュート MUTEボタンを押すと、 ロータリーコントローラやフェーダをミュートします。 この機能はソフトウェアでの設定を変更することなく、 フェーダやロータリーコントローラの設定値を変更することができます。 コントローラをミュートしても、 ボタンやフットスイッチ、 鍵盤に対する影響はありません。 MIDIアサイナブルなボタンやファンクションキー、 鍵盤を押すと解除されます。 コントローラがミュー トされている時はLEDの画面表示は消えています。 この機能は、 コントローラの設定を変更した複数のプリセットを切換えるのに便利です。 コントローラがミューロされている間は、 ソフトウェアのコントローラ設...
- Page 107 モジュレーションコントロール モジュレーションコントロールは、 現在弾いている音の音色や音質を変化させるのに使用します。 このようなリアルタイムなコントローラは、 鍵盤楽器上でもビ ブラートなどの変化をつけることができるように開発されました。 この機能により、 プレーヤーはアコースティックな楽器を演奏するのと同様に音に表情をつけ ることができます。 M-Audio O キーボードのモジュレーションコントロールにもMIDI信号をアサインすることができます。 本マニュアルの 「プログラミングとエディット」 の項を参 照して下さい。 フットスイッチ M-Audio O キーボードのフットスイッチソケットにはフットスイッチの極性を問わず接続できます。 キーボードの電源が入ると自動的にフットスイッチの極性を 判断します。 極性を逆にする場合は、 キーボードの電源を入れる時に、 フットスイッチを踏んだままにしておきます。 フットスイッチは鍵盤から手を離しても音を持続させておきたい場合に使用します。 この機能はM-Audio O ではデフォルトで設定されています。 フットスイッチは、 MIDIノートを送信するようにプログラミングすることもできます。 これにより、 キーボードから手を離さずに異なったMIDIチャンネルのサン プルに変えたり、 プログラムチェンジやキーボードがサポートするMIDIメッセージを種類に関わらず送信することができます。 フットスイッチの使い方の詳細は、 本マニュアルの 「プログラミングとエディット」 の項を参照して下さい。 MIDI OUT端子 キーボードのリアパネルにはMIDI OUT端子が装備されており、 外部サウンドモジュールやMIDIキーボードと接続することがきます。 デフォルトでは、 全てのコン...
- Page 108 フェーダとロータリーノブ : Knobs: MIDI CC Description Data 2 Data 3 0-119 Standard MIDI CCs 120-127 Channel Mode Messages Pitch Bend Sensitivity Channel Fine Tune Channel Coarse Tune Channel Pressure RPN Coarse RPN LSB RPN MSB RPN Fine RPN LSB RPN MSB NRPN Coarse NRPN LSB NRPN MSB...
- Page 109 キーボードでCTRL ASSIGN鍵盤を押します。 3. 数 値鍵盤を使って新しいMIDI CC番号を入力します。 LEDには入力した値が表示されます。 4. ENTER鍵盤を押して確認します。 ロータリーコントローラを一つ選んで動かすと、 LEDに表示される数値が変化し、 コントローラの現在の値が表示されます。 LEDに表示されるのは、 最後にコン トローラに割当てられていたMIDIコントローラ番号です。 プログラムモードでは最近エディットされたコントローラが常に選択されます。 プリセットメモリに変更を保存してから、 その他の設定をロードします。 コントローラをエディット作業のために選択する方法 M-Audio O のコントローラにMIDI CCをアサインする前に、 任意のコントローラを選択する必要があります。 1. ADVANCED FUNCTIONボタンを押し、 続いてCTRL SEL鍵盤を押します。 LEDには現在選択されているコントローラの値(先頭にC またはFの表示)が表示されます。 2. 数値鍵盤を使ってコントローラの番号を入力するか、 またはRECALL[ 「+」 か 「−」 ボタンで番号を呼び出します。 3. ENTER鍵盤を押して確認します。 または 1. ロータリーコントローラやフェーダを操作するかボタンを押します。...
- Page 110 1. ADVANCED FUNCTIONボタンを押し、 続いてCTRL ASGN鍵盤を押します。 2. 減少させるには153を、 増加には 154を入力します。 3. ENTER鍵盤を押して確認し、 プログラムモードを解除します。 4. 再びADVANCED FUNCTIONボタンを押し、 続いてDATA 1鍵盤を押します。 5. ボタンが送出するMIDI CC番号を入力します。 6. ENTER鍵盤を押して確認します。 7. 前述の通り、 最大値/最小値を入力します。 アサイナブルなボタンを使用した設定値の切換え 8個のアサイナブルなボタンとペダルを使って、 2つの設定値を切換えて使用することができます。 1. ADVANCED FUNCTIONボタンを押し、 続いてDATA 2(最小値)鍵盤を押します。 2. 数値鍵盤またはRECALL 「+」 「−」 ボタンを使って設定する小さい方の数値を入力します。 3. ENTER鍵盤を押して確認します。 4. ADVANCED FUNCTIONボタンを押し、 続いてDATA 3(最大値)鍵盤を押します。 5. 数値鍵盤またはRECALL 「+」 「−」 ボタンを使って設定する大きい方の数値を入力します。 6. ...
- Page 111 5. 再びADVANCED FUNCTIONを押し、 続いてDATA 2を押します。 6. これによってSPN/NRPN MSBの番号をアサインすることができます。 前述の手順に従い、 メッセージが送信されるチャンネルを設定します。 DATA 3とDATA 2(付録F参照)に入力するMSB とLSBのバリューは、 通常NRPN対応のシンセサイザのデータシートに掲載されています。 マニュアルによって は16進法の表記しかないものもあります。 M-Audio O では10進法の値を入力する必要があります。 この場合は、 Windowsの 「アクセサリ」 から 「電卓」 を選 択して、 簡単に換算を行うことができます。 「電卓」 の 「関数電卓」 モードを選択し、 「16進法」 を選択して16進法の値を入力します。 次に 「10進法」 ボタンを選 択し、 10進法の値に換算します。 また 「付録C」 には換算表を用意しました。 この表からも簡単に10進法の値に換算することができます。...
- Page 112 MIDIノート番号は 「付録D」 を参照して下さい。 注意: ノートモードでボタンを押すと、 LEDにノートベロシティが少しの間表示されます。 システムエクスクルーシブメッセージとデバイスID システムエクスクルーシブメッセージ(SysEx)を送信する場合は、 個々のコントロールチャンネル番号は送信チャンネルを指定せず、 代わりにデバイスIDを指定 します。 CHAN鍵盤を押しても、 LEDにはチャンネルのシンボルであるCが数値の前に表示されません。 デバイスIDは00〜127の間で指定することができます。 通常は127に設定して下さい。 デバイスIDが127に設定されていると、 すべてのデバイスがSysExメッセ ージを受信します。 コントローラにアサインされたデバイスIDのSysExメッセージは、 DEV ID鍵盤を使用しても変更することはできません。 このボタンは、 M-Audio O のグロー バルデバイスIDを変更するのに使用します。 詳細は本マニュアルの 「システムエクスクルーシブメッセージ」 と 「デバイスID」 を参照して下さい。 不揮発性メモリ M-Audio O では、 不揮発性メモリを使用しています。 このため、 電源を一度オフにして、 再起動した場合でも前回作業を中断したところから継続して作業を行 うことができます。 現在のコントローラとチャンネルのアサイン設定は、 セットアップをメモリロケーションに保存したかどうかにかかわらず、 保存されています。...
-
Page 113: Midiメッセージについて
USBからのMIDI OUTモード USBからのMIDI OUTモードでは、 M-Audio O をUSBからMIDI OUTへのインター フェイスとして使用できます。 USBからのMIDI OUTモードにすると、 M- Audio O のMIDI出力端子から送出される信号はUSBで受信したデータになります。 シーケンサでM-Audio O をUSB出力デバイスとして選択し、 USBからの MIDI OUTモードに切換えると、 シーケンサからの全てのデータはM-Audio O のMIDI OUT端子に送られます。 USBからのMIDI OUTモードを有効にするには: 1. ADVANCED FUNCTIONボタンを押します。 2. MIDI OUT鍵盤を押します。 L EDにはUSBの文字が表示され、 MIDI1OUT端子はUSB端子からのデータを送信する設定に切り換わります。 プログラムモードは自動的に解除され ます。 USBからのMIDI OUTモードが有効でない場合、 MIDI OUT端子はM-Audio O コントローラからUSB端子を介して送られたデータを反映します。 USBからの MIDI OUTモードを解除するには: 1. ADVANCED FUNCTIONボタンを押します。... -
Page 114: トラブルシューティング
でSysExメッセージを使用する場合は、 グローバルチャネルは無視されます。 コントローラにアサインするチャ ネルのかわりにCHAN鍵盤を押した場合は、 デバイスIDを入力します。 このとき、 LED画面には3桁の数字が表示され、 2桁で先頭にcのシンボルのある数字は 表示されません。 デバイスIDは00〜127の範囲で設定します。 M-Audio O では、 127がデフォルトに設定されています。 127に設定されている場合はSysExメッセージが全ての 機器に対して送信されます。 ユーザ独自のSysExメッセージでM-Audio O のコントローラをプログラムすることはできませんが、 MIDI入力信号を受信して、 ユーザが指定した別のメッセー ジを送信するソフトウェアを使用することができます。 このような 「翻訳」 ソフトウェアを使用して独自のSysExメッセージをプログラムすれば、 M-Audio O か らの入力信号を翻訳して、 使用するコントローラに対するSysExメッセージを送出することができます。 トラブルシューティング ご使用中に次のようなトラブルが生じた場合には、 以下の指示に従って操作して下さい。 問題 1: インストール後は適切に動作していたのに突然動作しなくなった。 解決 1: 電源を切って10秒間置いてください。 その後、 コンピュータを再起動して再度お試し下さい。 それでも解決しない場合は、 ドライバを再インストールする 必要があるかもしれません。... -
Page 115: お問い合わせ先
お問い合わせ先 本製品に関するサポートやドライバ等については、 M-Audio Japanのウェブサイトhttp://www.m-audio.co.jpのサポートセクションをご覧下さい。 本製品や 他のM-Audio製品に関するご質問、 ご意見等は下記までご連絡頂くようお願い申し上げます。 M-AUDIO U.S. M-AUDIO Deutschland (Germany) 5795 Martin Road, Irwindale, CA 91706-6211, U.S.A. Kuhallmand 34, D-74613 Ohringen, Germany Sales Information: 626-633-9050 Sales Information: 49 7941 98 7000 Sales Information (email): info@m-audio.com Sales Information (email): info@m-audio.de... - Page 116 付録 付録A ‒ MIDIインプリメンテーションチャート Function Transmitted Received Remarks Basic :Default 1-16 Channel: Changed 1-16 :Default --------- Mode :Messages :Altered ********* Note 0-127 Number: True Voice ********* Velocity: Note ON : Note OFF After : Keys Touch :Ch’s Pitch Bend Control 0-119 Change 120-127 Program 0-127...
- Page 117 付録B ‒ M-AUDIO O のアサイン可能なMIDI CC B1 ‒ フェーダとロータリーコントローラ : MIDI CC Description Data Lsb (Press Twice) Data Msb (Press Twice) 0-119 Standard MIDI CC’s 120-127 Channel Mode Messages Pitch Bend Sensitivity Channel Fine Tune Channel Coarse Tune Channel Pressure RPN Coarse RPN LSB RPN MSB...
- Page 118 B2 ‒ ボタンとベダル: Program MIDI CC Description Data Lsb (Press Twice) Data Msb (Press Twice) (Press Twice) 0-119 Standard MIDI CC’s Toggle value 2 Toggle value 1 120-127 Channel Mode Messages Toggle value 2 Toggle value 1 Pitch Bend Range Sensitivity value Channel Fine Tune Tuning amount Channel Coarse Tune...
- Page 119 付録C ‒ 16進数変換表 Hexadecimal Decimal Hexadecimal Decimal Hexadecimal Decimal Value Value Value Value Value Value...
- Page 120 付録D ‒ MIDIデータ一覧(GMセット) General MIDI Instruments Piano Bass Reed Synth Effects 0 Acoustic Grand Piano 32 Acoustic Bass 64 Soprano Sax 96 SFX Rain 1 Bright Acoustic Piano 33 Fingered Bass 65 Alto Sax 97 SFX Soundtrack 2 Electric grand Piano 34 Electric Picked Bass 66 Tenor Sax 98 SFX Crystal 3 Honky Tonk Piano...
- Page 121 付録E ‒ MIDIコントロールナンバー(MIDI CC) Bank Select Controller 46 Tremelo Depth Modulation Controller 47 Chorus Depth Breath Control Gen Purpose 1 LSB Celeste (De-tune) Controller 3 Gen Purpose 2 LSB Phaser Depth Foot Control Gen Purpose 3 LSB Data Increment Porta Time Gen Purpose 4 LSB Data Decrement Data Entry Controller 52...
- Page 122 付録F - Roland JV/XPで対応するRoland GS/Yamaha XGのNRPN NRPN NRPN Data Data CC99 CC98 CC06 CC38 00-7F n/a (-64 - 0 - +63) Vibrato Rate (relative change) 00-7F n/a (-64 - 0 - +63) Vibrato Depth (relative change) 00-7F n/a (-64 - 0 - +63) Vibrato Delay (relative change) 00-7F n/a (-64 - 0 - +63) Filter Cutoff Freq.