Advertisement
Quick Links
Please study these instructions carefully before installing your new Purge Valve Kit. If you have any questions, please
contact our Technical Hotline at: (800) 416-8628 from 7 am - 5 pm, Monday through Friday, Pacific Standard Time or e-mail us
at edelbrock@edelbrock.com.
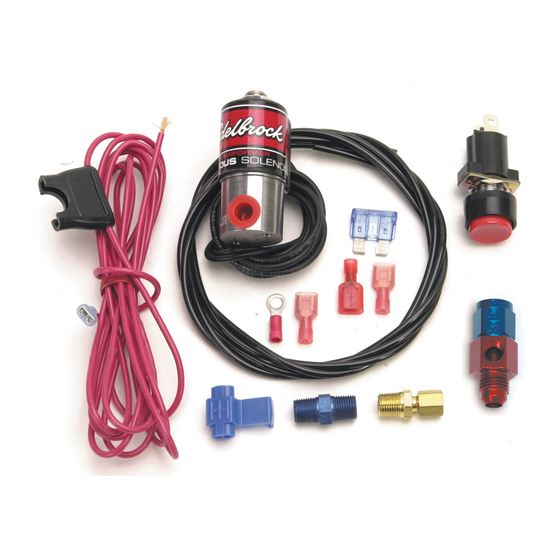
DESCRIPTION: The -4AN/-6AN Purge Valve Kit is design to vent gaseous nitrous to the atmosphere to fill the nitrous feed line with
liquid nitrous for a better nitrous charge when the nitrous system is in use. Be sure the nitrous purge line is mounted on the vehicle
so the spray direction is not pointed in a direction which could fill the passenger compartment with nitrous oxide.
1. Be sure the nitrous bottle is turned to the "off" position.
2. Relieve any pressure in the line by slowly loosening the main line fitting
from the bottle.
IMPORTANT NOTE: Nitrous Oxide can be lethal and must be
handled with extreme caution. Be sure you are located in a well-
ventilated area. Remove your hands from the fitting while the
nitrous oxide is venting and move away to keep from breathing
the escaping nitrous.
3. Install the 1/8"NPT x 1/8"NPT filter fitting adapter onto the purge valve
adapter. Use only liquid Teflon® on this connection.
4. Install the nitrous purge solenoid onto the 1/8"NPT x 1/8"NPT adapter.
Use only liquid Teflon® on this connection.
5. Install the compression fitting onto the nitrous purge solenoid. Use only
liquid Teflon® on the pipe section of this fitting connection.
6. Install the purge valve adapter fitting onto the nitrous solenoid fitting. Do not use any chemical thread sealant on either of these
fittings. Ensure that the purge valve adapter will not interfere with any other engine system or component.
7. Connect the main nitrous feed line to the purge valve adapter. Again, do not use any
chemical thread sealant on either of these fittings.
8. Attach the 1/8" poly line into the ferrule fitting on the nitrous purge solenoid. Bend
and conform the plastic tube to vent the nitrous purge towards the base of the
windshield, out and away from the engine compartment. Never configure this vent
tube to point in the direction of people. Securely attach the end of the vent tube to
the vehicle. This is a point of high-pressure gas escaping into the atmosphere and
the tube could cause injury, if not properly secured.
9. Mount the nitrous purge solenoid on/off push button switch in the passenger
compartment of the vehicle. Place it in a convenient and visible location.
10. Connect one solenoid wire (it does not matter which one) to a good ground on the
chassis.
11. Connect the remaining solenoid wire to the nitrous purge solenoid on/off push button
switch.
12. Connect the remaining lead from the nitrous purge solenoid on/off button switch to
the "ignition-switched" 12-volt source of the nitrous system. This will ensure that
your system can only be purged when the arming switch is in the "on" position.
13. Re-connect the nitrous feed line to the nitrous bottle. Check the system for leaks and
test your purge valve for proper operation and purge spray direction.
Catalog #72176, 72178
Rev. 2/08 - AJ/mc
INSTALLATION INSTRUCTIONS
Edelbrock Corporation • 2700 California St. • Torrance, CA 90503
Tech-Line: 800-416-8628 • E-Mail: Edelbrock@Edelbrock.com
Edelbrock Nitrous Systems
-4AN/-6AN Purge Valve Kit
Catalog #s 72176 & 72178
INSTALLATION INSTRUCTION
©2008 Edelbrock Corporation
Brochure No. 63-0161
Advertisement


