Table of Contents
Advertisement
AUDIO VIDEO SURROUND RECEIVER
KR-V999D
INSTRUCTION MANUAL
KENWOOD CORPORATION
About the supplied remote control . . .
Compared to standard remote controls, the remote control supplied with this receiver has several
operation modes. These modes enable the remote control to perform on screen operations and control
other audio/video components. In order to effectively use the remote control it is important to read the
operating instructions and obtain a proper understanding of the remote control and how to switch its
operation modes (etc.).
Using the remote control without completely understanding its design and how to switch the operation
modes may result in incorrect operations.
B60-3009-10 CH (T) WS
98/12 11 10 9 8 7 6 5 4 3 2 1 97/12 11 10 9 8 7 6 5 4 3
KR-V999D (En/T)
1
Advertisement
Table of Contents

Related Manuals for Kenwood KR-V999D


Summary of Contents for Kenwood KR-V999D
- Page 1 AUDIO VIDEO SURROUND RECEIVER KR-V999D INSTRUCTION MANUAL KENWOOD CORPORATION About the supplied remote control . . . Compared to standard remote controls, the remote control supplied with this receiver has several operation modes. These modes enable the remote control to perform on screen operations and control other audio/video components.
-
Page 2: Getting Started
Getting started Caution : Read this page carefully to ensure safe operation. KR-V999D (En/T) Before applying the power Units are designed for operation as follows. U.K. and Europe ............... AC 230 V only For the United Kingdom Factory fitted moulded mains plug 1.The mains plug contains a fuse. -
Page 3: Table Of Contents
KR-V999D (En/T) Contents Caution : Read the pages marked carefully to ensure safe operation. Getting started Before applying the power ................... 2 Safety precautions ......................2 Unpacking ........................2 Special features How to use this manual ....................5 Names and functions of parts Setting up the system Preparations Connecting the antennas .................... -
Page 4: Special Features
Special features KR-V999D (En/T) True home theater sound This receiver incorporates a wide variety of surround modes to bring you maximum enjoyment from your video software. Select › a surround mode according to your equipment or the software you are going to play and enjoy! Dolby Digital (AC-3) The DOLBY DIGITAL (AC-3) mode lets you enjoy full digital surround from software processed in the Dolby Digital (AC-3) format. -
Page 5: How To Use This Manual
When the broadcast ends, the receiver returns to the original station. When listening to KENWOOD source components connected with system control cords, the input selector on the receiver automatically switches to the tuner when a ¤... -
Page 6: Names And Functions Of Parts
Names and functions of parts KR-V999D (En/T) Frequency display, SURROUND Input display, indicator AC-3 Preset channel display, DSP indicator RDS indicators Band indicators indicator Surround mode display MEMORY indicator AC-3 MEMORY NEWS INFO. AUTO indicator ******* ** SURROUND AUTO STEREO indicator 3 STEREO LOUDNESS STEREO... - Page 7 If you connect audio components from to execute alternate commands. 9 Numeric keys KENWOOD and other makers to the Use in combination with the AUDIO, TAPE1/MD or CD jacks, you can set the VIDEO, or TV keys to execute a series of...
-
Page 8: Setting Up The System
Setting up the system KR-V999D (En/T) Connecting the antennas Make connections as shown below. Do not connect the power cord to a wall outlet until all connections are completed. Antenna terminal connections 2 Insert cord. 1 Push lever. 3 Return lever. FM indoor antenna AM loop antenna The supplied indoor antenna is for temporary use only. -
Page 9: Connecting Audio Components
Do not connect the power cord to a wall outlet until all microcomputer referring to “In case of difficulty”. connections are completed. SYSTEM CONTROL jacks For SYSTEM CONTROL con- nections to KENWOOD com- SYSTEM CONTROL ponents ƒ SYSTEM CONTROL... -
Page 10: Connecting Video Components
Setting up the system KR-V999D (En/T) Connecting video components Make connections as shown below. When connecting the related system components, be sure to also refer to the instruction manuals supplied with the components you are connecting. Do not connect the power cord to a wall outlet until all connections are completed. Video deck or video camera About the S-VIDEO jacks MONITOR... -
Page 11: Digital Connections
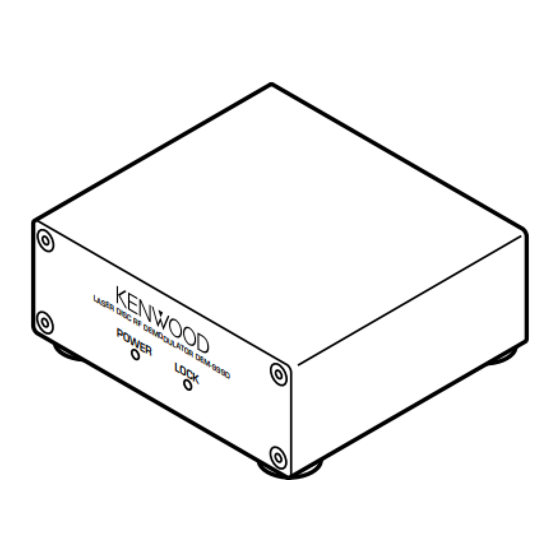
POWER LOCK To connect an LD player with a DIGITAL RF OUT. Connect the LD player to the KENWOOD RF digital demodulator (DEM-999D). Then connect the demodu- lator to the VIDEO 4 DIGITAL IN. Connect the video signal and analog audio signals to the VIDEO 4 jacks. -
Page 12: Connecting The System Control
• Once you finish making the system connections, be sure to register the appropriate setup code for each component. • If you own remote controllable KENWOOD audio components that are not compatible with system control (or cannot be combined with your other system control components), registering the setup code enables you to control those components using the remote control supplied with this unit (without connecting system control cords). -
Page 13: Connecting The Speakers
Setting up the system KR-V999D (En/T) Connecting the speakers 1 Strip coating. 2 Loosen. 3 Insert. 4 Secure. • Never short circuit the + and – speaker cords. • If the left and right speakers are connected inversely or the speaker cords are connected with reversed polarity, the sound will be unnatural with ambiguous acoustic imaging. -
Page 14: Pre Out Connections
Setting up the system KR-V999D (En/T) PRE OUT connections This receiver has additional preout jacks. These can be used for various purposes, but will need to be connected to an external power amplifier as shown in the example below. Connecting a speaker cord directly to a PRE OUT jack will not produce any sound from the speaker. -
Page 15: Making Connections To Another Room (Room B)
Setting up the system KR-V999D (En/T) Making connections to another room (ROOM B) The following connections allow you to connect your main system to a monitor TV and speaker system located in another area (ROOM B). The monitor TV can be connected directly to the SECOND ROOM PRE OUT VIDEO jack. To connect the speakers, use either of the connections described below. -
Page 16: Preparing The Remote Control
Setting up the system KR-V999D (En/T) Preparing the remote control Loading the batteries 1 Remove the cover. 3 Close the cover. 2 Insert the batteries. • Insert four AAA-size (LR03) batteries as indicated by the polarity markings. 1. The supplied batteries may have shorter lives than ordinary batteries due to use during operation checks. 2. -
Page 17: Preparing For Surround Sound
Preparing for surround sound KR-V999D (En/T) This receiver incorporates an on screen display (OSD) fea- POWER ture to simplify the surround setup procedure by providing MACRO SHIFT AUDIO large easy to read graphic information. VIDEO The section below shows you how to operate the on-screen P. -
Page 18: Surround Setup
Preparing for surround sound KR-V999D (En/T) Surround set up To obtain the best possible enjoyment from the receiver's various surround modes, be sure to complete the surround set up as shown below. Speaker placement. Front speakers : Place to the front left and right of the listening position. Front Center speaker speakers are required for all surround modes. - Page 19 Preparing for surround sound KR-V999D (En/T) Adjust the volume levels of each speaker. Listen to the test tone and adjust the volume level of each speaker so that they all produce the test tone at the same volume level. 1 Select the test tone type. AUTO : The test tone switches between each speaker in regular intervals.
-
Page 20: Normal Playback
Normal playback KR-V999D (En/T) POWER MACRO SHIFT Preparations • Turn on the power to the related compo- AUDIO VIDEO nents. AUDIO VIDEO SURROUND RECEIVER KR-V999D • Set the POWER key to the ON position. P. CALL P. CALL DOLBY BAND DIGITAL PRO LOGIC ¢... -
Page 21: Adjusting The Sound
Normal playback KR-V999D (En/T) POWER To adjust the balance MACRO SHIFT AUDIO VIDEO Use the test tone feature. AUDIO VIDEO SURROUND RECEIVER KR-V999D P. CALL P. CALL DOLBY BAND DIGITAL PRO LOGIC ¢ 3 STEREO STEREO 2-CH LEVEL INPUT SELECTOR VOLUME CONTROL STANDBY DOWNMIX... -
Page 22: Listening With Headphones
Normal playback KR-V999D (En/T) POWER MACRO SHIFT AUDIO VIDEO AUDIO VIDEO SURROUND RECEIVER KR-V999D P. CALL P. CALL DOLBY BAND DIGITAL PRO LOGIC ¢ 3 STEREO STEREO INPUT SELECTOR VOLUME CONTROL 2-CH LEVEL SOURCE DIRECT STANDBY DOWNMIX INDICATOR BASS TREBLE GUIDE FLAT FLAT... -
Page 23: Recording
Recording KR-V999D (En/T) POWER MACRO SHIFT AUDIO VIDEO AUDIO VIDEO SURROUND RECEIVER KR-V999D P. CALL P. CALL DOLBY BAND DIGITAL PRO LOGIC ¢ 3 STEREO STEREO 2-CH LEVEL INPUT SELECTOR VOLUME CONTROL STANDBY DOWNMIX INDICATOR SOURCE DIRECT BASS TREBLE GUIDE FLAT FLAT +10/... -
Page 24: Recording Video
Recording KR-V999D (En/T) POWER MACRO SHIFT AUDIO VIDEO AUDIO VIDEO SURROUND RECEIVER KR-V999D P. CALL P. CALL DOLBY BAND DIGITAL PRO LOGIC ¢ 3 STEREO STEREO 2-CH LEVEL INPUT SELECTOR VOLUME CONTROL STANDBY DOWNMIX INDICATOR SOURCE DIRECT BASS TREBLE GUIDE FLAT FLAT +10/... -
Page 25: Listening To Radio Broadcasts
Listening to radio broadcasts KR-V999D (En/T) POWER Radio stations can be classified into RDS (Radio Data Sys- MACRO SHIFT tem) stations and other stations. To listen to or store RDS AUDIO VIDEO stations in the preset memory, see the section entitled, P. -
Page 26: Tuning Radio Stations By Frequency (Direct Tuning)
Listening to radio broadcasts KR-V999D (En/T) POWER MACRO SHIFT AUDIO VIDEO AUDIO VIDEO SURROUND RECEIVER KR-V999D P. CALL P. CALL DOLBY BAND DIGITAL PRO LOGIC ¢ 3 STEREO STEREO 2-CH LEVEL INPUT SELECTOR VOLUME CONTROL STANDBY DOWNMIX INDICATOR SOURCE DIRECT BASS TREBLE GUIDE... -
Page 27: Using Rds (Radio Data System)
Listening to radio broadcasts KR-V999D (En/T) Using RDS (Radio Data System) RDS is a system that transmits useful information (in the form of digital data) for FM broadcasts along with the broadcast signal. Tuners and receivers designed for RDS reception can extract the information from the broadcast signal for use with various functions, such as automatic display of the station name. -
Page 28: Presetting Rds Stations (Rds Auto Memory)
Listening to radio broadcasts KR-V999D (En/T) Before listening to an RDS broadcast, follow the instructions POWER MACRO SHIFT below to store the RDS stations in the preset memory. AUDIO VIDEO Up to 40 stations can be preset, and then receivied with the AUDIO VIDEO SURROUND RECEIVER KR-V999D P. -
Page 29: Presetting Radio Stations Manually
Listening to radio broadcasts KR-V999D (En/T) The RDS auto memory function assigns preset numbers to POWER RDS stations starting from preset number "1". Therefore, be MACRO SHIFT AUDIO VIDEO sure to execute the RDS auto memory function before using AUDIO VIDEO SURROUND RECEIVER KR-V999D the following operations to manually store AM stations and P. -
Page 30: Tuning By Program Type (Pty Search)
Listening to radio broadcasts KR-V999D (En/T) POWER This function lets you set the tuner to automatically search MACRO SHIFT for stations which are currently broadcasting the type of AUDIO VIDEO program (genre) you want to listen to. AUDIO VIDEO SURROUND RECEIVER KR-V999D P. - Page 31 Listening to radio broadcasts KR-V999D (En/T) Start the search. EXAMPLE: Searching for a Rock Music broadcast. Display while searching +10/ Blinks PTY SEARCH ROCK M ROOM Program type name display Display when a station is received. Goes out To select another program type BBC 1 F M ROOM Repeat steps 1, 2 and 3...
-
Page 32: Reserving The Desired Information
Listening to radio broadcasts KR-V999D (En/T) When the receiver is tuned to an RDS EON station (a station POWER MACRO SHIFT at which the EON indicator lights up), this function lets you AUDIO VIDEO set the receiver to automatically switch stations to receive AUDIO VIDEO SURROUND RECEIVER KR-V999D P. - Page 33 Listening to radio broadcasts KR-V999D (En/T) Wait for the information you selected while listening to the current station. When listening to the tuner: The receiver will wait for the desired information to start as long as the tuner is set to a preset RDS station Be sure to stay tuned to stations that display both the “EON”...
-
Page 34: Ambience Effects
Ambience effects KR-V999D (En/T) This receiver incorporates 4 different sound modes to let you enjoy surround sound with a wide variety of program sources. The Dolby Digital (AC-3) and Dolby Pro Logic surround sound let you enjoy theater-like surround effects when you play Dolby Digital (AC-3) and Dolby Pro Logic program sources (like Laserdiscs and DVDs). -
Page 35: Dsp Mode
Ambience effects KR-V999D (En/T) DSP mode The DSP mode lets you add the atmosphere of an arena, jazz club, or stadium to almost any type of program source.* Center speaker These modes are particularly effective when used with stereo program sources, like CD, television, and FM radio. You might enjoy trying the STADIUM or ARENA mode the next time you watch a concert or sporting event! The WALL parameter lets you adjust the “brightness”... -
Page 36: Surround Play
Ambience effects KR-V999D (En/T) DOLBY AC-3 can be used when playing DVD or LD software bearing the mark and DOLBY DIGITAL (AC-3) for- mat digital broadcasts (etc.). DOLBY PRO LOGIC and DOLBY 3 STEREO can be used when playing video, DVD, or LD software bearing the mark. -
Page 37: Convenient Functions
Ambience effects KR-V999D (En/T) To select a DSP mode 1 Press the DSP icon. 2 Select a DSP mode ARENA : Simulates the presence of an S.DIR WALL MEDIUM ROOMSIZE MEDIUM EFFECT LEVEL indoor concert arena. JAZZ CLUB : Simulates the presence of a jazz club. - Page 38 Ambience effects KR-V999D (En/T) Press to switch. OSD switch When recording programs or watching movies you may want to turn of the OSD display mode. When the OSD display mode is ON, each operation of the remote control is displayed on the monitor TV. When OSD display mode is OFF, the receiver will only shows the on-screen display when the SOUND or SETUP keys are pressed.
- Page 39 KR-V999D (En/T)
-
Page 40: Getting The Most From Your Remote Control
Refer to "Remote operation of other components" for details about the operations available for each component. * When registering setup codes for KENWOOD audio components which are connected to this unit by system control cords, use the following codes to insure proper system control operation: Cassette: 7000, CD: 8099, MD: 9000. - Page 41 Getting the most from your remote control KR-V999D (En/T) Enter the setup code. • Example: Press 5258 to register a LD player made by KENWOOD. MENU THEME • The backlight flashes once each time a number is entered. • If an invalid setup code is entered the remote will output one long blink, disregard that code and return to the beginning of step 4.
-
Page 42: Operating Other Components
(etc.). Be sure to point the remote control at the remote sensor on the receiver when you want to operate KENWOOD components connected by system control cords. Otherwise, point the remote control at the component you want to operate. -
Page 43: Changing (Confirming) The Operation Mode
Getting the most from your remote control KR-V999D (En/T) This operation lets you change the remote control operation POWER MACRO SHIFT mode without changing the input selector. AUDIO VIDEO You may find this useful when you want to control one P. -
Page 44: Preparing For Automatic Operations (Macro Play)
Getting the most from your remote control KR-V999D (En/T) The macro play function allows you to set the remote to POWER MACRO SHIFT control several components in succession. After completing AUDIO VIDEO this setup, you can perform a series of operations automati- P. - Page 45 Getting the most from your remote control KR-V999D (En/T) Select where the macro should be stored. Press the VIDEO, AUDIO, or TV • You can store up to 3 different macros, one at each key: VIDEO = "MACRO 1", AUDIO = "MACRO 2", TV = "MACRO 3" key to select the macro location.
-
Page 46: Executing An Automatic Operation
Getting the most from your remote control KR-V999D (En/T) POWER MACRO SHIFT AUDIO VIDEO P. CALL P. CALL BAND ¢ GUIDE TUNING/SKIP VOLUME MUTE LISTEN SUBWOOFER MODE SOUND FUNCTION SETUP SHIFT MENU THEME TV/SAT/VID INFO ALT AUD Keys or controls used in this operation. +100 REPEAT RANDOM... -
Page 47: Controlling The Sound In Another Room (Room B)
VIDEO the volume (etc.) output to the other room. P. CALL P. CALL * KENWOOD system control operations are only possible when the BAND ¢ remote control is set to the Room A operation mode. In order to avoid malfunctions, do not make system control connections to audio com-... -
Page 48: Setup Code Correlation
Getting the most from your remote control KR-V999D (En/T) POWER MACRO SHIFT AUDIO VIDEO P. CALL P. CALL BAND ¢ GUIDE TUNING/SKIP VOLUME MUTE LISTEN SUBWOOFER MODE SOUND FUNCTION SETUP SHIFT MENU THEME TV/SAT/VID INFO ALT AUD +100 REPEAT RANDOM Keys or controls used in this operation. -
Page 49: Futureset Upgrade Option
• The hours for cutomer service are: listed above. Monday-Friday 9:00 am - 7:00 pm (Greenwich time) • For customers outside the U.K., please contact your Kenwood dealer Saturday 9:00 am - 3:00 pm (Greenwich time) who will be able to assist you. - Page 50 Getting the most from your remote control KR-V999D (En/T) Hold your remote to the speaker portion of your telephone. • For each setup code the operator can supply a setup code number. Should you ever need to change your input configuration, this number can be used.
-
Page 51: Set Up Code Chart
Finlandia 4081, 4104 Kaisui 4072 Baird 4000, 4041, 4104 Finlux 4000, 4042, 4081, 4037, 4278 Basic Line 4072, 4278 4104 Kenwood 4038, 4041, 4067 Beaumark 4240 Firstline 4037, 4043, 4045, 4072 4072 Bell & Howell 4104 Kodack 4035, 4037 Fisher... - Page 52 Set up code chart KR-V999D (En/T) VCR Set up codes (continued) Maker Set up codes Maker Set up codes Maker Set up codes Memorex 4000, 4035, 4037, Pioneer 4067, 4081 Silva 4037 4039, 4046, 4047, Profitronic 4240 Singer 4045, 4072 4048, 4104, 4240, Proline 4000...
- Page 53 1282 Pulsar 1017, 1019 Celebrity 1000 1180 Quasar 1051, 1055, 1165, Citizen 1030, 1039, 1046, 1250 Kenwood 1019, 1030 1056, 1060, 1092, Radio Shack 1019, 1030, 1039, 1186, 1280 Kloss 1024, 1046 1047, 1056, 1154, Concerto 1056 1030, 1039, 1180,...
- Page 54 5194 Mitsubishi 5059 Quasar 5204 Disco Vision 5023 5059 Sega 5023 Hitatchi 5023 Panasonic 5204 Sony 5201 Kenwood 5258 Philips 5194 Telefunken 5059 Magnavox 5194 Pioneer 5023, 5059 Theta Digital 5194 Marantz 5194 DSS Set up codes Maker Set up codes...
- Page 55 8179, 8305, 8468 Tandy 8032 Hitachi 8032 Panasonic 8029, 8303 Teac 8393 8072, 8655 Philips 8157 Technics 8029, 8303 Kenwood 8028, 8037, 8048, 8099, 8190, 8858, Pioneer 8032, 8305, 8468 Universum 8157 8859 Proton 8157 Victor 8072 Yamaha 8036, 8187...
- Page 56 Set up codes Maker Set up codes Maker Set up codes Aiwa 7029, 7197 7244, 7273, 7274 Revox 7029 Arcam 7076 Kenwood 7000, 7071, 7183 Sansui 7009, 7029 Carver 7029 Magnavox 7029 Sony 7170, 7243, 7291 Marantz 7009, 7029 Teac...
-
Page 57: In Case Of Difficulty
In case of difficulty KR-V999D (En/T) Resetting the Microcomputer With the power cord plugged in, turn the POWER key OFF. Then, while holding down the ON/STANDBY key, If the microcomputer may malfunction (unit cannot be operated, or press POWER. shows an erroneous display) if the power cord is unplugged while the power is ON, or due to some other external factor. -
Page 58: Remote Control Unit
In case of difficulty KR-V999D (En/T) Remote control unit Symptom Cause Remedy The backlight flashes five times during nor- • The batteries are nearing exhaustion. • Replace with new batteries to preserve the mal operation. currently registered setup information.^ Subwoofer volume cannot be adjusted. •... -
Page 59: Specifications
................H : 35 mm (chrominance signal) ..0.286 Vp-p / 75 ................. D : 101 mm Weight (Net) ..............200 g KENWOOD follows a policy of continuous advancements in development. For this reason specifications may be changed without notice. Note Note... -
Page 60: Remote Operation Of Other Components
Remote operation of other components KR-V999D (En/T) Refer to the following for the type of remote control operations available for each component. ‚ The setup code for each component must be entered beforehand. • When pressing keys in succession, press each key firmly and be sure 1 Use the AUDIO, VIDEO, or TV keys to select the component to wait at least 1 second before pressing the next key. -
Page 61: Vcr Operations
Remote operation of other components KR-V999D (En/T) TV operations FUNCTION SHIFT MENU THEME MENU THEME TUNING/SKIP P. CALL P. CALL TV/SAT/VID INFO ALT AUD TV/SAT/VID INFO ALT AUD BAND ¢ +100 REPEAT RANDOM +100 REPEAT RANDOM ROOM A DISPLAY ROOM B DISPLAY 6 (Mute) + (Channel +) -
Page 62: Dvd Player Operations
Remote operation of other components KR-V999D (En/T) Cable tuner operations FUNCTION SHIFT MENU THEME MENU THEME GUIDE TUNING/SKIP P. CALL P. CALL TV/SAT/VID INFO ALT AUD TV/SAT/VID INFO ALT AUD BAND ¢ +100 REPEAT RANDOM +100 REPEAT RANDOM (OSD menu) ROOM A DISPLAY ROOM B... - Page 63 KR-V999D (En/T)
- Page 64 For your records Record the serial number, found on the back of the unit, in the spaces designated on the warranty card, and in the space provided below. Refer to the model and serial numbers whenever you call upon your dealer for information or service on this product.
- Page 65 For the United Kingdom Factory fitted moulded mains plug 1. The mains plug contains a fuse. For replacement, use only a 13-Amp ASTA-approved (BS1362) fuse. 2. The fuse cover must be refitted when replacing the fuse in the moulded plug. 3.