Table of Contents
Advertisement
Advertisement
Table of Contents

Related Manuals for Dymo LabelManager 220P


Summary of Contents for Dymo LabelManager 220P
-
Page 2: Table Of Contents
Contents About Your New Label Maker ..............5 Product Registration .................... 5 Getting Started ..................5 Connecting the Power..................5 Inserting the Batteries ..................5 Connecting the Optional Power Adapter ............6 Inserting the Tape Cassette .................. 6 Using the Label Maker for the First Time ..........7 Getting to Know the Label Maker ............8 Power ........................ - Page 3 Using the Label Maker Memory ............17 Saving a Label .....................17 Opening Saved Labels ..................18 Inserting Saved Text ...................18 Caring for Your Label Maker ..............19 Troubleshooting .................20 DYMO D1 Tape Cassettes ..............21 Power Adapter ...................21 Documentation Feedback ..............22 Environmental Information ..............23...
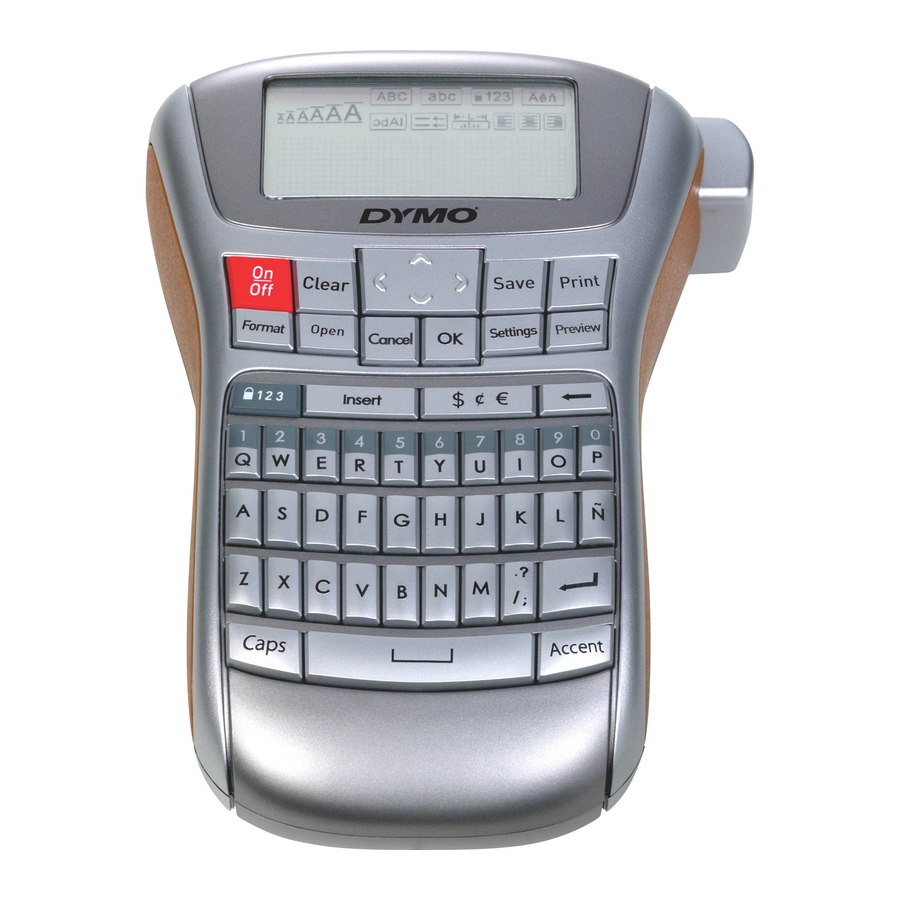
- Page 4 18 19 22 23 24 Figure 1 LabelManager 220P Electronic Label Maker 17 AC power connector Tape cutter button Currency 18 Clear Print Space bar 19 Recall Preview Insert 20 Navigation CAPS 21 LCD display Backspace Number lock 22 Settings Enter Cancel 23 Save...
-
Page 5: About Your New Label Maker
You can choose to print your labels in many different font sizes and styles. The label maker uses DYMO D1 tape cassettes in widths of 6 mm, 9 mm, or 12 mm. These tape cassettes are available in a wide range of colors. -
Page 6: Connecting The Optional Power Adapter
Connecting the Optional Power Adapter An optional 9 Volt, 1.5 A power adapter can also be used to power the label maker. Connecting the AC adapter disconnects the batteries as a power source. To connect the power adapter Plug the power adapter into the power connector on the top, left side of the label maker. -
Page 7: Using The Label Maker For The First Time
Using the Label Maker for the First Time The first time you turn on the power, you are asked to select the language and units of measure. These selections will remain set until you change them, or until the label maker is reset. You can change these selections using the Settings key. To set up the label maker Press { to turn on the power. -
Page 8: Getting To Know The Label Maker
The number of characters displayed will vary due to proportional spacing. With DYMO’s exclusive graphical display, most of the formatting you add is visible instantly. For example, the italics and rounded border added to the text below is clearly displayed. -
Page 9: Format
Format key displays the Font Size, Clear Format, Mirror, Label Length, Alignment, Underline, Borders, and Style submenus. These formatting features are described later in this User Guide. Insert key allows you to insert symbols or saved text on your label. These features are described later in this User Guide. -
Page 10: Clear
Clear key gives you a choice to clear all label text, just the text formatting, or both. Navigation Keys You can review and edit your label using the left and right arrow keys. You can also navigate through menu selections using the up and down arrow keys, and then press to make a selection. -
Page 11: Adding Font Styles
Adding Font Styles You can choose from six different font styles: AaBbCc Normal Outline AaBbCc Bold Shadow AaBbCc Italic Vertical The style you select applies to all characters. Styles can be used with alphanumeric characters and some symbols. To set the font style Press Style and press Select... -
Page 12: Creating Two-Line Labels
To add a border style Press Select Borders and press Select a border style and press When using borders on two-line labels, both lines are enclosed in one border. To add an underline Press Underline and press Select Press again when the underlined text is shown in the display. On two-line labels, both lines are underlined. -
Page 13: Creating Fixed-Length Labels
Creating Fixed-Length Labels Normally, the length of the label is determined by the length of the text. However, you can choose to set the length of the label for a specific application. When you choose a fixed label length, the label text is automatically resized to fit the label. -
Page 14: Using Symbols And Special Characters
Using Symbols and Special Characters Symbols, punctuation, and other special characters can be added to your labels. Adding Symbols The label maker supports the extended symbol set shown below. (Subscripts/Superscripts) -
Page 15: Adding Punctuation
To insert a symbol Press Select Symbols and press Select the symbol category and press Use the left and right arrow keys to move to your desired symbol. The left and right arrows move horizontally along a row of symbols. The up and down arrow keys scroll vertically through the rows of symbol types. -
Page 16: Printing Options
To add accented characters Press The accented character indicator is shown on the display. Press an alpha character. The accent variations are displayed. When the desired accented character appears, wait a few seconds for the cursor to move beyond the character to continue entering text. Printing Options You can preview your label, print multiple labels, and adjust the print contrast. -
Page 17: Adjusting The Print Contrast
Adjusting the Print Contrast You can adjust the print contrast to fine tune the print quality of your label. To set the contrast Press Contrast and press Select 1 (less contrast) and Use the arrow keys to select a contrast setting between 5 (more contrast), and press Using the Label Maker Memory The label maker has a powerful memory feature that allows you to save the text of... -
Page 18: Opening Saved Labels
Opening Saved Labels You can easily open labels saved in memory to use at a later time. To open saved labels Press A message is displayed to confirm you want to overwrite the current label. Press The first memory location is displayed. Use the arrow keys to select a label to open and press To clear a memory location, first select a memory location and then press Inserting Saved Text... -
Page 19: Caring For Your Label Maker
Caring for Your Label Maker Your label maker is designed to give you long and trouble-free service, while requiring very little maintenance. Clean your label maker from time to time to keep it working properly. Clean the cutter blade each time you replace the tape cassette. To clean the cutter blade Remove the tape cassette. -
Page 20: Troubleshooting
Remove jammed label; replace tape cassette. Motor is stalled due to label jam • Clean cutter blade. If you still need assistance, contact DYMO Customer Support. See Contacting Customer Support at the back of this User Guide to locate the contact number for your country. -
Page 21: Dymo D1 Tape Cassettes
DYMO D1 Tape Cassettes Width: 6 mm 9 mm 12 mm Length: S0720770/ S0720670 S0720500 Black/Clear 43610 40910 45010 S0720510 Blue/Clear 45011 S0720520 Red/Clear 45012 S0720780 S0720680 S0720530 Black/White 43613 40913 45013 S0720690 S0720540 Blue/White 40914 45014 S0720700 S0720550 Red/White... -
Page 22: Documentation Feedback
We also welcome your suggestions about additional topics you would like to see covered in the documentation. Send email messages to: documentation@dymo.com. Please keep in mind that this email address is only for documentation feedback. If you have a technical question, please contact Customer Support. -
Page 23: Environmental Information
Environmental Information The equipment that you have bought requires the extraction and use of natural resources for its production. It may contain substances that are hazardous to health and the environment. In order to avoid the dissemination of those substances in our environment, and to diminish the pressure on natural resources, we encourage you to use the appropriate take-back systems. -
Page 25: Contacting Customer Support
CONTACTING CUSTOMER SUPPORT COUNTRY TELEPhONE SUPPORT FAx SUPPORT UNITED KINGDOM 020 73 41 55 29 + 31 20 581 93 80 IRELAND 014 118 934 + 31 20 581 93 80 FRANCE 01 69 32 49 32 + 31 20 581 93 80 NEDERLAND 020 581 93 86 020 581 93 80... - Page 26 ©2007 DYMO A Newell Rubbermaid company DYMO bvba Industriepark-Noord 30 9100 Sint-Niklaas Belgium www.dymo.com...
Need help?
Do you have a question about the LabelManager 220P and is the answer not in the manual?
Questions and answers