Table of Contents
Advertisement
Available languages
Available languages
DJM-250-K
DJM-250-W
http://www.prodjnet.com/support/
The Pioneer website shown above offers FAQs, information on software and various other types of information
and services to allow you to use your product in greater comfort.
Le site Pioneer ci-dessus offre une FAQ, des informations sur le logiciel et divers types d'informations et de
services permettant de tirer le meilleur parti de ce produit.
Die oben gezeigte Pioneer-Website enthält häufig gestellte Fragen, Informationen über Software und andere
wichtige Informationen und Dienste, die Ihnen helfen, Ihr Produkt optimal zu verwenden.
Il sito Web di Pioneer sopra menzionato offre FAQ, informazioni sul software e vari altri tipi di informazione e
servizi, in modo da permettervi di fare uso del vostro prodotto in tutta comodità.
De bovengenoemde Pioneer website biedt een overzicht van de vaak gestelde vragen, informatie over
software, tips en hulpfuncties om uw gebruik van dit product te veraangenamen.
El sitio Web de Pioneer indicado más arriba tiene una sección con las preguntas más frecuentes, y además
ofrece información del software y varios tipos de información y servicios para que usted pueda usar su
producto con la mayor comodidad.
Pioneer
.
Operating Instructions
Mode d'emploi
Bedienungsanleitung
Istruzioni per l'uso
Handleiding
Manual de instrucciones
DJ MIXER
TABLE DE MIXAGE
DJ-MISCHPULT
MIXER PER DJ
DJ MENGPANEEL
MESA DE MEZCLAS DJ
DJ
,
,
Advertisement
Chapters
Table of Contents

Related Manuals for Pioneer DJM-250


Summary of Contents for Pioneer DJM-250
-
Page 1: Operating Instructions
Informationen und Dienste, die Ihnen helfen, Ihr Produkt optimal zu verwenden. Il sito Web di Pioneer sopra menzionato offre FAQ, informazioni sul software e vari altri tipi di informazione e servizi, in modo da permettervi di fare uso del vostro prodotto in tutta comodità. -
Page 2: Operating Environment
Thank you for buying this Pioneer product. Please read through these operating instructions so you will know how to operate your model properly. After you have finished reading the instructions, put them away in a safe place for future reference. -
Page 3: Table Of Contents
Using the filter function (filter section) ........... 11 Selecting the crossfader’s curve characteristics (crossfader section) .................. 11 Starting playback of a Pioneer DJ player using the fader (fader start section) .................. 11 Monitoring the sound over headphones (headphones section) ..12 Using a microphone or external device (MIC/AUX section) .... -
Page 4: Before Start
Features This unit is a DJ mixer that carries over the technology of the Pioneer DJM series, the world standard in club sound. It is a standard type unit equipped with the basic functions required for mixing, enabling full-fledged DJ play easily. -
Page 5: Connections
Connect to a DJ player or other line level device. 6 CONTROL terminal (page 6) Connect using a control cord (included with Pioneer DJ players). 7 SIGNAL GND terminal (page 6) Connect an analog player’s ground wire here. This helps reduce noise when the analog player is connected. -
Page 6: Connecting The Input/Output Terminals
Audio cable 1 To use the fader start function, connect a control cord (page 11). The fader start function can only be used when connected to a Pioneer DJ player. Cord hook Loosen the cord hook’s screw and pinch the AC adapters’... -
Page 7: About The Ac Adapter
If there are irregularities with the AC adapter or power plug, ask your Read & Retain Instructions nearest Pioneer authorized service center or your dealer to carry out Read all operating and user information provided with this product. repair work. - Page 8 Mounting the power plug Slide the power plug along the guide rails in the AC adapter unit as shown on the diagram below, then press in until a click is heard. Removing the power plug While pressing the [PUSH] button on the AC adapter unit, slide the power plug away from the adapter as shown on the diagram below to remove it.
-
Page 9: Operation
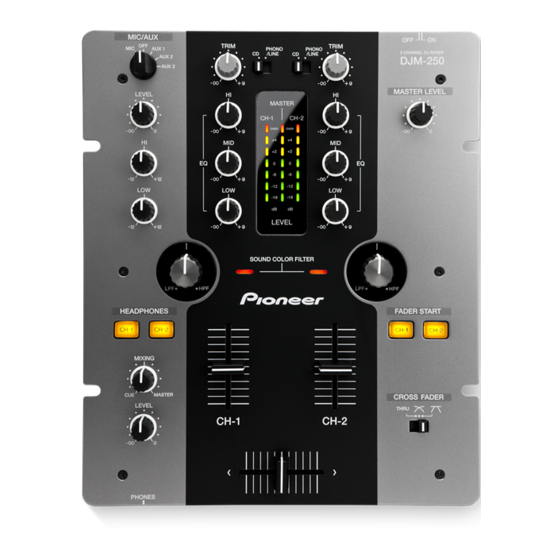
9 CD, PHONO/LINE input selector switch TRIM TRIM AUX 1 PHONO PHONO /LINE /LINE 2 CHANNEL DJ MIXER AUX 2 DJM-250 AUX 3 a TRIM control MASTER LEVEL LEVEL MASTER b EQ (HI, MID, LOW) control CH-1 CH-2 OVER OVER... -
Page 10: Basic Operations (Mixer Section)
5 Move the crossfader f. Basic operations (mixer section) Switch the channel whose sound is output from the speakers. — Left edge: The [CH-1] sound is output. — Center position: The sound of [CH-1] and [CH-2] is mixed and output. TRIM TRIM PHONO... -
Page 11: Using The Filter Function (Filter Section)
Description of effect Indicator rotation Applies the effect of the If you connect a Pioneer DJ player using a control cable (supplied with Left treble sound fading out. Red (flashing) a DJ player), you can start playback of control other operations of the DJ (LPF: low pass filter) player with the fader of this unit. -
Page 12: Monitoring The Sound Over Headphones (Headphones Section)
To start playback using the crossfader Using a microphone or external device (MIC/AUX section) 1 Set [THRU, ] (the crossfader curve selector switch) j to [ ] or [ MIC/AUX AUX 1 2 Press the [CH-1] or [CH-2] button i in the fader start AUX 2 AUX 3 section. -
Page 13: Additional Information
Sometimes the trouble may lie in another component. Inspect the other components and electrical appliances being used. If the trouble cannot be rectified after checking the items below, ask your nearest Pioneer authorized service center or your dealer to carry out repair work. -
Page 14: About Trademarks And Registered Trademarks
BALANCED OUTPUT output terminal trademarks XLR connector................... 1 set PHONES output terminal Pioneer is a registered trademark of PIONEER CORPORATION. Stereo phone jack (Ø 6.3 mm) ............1 set The names of companies and products mentioned herein are the CONTROL terminal trademarks of their respective owners. - Page 16 Nous vous remercions d’avoir acquis un produit Pioneer. Veuillez lire attentivement ce mode d’emploi afin de connaître la manière d’utiliser l’appareil comme il convient. Cela fait, conservez le mode d’emploi de façon à pouvoir vous y référer en cas de nécessité.
- Page 17 Utilisation de la fonction de filtrage (section Filtres) ......11 Sélection des caractéristiques de la courbe du crossfader (section Crossfader) ................. 11 Lancement de la lecture sur un lecteur DJ Pioneer avec la fader (section Lancement par le fader) ............11 Contrôle du son par le casque d’écoute (Section Casque d’écoute) ...............
-
Page 18: Informations Préliminaires
Caractéristiques Cet appareil est une table de mixage DJ intégrant la technologie spécifique des DJM Pioneer, la référence mondiale pour les discothèques. Cet appa- reil de type standard est pourvu des fonctions élémentaires indispensables pour le mixage et permet des prestations DJ de qualité. -
Page 19: Raccordements
6 Prise CONTROL (la page 6) Pour raccorder un cordon de commande (fourni avec les lecteurs DJ Pioneer). 7 Prise SIGNAL GND (la page 6) Pour raccorder le fil de terre d’un lecteur analogique. Ceci permet de réduire le bruit lorsqu’un lecteur analogique est raccordé. -
Page 20: Raccordement Des Prises D'entrée/Sortie
écoute 1 Pour lancer la lecture par le fader, raccordez un cordon de commande (la page 11). Le lancement par le fader ne peut être utilisé que lorsqu’un lecteur DJ Pioneer est raccordé. Crochet de cordon Desserrez la vis du crochet de cordon et coincez le cordon d’alimentation de l’adaptateur secteur sous le crochet. -
Page 21: À Propos De L'adaptateur Secteur
Si l’adaptateur secteur ou la fiche d’alimentation présente une anoma- lie, adressez-vous au service après-vente agréé Pioneer le plus proche ou Nettoyage à votre revendeur pour une réparation. Utilisez un chiffon humide pour nettoyer l’extérieur du coffret. Évitez Ne mettez pas l’adaptateur secteur autour du cou. - Page 22 Montage de la fiche d’alimentation Faites glisser la fiche d’alimentation dans l’adaptateur secteur le long des rainures, comme indiqué sur le schéma suivant, puis enfoncez-la jusqu’à ce qu’un clic soit audible. Retrait de la fiche d’alimentation Tout en appuyant sur le bouton [PUSH] sur l’adaptateur secteur, détachez la fiche d’alimentation de l’adaptateur en la faisant glisser, comme indiqué...
-
Page 23: Fonctionnement
MIC/AUX 9 Sélecteur d’entrée CD, PHONO/LINE TRIM TRIM AUX 1 PHONO PHONO /LINE /LINE 2 CHANNEL DJ MIXER AUX 2 DJM-250 AUX 3 a Commande TRIM MASTER LEVEL LEVEL MASTER b Commandes EQ (HI, MID, LOW) CH-1 CH-2 OVER OVER... -
Page 24: Opérations Élémentaires (Section Mixeur)
5 Bougez le crossfader f. Opérations élémentaires (Section Basculez sur le canal dont le son est restitué par les enceintes. — Côté gauche : Le son de [CH-1] est restitué. Mixeur) — Position centrale : Le son de [CH-1] et [CH-2] est mixé et restitué. —... -
Page 25: Utilisation De La Fonction De Filtrage (Section Filtres)
Applique un effet de sortie Gauche en fondu des aigus. Rouge (clignotant) (LPF : filtre passe-bas) Si vous raccordez un lecteur DJ Pioneer avec un câble de commande Centre — Orange (éclairé) (fourni avec le lecteur DJ), vous pourrez lancer la lecture et contrôler d’autres opérations du lecteur DJ avec le fader de cet appareil. -
Page 26: Contrôle Du Son Par Le Casque D'écoute (Section Casque D'écoute)
Pour lancer la lecture en utilisant le Utilisation d’un microphone ou d’un crossfader dispositif externe (Section MIC/AUX) 1 Réglez [THRU, ] (le sélecteur de courbe du MIC/AUX AUX 1 crossfader) j sur [ ] ou [ AUX 2 AUX 3 2 Appuyez sur la touche [CH-1] ou [CH-2] i dans la LEVEL... -
Page 27: Informations Supplémentaires
électriques utilisés. Si le problème persiste malgré les vérifications des points suivants, confiez les réparations au service après-vente Pioneer le plus proche ou à votre revendeur. De l’électricité statique ou des influences externes ont peut être déréglé cet appareil. Dans ce cas, il est possible de faire fonctionner à nouveau l’appareil en l’éteignant, puis rallumant 1 minute plus tard. -
Page 28: Schéma Fonctionnel
Les caractéristiques et la présentation peuvent être modifiées, sans Caractéristiques des fréquences avis préalable, dans un souci d’amélioration. CD/LINE/AUX/MIC ............20 Hz à 20 kHz © 2011 PIONEER CORPORATION. Tous droits de reproduction et de Rapport S/B (sortie nominale) traduction réservés. CD ....................91 dB LINE .................... - Page 30 Vielen Dank, dass Sie sich für dieses Pioneer-Produkt entschieden haben. Bitte lesen Sie diese Bedienungsanleitung gründlich durch, um sich mit der Bedienung des Geräts vertraut zu machen. Nachdem Sie die Bedienungsanleitung gelesen haben, legen Sie sie griffbereit zum Nachschlagen ab.
- Page 31 Verwendung der Filter-Funktion (Filter-Sektion) ........11 Wählen der Crossfader-Kurve-Eigenschaften (Crossfader-Sektion) ................. 11 Starten der Wiedergabe auf einem Pioneer DJ-Player mit dem Fader (Fader Start-Sektion) ................. 11 Mithören des Sounds über Kopfhörer (Kopfhörer-Sektion) ....12 Verwendung eines Mikrofons oder externen Geräts (MIC/AUX-Sektion) ...................
-
Page 32: Vor Der Inbetriebnahme
Vor der Inbetriebnahme Merkmale Dieses Gerät ist ein DJ-Mixer, der die Technologie der Pioneer DJM-Serie fortführt, dem Weltstandard im Club-Sound. Es ist ein Standardtyp, ausge- stattet mit den Grundfunktionen zum Mischen, das umfassende DJ-Auftritte leicht macht. SOUND COLOR FILTER MIC/AUX INPUT Jeder Kanal ist mit einer SOUND COLOR FILTER-Funktion ausge- Dieses Gerät ist mit drei Sätzen von AUX-Eingängen für die Eingabe von... -
Page 33: Anschlüsse
5 CD-Buchsen (Seite 6) Schließen Sie einen DJ-Player oder ein anderes Gerät mit Line-Pegel 6 CONTROL-Buchse (Seite 6) Stellen Sie die Verbindung mit einem Steuerkabel her (mit Pioneer DJ-Playern mitgeliefert). 7 SIGNAL GND-Buchse (Seite 6) Schließen Sie hier den Massedraht eines Plattenspielers an. -
Page 34: Anschließen An Die Eingangs-/Ausgangsbuchsen
Ausgangssektion Audiokabel 1 Zur Verwendung der Fader-Startfunktion schließen Sie ein Steuerkabel an (Seite 11). Die Fader-Start-Funktion steht nur zur Verfügung, wenn ein Pioneer DJ-Player angeschlossen ist. Kabelhaken Lösen Sie die Schraube des Kabelhakens und klemmen das Netzkabel des Netzteils unter dem Haken ein. -
Page 35: Über Das Netzteil
Einzelheiten siehe Anbringen des Netzsteckers auf Seite 8. Wenn anormale Zustände am Netzteil oder Netzstecker vorliegen, wen- Mitgeliefertes Zubehör den Sie sich an die nächste Pioneer-Kundendienststelle oder an Ihren Platzieren Sie dieses Produkt nicht auf einem instabilen Rollwagen, Händler. - Page 36 Der Netzstecker könnte sich vom Netzteil lösen und in der Steckdose Netzstecker bleiben, wenn jemand über das Netzkabel stolpert oder wenn das Netzteil angestoßen wird. In diesem Fall ziehen Sie den noch in der Dieses Produkt wird mit den unten aufgeführten Typen von Netzsteckern Steckdose steckenden Netzstecker mit trockenen Händen ab, wobei geliefert.
-
Page 37: Bedienung
DJ-Mischen eingestellt werden (Seite 10). MIC/AUX 9 CD, PHONO/LINE-Eingangswahl-Schalter TRIM TRIM AUX 1 PHONO PHONO /LINE /LINE 2 CHANNEL DJ MIXER AUX 2 DJM-250 AUX 3 a TRIM-Regler MASTER LEVEL LEVEL MASTER b EQ (HI, MID, LOW)-Regler CH-1 CH-2 OVER OVER c Master-Pegelanzeige... -
Page 38: Grundlegender Betrieb (Mixer-Sektion)
4 Schalten Sie den [THRU, ] (Crossfader Curve- Grundlegender Betrieb Wahlschalter) j um. Dadurch werden die Crossfader-Curve-Eigenschaften umgeschal- (Mixer-Sektion) tet. Einzelheiten siehe Wählen der Crossfader-Kurve-Eigenschaften (Crossfader-Sektion) auf Seite 11. TRIM TRIM 5 Stellen Sie den Crossfader f ein. PHONO PHONO /LINE /LINE... -
Page 39: Verwendung Der Filter-Funktion (Filter-Sektion)
Die Fader-Start-Funktion steht nur zur Verfügung, wenn ein Pioneer Links denden Höhen an. Rot (blinkt) DJ-Player angeschlossen ist. (LPF: Tiefpassfilter) Schließen Sie im voraus einen Pioneer DJ-Player an dieses Gerät an. Center — Orange (leuchtet) Anweisungen zu Verbindungen siehe Anschließen an die Eingangs-/ Legt den Effekt der ausblen- Ausgangsbuchsen auf Seite 6. -
Page 40: Mithören Des Sounds Über Kopfhörer (Kopfhörer-Sektion)
Zum Starten der Wiedergabe mit dem Verwendung eines Mikrofons oder Crossfader externen Geräts (MIC/AUX-Sektion) 1 Stellen Sie den [THRU, ] (Crossfader Curve- MIC/AUX AUX 1 Wahlschalter) j auf [ ] oder [ ] ein. AUX 2 AUX 3 2 Drücken Sie die Taste [CH-1] oder [CH-2] i in der LEVEL Fader Start-Sektion. -
Page 41: Zusätzliche Informationen
Überprüfen Sie die anderen verwendeten Komponenten und elektrischen Geräte. Wenn Sie die Störung nicht beheben können, wenden Sie sich an die nächste Pioneer-Kundendienststelle oder an Ihren Händler. Dieses Gerät kann möglicherweise aufgrund von statischer Elektrizität oder anderen externen Faktoren nicht richtig arbeiten. In diesem Fall kann richtiger Betrieb durch Ausschalten, mindestens 1 Minute Warten und dann erneutes Einschalten wieder hergestellt werden. -
Page 42: Blockdiagramm
Über Markenzeichen und Kanal-Equalizer-Eigenschaften eingetragene Markenzeichen HI ................. MID ................ Pioneer ist ein eingetragenes Markenzeichen der PIONEER LOW ..............CORPORATION. MIC/AUX Equalizer-Eigenschaften Die hier erwähnten Produkt- oder Firmennamen sind Markenzeichen HI ..............–12 dB bis +12 dB (10 kHz) der jeweiligen Eigentümer. - Page 44 Vi ringraziamo per avere acquistato questo prodotto Pioneer. Vi preghiamo di leggere queste queste istruzioni per l’uso in modo da sapere usare corret- tamente il proprio modello. Dopo aver letto queste istruzioni, riporle in un luogo sicuro per poterle consultare di nuovo al momento del bisogno.
- Page 45 Usare la funzione di filtro (sezione filtri) ..........11 Scelta delle caratteristiche della curva del crossfader (sezione crossfader) ................. 11 Inizio della riproduzione con un lettore DJ Pioneer usando il fader (sezione apertura con fader) ..............11 Monitoraggio in cuffia del suono (sezione cuffia) ......... 12 Uso di un microfono o dispositivo esterno (sezione MIC/AUX) ...
-
Page 46: Prima Di Cominciare
Caratteristiche Questa unità è un mixer DJ che eredita tutta la tecnologia della serie DJM Pioneer, lo standard mondiale dell’audio per club. È una unità di tipo stan- dard che possiede le funzione di base richieste per il missaggio, permettendo con facilità tutte le funzioni di riproduzione DJ. -
Page 47: Nome Delle Varie Parti
Collegare ad un lettore DJ o altro dispositivo a livello di linea. 6 Terminale CONTROL (a pagina 6) Collegare con un cavo di controllo (accluso al lettori DJ Pioneer). 7 Terminale SIGNAL GND(a pagina 6) Collegare qui il filo di terra di lettori analogici. Questo aiuta a ridurre il rumore quando si usano lettori analogici. -
Page 48: Collegamento Ai Terminali Di Ingresso/Uscita
1 Per iniziare la riproduzione con i cursori di questa unità, collegare un cavo di controllo (a pagina 11). La funzione di avvio della dissolvenza può venire usata solo quando si è collegati ad un lettore Pioneer DJ. Gancio del cavo Allentare la vite del gancio del cavo ed inserire nel gancio il cavo di alimentazione dell’adattatore di CA. -
Page 49: L'adattatore Di Ca
Leggere e conservare le istruzioni Se ci sono anomalie nell’adattatore di CA o nella spina, chiedere ripara- Leggere tutte le istruzioni per l’uso e le informazioni fornite col prodotto. zioni al centro di assistenza autorizzato Pioneer o al proprio negoziante di fiducia. Pulizia Non avvolgere il cavo dell’adattatore di CA attorno al collo. - Page 50 Inserimento della spina di alimentazione Fare scivolare la spina di alimentazione lungo le guide nell’adattatore di corrente alternata viste nella figura che segue e premere fino a sentire uno scatto. Rimozione della spina di alimentazione Premere il pulsante [PUSH] dell’adattatore di CA, far scivolare la spina dall’adattatore come visto in figura e toglierla.
-
Page 51: Pannello Di Controllo
MIC/AUX 9 Selettore d’ingresso CD, PHONO/LINE TRIM TRIM AUX 1 PHONO PHONO /LINE /LINE 2 CHANNEL DJ MIXER AUX 2 DJM-250 AUX 3 a Controllo TRIM MASTER LEVEL LEVEL MASTER b Comando EQ (HI, MID, LOW) CH-1 CH-2 OVER OVER... -
Page 52: Operazioni Di Base (Sezione Mixer)
5 Muovere il crossfader f. Operazioni di base (sezione mixer) Passare al canale il cui audio viene emesso dai diffusori. — Bordo sinistro: Non viene emesso il suono [CH-1]. — Posizione centrale: Il suono di [CH-1] e [CH-2] viene missato ed emesso. -
Page 53: Scelta Delle Caratteristiche Della Curva Del Crossfader (Sezione Crossfader)
Destra sura in dissolvenza ai bassi. Verde (che lampeggia) Collegando un lettore DJ Pioneer attraverso un cavo di controllo (alle- (HPF: filtro passa alto) gato al lettore DJ) è possibile iniziare la riproduzione o altre operazioni del lettore DJ usando il fader di questa unità. -
Page 54: Monitoraggio In Cuffia Del Suono (Sezione Cuffia)
Inizio della riproduzione col crossfader Uso di un microfono o dispositivo esterno (sezione MIC/AUX) 1 Portare [THRU, ] (il selettore della curva del crossfader ) j su [ ] o [ MIC/AUX AUX 1 2 Premere il pulsante [CH-1] o [CH-2] i nella sezione AUX 2 AUX 3 apertura con fader. -
Page 55: Informazioni Aggiuntive
Pioneer. Questa unità può non funzionare a causa di elettricità statica o altre influenze esterne. In questo caso, il funzionamento corretto dovrebbe tornare spegnendo questa unità, attendendo un minuto e riaccende. -
Page 56: Diagramma A Blocchi
Caratteristiche di equalizzazione dei canali marchi di fabbrica depositati HI ................MID ................. Pioneer è un marchio di fabbrica depositato della PIONEER LOW ..............CORPORATION. Caratteristiche di equalizzazione MIC/AUX I nomi delle aziende e dei prodotti menzionati sono marchi di fab- HI .............. - Page 58 Hartelijk dank voor uw aankoop van dit Pioneer product. Lees deze gebruiksaanwijzing aandachtig door om bekend te raken met de juiste bediening van uw apparaat. Na het doorlezen van de gebruiksaanwijzing dient u deze te bewaren op een veilige plaats, voor latere naslag.
- Page 59 Gebruik van de filterfunctie (filter-gedeelte) ........... 11 Selecteren van de curvekarakteristieken van de crossfader (crossfader-gedeelte) ................11 Starten van de weergave van een Pioneer DJ-speler met behulp van de schuifregelaar (fader-start) ..........11 Controleren van de weergave via de hoofdtelefoon (hoofdtelefoon-gedeelte) ................
-
Page 60: Alvorens Te Beginnen
Alvorens te beginnen Kenmerken Dit DJ-mengpaneel presenteert de verfijnde techniek van Pioneer’s DJM-serie, de wereldstandaard in muziek op clubniveau. Het is een standaardmo- del met alle vereiste functies voor veelzijdig geluidsmengen, voor moeiteloos dynamische DJ-optredens. SOUND COLOR FILTER MIC/AUX INPUT... -
Page 61: Benaming Van De Onderdelen
Sluit hierop een DJ-speler of ander apparaat met een gewone lijnuit- gang aan. 6 CONTROL aansluiting (bladzijde 6) Aansluiten via een bedieningssnoer (inbegrepen bij Pioneer DJ-spelers). 7 SIGNAL GND aansluiting (bladzijde 6) Sluit hierop de aardingsdraad van een analoge platenspeler aan. -
Page 62: Aansluiten Van De In/Uitgangsaansluitingen
Audio-uitgangsgedeelte Audiosnoer 1 Voor het gebruik van de fader-startfunctie sluit u een bedieningskabel aan (bladzijde 11). De fader-startfunctie is alleen te gebruiken bij aansluiting op een Pioneer DJ-speler. Snoerhaak Maak de schroef van de snoerhaak los en klem het snoer van de netstroomadapter onder de haak. -
Page 63: Over De Netstroomadapter
Bevestigen van de stroomstekker op bladzijde 8. gingsproducten op alcoholbasis. Als er iets mis is met de netstroomadapter of de stekker dient u uw dichtstbijzijnde erkende Pioneer service-centrum of dealer om reparatie Water of vocht te verzoeken. Gebruik of breng dit product niet in de buurt van water of andere Hang het snoer van de netstroomadapter niet om uw nek. - Page 64 Bevestigen van de stroomstekker Schuif de stroomstekker langs de geleiderails in de netstroomadapter zoals u kunt zien op de afbeelding hieronder en druk hem vast tot u een klik hoort. Verwijderen van de stroomstekker Houd de [PUSH] knop op de netstroomadapter ingedrukt en schuif de stroomstekker van de netstroomadapter zoals u kunt zien op de afbeelding hieronder om hem te verwijderen.
-
Page 65: Regelpaneel
MIC/AUX 9 CD, PHONO/LINE ingangskeuzeschakelaar TRIM TRIM AUX 1 PHONO PHONO /LINE /LINE 2 CHANNEL DJ MIXER AUX 2 DJM-250 AUX 3 a TRIM instelling MASTER LEVEL LEVEL MASTER b EQ (HI, MID, LOW) instelling CH-1 CH-2 OVER OVER c Hoofdniveau-aanduiding d Kanaalniveau-aanduiding... -
Page 66: Basisbediening (Mengpaneel-Gedeelte)
3 Beweeg de [CH-1] 1 kanaalfader e van u af. Basisbediening Hiermee regelt u het geluid dat wordt weergegeven via de [CH-1]-aansluitingen. (mengpaneel-gedeelte) 4 Schakel de [THRU, ] (de crossfader- curveschakelaar) j om. Hiermee wordt crossfader-curvekarakteristiek omgeschakeld. Zie TRIM TRIM PHONO PHONO... -
Page 67: Gebruik Van De Filterfunctie (Filter-Gedeelte)
(LPF: laag-doorlaatfilter) Pioneer DJ-speler. Midden — Oranje (brandt) Sluit vooraf dit apparaat aan op een Pioneer DJ-speler. Nadere aanwij- zingen voor het aansluiten vindt u onder Aansluiten van de in/uitgangs- Past een effect toe van lage aansluitingen op bladzijde 6. Rechts tonen die wegsterven. -
Page 68: Controleren Van De Weergave Via De Hoofdtelefoon (Hoofdtelefoon-Gedeelte)
5 Beweeg de kanaalfader e van u af. 4 Draai de [LEVEL]-instelling 7 in het Het afspelen begint op de DJ-speler. hoofdtelefoongedeelte naar rechts. Wanneer u de kanaal-fader terugzet in de oorspronkelijke stand, Het geluid wordt weergegeven via de hoofdtelefoon. keert de speler onmiddellijk terug naar het eerder ingestelde cue- Wanneer er nog een keer op de [CH-1] of [CH-2]-knop in het hoofdte- punt, om daar de weergave te pauzeren (back-cue). -
Page 69: Aanvullende Informatie
Als u het probleem aan de hand van de onderstaande controlepunten niet kunt verhelpen, verzoekt u dan uw dichtstbijzijnde officiële Pioneer onderhoudsdienst of uw vakhandelaar om het apparaat te laten repareren. Dit apparaat kan soms niet goed werken vanwege statische elektriciteit of andere externe invloeden. In dat geval kunt u de juiste werking herstellen door de stroom uit te schakelen, 1 minuut te wachten en dan de stroom weer in te schakelen. - Page 70 Over handelsmerken en Kanaalequalizerkarakteristiek gedeponeerde handelsmerken HI ................MID ................. Pioneer is een gedeponeerd handelsmerk van PIONEER LOW ..............CORPORATION. MIC/AUX equalizer-karakteristiek De hierin vermelde namen van bedrijven en hun producten zijn de HI ..............–12 dB tot +12 dB (10 kHz) handelsmerken van hun respectieve eigenaars.
- Page 72 Le damos las gracias por la adquisición de este producto Pioneer. Lea a fondo estas instrucciones de utilización para que aprenda a utilizar correcta- mente su modelo. Después de haber terminado de leer estas instrucciones, guárdelas en un lugar seguro para, en caso de ser necesario, consultarlas en el futuro.
- Page 73 Selección de las características de curva de crossfader (sección de crossfader) ................11 Inicio de reproducción en un reproductor DJ de Pioneer usando el fader (sección de inicio de fader) .......... 11 Monitoreo del sonido con los auriculares (sección de auriculares)..12 Utilizando un micrófono o aparato externo (Sección MIC/AUX) ..
-
Page 74: Antes De Empezar A Usar La Unidad
Características Esta unidad es un mezclador DJ que emplea la tecnología de la serie DJM de Pioneer, la norma mundial en sonido de clubes. La unidad es del tipo estándar, equipada con las funciones básicas necesarias para mezclar sonidos, lo que permite al DJ realizar una reproducción completa. -
Page 75: Nombres De Las Partes
Conecte a un reproductor DJ o a otro aparato de nivel de línea. 6 Terminal CONTROL (la página 6) Conecte usando un cable de control (incluido con los reproductores DJ de Pioneer). 7 Terminal SIGNAL GND (la página 6) Conecte aquí el cable de tierra de un reproductor analógico. -
Page 76: Conexión De Los Terminales De Entrada/Salida
Cable de audio 1 Para usar la función de inicio de fader, conecte un cable de control (la página 11). La función de inicio del fader sólo se puede usar cuando hay conexión con un reproductor DJ de Pioneer. Gancho de cables Afloje el tornillo del gancho del cable y fije el cable de alimentación de CA debajo del gancho. -
Page 77: Acerca Del Adaptador De Ca
8. este producto. Si hay irregularidades con el adaptador de CA o la clavija de alimenta- ción, pida a su centro de servicio autorizado por Pioneer más cercano o Limpieza a su concesionario que realice el trabajo de reparación. - Page 78 Montaje de la clavija de alimentación Deslice la clavija de alimentación a lo largo de los raíles guía de la unidad del adaptador de CA como se muestra en el diagrama de abajo, y luego presione hasta que se oiga un clic. Desconexión de la clavija de alimentación Mientras pulsa el botón [PUSH] de la unidad del adaptador de CA, deslice la clavija de alimentación...
-
Page 79: Operación
9 Conmutador selector de entrada CD, PHONO/LINE TRIM TRIM AUX 1 PHONO PHONO /LINE /LINE 2 CHANNEL DJ MIXER AUX 2 DJM-250 AUX 3 a Control TRIM MASTER LEVEL LEVEL MASTER b Control EQ (HI, MID, LOW) CH-1 CH-2 OVER... - Page 80 4 Cambie [THRU, ] (el conmutador selector de Operaciones básicas (sección del curva de crossfader) j. Esto cambia las características de la curva del crossfader. Para conocer mezclador) detalles, vea Selección de las características de curva de crossfader (sec- ción de crossfader) en la página 11.
-
Page 81: Uso De La Función De Filtro (Sección De Filtro)
Rojo (parpadeando) (LPF: filtro pasabajos) Centro — Naranja (encendido) Si conecta un reproductor DJ de Pioneer usando un cable de control Aplica el efecto de sonido (suministrado con el reproductor DJ), usted puede iniciar la reproduc- Derecha grave que se desvanece. -
Page 82: Monitoreo Del Sonido Con Los Auriculares (Sección De Auriculares)
Para iniciar la reproducción usando el Utilizando un micrófono o aparato crossfader externo (Sección MIC/AUX) 1 Ponga [THRU, ] (el conmutador selector de MIC/AUX AUX 1 curva de crossfader) j en [ ] o [ AUX 2 AUX 3 2 Pulse el botón [CH-1] o [CH-2] i en la sección de inicio LEVEL del fader. -
Page 83: Información Adicional
Si no se puede corregir el problema después de comprobar los elementos de abajo, pida al servicio de Pioneer autorizado más cercano o a su concesionario que realice el trabajo de reparación. Esta unidad puede no funcionar bien debido a la electricidad estática o a otras influencias externas. En este caso, el funcionamiento apropiado se puede restaurar desconectando la alimentación, esperando 1 minuto y volviendo a conectar la alimentación. - Page 84 Características del ecualizador de canales marcas registradas HI ................MID ................Pioneer es una marca registrada de PIONEER CORPORATION. LOW ................. Los nombres de compañías y productos mencionados aquí son Características del ecualizador del micrófono/AUX marcas de fábrica de sus respectivos propietarios.
- Page 86 - D3-4-2-1-3_A1_Ru D3-4-2-2-1a_A1_Ru ON/OFF , 230 120 ), D3-4-2-1-4*_A1_Ru D3-4-2-1-7a_A1_Ru +5 °C +35 °C; 85 % ( D3-4-2-2-2a*_A1_Ru D3-4-2-1-7c*_A1_Ru K041_A1_Ru PIONEER S002*_A1_Ru K058b_A1_Ru...
- Page 87 MASTER ON/OFF...
- Page 88 INPUT POWER POWER S-DJ05, MIC/AUX TRIM TRIM PHONO PHONO AUX 1 2 CHANNEL DJ MIXER /LINE /LINE AUX 2 DJM-250 TIME MODE BACK TIME MODE BACK AUX 3 REMAIN TEMPO REMAIN TEMPO LOCK LOCK AUTO CUE AUTO CUE MASTER LEVEL LEVEL A.CUE...
- Page 89 - CH-2 CH-1 SIGNAL PHONO / LINE PHONO / LINE CONTROL CONTROL LINE PHONO LINE PHONO DC IN 1GND 3 COLD 2 HOT MASTER 2 MASTER 1 ON/OFF - - DC IN - MASTER 1 PHONO/LINE PHONO/LINE MASTER 2 PHONO/LINE MASTER LEVEL PHONO/LINE -...
- Page 90 - П Ра а а CDJ-350 AUDIO CONTROL А а CH-2 CH-1 SIGNAL PHONO / LINE PHONO / LINE К CONTROL CONTROL LINE PHONO LINE PHONO DC IN 1GND 3 COLD А а 2 HOT MASTER 2 MASTER 1 А а...
- Page 91 - - - - - - - - - - - - - - - - -...
- Page 92 - Н а а PUSH -...
- Page 93 MIC/AUX MIC/AUX CD PHONO/LINE TRIM TRIM AUX 1 PHONO PHONO /LINE /LINE 2 CHANNEL DJ MIXER AUX 2 DJM-250 AUX 3 TRIM MASTER LEVEL LEVEL MASTER EQ HI MID LOW CH-1 CH-2 OVER OVER LEVEL SOUND COLOR FILTER HEADPHONES FADER START...
- Page 94 CH-1 1 e CH-1 THRU TRIM TRIM PHONO PHONO /LINE /LINE MASTER CH-1 CH-2 OVER OVER — CH-1 — CH-1 CH-2 — CH-2 LEVEL THRU THRU SOUND COLOR FILTER MASTER LEVEL 1 MASTER LEVEL - CH-1 CH-2 CH-1 1 CH-2 2 EQ HI MID LOW b -...
- Page 95 CH-2 2 CH-2 2 e CH-1 1 CH-1 1 - SOUND COLOR FILTER h CH-1 CH-2 CH-2 2 CH-2 SOUND COLOR FILTER h - SOUND COLOR FILTER h CH-1 CH-2 CH-1 1 e THRU CH-2 CH-2 2 - CH-1 CH-2 CH-2 CROSS FADER THRU...
- Page 96 LEVEL 7 - CH-1 CH-2 MASTER 1 MASTER 2 THRU MIC/AUX AUX 1 CH-2 i CH-1 AUX 2 AUX 3 LEVEL MIC OFF AUX 1 AUX 2 AUX 3 2 — MIC - — AUX LEVEL 3 HEADPHONES CH-1 CH-2 MIXING LOW 4 MASTER...
- Page 97 - - - - ON/OFF ON/OFF CD PHONO/LINE PHONO/LINE PHONO/LINE PHONO/LINE TRIM TRIM MASTER LEVEL MASTER LEVEL - - - MASTER LEVEL MASTER LEVEL - TRIM TRIM - THRU THRU THRU THRU CH-1 CH-2 CH-1 CH-2 - - - - PHONO/LINE -...
- Page 98 3Band MASTER LEVEL TRIM FILTER METER LINE1/ CH 1 PHONO1 LEVEL METER CH 1 MASTER 1 OUT FADER HP CH 1 MASTER CROSS 3Band TRIM FILTER MASTER 2 OUT FADER LINE2/ CH 2 PHONO2 LEVEL METER CH 2 FADER HP MASTER HP CH 2 2Band LEVEL...
- Page 100 “ ” 1997 Pioneer Europe NV . .): 5 D3-7-10-6_A1_Ru © 2011 PIONEER CORPORATION. All rights reserved. © 2011 PIONEER CORPORATION. Tous droits de reproduction et de traduction réservés. PIONEER CORPORATION 1-1, Shin-ogura, Saiwai-ku, Kawasaki-shi, Kanagawa 212-0031, Japan 1-1, - , .