Desa LDL3924PR Owner's Operation And Installation Manual
Unvented (vent-free) gas log heater
Hide thumbs
Also See for LDL3924PR:
- Owner's operation and installation manual (28 pages) ,
- Owner's operation and installation manual (32 pages) ,
- Owner's operation and installation manual (31 pages)
Table of Contents
Advertisement
Quick Links
For more information, visit www.desatech.com
For more information, visit www.desatech.com
MODELS
LDL3924NR
LDL3924PR
LDL3930NR
LDL3930PR
WARNING: If the information in this manual
is not followed exactly, a fire or explosion
may result causing property damage, per-
sonal injury, or loss of life.
— Do not store or use gasoline or other
flammable vapors and liquids in the vicinity
of this or any other appliance.
— WHAT TO DO IF YOU SMELL GAS
• Do not try to light any appliance.
• Do not touch any electrical switch; do not
use any phone in your building.
• Immediately call your gas supplier from a
neighbor's phone. Follow the gas
supplier's instructions.
• If you cannot reach your gas supplier, call
the fire department.
— Installation and service must be performed
by a qualified installer, service agency, or
the gas supplier.
WARNING: This is an unvented gas-fired heater. It uses air (oxygen) from the room in which
it is installed. Provisions for adequate combustion and ventilation air must be provided. Refer
to Air for Combustion and Ventilation section on page 4 of this manual.
This appliance may be installed in an aftermarket,* permanently located, manufactured
(mobile) home, where not prohibited by local codes.
This appliance is only for use with the type of gas indicated on the rating plate. This appliance
is not convertible for use with other gases.
* Aftermarket: Completion of sale, not for purpose of resale, from the manufacturer
Save this manual for future reference.
Save this manual for future reference.
Also Design-Certified As Vented Decorative Appliances
24" and 30" Remote-Ready Models
UNVENTED (VENT-FREE)
GAS LOG HEATER
OWNER'S OPERATION AND
INSTALLATION MANUAL
WARNING: Improper installation, adjust-
ment, alteration, service, or maintenance
can cause injury or property damage. Re-
fer to this manual for correct installation
and operational procedures. For assis-
tance or additional information consult a
qualified installer, service agency, or the
gas supplier.
WARNING: This appliance is for installa-
tion only in a solid-fuel burning masonry
or UL127 factory-built fireplace, or in a
listed ventless firebox enclosure. It is de-
sign-certified for these installations in ac-
cordance with ANSI Z21.11.2. Exception:
Do not install this appliance in a factory-
built fireplace that includes instructions
stating it has not been tested or should not
be used with unvented gas logs.
Advertisement
Table of Contents

Related Manuals for Desa LDL3924PR


Summary of Contents for Desa LDL3924PR
- Page 1 For more information, visit www.desatech.com For more information, visit www.desatech.com Also Design-Certified As Vented Decorative Appliances MODELS LDL3924NR LDL3924PR LDL3930NR LDL3930PR WARNING: If the information in this manual is not followed exactly, a fire or explosion may result causing property damage, per- sonal injury, or loss of life.
-
Page 2: Table Of Contents
TABLE OF CONTENTS SAFETY INFORMATION TABLE OF CONTENTS SAFETY INFORMATION ... 2 LOCAL CODES ... 3 UNPACKING ... 3 PRODUCT IDENTIFICATION ... 4 PRODUCT FEATURES ... 4 AIR FOR COMBUSTION AND VENTILATION ... 4 INSTALLATION ... 7 OPERATING HEATER ... 15 INSPECTING BURNERS ... -
Page 3: Local Codes
SAFETY INFORMATION Continued 1. This appliance is only for use with the type of gas indicated on the rating plate. This appliance is not convertible for use with other gases. Do not place propane/LP supply tank(s) inside any structure. Lo- cate propane/LP supply tank(s) outdoors (propane/LP units only). -
Page 4: Product Identification
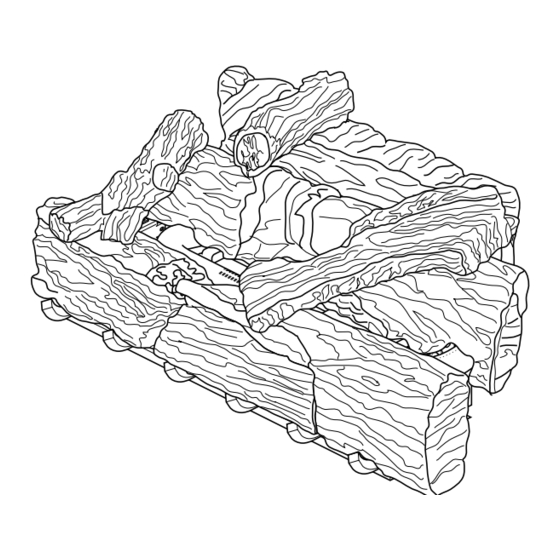
PRODUCT IDENTIFICATION REMOTE CONTROL ACCESSORIES PRODUCT FEATURES AIR FOR COMBUSTION AND VENTILATION Providing Adequate Ventilation PRODUCT IDENTIFICATION 8 Piece Log Set Remote Control Control Cover Log Control Knob and Piezo Ignitor (behind cover log) Figure 1 - Product Identification PRODUCT FEATURES OPERATION This heater is clean burning. - Page 5 AIR FOR COMBUSTION AND VENTILATION Continued c. caulking or sealants are applied to areas such as joints around window and door frames, between sole plates and floors, between wall-ceiling joints, between wall panels, at penetrations for plumbing, electrical, and gas lines, and at other openings. If your home meets all of the three criteria (a,b, and c, you must provide additional fresh air.
-
Page 6: Ventilation Air
AIR FOR COMBUSTION AND VENTILATION Ventilation Air AIR FOR COMBUSTION AND VENTILATION Continued VENTILATION AIR Ventilation Air From Inside Building This fresh air would come from an adjoining unconfined space. When ventilating to an adjoining unconfined space, you must provide two permanent openings: one within 12" of the ceiling and one within 12"... -
Page 7: Installation
INSTALLATION NOTICE: This heater is intended for use as supple- mental heat. Use this heater along with your primary heating system. Do not install this heater as your primary heat source. If you have a central heating system, you may run system’s circulating blower while using heater. - Page 8 INSTALLATION Installation and Clearances for Vent-Free Operation (Cont.) INSTALLATION Continued Carefully follow the instructions below. This will ensure safe installation into a masonry, UL127-listed manufactured fireplace, or listed vent-free firebox. Minimum Clearances For Side Combustible Material, Side Wall, and Ceiling A.
-
Page 9: Mantel Clearances
INSTALLATION Continued MANTEL CLEARANCES In addition to meeting noncombustible material clearances, you must also meet required clearances between fireplace opening and mantel shelf. If you do not meet the clearances listed below, you will need a hood. Determining Minimum Mantel Clearance If you meet minimum clearance between mantel shelf and top of fireplace opening, a hood is not required (see Figure 6). -
Page 10: Installing Damper Clamp Accessory For Vented Operation
INSTALLATION Installing Damper Clamp Accessory for Vented Operation Installing Heater Base Assembly INSTALLATION Continued INSTALLING DAMPER CLAMP ACCESSORY FOR VENTED OPERATION Note: When used as a vented heater, appliance must be installed only in a solid-fuel burning fireplace with a working flue and constructed of noncombustible material. - Page 11 INSTALLATION Continued 5. Center heater base and logs front-to-back and side-to-side in fireplace. 6. Carefully remove logs without moving heater base. 7. Mark screw locations through one hole on each side of the base (see Figure 12). If installing in a brick-bottom fireplace, mark screw locations in mortar joint of bricks.
-
Page 12: Connecting To Gas Supply
INSTALLATION Connecting To Gas Supply INSTALLATION Continued CONNECTING TO GAS SUPPLY WARNING: This appliance requires a 1/2" NPT (National Pipe Thread) inlet connection to the pres- sure regulator. WARNING: A qualified service person must con- nect heater to gas supply. Follow all local codes. CAUTION: Never connect propane/LP fireplace directly to the propane/LP supply. -
Page 13: Checking Gas Connections
INSTALLATION Continued CHECKING GAS CONNECTIONS WARNING: Test all gas piping and connections, internal and external to unit, for leaks after installing or servicing. Correct all leaks at once. WARNING: Never use an open flame to check for a leak. Apply a noncorrosive leak detection fluid to all joints. -
Page 14: Installing Logs
INSTALLATION Installing Logs INSTALLATION Continued INSTALLING LOGS WARNING: Failure to position the parts in accor- dance with these diagrams or failure to use only parts specifically approved with this heater may result in property damage or personal injury. CAUTION: After installation and periodically there- after, check to ensure that no flame comes in contact with any log. -
Page 15: Operating Heater
OPERATING HEATER FOR YOUR SAFETY READ BEFORE LIGHTING WARNING: If you do not follow these instructions exactly, a fire or explosion may result causing prop- erty damage, personal injury or loss of life. A. This appliance has a pilot which must be lighted by hand. When lighting the pilot, follow these instructions exactly. -
Page 16: Manual Lighting Procedure
OPERATING HEATER Lighting Instructions (Cont.) To Turn Off Gas To Appliance Manual Lighting Procedure Hand-Held Remote Operation OPERATING HEATER Continued 8. With control knob pressed in, press and release ignitor but- ton. This will light pilot. The pilot is attached to the rear of the front burner. -
Page 17: Inspecting Burners
OPERATING HEATER Continued Fahrenheit/Celsius Temperature Indication To toggle between temperature degrees Fahrenheit and Celsius perform the following steps. 1. Press the up and down key until the small triangle is to the left of the clock icon (see Figure 29, page 16). 2. -
Page 18: Cleaning And Maintenance
CLEANING AND MAINTENANCE Cleaning Burner Injector Holder and Pilot Air Inlet Hole Logs Main Burner CLEANING AND MAINTENANCE WARNING: Turn off heater and let cool before cleaning. CAUTION: You must keep control areas, burners, and circulating air passageways of heater clean. In- spect these areas of heater before each use. -
Page 19: Troubleshooting
TROUBLESHOOTING Note: For additional help, visit DESA Heating Products’ technical service web site at www.desatech.com. Note: All troubleshooting items are listed in order of operation. OBSERVED PROBLEM When ignitor button is pressed, there is no spark at ODS/pilot When ignitor button is pressed, there is... - Page 20 TROUBLESHOOTING TROUBLESHOOTING Continued OBSERVED PROBLEM Burner does not light after ODS/pilot is lit Delayed ignition of one or both burners Burner backfiring during combustion Slight smoke or odor during initial operation Heater produces a whistling noise when burners are lit White powder residue forming within burner box or on adjacent walls or furniture Moisture/condensation noticed on windows...
- Page 21 TROUBLESHOOTING Continued WARNING: If you smell gas • Shut off gas supply. • Do not try to light any appliance. • Do not touch any electrical switch; do not use any phone in your building. • Immediately call your gas supplier from a neighbor’s phone. Follow the gas supplier’s instructions.
-
Page 22: Illustrated Parts Breakdown And Parts List
ILLUSTRATED PARTS BREAKDOWN Models LDL3924NR, LDL3924PR, LDL3930NR and LDL3930PR ILLUSTRATED PARTS BREAKDOWN MODELS LDL3924NR, LDL3924PR LDL3930NR AND LDL3930PR 27-1 27-2 27-3 27-4 27-5 27-6 27-7 27-8 For more information, visit www.desatech.com For more information, visit www.desatech.com 111515-01C... -
Page 23: Parts List
100563-01 100563-01 103877-05 103877-05 GA6060 GA6060 101137-02 101137-02 For more information, visit www.desatech.com For more information, visit www.desatech.com 111515-01C Models LDL3924NR, LDL3924PR, LDL3930NR and LDL3930PR LDL3930NR LDL3930PR 110998-02PP 110998-02PP ASM, Low Profile Base, Painted 102772-01 102772-01 Dual Burner 103779-01 103778-01... -
Page 24: Specifications
If so, contact DESA Heating Products’ Technical Service Department at 1-866-672-6040. When calling please have your model and serial numbers of your heater ready. You can also visit DESA Heating Products’ technical services web site at www.desatech.com. Black 111515-01C... -
Page 25: Owner's Registration Form
Address: City: Home Phone: E-Mail: Please answer the following questions to register your product with DESA Heating Products: 1. Where will the product be used? Living/Family Room Office/Warehouse If you bought this product yourself, did you plan to purchase this type of product before going into the store? 3. - Page 26 Postage Required 2701 Industrial Drive P.O. Box 90004 Bowling Green, KY 42102-9004 For more information, visit www.desatech.com For more information, visit www.desatech.com TAPE 111515-01C...
-
Page 27: Accessories
Purchase these heater accessories from your local dealer. If they can not supply these accessories, call DESA Heating Products at 1-866-672-6040 for referral information. You can also write to the address listed on the back page of this manual. -
Page 28: Warranty Information
DESA Heating Products warrants this product to be free from defects in materials and components for two (2) years from the date of first purchase, provided that the product has been properly installed, operated and maintained in accordance with all applicable instructions. To make a claim under this warranty the Bill of Sale or cancelled check must be presented.