Table of Contents
Advertisement
Advertisement
Table of Contents

Related Manuals for Lexicon MX200


Summary of Contents for Lexicon MX200
- Page 1 MX200 User Guide...
- Page 3 In no event shall Lexicon Professional or its dealers be liable for special or consequential damages or from any...
-
Page 5: Table Of Contents
The MX-Edit Editor/Librarian - Mac .................32 Minimum System Requirements ...............32 Installing the MX-Edit Editor/Librarian ..............32 Quick Start ......................32 The MX-Edit Program Window .................32 Editing a Program .....................33 Quick Access Menu ..................34 Using the MX200 as a Hardware Plug-In ..............35 Minimum System Requirements ...............35... - Page 6 Installing the MX-Edit VST Hardware Plug-In...........35 Connecting the MX200 ..................35 Software Configuration ..................36 Using the MX200 Plug-In Window ..............36 Controls......................36 MIDI Port Error Message ..................37 CC Mapping ......................37 MIDI Implementation Chart ..................37 Specifications ......................38 Appendix ........................39 Program List......................40...
-
Page 7: Quick Start
12 o’clock position. connection (using the MX200 with a mixer) 3. Set the Input level on the MX200 to the and select a program. 12 o’clock position. 4. Set the Mix 1 and Mix 2 knobs on the Powering the Unit MX200 to their full clockwise position. -
Page 8: Audition The Effect
There are five audio samples included in the MX200, including various drum sounds, vocal, and guitar. In the factory setting, tap- ping the Audition button cycles through the five sounds, but you may want to repeat a particular sound as you choose or edit an effect. -
Page 9: About The Mx200
Those using the MX200 in live applications will appreciate its intuitive front panel lay- Either way you use the MX200 – live or in out. The Active Reverb/Effects Matrix the studio – you can choose two effects at... -
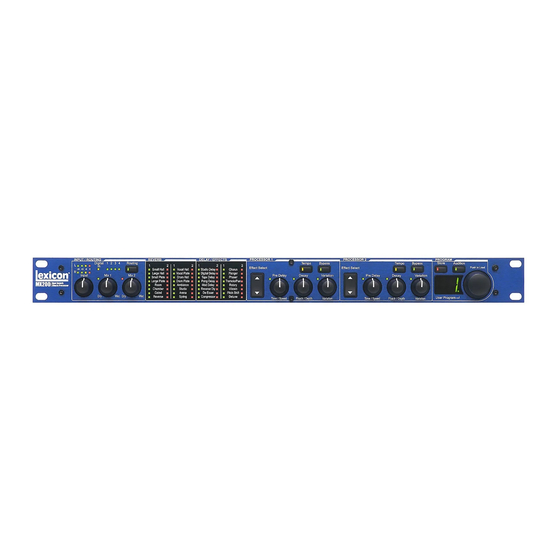
Page 10: Diagram - Front Panel
D D i i a a g g r r a a m m - - F F r r o o n n t t P P a a n n e e l l 1 2 3 7 8 9 10 11 12 13 . - Page 11 D D i i a a g g r r a a m m - - F F r r o o n n t t P P a a n n e e l l 14. Effect Select - P1 19.
-
Page 12: Diagram - Rear Panel
2. Footswitch Input Make sure the device you are connecting An optional 2-button footswitch can be to the MX200’s S/PDIF In is set as the plugged into this TRS jack for independent Clock Master (if that option is available) Bypass control of P1 and P2. Use the... -
Page 13: Setup
The following illustrations show how to your console) to the 12 o’clock position. connect the MX200 in both Serial and 6. Set the Input on the MX200 to the 12 Parallel configurations, using some com- o’clock position. mon, real-world examples. -
Page 14: Serial Connections
1. Select routing 1 or 4 using the Routing 4. Connect the MX200’s Left output to the button. amp’s Effects Loop Return or Power 2. Connect Aux 1 send to the MX200 Left Amp In. input. 5. Set Mix 1 and Mix 2 knobs to the 12 3. - Page 15 44.1kHz or 48kHz only. (Refer to 4. Set the MX200’s Input knob to the 12 the documentation for your device o’clock position. and/or software for proper setup.) 5.
-
Page 16: Using The Mx200
U U s s i i n n g g t t h h e e M M X X 2 2 0 0 0 0 The MX200 is equipped with 99 Factory changes, you must store them to a User programs that combine the 32 reverbs and program location (see Storing Programs). -
Page 17: Tap Tempo
A A 1 1 - Drum Stick Click A A 2 2 - Snare Drum MX200 can also use MIDI Sync to set the A A 3 3 - Kick Drum tempo of delays. When MX200 detects A A 4 4 - Female Vocal “Doo”... -
Page 18: Routing Options
U U s s i i n n g g t t h h e e M M X X 2 2 0 0 0 0 Routing Options Storing Programs The MX200’s powerful Dual Processor Once you have edited a program to your design and four signal routing options... -
Page 19: Effects Descriptions
E E f f f f e e c c t t s s D D e e s s c c r r i i p p t t i i o o n n s s Reverbs The MX200 effects come in four varieties: Reverberation (or “reverb” for short) is the... - Page 20 The Plates in the MX200 model the sound of metal plates with high initial diffusion and a Mono In/Stereo Out relatively bright, colored sound. Plate...
- Page 21 E E f f f f e e c c t t s s D D e e s s c c r r i i p p t t i i o o n n s s - - R R e e v v e e r r b b s s beration times which are usually associat- Stereo ed with larger acoustical environments, but...
- Page 22 R R e e v v e e r r b b C C o o n n t t r r o o l l V V a a l l u u e e s s Note: Values of 0 – 100 are displayed as 0 – 00 (100 is displayed as 00 in the Program Display).
-
Page 23: Delays
Delays mono delay time. Delays repeat a sound a short time after it Stereo first occurs. Delay becomes echo when the Modulated Delay output is fed back into the input (feedback). The Modulated Delay is enhanced by an This turns a single repeat into a series of LFO (low frequency oscillator) that pro- repeats, each a little softer than the last. - Page 24 E E f f f f e e c c t t s s D D e e s s c c r r i i p p t t i i o o n n s s - - D D e e l l a a y y s s Ducker Threshold repeats are evenly alternated between left MX200’s Studio and Digital delays offer a and right channels. As this knob is turned “ducking” feature, which causes the delay...
-
Page 25: Dbx® Dynamics
Knob 2: Compression Ratio useful but often misunderstood tool. To bet- Selects the compression ratio, from 1:1 (no ter use the Compressor in the MX200, a effect) to Infinity:1 (or complete limiting). bit of understanding about compression is helpful. -
Page 26: Modulated Effects
Modulated Effects Stereo Chorus Chorus creates a lush, full sound by com- bining two or more signals together where Flanger Controls one is unaffected and the other signals Knob 1: Speed vary in pitch very slightly over time. Controls the modulation rate of the Chorus is commonly used to fatten up Flanger effect. - Page 27 E E f f f f e e c c t t s s D D e e s s c c r r i i p p t t i i o o n n s s - - M M o o d d u u l l a a t t e e d d E E f f f f e e c c t t s s ed signal being fed back into the input, cre- ating feedback.
- Page 28 - from subtle detunes to full interval shifts up Knob 2: Right Shift Amount or down a two octave range. The MX200’s Determines the detune amount of the Pitch Shift effect is a chromatic shifter, Right input, from -24 cents to +24 cents.
-
Page 29: Mx200 Utilities
2. Press the Audition button repeatedly MIDI Channel until Lo appears in the Program Display. The Program Display flashes The MX200 is capable of receiving incom- between Lo and OF, indicating the ing MIDI Program Change and CC AutoLoad feature is disabled. -
Page 30: Digital Out Dry Track
OP and then St Note: The Dry Track feature is only avail- to indicate Stereo Output Mode is able for signals brought into the MX200 via selected. the analog inputs. Dry Track has no effect 3. To change the Output Mode to Mono, on signals being received at the S/PDIF In. -
Page 31: Bypass Mode Select
MX200 will have a signal source (such Routing 2 (Cascade) is selected will cause as an instrument) connected directly to its the MX200 to have no output, as the entire inputs and the MX200’s outputs are con- signal is muted by the Processor placed in nected to a mixer or amplifier input chan- Bypass. -
Page 32: The Mx-Edit Editor/Librarian - Windows
Note that you will be prompted to User program locations 1-99 in your connect the MX200 via the USB port dur- MX200 hardware. ing the installation process. In order for your computer to recognize the MX200... -
Page 33: The Mx-Edit Library
Parameter knobs and buttons in the Program Editor window. The selected program is now loaded in your MX200 as well, and can be previewed using the Audition button on the MX200’s front panel. Any changes made in the MX- Edit Program Editor window will also occur simultaneously on the MX200 hardware. -
Page 34: The Mx-Edit Program Editor
The MX-Edit Program Editor lets you Program Editor, and you only hear the set- quickly and easily view, compare and edit tings of the active (selected) Program any program stored in the MX200, or pro- Editor window. grams saved to your computer. Editing a Program Signal Routing Options To change MX200’s Routing, left click on... - Page 35 W i i n n d d o o w w s s Tempo tion depending on the default values for the selected reverb or effect. If one of the MX200’s six delays is select- ed, the Tempo button in that processor Adjusting Knobs becomes active, and begins to flash at the...
-
Page 36: Saving A Program
MX200’s physical memory), open the pro- sponding knob or button and the Store but- gram you wish to store. With the Program ton on the MX200’s front panel also illumi- Editor window active, click Device, then Store Program. The Store to Device dia- nates, indicating a change from the loaded program. - Page 37 To proceed, click OK. A progress bar appears at the bottom of the MX-Edit screen, indicating that a Bulk Dump is in process. When all the MX200 data is received, a Save dialog box appears. The default file name is the cur- rent day and date (e.g.
-
Page 38: The Mx-Edit Editor/Librarian - Mac
Program Name. Unit in the Components folder, and the MX-Edit VST in the VST folder. To open a program from the MX200 click in Quick Start the Program Menu field and select a pro- gram from the list. -
Page 39: Editing A Program
Tempo on the User or Factory programs, but you may only store to User program locations. If one of the MX200’s six delays is select- As in the MX200 hardware, Factory pro- ed, the Tempo button in that processor grams cannot be over-written. -
Page 40: Quick Access Menu
Archiving Archiving is a powerful tool for preserving For instant access to the most often used the current state of your MX200. When you commands, click the small down arrow in archive the MX200, all of its presets and the upper left corner of the program win- global settings are sent to the computer dow to open the Quick Access Menu. -
Page 41: Using The Mx200 As A Hardware Plug-In
Follow the on-screen recall, without burdening your CPU! Using prompts to install the software. the MX200 with the VST and Audio Units Connecting the MX200 software works much like any other plug-in you’d use with a DAW, except that the... -
Page 42: Software Configuration
Because the audio is being processed If you have followed these steps correctly, within the MX200 hardware, and not inside when you open an instance of the MX200 your computer, your DAW (Digital Audio plug-in, its audio path will lead it to the bus... -
Page 43: Midi Port Error Message
C C C C M M a a p p p p i i n n g g MIDI Port Error Message If you see this message, the MX200 is either disconnected or its USB MIDI ports are in use by an application. Some hosts, such as Cubase, may automatically open the MX200’s MIDI ports by default. -
Page 44: Specifications
S S p p e e c c i i f f i i c c a a t t i i o o n n s s Audio Inputs: (2) 1/4” TRS balanced or unbalanced Input Impedance: 20k Ohms balanced, 10k Ohms unbalanced Input Level: +4dBu Nominal, +20dBu Maximum Frequency Response:... -
Page 45: Appendix
A A p p p p e e n n d d i i x x Delay De-Esser Time Range Values Frequency Values Bandwidth Values Note: A value of 36 is the 12 o'clock knob position, or equal to the Tempo LED rate. Intermediate values (e.g. -
Page 46: Program List
P P r r o o g g r r a a m m L L i i s s t t Effects in the list that are italicized and shaded are in Bypass in the factory programs. Effects that are bolded are designed to be Full Wet only (e.g. Compressor). - Page 47 Effects in the list that are italicized and shaded are in Bypass in the factory programs. Effects that are bolded are designed to be Full Wet only (e.g. Compressor).
- Page 48 L L e e x x i i c c o o n n ® ® 8 8 7 7 6 6 0 0 S S o o u u t t h h S S a a n n d d y y P P a a r r k k w w a a y y S S a a n n d d y y , , U U t t a a h h 8 8 4 4 0 0 7 7 0 0 P P H H ( ( 8 8 0 0 1 1 ) ) 5 5 6 6 6 6 - - 8 8 8 8 0 0 0 0 F F A A X X ( ( 8 8 0 0 1 1 ) ) 5 5 6 6 6 6 - - 7 7 0 0 0 0 5 5...