Table of Contents
Advertisement
CD RECEIVER
RECEPTOR CON CD
RECEPTEUR CD
For installation and connections, refer to the separate manual.
Para la instalación y las conexiones, refiérase al manual separado.
Pour l'installation et les raccordements, se référer au manuel séparé.
SOUND
U
R
SOURCE
F
D
VOL
VOL
INSTRUCTIONS
MANUAL DE INSTRUCCIONES
MANUEL D'INSTRUCTIONS
KD-SX980
KD-SX980
KD-SX980
For customer Use:
Enter below the Model No. and
Serial No. which are located on
the top or bottom of the cabinet.
Retain this information for future
reference.
Model No.
Serial No.
GET0091-001A
[J]
Advertisement
Table of Contents

Related Manuals for JVC KDSX980 - Am/Fm/Cd/Mp3 Detachable Face


Summary of Contents for JVC KDSX980 - Am/Fm/Cd/Mp3 Detachable Face
- Page 1 CD RECEIVER KD-SX980 RECEPTOR CON CD KD-SX980 RECEPTEUR CD KD-SX980 SOUND SOURCE For installation and connections, refer to the separate manual. Para la instalación y las conexiones, refiérase al manual separado. Pour l’installation et les raccordements, se référer au manuel séparé. For customer Use: Enter below the Model No.
-
Page 2: How To Reset Your Unit
INFORMATION (For U.S.A.) This equipment has been tested and found to comply with the limits for a Class B digital device, pursuant to Part 15 of the FCC Rules. These limits are designed to provide reasonable protection against harmful interference in a residential installation. This equipment generates, uses, and can radiate radio frequency energy and, if not installed and used in accordance with the instructions, may cause harmful interference to radio communications. -
Page 3: Table Of Contents
Thank you for purchasing a JVC product. Please read all instructions carefully before operation, to ensure your complete understanding and to obtain the best possible performance from the unit. CONTENTS MP3 OPERATIONS ......16 How to reset your unit ....... -
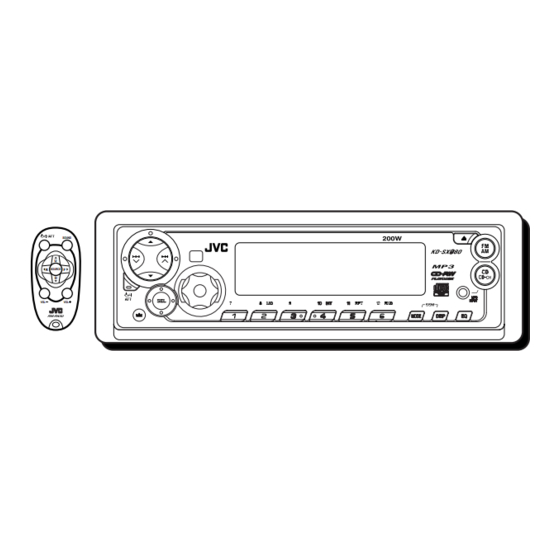
Page 4: Location Of The Buttons
LOCATION OF THE BUTTONS Control panel Display window 200W INPUT i o ; ; EQ (equalizer) button /¢ buttons 2 5 (up) button a MP3 INPUT jack 3 ∞ (down) button Display window 4 Remote sensor 5 Display window s DISC indicator 6 0 (eject) button d TRACK indicator 7 FM AM button... -
Page 5: Preparing The Remote Controller
Preparing the remote controller Place the battery. Slide the battery into the holder with the + side facing upwards so that the battery is fixed in Before using the remote controller: the holder. • Aim the remote controller directly at the remote Lithium coin battery sensor on the main unit. -
Page 6: Remote Controller
3 • Selects the preset stations while listening to Remote controller the radio. Each time you press the button, the preset station number increases, and the selected RM–RK50 station is tuned into. • Skips to the previous disc while listening to the CD changer. -
Page 7: Basic Operations
BASIC OPERATIONS Turning on the power Adjust the volume. To increase the volume. Turn on the power. To decrease the volume. Volume or audio Note on One-Touch Operation: level (see page 26) When you select a source in step 2 below, the indicator power automatically comes on. -
Page 8: Radio Basic Operations
RADIO BASIC OPERATIONS Listening to the radio While searching stations, “SEEK” appears on the display. When a station is received, searching stops. You can use either automatic searching or manual searching to tune in to a particular station. To stop searching before a station is received, press the same button you have pressed for Searching a station automatically: searching. -
Page 9: Storing Stations In Memory
Storing stations in memory Tune in to a station you want while “MANU” is flashing. Press ¢ to tune You can use one of the following two methods to in to stations of higher store broadcasting stations in memory. frequencies. •... -
Page 10: Tuning In To A Preset Station
Manual preset Repeat the above procedure to store other stations into other preset You can preset up to 6 stations in each band (FM1, numbers. FM2, FM3 and AM) manually. Ex.: Storing an FM station of 88.3 MHz into the Notes: preset number 1 of the FM1 band •... -
Page 11: Cd Operations
CD OPERATIONS Playing a CD Total playing time of Total track number the inserted disc of the inserted disc Open the control panel. Current track Elapsed playing time Note: When an external component is connected to the MP3 INPUT jack on the control panel, be careful of handling a CD. -
Page 12: Locating A Track Or Particular Portion On A Disc
Locating a track or particular Selecting CD playback modes portion on a disc To play back tracks at random (Random Play) You can play back all tracks on the disc at random. To fast-forward or reverse the track Press and hold ¢ Press MODE to enter the functions while playing a disc, to mode while playing a disc. -
Page 13: Prohibiting Cd Ejection
To play back only intros (Intro Scan) To cancel the prohibition and unlock the disc, press again for more than 2 seconds, You can play back the first 15 seconds of each while pressing CD CD-CH. track sequentially. Press MODE to enter the functions mode while playing a disc. -
Page 14: Mp3 Introduction
MP3 INTRODUCTION Precautions when recording MP3 files What is MP3? on a CD-R or CD-RW This unit can only read MP3 files that are recorded MP3 is an abbreviation of Motion Picture Experts in the format that is compliant with ISO 9660 Group (or MPEG) Audio Layer 3. - Page 15 MP3 directory/file configuration ROOT 15 16 18 19 : Root ROOT : Directories : MP3 files Note: There is no limit to the number of hierarchy levels (nested directories). However, up to 8 hierarchy levels is recommended for stable operations. MP3 playback/search order (page 17) •...
-
Page 16: Mp3 Operations
MP3 OPERATIONS Refer also to “CD OPERATIONS” on pages 11 to The display changes to show the following: CD–in indicator lights up Playing an MP3 disc Open the control panel. Insert an MP3 disc into the loading slot. The unit draws the disc. -
Page 17: Locating A File Or Particular Portion On An Mp3 Disc
To change the display information To stop play and eject the disc Press 0. While playing back an MP3 file, you can change the file information CD play stops, the control panel opens, then the shown on the display. CD automatically ejects from the loading slot. Each time you press DISP (display), If you change the source, the CD play also stops the display changes to show the... - Page 18 To go to a particular directory directly To skip to the next directory IMPORTANT: To directly select the directories using the number button(s), it is required that directories are assigned 2 digit numbers at the beginning of their directory names. (This can only be done during the recording of CD-Rs or CD-RWs.) Ex.: If directory name is “01 ABC”...
-
Page 19: Selecting Mp3 Playback Modes
Selecting MP3 playback modes To skip to the previous directory To play back files at random (Random Play) You can play back all files on the MP3 disc at random. Press MODE to enter the functions mode while playing an MP3 disc. Press ∞... - Page 20 To play back files repeatedly (Repeat Play) To play back only intros (Intro scan) You can play back the current file or all the files in You can play back the first 15 seconds of each file the current directory repeatedly. sequentially.
-
Page 21: Sound Adjustments
SOUND ADJUSTMENTS Adjusting the sound Adjust the level. To increase the level. You can adjust the sound characteristics to your preference. To decrease the level. Select the item you want to adjust. Each time you press the button, the adjustable items Equalization pattern changes as change as follows: you adjust the bass or treble. -
Page 22: Selecting Preset Sound Modes (C-Eq: Custom Equalizer)
Indication For: Preset values Selecting preset sound modes LOUD (C-EQ: custom equalizer) USER (Flat sound) ROCK Rock or disco music You can select a preset sound mode (C-EQ: Custom Equalizer) suitable to the music genre. CLASSIC Classical –02 music Press EQ. POPS Light music The last selected sound mode is... -
Page 23: Storing Your Own Sound Adjustments
• When “CEQ LINK” is set to “LINK ON,” Adjust the level. The selected sound mode can be stored in memory for the current source. To increase the level. Each time you change to the same source, the same sound mode is also recalled and shown on the display. -
Page 24: Other Main Functions
OTHER MAIN FUNCTIONS Setting the clock To check the current clock time while the unit is turned off, press DISP (display). The power turns on, the clock time is shown for 5 seconds, then the power turns off. Press and hold SEL (select) for more than 2 seconds so that one of the PSM To check other information during play, press items appears on the display. - Page 25 Repeat steps 2 and 3 to adjust the other PSM items if necessary. Finish the setting. Preferred Setting Mode (PSM) items Factory-preset Set. settings page Counter- clockwise Clockwise Hold. Select. CLOCK H Hour adjustment Back Advance 1:00 CLOCK M Minute adjustment Back Advance CEQ LINK...
- Page 26 Note: To set Custom Equalizer Link – CEQ LINK Auto Dimmer equipped with this unit may not work A different sound mode (C-EQ) can be stored in correctly on some vehicles, particularly on those memory for each source so that you can change having a control dial for dimming.
-
Page 27: Assigning Names To The Sources
Note: Assigning names to the sources For connecting the Line Input Adaptor KS-U57 and the external component, refer to the Installation/Connection You can assign names to station frequencies and Manual (separate volume). discs (both in this unit and in the CD changer). After assigning a name, it will appear on the display when you select the source. - Page 28 Select a character. Available characters • See next column for available characters. – < > space Move the cursor to the next (or previous) character position. Notes: • When you try to assign a name to the 41st disc, “NAME FULL” appears on the display. (In this case, delete unwanted names before assignment.) •...
-
Page 29: Detaching The Control Panel
Detaching the control panel Attaching the control panel Insert the right side of the control panel You can detach the control panel when leaving into the groove on the panel holder. the car. When detaching or attaching the control panel, be careful not to damage the connectors on the back of the control panel and on the panel holder. -
Page 30: Cd Changer Operations
Playing CDs with your unit. If you have another CD automatic changer, consult your JVC car audio dealer for connections. Select the CD automatic changer (CD-CH). • For example, if your CD automatic changer is one of the KD-MK series, you need a cord (KS-U15K) for CD-CH connecting it to this unit. - Page 31 Each To show the CD Text information time you press the button consecutively, the This is possible only when connecting a JVC CD beginning of the previous automatic changer equipped with CD Text reading tracks is located and capability.
-
Page 32: Selecting Cd Playback Modes
Selecting CD playback modes To play back only intros (Intro Scan) You can play back the first 15 seconds of each To play back tracks at random (Random Play) track sequentially. Press MODE to enter the functions Press MODE to enter the functions mode while playing a disc. -
Page 33: External Component Operations
EXTERNAL COMPONENT OPERATIONS Portable MP3 player, etc. MP3 INPUT* * Not compatible with digital signals. Playing an external component To select “AUX IN” (component connected to the MP3 INPUT jack on the control panel), press and hold CD CD-CH. You can connect two external components to this unit. -
Page 34: Troubleshooting
TROUBLESHOOTING What appears to be trouble is not always serious. Check the following points before calling a service center. Remedies Symptoms Causes Insert the disc correctly. • CD cannot be played back. Disc is inserted upside down. Stop playback while driving on •... - Page 35 Symptoms Causes Remedies • “NO DISC” appears on the No disc in the magazine. Insert a disc. display . • “RESET 8” appears on the This unit is not connected to Connect this unit and the CD display . a CD changer correctly. changer correctly and press the reset button of the CD changer.
-
Page 36: Maintenance
MAINTENANCE Handling discs Moisture condensation Moisture may condense on the lens inside the This unit has been designed to reproduce CDs unit in the following cases: and CD-Rs. • After starting the heater in the car. • You can also play back CD Text. •... -
Page 37: Specifications
SPECIFICATIONS AUDIO AMPLIFIER SECTION CD PLAYER SECTION Maximum Power Output: Type: Compact disc player Front: 50 W per channel Signal Detection System: Non-contact optical Rear: 50 W per channel pickup (semiconductor laser) Continuous Power Output (RMS): Number of channels: 2 channels (stereo) Front: 19 W per channel into 4 , 40 Hz to Frequency Response: 5 Hz to 20 000 Hz 20 000 Hz at no more than... - Page 38 Technical Support & Customer Satisfaction Survey. US RESIDENTS ONLY Having TROUBLE with operation? Please reset your unit Refer to page of How to Reset Still having trouble?? USA ONLY Call 1-800-252-5722 http://www.jvc.com We can help you! VICTOR COMPANY OF JAPAN, LIMITED EN, SP, FR 0102KKSMDTJEIN...
- Page 39 Si tiene alguna pregunta o necesita información votre voiture particulière. Si vous avez des questions ou avez installation kits, consult your JVC car audio dealer or a company acerca de las herramientas para instalación, consulte con su besoin d’information sur des kits d’installation, consulter votre...
-
Page 40: Electrical Connections
JVC car audio dealers. puede ser adquirido en los concesionarios de JVC de equipos de tension, que vous pouvez acheter chez un revendeur d’autoradios • Replace the fuse with one of the specified rating. If the fuse audio para automóviles. - Page 41 (See diagram Recomendamos conectar uno de los cambiadores de CD de la serie CH-X. JVC CD changer or another external component • Si su cambiador de CD es de la serie KD-MK, necesitará un cable opcional (KS-U15K). Cambiador de CD u otro componente exterior Conectando el adaptador de entrada de línea KS-U57 (no suministrado), también podrá...
- Page 42 INPUT damage to this unit. JVC Amplifier Fije firmemente el cable de tierra a la carrocería Amplificador de JVC metálica o al chasis—a un lugar no cubierto con pintura (si está cubierto con pintura, quítela antes Amplificateur JVC de fijar el cable). De lo contrario, se podrían Blue with white stripe producir daños en la unidad.