
Related Manuals for LG BD530


Summary of Contents for LG BD530
- Page 1 OWNER’S MANUAL Network Blu-ray Disc™ Player Please read this manual carefully before operating your set and retain it for future reference. MODEL BD530 www.lg.com P/NO : MFL65225347...
-
Page 3: Safety Information
Safety Information Safety Information CAUTION RISK OF ELECTRIC SHOCK DO NOT OPEN CAUTION: TO REDUCE THE RISK OF ELECTRIC SHOCK CAUTION: This product employs a Laser System. DO NOT REMOVE COVER (OR BACK) NO USER- To ensure proper use of this product, please read SERVICEABLE PARTS INSIDE REFER SERVICING TO this owner’s manual carefully and retain it for future QUALIFIED SERVICE PERSONNEL. -
Page 4: Safety Information
Safety Information This device is equipped with a portable battery or • Connect the equipment into an outlet on a accumulator. circuit different from that to which the receiver is connected. Safety way to remove the battery or the battery from the equipment: Remove the old battery • Consult the dealer or an experienced radio/TV or battery pack, follow the steps in reverse order... - Page 5 Safety Information IMPORTANT SAFETY Notes on Copyrights • Because AACS (Advanced Access Content System) INSTRUCTIONS is approved as content protection system for BD format, similar to use of CSS (Content Scramble System) for DVD format, certain restrictions are 1. Read these instructions. imposed on playback, analog signal output, etc., of AACS protected contents.
-
Page 6: Table Of Contents
Contents Installation Connecting to Your TV HDMI Connection What is SIMPLINK? Component Video Safety Information Connection Video/Audio (Left/Right) Cautions and Warnings Connection Resolution Setting Connecting to an Amplifier Connecting to an Amplifier Preparation via HDMI Output Introduction Connecting to an Amplifier via Digital Audio Output About the “... - Page 7 Operation Troubleshooting General Playback General Advanced Playback Picture On-Screen display Sound Enjoying BD-Live™ Network Playing a movie file and VR disc Viewing a photo Options while viewing a Appendix photo Listening to music while Controlling a TV with the Supplied slide show Remote Control Listening to music...
-
Page 8: Preparation
Preparation Preparation Introduction Music files contained in MUSIC the USB/Disc PHOTO Photo files About the “ ” Symbol Display Supplied Accesorries “ ” may appear on your TV display during operation and indicates that the function explained in this owner’s manual is not available on that specific media. -
Page 9: Playable Discs
[Mastered] in order to make the discs compatible audio titles, Movie, Music or with the LG players when formatting rewritable Photo files. discs. When setting the option to Live System, you cannot use it on LG player. (Mastered/Live File System : Disc format system for windows Vista) -
Page 10: File Compatibility
Preparation File compatibility NOTE Overall • HD movie files contained on the CD or USB 1.0/1.1 may not played properly. BD, DVD or USB Available File extensions: “.jpg”, “.jpeg”, “.png”, 2.0 are recommended to play back HD movie “.avi”, “.divx”, “.mpg”, “.mpeg”, “.mkv”, “.mp4”, “.mp3”, files. -
Page 11: Regional Code
Preparation Regional Code For Dolby® Digital Plus, Dolby TrueHD and DTS- HD multi-channel audio playback: This unit has a regional code printed on the • An amplifier/receiver with a built-in (Dolby rear of the unit. This unit can play only BD-ROM Digital, Dolby Digital Plus, Dolby TrueHD, or DVD discs labeled same as the rear of the DTS or DTS-HD) decoder. -
Page 12: Remote Control
Preparation Remote control • • • • • • a • • • • • • • • • • • • c • • • • • • 1 (POWER): Switches the HOME ( ): Displays or exits player ON or OFF. the [Home Menu]. -
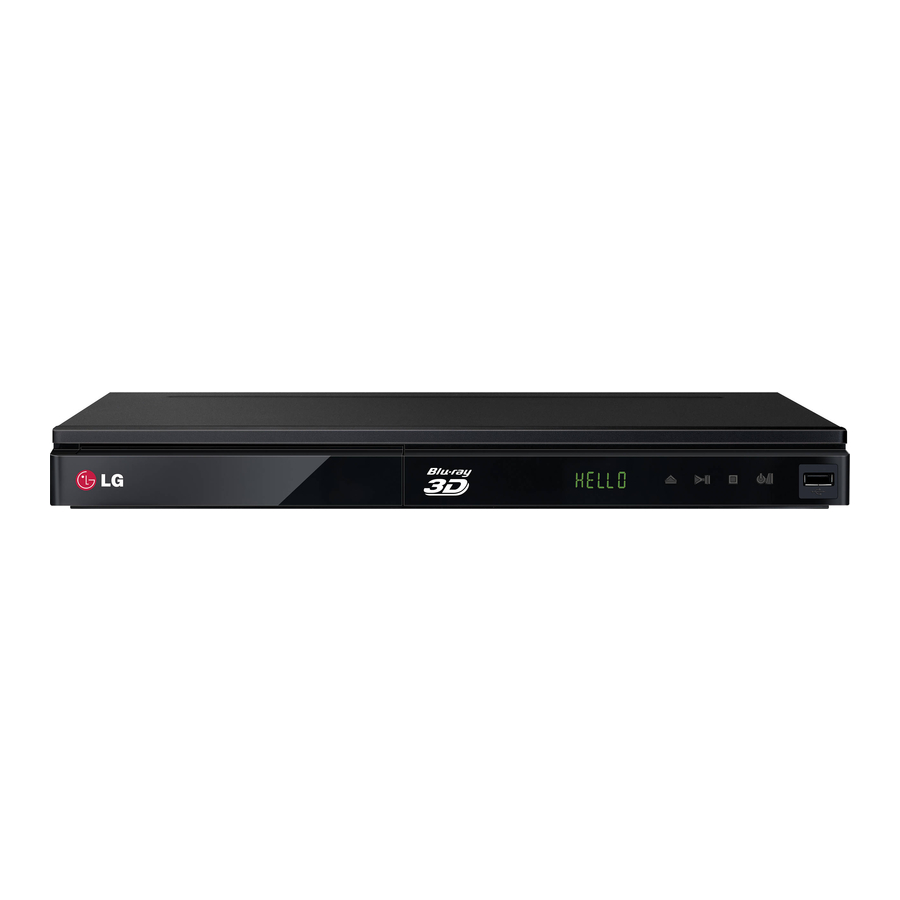
Page 13: Front Panel
Preparation Front panel a Disc Tray (PLAY / PAUSE) b Display Window (STOP) c Remote Sensor (POWER) Button (OPEN/CLOSE) h USB Port Rear panel a AC power cord e HDMI OUT (Type A, Version 1.3) b VIDEO OUT f DIGITAL AUDIO OUT (COAXIAL) c 2CH AUDIO OUT (Left/Right) g LAN port d COMPONENT VIDEO OUT (Y P... -
Page 14: Installation
Installation Installation Connecting to Your TV HDMI Connection If you have a HDMI TV or monitor, you can connect it to this player using a HDMI cable (Type A, Version 1.3). Connect the HDMI jack Make one of the following connections, on the player to the HDMI jack on a HDMI depending on the capabilities of your existing compatible TV or monitor. -
Page 15: What Is Simplink
HDMI device Some functions of this unit are controlled by ’s audio sound may be distorted or may not the TV’s remote control when this unit and LG output. TV’s with SIMPLINK are connected through • When you use HDMI connection, you can... -
Page 16: Component Video Connection
Installation Component Video Connection NOTE Connect the COMPONENT VIDEO OUT jacks on When you use COMPONENT VIDEO OUT the player to the corresponding input jacks on connection, you can change the resolution for the the TV using component video cable. Connect output. -
Page 17: Resolution Setting
Installation Resolution Setting NOTE The player provides several output resolutions for HDMI OUT and COMPONENT VIDEO OUT • If your TV does not accept the resolution you have set on the player, you can set resolution to jacks. You can change the resolution using 480p as follows: [Setup] menu. -
Page 18: Connecting To An Amplifier
Installation Connecting to an Connecting to an Amplifier via HDMI Output Amplifier Connect the player’s HDMI OUT jack to the corresponding in jack on your amplifier using a HDMI cable. You will need to activate the player’s digital output. (See “[AUDIO] Menu” on Make one of the following connections, pages 27-28.) depending on the capabilities of your existing... -
Page 19: Connecting To An Amplifier Via Digital Audio Output
Installation Connecting to an Amplifier via Connecting to an Amplifier via Digital Audio Output 2 Channel Audio Output Connect the player’s DIGITAL AUDIO OUT jack Connect the Left and Right 2CH AUDIO OUT to the corresponding in jack (COAXIAL) on your jacks on the player to the audio left and right amplifier. -
Page 20: Connecting To Your Home Network
Installation Connecting to your Wired Network Connection Home Network Router/Modem Broadband This player can be connected to a local area service network (LAN) via the LAN port on the rear panel. By connecting the unit to a broadband home network, you have access to services such as software updates, BD-Live interactivity and streaming services. -
Page 21: Wired Network Setup
Installation Wired Network Setup NOTE If there is a DHCP server on the local area If there is no DHCP server on the network and you network (LAN) via wired connection, this player want to set the IP address manually, select [Static] will automatically be allocated an IP address. - Page 22 Installation Notes on Network Connection: • Any fees charged by an ISP including, without limitation, connection charges are • Many network connection problems during your responsibility. set up can often be fixed by re-setting the • A 10 Base-T or 100 Base-TX LAN port is router or modem.
-
Page 23: Usb Device Connection
Installation USB device 3. Select [Movie],[Photo] or [Music] using Y, and press ENTER ( ). connection This player can play movie, music and photo files contained in the USB device. 4. Select the [USB] option using Y, and press ENTER ( ). Playback content in the USB device 1. -
Page 24: Settings
Installation Settings NOTE • This player supports USB flash drive/external HDD formatted in FAT16, FAT32 and NTFS when Adjust the Setup Settings accessing files (movie,music, photo). However, for BD-Live and Audio CD recording, only FAT16 You can change the settings of the player in and FAT32 formats are supported. -
Page 25: Display] Menu
Installation 4. Use vV to select a second setup option, NOTE and press ENTER ( ) to move to the third level. You cannot select [4:3 Letter Box] and [4:3 Pan Scan] option when the resolution is set to higher than 720p. -
Page 26: Language] Menu
Installation 1080p Display Mode [LANGUAGE] Menu When the resolution is set to 1080p, select [24Hz] for smooth presentation of film material (1080p/24 Hz) with a HDMI-equipped display Display Menu compatible with 1080p/24 Hz input. Select a language for the [Setup] menu and on-screen display. -
Page 27: Audio] Menu
Installation [AUDIO] Menu NOTE Each disc has a variety of audio output options. • When [HDMI] option is set to [PCM Multi-Ch], Set the player’s Audio options according to the the audio may output as PCM Stereo if the PCM Multi-Ch information is not detected from HDMI type of audio system you use. - Page 28 Installation DRC (Dynamic Range Control) DTS Neo:6 This function allows you to listen to a movie at If the player is connected to the multi-channel a lower volume without losing clarity of sound. Audio Receiver by HDMI connection, set this option to enjoy the multi-channel surround [Off] sound with the 2-channel audio source.
-
Page 29: Lock] Menu
Installation DVD Rating [LOCK] Menu Blocks playback of rated DVD based on their content. (Not all discs are rated.) The [LOCK] settings affect only BD and DVD [Rating 1-8] playback. Rating one (1) has the most restrictions and To access the any features in [LOCK] settings, rating eight (8) is the least restrictive. -
Page 30: Network] Menu
Installation [OTHERS] Menu [NETWORK] Menu The [NETWORK] settings are needed to use the DivX VOD software update, BD Live and On-line features. ABOUT DIVX VIDEO: DivX® is a digital video format created by DivX, Inc. This is an official Connection Setting DivX Certified device that plays DivX video. -
Page 31: Auto Power Off
Operation Auto Power Off The screen saver appears when you leave the player in Stop mode for about five minutes. If you set this option to [On], the unit automatically turns itself off after the Screen Saver is displayed for 20 minutes. Set this option to [Off ] to leave the screen saver until the unit is operated by the user. -
Page 32: General Playback
Operation Operation General Playback 5. Select the [Disc] option using Y, and press ENTER ( ). Playing Discs 1. Press Z (OPEN/CLOSE), and place a disc on the disc tray. Insert a disc This step is needed only when a disc and a USB device is connected simultaneously in this unit. -
Page 33: Using The Disc Menu
Operation Using the disc menu To stop playback AVCHD Press x (STOP) while playback. To display the disc menu To pause playback The menu screen may be displayed first after Press X (PAUSE) while playback. loading a disc which contains a menu. If you Press N (PLAY) to resume playback. -
Page 34: Advanced Playback
Operation Advanced Playback Repeating a specific portion AVCHD ACD MOVIE This player can repeat a portion you have selected. Repeat Playback 1. While playback, press REPEAT to select [A-] AVCHD ACD MUSIC at the beginning of the portion you wish to MOVIE repeat. -
Page 35: Marker Search
Operation Marker Search Using the search menu AVCHD MOVIE AVCHD MOVIE You can start playback from up to nine Using search menu, you can easily to find the memorized points. point where you want to start playback. To enter a marker To search a point 1. -
Page 36: Changing Content List View
Operation Changing content list view Viewing content information MUSIC PHOTO MOVIE MOVIE On the [Movie] [Music] or [Photo] menu, you The player can display the content information. can change the content list view. 1. Select a file using vVY. 2. Press INFO/DISPLAY ( ) to display the Method 1 option menu. -
Page 37: On-Screen Display
Operation On-Screen display 2. Select an option using vV. 3. Use Y to adjust the selected option value. 4. Press RETURN(O) to exit the On-Screen You can display and adjust various information display. and settings about the content. NOTE Displaying content information on-screen • If no button is pressed for a few seconds, the on- screen display disappears. -
Page 38: Hearing A Different Audio
Operation Hearing a different audio Watching from a different angle AVCHD MOVIE 1. During playback, press INFO/DISPLAY ( ) to display the On-Screen display. If the disc contains scenes recorded at different camera angles, you can change to a different 2. -
Page 39: Enjoying Bd-Live
Operation Enjoying BD-Live™ Changing the Picture Mode AVCHD MOVIE You can change the [Picture mode] option while playback. This unit allows you to enjoy functions such as picture-in-picture, secondary audio and Virtual 1. During playback, press INFO/DISPLAY ( ) to packages, etc., with BD-Video supporting display the On-Screen display. -
Page 40: Playing A Movie File And Vr Disc
Operation Playing a movie file 3. Press HOME ( ), and set the [BD-LIVE connection] option on the [Setup] menu and VR disc (page 30). Depending on a disc, the BD-Live function may not be operated if [BD- LIVE connection] option is set to [Partially Permitted]. -
Page 41: Changing Subtitle Code Page
Operation NOTE NOTE If you press x (STOP) during playback, the subtitle • The file requirements are described on page 10. selection is cancelled. • You can use various playback functions. Refer to pages 32-36. • Unfinalized DVD VR format discs may not be played in this player. -
Page 42: Viewing A Photo
Operation Viewing a photo To play a slide show Press N (PLAY) to start slide show. To stop a slide show You can view photo files using this player. Press x (STOP) while slide show. 1. Press HOME ( To pause a slide show Press X (PAUSE) while slide show. -
Page 43: Listening To Music While Slide Show
Operation a Current photo/Total number of photos – Use Y to view previous/next photo. b Slide Show – Press ENTER ( ) to start or pause slide show. c Music Select – Select the background music for the slide show (page 43). d Music –Press ENTER ( ) to start or pause 4. -
Page 44: Listening To Music
Operation Listening to music NOTE • The file requirements are described on page 10. • You can use various playback functions. Refer to The player can play Audio CDs and audio files. pages 32-36. 1. Press HOME ( Displaying MP3 music information (ID3 Tag) 1. - Page 45 Operation 3. Press INFO/DISPLAY to display the option Enter a folder name using virtual keyboard, menu. and press ENTER ( ) while [OK] is selected. 4. Use vV to select [CD Recording] option, 8. Use vVY to select [OK], and press ENTER and press ENTER ( ) to display the [CD ( ) to start Audio CD Recording.
-
Page 46: Using The On-Line Entertainment Access
Operation Using the On-line Using the AccuWeather Entertainment Access You can use various content services via See on-line local and global weather forecasts Internet with the On-line Entertainment Access from AccuWeather.com. feature. Viewing weather information 1. Check the network connection and settings (pages 20-22). - Page 47 Operation Adding more cities 5. Select a city using vVY, and press ENTER ( ). 1. Use Y to select [Favorite City List] on the AccuWeather menu, and press ENTER ( ). 6. Use vVY to select [Home] and press ENTER ( ) to display weather information of the selected city.
-
Page 48: Playing Youtube™ Videos
Featured – The featured videos list will be You can browse, search and watch YouTube™ videos over the internet to your TV via your LG displayed. Blu-ray disc player. Recent Videos – The most recently updated videos list will be displayed. -
Page 49: Using The Virtual Keyboard
Operation [Cancel] – Returns to the previous screen. NOTE [Space] – Inserts a space at the cursor position. • The YouTube™ menu can display 5 videos in the [Backspace] – Deletes the previous character videos list. Press green (G) or yellow (Y) buttons at the cursor position. - Page 50 Operation 1. Use Y to select [Sign In] option from the Button Operation menu and press ENTER ( ) to display the virtual keyboard. CLEAR Deletes the previous character at the cursor position. REPEAT Inserts a space at the cursor position.
-
Page 51: Viewing Picasa™ Web Albums
Operation Viewing Picasa™ Web Albums Options while viewing a photo You can use various options during viewing a photo in full screen. 1. While viewing a photo in full screen, press INFO/DISPLAY ( ) to display the option Enjoy photo albums from friends and family on menu. - Page 52 Operation About the Picasa™ menu Adding friends There are various options on the Picasa™ If you add your friends on the [NetCast Friends] menu. Use vVY to select an menu option menu, you can see the photos of your friend’s and press ENTER ( ) to select the options as public photos directly.
- Page 53 Operation Searching photos 3. Enter the password using the virtual keyboard, and press ENTER ( ) while [OK] is You can enter a search word to find related selected. photos. Your web album is appeared on the screen. 1. Select the [Search] on the Picasa™ menu 4.
-
Page 54: Maintenance
Maintenance Maintenance Notes on Discs Handling the Unit Handling Discs When shipping the unit Do not touch the playback side of the disc. Please save the original shipping carton and Hold the disc by the edges so that fingerprints packing materials. If you need to ship the unit, do not get on the surface. -
Page 55: Troubleshooting
Troubleshooting Troubleshooting General Symptom Cause & Solution The Power does not • Plug the power cord into the wall outlet securely. turned on. The unit does not start • Insert a playable disc. (Check the disc type, color system, and playback. -
Page 56: Picture
Troubleshooting Picture Symptom Cause & Solution There is no picture. • Select the appropriate video input mode on the TV so the picture from the unit appears on the TV screen. • Connect the video connection securely. • Check the [HDMI Color Setting] in the [Setup] menu is set to the appropriate item that conforms to your video connection. -
Page 57: Network
You can update the Player using the latest software to enhance the products operation and/or add new features. To obtain the latest software for this player (if updates have been made), please visit http://us.lgservice.com or contact LG Electronics customer care center. -
Page 58: Appendix
Appendix Appendix Controlling a TV with NOTE the Supplied Remote Depending on the unit being connected, you may not be able to control your TV using some of the Control buttons. Setting up the remote to control your TV You can control your TV using the buttons below. -
Page 59: Network Update Notification
Appendix Network Software Option 2: If the software update is available from the Update update server, the “Update” icon appears at the bottom of the Home menu. Press blue (B) colored button to start the update procedure. Network update notification Software Update From time to time, performance improvements You can update the player using the latest... - Page 60 The Software Update function may not work properly depending on your Internet environment. In this case, you can obtain the latest software from the authorized LG Electronics Service Center then update your player. Refer to “Customer Support” on page 57.
-
Page 61: Area Code List
Appendix Area Code List Choose an area code from this list. Area Code Area Code Area Code Area Code Afghanistan Fiji Monaco Singapore Argentina Finland Mongolia Slovak Republic Australia France Morocco Slovenia Austria Germany Nepal South Africa Belgium Great Britain Netherlands South Korea Bhutan... -
Page 62: Language Code List
Appendix Language code List Use this list to input your desired language for the following initial settings: [Disc Audio], [Disc Subtitle] and [Disc Menu]. Language Code Language Code Language Code Language Code Afar 6565 French 7082 Lithuanian 7684 Sindhi 8368 Afrikaans 6570 Frisian... -
Page 63: Trademarks And Licenses
Appendix Trademarks and Licenses “DVD Logo” is a trademark of DVD Format/Logo Licensing Corporation. This product is licensed under the AVC patent “Blu-ray Disc™”, “Blu-ray™” and “Blu-ray Disc™” logo are portfolio license and VC-1 patent portfolio license trademarks of Blu-ray Disc Association. for the personal and non-commercial use of a consumer to (i) encode video in compliance with the AVC Standard and VC-1 Standard (“AVC/VC-1... - Page 64 Appendix Manufactured under license under U.S. Patent #’s: 5,451,942; 5,956,674; 5,974,380; 5,978,762; 6,226,616; 6,487,535; 7,212,872; 7,333,929; 7,392,195; 7,272,567 & other U.S. and worldwide patents issued & pending. DTS is a registered trademark and the DTS logos, Symbol, DTS-HD and DTS-HD Master Audio are trademarks of DTS, Inc.
-
Page 65: Audio Output Specifications
Appendix Audio Output Specifications Jack/Setting Digital Output (SPDIF) (DIGITAL AUDIO OUT) Analog 2CH Output Source PCM Stereo DTS Re-encode Primary Pass-Thru Dolby Digital PCM 2ch PCM 2ch Dolby Digital Dolby Digital Plus PCM 2ch PCM 2ch Dolby Digital Dolby TrueHD PCM 2ch PCM 2ch DTS (2CH) - Page 66 Appendix *5 If the [HDMI] or [Digital Output (SPDIF)] • Multi-channel Digital Surround Sound via option is set to [DTS re-encode], the audio digital connection can only be obtained output is limited to 48 kHz and 5.1Ch. If the if your receiver is equipped with a Digital [HDMI] or [Digital Output (SPDIF)] option is Multi-channel decoder.
-
Page 67: Video Output Resolution
Appendix Video Output Resolution When the non-copy protected media is playing back Video Out COMPONENT VIDEO OUT HDMI OUT HDMI connected HDMI disconnected Resolution 480i 480p 480i 480p 480p 480p 720p 720p 720p 1080i 1080i 1080i 1080p/24 Hz 1080p / 24 Hz 1080i 1080p / 60 Hz 1080p / 60 Hz... -
Page 68: Specifications
Appendix Specifications System Laser: Semiconductor laser General wavelength: 405 nm / 650 nm Power requirements: AC 120 V ~, 60 Hz Signal system: Standard NTSC color TV system Power consumption: 14 W Frequency response: 20 Hz to 20 kHz Dimensions (W x H x D): (48 kHz, 96 kHz, 192 kHz sampling) Approx. -
Page 69: Important Information Relating To Network Services
The Network Services belong to third parties and facilities over which LG has no control. LG EXPRESSLY may be protected by copyright, patent, trademark DISCLAIMS ANY RESPONSIBILITY OR LIABILITY and/or other intellectual property laws. The Network... -
Page 70: Open Source Software Notice
LGPL LIBRARIES: glibc, libmtp, libusb, libusb-compat purpose, provided that the above copyright notice and LG Electronics offers to provide source code to you on the following two paragraphs appear in all copies of this CD-ROM for a charge covering the cost of performing software. -
Page 71: Warranty
LG Electronics, Inc. Limited Warranty - USA This LG Electronics product, will be repaired or replaced, at LG’s option, if it proves to be defective in material or workmanship, under normal use, during the warranty period (“Warranty Period”) listed below, effective from the date (“Date of Purchase”) of original consumer purchase of the product. - Page 72 As an E ® Partner, LG nergy LG Customer Information Center has determined that this product or product models meet the 1-800-243-0000 USA, Consumer ® guidelines for energy nergy 1-888-865-3026 USA, Commercial efficiency. ® is a U.S. registered mark. nergy Register your product Online! www.lg.com...