
Related Manuals for GE 21098GE3


Summary of Contents for GE 21098GE3
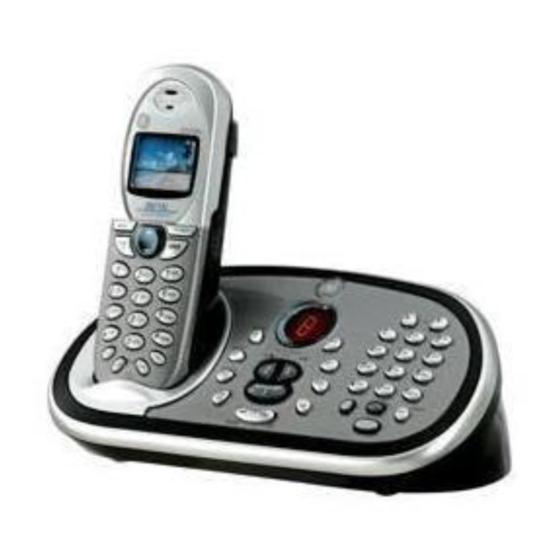
- Page 1 21098 2.4 GHz Color Display Cordless Handset Call Waiting Caller ID Phone System User’s Guide...
-
Page 2: Equipment Approval Information
Equipment Approval Information Your telephone equipment is approved for connection to the Public Switched Telephone Network and is in compliance with parts 15 and 68, FCC Rules and Regulations and the Technical Requirements for Telephone Terminal Equipment published by ACTA. 1 Notification to the Local Telephone Company On the bottom of this equipment is a label indicating, among other information, the US number and Ringer Equivalence Number (REN) for the equipment. -
Page 3: Licensing
This equipment generates, uses, and can radiate radio frequency energy and, if not installed and used in accordance with the instructions, may cause harmful interference to radio communications. However, there is no guarantee that interference will not occur in a particular installation. If this equipment does cause harmful interference to radio or television reception, which can be determined by turning the equipment off and on, the user is encouraged to try to correct the interference by one or more of the following measures:... -
Page 4: Table Of Contents
Table of Contents ) 21 ....2 ECURITY CODE FOR ANSWERING MACHINE QUIPMENT PPROVAL NFORMATION ......2 ING TO NSWER FOR ANSWERING MACHINE NTERFERENCE NFORMATION ............22 ........... 3 ICENSING ......23 (HAC) ....3 HONE ETTING EARING OMPATIBILITY ..........23 ANGUAGE ........ -
Page 5: Save These Instructions
....41 ........ 57 DVANCED NTERCOM EATURES NOTHER OCATION ........57 ECEIVING NCOMING ELEPHONE EMORY ....41 ......58 URING NTERCOM HANGING THE ATTERY ....58 SING NTERCOM XTERNAL ELEPHONE ATTERY AFETY RECAUTIONS ..........41 21009A O ALLS PTIONAL ANDSET DDITIONAL ........ -
Page 6: Fcc Rf Radiation Exposure Statement
SAFETY INSTRUCTIONS provided with this product and save them for future reference. Congratulations on purchasing the GE Color Display Cordless Handset Telephone System. This system operates in the 2.4 GHz frequency range, and is unique to conventional cordless telephones. When the base is connected to electrical power and a telephone line, you can place a fully- featured cordless handset anywhere electrical power is available. - Page 7 • 3-way conferencing, intercom, call transfer, and room monitoring between handsets (by purchase of optional Model 21009A handset) This telephone has been designed to be simple to use, however, you can reach its full potential more quickly by taking a few minutes to read this Instruction Book.
-
Page 8: Handset Layout
Handset Layout display SELECT (button) SPKR (speaker button) MENU (button) TALK/END/call back (button) skip (button) review (button) play-stop (button) erase (button) # pause (button) *exit (button) flash/delete (button) (intercom button) redial (button) ringer/hi lo off (button) microphone... -
Page 9: Base Layout
Base Layout PLAY/STOP 2 LANGUAGE (button), (button/indicator) RINGER MIN (Minute) (button), (OFF, LO, HI) HOUR (button), PLAY/STOP 3 DAY/CHECK (button) (button/indicator) vol (buttons) display PAGE/INT (button) (memory button) del (button) *exit (button) # pause (button) flash (button) announce 1 (button) do not disturb (button/indicator) hold... -
Page 10: Parts Checklist
Parts Checklist Make sure your package includes the items shown here. Handset Belt clip Battery and battery Base compartment doors Telephone line AC power adaptor cord Telephone Jack Requirements Wall plate To use this phone, you need an RJ11C type modular phone telephone jack, which might look like the one Modular pictured here, installed in your home. -
Page 11: Installation
Installation INSTALLATION NOTE: Some cordless telephones operate at frequencies that may cause or receive interference with TVs, microwave ovens, and VCRs. To minimize or prevent such interference, the base of the cordless telephone should not be placed near or on top of a TV, microwave ovens, or VCR. If such interference continues, move the cordless telephone farther away from these appliances. -
Page 12: Installing The Handset Battery
Installing the Handset Battery NOTE: You must connect the handset battery before use. 1. Locate battery and battery door which are packaged together inside a plastic bag and are separate from the handset. 2. Locate the battery compartment on the back of the handset. 3. -
Page 13: Connecting The Ac (Electrical) Power
Connecting the AC (Electrical) Power On the base, plug one end of the power adaptor cord into the power jack on the back of the base and the other end into an electrical outlet. CAUTION: Use only the ATLINKS USA, Inc. power adaptor 5-2596 that came with this unit. -
Page 14: Answering System Setup
NOTE: To change to “English,” press the language button again. NOTE: In remote access mode, the system follows the selected language. The voice prompt language cannot be switched remotely. Answering System Setup This section shows you how to set up your answering system to receive incoming calls. -
Page 15: Voice Instruction
Speaker Volume Use the vol ( or ) buttons to adjust speaker volume on the base to a comfortable level. L1 is the minimum speaker volume and L8 is the maximum. Voice Instruction If you need additional assistance, press the REVIEW button in standby mode and follow the voice instructions. -
Page 16: A Nnouncement
Reviewing and Choosing the Announcement Press and release the announce 1 button to review and select this one as your outgoing announcement. Or, press and release the announce 2 button to review and select this one as your outgoing announcement. Answering System Operation This section discusses the buttons and features on the answering system. -
Page 17: Leavinga Message
l) Message counter has SP on the display - Spanish is selected as the current voice prompt during language selection. NOTE: While the messages are playing, the message counter will display the messages in the order they were received. NOTE: The maximum recording time for each message is 3 minutes and the total recording time of this unit is 20 minutes. -
Page 18: Message Playback
Message Playback The message counter and the base mailbox button/indicators (play/stop 1, 2 or 3) let you know when you have message(s) or new message(s). To play the messages, press the corresponding play/stop 1, 2 or 3 button. While a message is playing, you may do the following: •... -
Page 19: Leaving A Memo
To erase a message from the handset: 1. Press the MENU button on the handset. 2. Use the ( or ) buttons to select ANSWERER and press SELECT to enter the menu. 3. Use the touch tone pad or the or buttons to select 1 REMOTE ACCESS. -
Page 20: Programming Functions
Programming Functions The system uses a menu structure to give you access to all of the built- in features. You may program the following items in main menu: Room Monitor, Answerer, Display Setting, Phone Setting and Sound Setting. During programming, you may press the *exit button at any time to exit and keep the previous setting. -
Page 21: Nswerer
NOTE: If handsets have been named, then the name will be displayed on the LCD instead of handset numbers. NOTE: During the room monitoring, it will emit a beep tone if there are incoming calls. You may press the TALK/END/call back button or SPKR button to answer the call and quit the room monitor mode. - Page 22 7. Use the touch tone pad to enter your new 3-digit security code. The default setting is 123. 8. Press the SELECT button to save your selection. You will hear a confirmation tone. NOTE: If you make a mistake, key in the digits again or press the flash/delete button to erase all and re-enter.
-
Page 23: Anguage
Phone Setting You may program the following items: Language, Area Code, Handset Name, Registration, Deregistration and Default Setting. Language 1. Make sure your phone is OFF (not in talk mode). 2. Press the MENU button to go to the main menu. 3. -
Page 24: Registration
5. Use the or buttons or touch tone pad to scroll to 2 AREA CODE menu. 6. Press the SELECT button to enter the menu. SET AREA CODE shows on the display. 7. Use the touch tone pad to enter your 3 digit area code. “- - -” is the default setting. -
Page 25: Handset Name
1 NO 2 YES REGISTRATION 7. Use the touch tone pad on the handset to select 1 for NO or 2 for YES or use the or buttons to scroll to 1 for NO or 2 for YES. The default is 1 8. -
Page 26: Deregistration
7. Use the touch tone pad to enter a name (up to 15 characters). More than one letter is stored in each of the number keys. For example, to enter Bill Smith, press the 2 key twice for the letter B. Press the 4 key 3 times for the letter I. -
Page 27: Global De-Registration
7. Use the touch tone pad on the handset to select 1 for NO or 2 for YES or use the or buttons to scroll to 1 NO or 2YES. The default setting is 1 WARNING: It is not recommended that a handset be de-registered unless absolutely necessary because once a handset is de-registered, that handset’s telephone features cannot be used until the handset is re-registered. -
Page 28: Default Setting
3. Press and release the PAGE/INT button on the base once. All handsets are de-registered and HANDSET NEEDS REGISTRATION shows on the display. Default Setting 1. Make sure your phone is OFF (not in talk mode). 2. Press the MENU button to go to the main menu. 3. -
Page 29: Wallpaper
Wallpaper You may choose from ten different wallpapers. 1. Make sure your phone is OFF (not in talk mode). 2. Press the MENU button to go to the main menu. 3. Use the or buttons to scroll to DISPLAY SETTING. 4. -
Page 30: Set The Contrast
COLOR SCHEME 7. Use the or buttons to scroll to 1 BLUE, 2 GREEN, 3 RED, 4YELLOW, or use the touch tone pad to select the desired color scheme. The default setting is 2 GREEN. 8. Press the SELECT button to save your selection. You will hear a confirmation tone. -
Page 31: Sound Setting
Sound Setting You may program the following items: Ringer Volume, Ringer Tone and Key Tone. Ringer Volume 1. Make sure your phone is OFF (not in talk mode). 2. Press the MENU button to go to the main menu. 3. Use the or buttons to scroll to SOUND SETTING. 4. -
Page 32: Key Tone
4. Press the SELECT button to confirm. 5. Use the or buttons or touch tone pad to scroll to 2 RINGERTONE menu. 6. Press the SELECT button to enter the menu. SET RINGERTONE shows on the display. SET RINGER TONE 7. -
Page 33: Call
SET KEY TONE 7. Use the touch-tone pad on the handset to select 1 for ON or 2 for OFF or use the or buttons. The default is 1 ON. 8. Press the SELECT button to save your selection. You will hear a confirmation tone. -
Page 34: Call Timer
2. When finished, press the SPKR button or speaker button on the base again to hang up. Making A Call with The Speakerphone 1. Press the SPKR button on the handset or speaker button on base. Listen for a dial tone. 2. -
Page 35: Number Redial
• To connect to the waiting call, press the flash/delete button on the handset, or flash button on the base, and your original call is put on hold. • To switch between the two calls, press the flash/delete button on the handset, or flash button on the base. - Page 36 IMPORTANT NOTE: The following procedures for the handset can ONLY be done with a Model 21098A handset. If you are using an optional Model 21009A handset, please refer to the Section “21009A Optional Handset Additional Instructions” in the latter part of this User’s Guide. Paging from the Base 1.
- Page 37 STEVE RAYMOND SENDING HANDSET RECEIVING HANDSET Handset Paging The Base 1. Make sure the phone is OFF (not in talk mode). 2. Press the MENU button to go to the main menu. 3. Use the or buttons to scroll to INTERCOM. 4.
-
Page 38: Mute
Mute To have a private, off-line conversation, use the MUTE feature. The party on the telephone line cannot hear you, but you can hear them. On the Base 1. Press the mute button on the base. The mute indicator turns on. 2. -
Page 39: D O Not Disturb
Speakerphone/Answering System Volume Control When the speakerphone is ON, adjust the volume by pressing the vol ( or ) buttons . There are eight volume levels, and each press of the volume button adjusts the speaker volume by one level. NOTE: You can also adjust the volume during intercom mode, and conference mode. - Page 40 3. Enter the handset number you want to intercom with. NOTE: To cancel page, press the PAGE/INT button again or the *exit button on the base. 4. Wait for the person at the receiving handset to press the int button. 5.
-
Page 41: Receiving An Intercom Call
3. Use or button to scroll to INTERCOM. 4. Press SELECT button to access the intercom menu. NOTE: You may press the int button to shortcut to the intercom menu. 5. Use the touch-tone pad or the or button to select 0 BASE UNIT. 6. -
Page 42: Two-Way Calling
NOTE: Before you intercom/page another handset or base, you must decide whether you want to create a two-way or a three-way conversation. IMPORTANT NOTE: The following procedures for the handset can ONLY be done with a Model 21098A handset. If you are using an optional Model 21009A handset, please refer to the Section “21009A Optional Handset Additional Instructions”... -
Page 43: Three-Way Calling
Three-Way Calling On the Base 1. During an external call, press the PAGE/INT button on base. P_ shows on the display. 2. Use the touch-tone pad to enter the handset number. You will hear a paging tone and PX shows in the indicator where X is the handset number. -
Page 44: Transferring External Calls To Other Handsets
Transferring External Calls To Other Handsets During an external call, you may transfer the external call to another handset. On the Base 1. Press the PAGE/INT button on the base to put an external call on hold, and then page the receiving handset. 2. -
Page 45: Storinga Name Andn
IMPORTANT NOTE: The following procedures for the handset can ONLY be done with a Model 21098A handset. If you are using an optional Model 21009A handset, please refer to the Section “21009A Optional Handset Additional Instructions” in the latter part of this User’s Guide. Storing A Name and Number in Phone book on Handset 1. - Page 46 9. Use the touch-tone pad to enter a name (up to 15 characters). More than one letter is stored in each of the number keys. For example, to enter Bill Smith, press the 2 key twice for the letter B. Press the 4 key 3 times for the letter I.
-
Page 47: Storing The Last Number Dialed
13. Press the SELECT button to save the record. The unit beeps to confirm. 14. To enter another name and number in a different memory location, return to step 4 and repeat the process. This feature allows you to assign a specific melody for the phone book entry. -
Page 48: Stored Number
NOTE: If the redial number is longer than 24 digits, the redial number cannot be stored in memory. On the Cordless Handset Make sure the phone is OFF (not in talk mode). 1. Press the redial button on the handset to access the DIALED menu. 2. -
Page 49: Book On Handset
Changing Records Stored in Memory On the Base 1. Make sure the phone is OFF (not in talk mode). 2. Press the mem button to display [ ] on the indicator. 3. Press the desired memory location button (0 through 9 number keys). 4. -
Page 50: Cordless Handset
4. Press SELECT button to access the phone book. 5. Use the or buttons to scroll to desired record. 6. Press the SELECT button to access record details. 7. Press the SELECT button again to enter the option menu. 8. -
Page 51: Chain Dialing From Memory
Dialing a Number from Memory On The Base 1. Make sure the phone is ON (in talk mode) by pressing the speaker button. 2. Press the mem button to display [ ]. 3. Use the touch tone pad to enter the memory location number (0-9). The number dials automatically. -
Page 52: Caller Id (Cid)
2. Press the MENU button to access the option menu. 3. Use the 3 button or touch-tone pad to select PHONE BOOK. 4. Press SELECT to show the list of records, the corresponding number of the highlighted record is shown on the bottom of the display. 5. -
Page 53: Cid Error Codes
CID Error Codes Various Caller ID error messages may appear on the display. Refer to the Display Messages section of this User’s Guide for more information. Receiving CID Records When you receive a call, the Caller ID information is transmitted between the first and second ring. -
Page 54: Storing Cid Records In Internal Memory
Storing CID Records in Internal Memory You may also store CID information in the phone’s internal memory. You may not reformat CID records stored in memory. TIP: To prevent the CID information from automatically being deleted, you may want to store it in the phone’s memory. NOTE: It is important that you format CID records correctly before storing in internal memory. -
Page 55: Deleting Acid Record
NOTE: Depending on (a) how the incoming caller’s phone number is formatted when it is received, and (b) whether or not you previously pre- programmed your local area code into the set up menu, you may need to adjust the format of the incoming caller’s stored phone number before making the call. -
Page 56: Cordless Handset
6. Press SELECT again to confirm deletion. DELETED shows on the display. NOTE: Press the *EXIT key to return to the standby mode. Deleting All CID Records 1. Make sure the phone is OFF (not in talk mode). 2. Press the MENU button to access the option menu. 3. -
Page 57: Screening Calls From The Handset
Screening Calls from the Handset Use the handset to screen calls even when you can’t hear the answering system. When the answering system picks up: 1. Press the SELECT button to access the answering system. 2. Listen as the caller leaves a message. 3. -
Page 58: Hanging The Battery
You should erase some messages so the answering system can record new messages. NOTE: The unit also answers after the 10th ring if it is turned off. To access the answering system, enter your 3-digit security code after you hear the beep. Changing the Battery CAUTION: To reduce the risk of fire or personal injury, use only the battery listed... -
Page 59: 21009A Optional Handset Additional
21009A Optional Handset Additional Instructions 1. Make sure the originating phone is OFF (not in talk mode). 2. Press and release the int button on the handset. PAGING EXTENSION? shows on the display. 3. Use the touch-tone pad to enter the extension you want to page. (0 - to page base, 1 - to page handset 1, 2 - to page handset 2, 3 - to page handset 3, 4 - to page handset 4, and 5 - to page all handsets). -
Page 60: Hree -Way Calling
Three-Way Calling 1. During an external call, press the page/int key. LINE ON HOLD EXTENSION? shows on the display. 2. Use the touch-tone pad to select Handset 1 or Handset 2. You will hear a paging tone and PAGING shows in the originating handset’s display. NOTE: “PAGING FROM...”... -
Page 61: Reviewing And Dialing From Memory
8. To enter another name and number in a different memory location, return to step 2 and repeat the process. Reviewing and Dialing from Memory 1. Make sure the phone is ON (in talk mode) by pressing the TALK/END/ call back button. 2. -
Page 62: Toring Vip Melody
Storing VIP Melody 1. Make sure the phone is OFF (not in talk mode). 2. Press the mute/prog button once to display the submenus; ROOM MONITOR and HANDSET SETUP. 3. Press the or buttons to scroll to the HANDSET SETUP. 4. -
Page 63: Record
When REPLACE VIP# ? shows on the display, you must press the mute/prog button on the handset to confirm replacement. Reviewing And Deleting Stored VIP Melody Record 1. Press the mute/prog button to enter the VIP MELODY menu. 2. Use the cid/vol or buttons to scroll to the desired VIP Melody Record. -
Page 64: Onnecting The Belt Clip
4. Press the TALK/END/call back button on the handset. The number dials automatically. NOTE: If the telephone number is corrupted, such as an alphabetical character in a number field, you will hear an error tone and the number will not be dialed. Unit displays “UNABLE TO DIAL.” Deleting a CID Record 1. -
Page 65: Display Messages
Connecting an Optional Headset to the Handset Headset jack Each handset can be used with an optional headset for hands free operation. 1. Connect the headset to the headset jack on the side of the handset. The handset receiver and microphone are disabled when the headset is connected. - Page 66 DELETE? Prompt asking if you want to erase one of the 50 records stored in the phone’s memory. END OF LIST Indicates that there is no additional information in Caller ID Memory. Indicates call or calls have not been reviewed. UNKNOWN/NAME The incoming call is from an area not serviced by Caller ID or the information was not sent.
-
Page 67: Andset Sound Signals
PRESS TALK KEY Indicates CID number is Direct Dial Number (DDN) and cannot be formatted. CHARGING.... This occurs when the handset is placed on the cradle after the battery is inserted. The handset needs to be fully charged before it can function properly Handset Sound Signals Signal... - Page 68 • The handset should beep when you press the TALK/END/call back button, and the charge indicator on the base should be lit when the handset rests in the cradle. If not, the battery may need to be charged. • Place handset in charge cradle for at least 20 seconds to reset the unit. Handset does not ring •...
-
Page 69: Caller Id Solutions
• Unplug the power adaptor from the electrical outlet and the back of the base. Remove the handset battery. Wait for 30 seconds and plug the power adaptor back into the base and electrical outlet. Reconnect the battery and charge for 16 hours. Handset displays SEARCHING or OUT OF RANGE and cannot link up with the base when TALK/END/call back button is pressed. -
Page 70: Eneral Product Care
Battery If you experience any of the following problems, even after recharging the battery, you may need to replace the battery pack: • Short talk time • Poor sound quality • Limited range • In use/charging indicator of the base or charge indicator of the extra charging cradle fails to turn on. - Page 71 • Base is plugged into AC outlet with other electronic devices. • Baby monitor is using the same frequency. • Handset battery is low.
- Page 72 Index Deleting All CID Records 56 Deleting Records Stored in Memory 49 21009A Optional Handset Additional Deregistration 26 Instructions 59 Dialing a CID Number 54 Accessing the Answering System from Another Location 57 Dialing a Number from Memory On The Base 51 Accessory Information 74 Dialing A Number From The Phone Book On The Cordless Handset 50...
- Page 73 Leaving a Memo 19 Leaving A Message 17 Screening Calls 17 Licensing 3 Screening Calls from the Handset 57 Limited Warranty 75 Security code (for answering machine) 21 Service 74 Set The Contrast 30 Mailbox Indicator 17 Setting the Voice Prompt Language 13 Making An Intercom Call 39 Sound Setting 31 Making Calls 33...
-
Page 74: Ervice
Service If trouble is experienced with this equipment, for repair or warranty information, please contact customer service at 1-800-448-0329. If the equipment is causing harm to the telephone network, the telephone company may request that you disconnect the equipment until the problem is resolved. This product may be serviced only by the manufacturer or its authorized service agents. -
Page 75: Limited Warranty
Limited Warranty What your warranty covers: • Defects in materials or workmanship. For how long after your purchase: • One year, from date of purchase. (The warranty period for rental units begins with the first rental or 45 days from date of shipment to the rental firm, whichever comes first.) What we will do: •... - Page 76 ATLINKS USA, Inc. 101 West 103rd Street Model 21098 Indianapolis, IN 46290 00003687 (Rev 0 E/S ) © 2005 ATLINKS USA, Inc. 05-17 Trademark(s) ® Registered Printed in China Marca(s) Registrada(s)
- Page 77 21098 2.4. GHz de Color de la Exhibición Auricular Inalámbrico con Identificador de Llamada en Espera Sistema de Telefóno de Guía del Usuario...
-
Page 78: Información Sobre La Aprobación De Equipo
Información sobre la Aprobación de Equipo El equipo de su teléfono esta aprobado para la conexión con la red Telefónica Pública (Public Switched Telephone Network) y cumple con los requisitos establecidos en las secciones 15 y 68 de las Reglas y Regulaciones de la FCC y con los Requerimientos Técnicos para Equipos de Terminales Telefónicas (Technical Requirements for Telephone Terminal Equipment), publicado por ACTA. -
Page 79: Compatibilidad Con Audífonos (Cca)
Este equipo genera, usa y puede radiar la energía de frecuencia de una radio y, si no fuera instalado y usado de acuerdo con las instrucciones, puede causar interferencia dañosa a las transmisiones radiales. Sin embargo, no hay garantía que la interferencia no ocurrirá en una instalación en particular. Si este equipo causa en efecto una interferencia dañosa a la recepción de la radio o de la televisión, lo cual puede ser determinado apagando y prendiendo el equipo, le animamos a Ud. -
Page 80: Tabla De Contenido
Tabla de Contenido ............23 NFORMACIÓN SOBRE LA PROBACIÓN DE QUIPO DIOMA ..........23 ....2 ÓDIGO DE NFORMACIÓN DE NTERFERENCIAS ............24 ........... 3 EGISTRO ICENSING ....... 25 OMBRE DE URICULAR (CCA)..3 OMPATIBILIDAD CON UDÍFONOS ..........26 UITAR EGISTRO ........ - Page 81 ........42 ..56 LAMADA DE ÍAS ILTRAR LAMADAS DESDE EL URICULAR ........43 LAMADA DE ÍAS ENER CCESO AL ISTEMA ONTESTADOR ....... 57 RANSFERENCIA DE LAMADAS XTERNAS A TROS DESDE OCALIZACIÓN ........... 44 ..........57 URICULARES EMORIA LENA ..........44 ......
-
Page 82: Estatuto Sobre La Exposición A La Radiación De La Fcc Rf
Estatuto sobre la Exposición a la Radiación de la FCC RF Este equipo cumple con los límites expresos por la FCC RF para la exposición de radiación en un ambiente no controlado. Este equipo debe ser instalado y operado a una distancia mínima de 20 centímetros entre el radiador y su cuerpo. - Page 83 • Conferencia de tres vías, intercomunicación, transferencia de llamada, y monitoreo de habitación entre auriculares (mediante la compra del Auricular opcional Modelo 21009) Este teléfono ha sido está diseñado para ser de fácil operación; sin embargo, usted puede aprovechar al máximo su potencial más rápidamente si se toma unos minutos para leer esta Guía del Usuario.
-
Page 84: Formato Del Auricular
Formato del Auricular pantalla SELECT (botón selec) MENU (botón menú) SPKR (botón bocina) TALK/END/call back (botón para hablar/ terminar/devolver el llamado) skip review (botón para volver) (botón para saltar) play-stop (botón para reproducir/ erase detener) (botón para borrar) # pause (botón para pausa) *exit (botón para salir) -
Page 85: Formato De La Base
Formato de la Base PLAY/STOP 2 (botón/ indicador reproducir/ LANGUAGE (idioma), MIN detener 2) (Minute) (botón de minuto), RINGER (OFF, HOUR (botón de hora), PLAY/STOP 3 LO, HI) (timbre, DAY/CHECK (botón dia/ (botón/indicador apagado, bajo, alto) checar) reproducir/ detener 3) PAGE/INT vol (botones (botón buscar/... -
Page 86: Lista De Partes
Lista de Partes Asegúrese que su paquete incluye los artículos mostrados aquí. Puertas del compartimento de Base batería y baterías Auriculare Adaptador de Cable de línea Gancho del corriente AC Cinturón telefónica Requerimientos Para Enchufe Placa de pared Telefónico Para utilizar este teléfono, usted puede necesitar un enchufe Enchufe modular telefónico tipo RJ11C como el ilustrado aquí, instalado telefónico... -
Page 87: Instalación
Instalación NOTA SOBRE LA INSTALACION: Algunos teléfonos inalámbricos operan en frecuencias que pueden causar o recibir interferencia con Televisiones, hornos de microondas, y videograbadoras cercanos. Para minimizar o prevenir tal interferencia, la base del teléfono inalámbrico no debería ser colocada cerca de una TV, horno de microondas, o videograbadora. -
Page 88: Para Instalar La Batería Del Auricular
Para Instalar la Batería del Auricular NOTA: Usted debe conectar la batería del auricular antes de usarlo. 1. Localice la puerta de la batería y la batería que vienen empacadas juntos dentro de una bolsa de plástico y están separados del auricular. 2. -
Page 89: Para Conectar La Corriente
Para Conectar la Corriente AC (Eléctrica) En la base, conecte un extremo del cable del adaptador de corriente en el receptáculo de corriente en la parte posterior de la base y el otro extremo en una toma de corriente. CUIDADO: Utilice únicamente el adaptador de corriente ATLINKS USA, Inc. - Page 90 NOTA: Para cambiar a “English”, presione el botón language otra vez. NOTA: En el modo de acceso remoto, el sistema sigue el idioma seleccionado. El idioma voice prompt no se puede cambiar vía remota. Operación del Sistema Contestador Esta sección le muestra cómo programar su sistema contestador para recibir llamadas entrantes.
-
Page 91: Instrucciones De Voz
Volumen del Altavoz Utilice los botones de vol (/) para ajustar el volumen del altavoz en la base a un nivel cómodo. El nivel mínimo de volumen del altavoz el L1 y el máximo es L8. Instrucciones de Voz Si Ud. necesita ayuda adicional, presione el botón REVIEW en el modo standby y siga las instrucciones de voz. -
Page 92: Para Revisar Y Elegir El Anuncio
Para Revisar y Elegir el Anuncio Presione y suelte el botón announce 1 para revisar y seleccionar este como su mensaje de saludo. O, presione y suelte el botón announce 2 para revisar y seleccionar este como su mensaje de saludo. Operación del Sistema Contestador Esta sección habla sobre los botones y funciones del sistema contestador. -
Page 93: Para Dejar Mensaje
NOTA: Mientras los mensajes son reproducidos, el contador de mensajes mostrará los mensajes en el orden en que fueron recibidos NOTA: El tiempo de grabación máximo para cada mensaje es de 3 minutos y el tiempo de grabación total de esta unidad es de 20 minutos. Para Dejar Mensaje 1. -
Page 94: Reproducción De Mensajes
Reproducción de Mensajes El contador de mensajes y los indicadores/botón de buzón en la base (play/stop, 1, 2 ó) le permiten saber cuando usted tiene mensaje(s) un nuevo(s) mensaje(s). Para reproducir los mensajes, presione el botón play/stop, 1, 2 ó 3 correspondiente. Mientras esté... -
Page 95: Para Dejar Un Recado
Para borrar mensajes desde el teléfono : 1. Presione el botón MENU en el auricular. 2. Use los botones ( o ) para seleccionar CONTESTADOR y presione SELECT para entrar al menú. 3. Use el teclado numérico de tonos o los botones o para seleccionar 1 ACCESO REMOTO. -
Page 96: Monitoreo En Habitación
Funciones de Programación El sistema usa una estructura de menú para darle acceso a todas las características integradas. Usted puede programar los siguientes elementos en el menú principal: Room Monitor, Answerer, Display Setting, Phone Setting y Sound Setting. Durante la programación, usted puede presionar el botón *exit en cualquier momento para salir y mantener la configuración anterior. -
Page 97: Para Quien Responda La Llamada
NOTA: Si los auriculares han sido nombrados, entonces el nombre será mostrado en el LCD en lugar de los números de auricular. NOTA: Durante el monitoreo de habitación, éste emitirá un tono de bip si hay llamadas entrantes. Usted puede presionar el botón TALK/END/call back o el botón SPKR para responder la llamada y salir del modo monitoreo de habitación. -
Page 98: Timbre Para Responder
7. Use el teclado numérico de tonos para ingresar su nuevo código de seguridad de 3 dígitos. El valor por defecto es 123. 8. Presione el botón SELECT para guardar su selección. Usted escuchará un tono de confirmación. NOTA: Si usted comete un error, teclee los dígitos otra vez o presione el botón flash/delete para borrar todo y volver a ingresar. -
Page 99: Idioma
Programación de Teléfono Usted puede programar los siguientes elementos: Language, Area Code, Handset Name, Registration, Deregistration y Default Setting. Idioma 1. Asegúrese de que su teléfono esté en OFF (no en modo hablar). 2. Presione el botón MENU para ir al menú principal. 3. -
Page 100: Registro
5. Use los botones o o el teclado numérico de tonos para desplazarse al menú 2 CODIGO AREA. 6. Presione el botón SELECT para entrar al menú. PROG AREA LOCAL se muestra en la pantalla. 7. Use el teclado numérico de tonos para ingresar su código de área de 3 dígitos. “- - -”... -
Page 101: Nombre De Auricular
1 NO 2 SI REGISTRAR 7. Use el teclado numérico de tonos en el auricular para seleccionar 1 para NO ó 2 para YES use los botones o para desplazarse a 1 para NO ó 2 para YES. El valor por defecto es 1 NO. -
Page 102: Quitar Registro
7. Use el teclado numérico de tonos para ingresar un nombre (hasta 15 caracteres). Más de una letra está programada en cada una de las teclas de número. Por ejemplo, para ingresar Bill Smith, presione la tecla 2 dos veces para la letra B. Presione la tecla 4 3 veces para la letra I. -
Page 103: Para Quitar El Registro Global
7. Use el teclado numérico de tonos en el auricular para seleccionar 1 para NO ó 2 para YES o use los botones o para desplazarse a 1 NO ó 2 SI. El valor por defecto es 1 NO. ADVERTENCIA: No se recomienda quitar el registro a un auricular a menos que sea absolutamente necesario porque una vez que se quita el registro a un auricular, las opciones de teléfono de ese auricular no pueden ser usadas hasta que el... -
Page 104: Programación Por Defecto
3. Presione y suelte el botón PAGE/INT en la base una vez. Todos los auriculares quedan sin registro y AURICUL NECESIT REGISTRAR se muestra en la pantalla. Programación Por Defecto 1. Asegúrese de que su teléfono esté en OFF (no en modo hablar). 2. -
Page 105: Tapiz Del Escritorio
Tapiz del Escritorio Usted puede elegir de entre 10 diferentes tapices del escritorio. 1. Asegúrese de que su teléfono esté en OFF (no en modo hablar). 2. Presione el botón MENU para ir al menú principal. 3. Use los botones o para desplazarse a CONFIG PANTALLA. 4. -
Page 106: Ajuste De Constraste
ESQUEMA COLOR 7. Use los botones o para desplazarse a 1 AZUL, 2 VERDE, 3 ROJO, 4 AMARILLO, o use el teclado numérico de tonos para seleccionar la combinación de color deseada. La selección por defecto es 2 VERDE. 8. -
Page 107: Ajuste De Sonido
Ajuste de Sonido Usted puede programar los siguientes elementos: Volumen de Timbre, Tono de Timbre y Tono de Teclas. Volumen de Timbre 1. Asegúrese de que su teléfono esté en OFF (no en modo hablar). 2. Presione el botón MENU para ir al menú principal. 3. -
Page 108: Tono De Tecla
4. Presione el botón SELECT para confirmar. 5. Use los botones o o el teclado numérico de tonos para desplazarse al menú 2TONOTIMBRE. 6. Presione el botón SELECT para entrar al menú. PROGTONOTIMBR se muestra en la pantalla. PROG TONO TIMBR 7. -
Page 109: Para Hacer Una Llamada
PROG BOTON TONO 7. Use el teclado numérico de tonos en el auricular para seleccionar 1 para ON ó 2 para OFF o use los botones o . El valor por defecto es 1 ENCEND. 8. Presione el botón SELECT para guardar su selección. Usted escuchará un tono de confirmación. -
Page 110: Temporizador De Llamadas
Para Hacer Una Llamada con el Altovoz 1. Presione el botón SPKR el auricular o el botón altavoz en la base, escuche un tono de marcación. 2. Marque el número al que usted quiere llamar, o marque el número primero luego presione el botón SPKR en el auricular o el botón altavoz en la base. -
Page 111: Número Marcado
• Para pasar de una a otra llamada, oprima el botón flash/delete en el auricular, o el botón flash en la base. SUGERENCIA: No oprima el botón TALK/END/call back o el botón SPKR en el auricular inalámbrico para activar un servicio de llamadas, o el botón SPKR en la base como llamada en espera, porque de ser así, usted colgará... - Page 112 NOTA IMPORTANTE: Los siguientes procedimientos para el auricular SOLO puede ser efectuados con un auricular Modelo 21098A. Si usted está usando un auricular opcional Modelo 21009A, por favor consulte la Sección “21009A Instrucciones Adicionales del Auricular Opcional” en la última parte de esta Guía del Usuario.
- Page 113 STEVE RAYMOND AURICULAR EMISOR RECEPTOR AURICULAR Auricular Buscando la Base 1. Asegúrese de que su teléfono esté en OFF (no en modo hablar). 2. Presione el botón MENU para ir al menú principal. 3. Use los botones o para desplazarse a INTERFONO. 4.
-
Page 114: Mute
Mute Para tener una conversación fuera de la línea, utilice la función enmudecedora MUTE. La persona del otro lado de la línea no le puede escuchar, pero usted puede escuchar a esa persona. En la Base 1. Presione el botón mute en la base. El indicador mute se enciende. 2. -
Page 115: No Molestar (Dnd)
Control de Volumen Sistema de Contestadora/Altavoz ó Cuando el altavoz esté en ON, ajuste el volumen presionando los botones vol ( Hay ocho niveles de volumen, y cada presión del botón de volumen ajusta el volumen del altavoz en un nivel. NOTA: Usted puede también ajustar el volumen durante el modo de intercomunicación, y el modo de conferencia. - Page 116 3. Ingrese el número del auricular con el cual usted quiere intercomunicarse. NOTA: Para cancelar la búsqueda, presione el botón PAGE/INT otra vez o el botón *exit en la base. 4. Espere que la persona en el auricular receptor presione el botón INT. 5.
-
Page 117: Para Recibir Una Llamada De Intercomunicación
4. Presione el botón SELECT para accesar el menú intercom. NOTA: Usted puede presionar el botón int para un acceso directo al menú intercomunicación. 5. Use el teclado numérico de tonos o el botón o para seleccionar 0 UNIDAD BASE. -
Page 118: Llamada De Dos Vías
NOTA: Antes de que usted use la función de intercomunicación/búsqueda con otro auricular o base, usted debe decidir si quiere crear una conversación de dos vías o de tres vías. NOTA IMPORTANTE: Los siguientes procedimientos para el auricular SOLO puede ser efectuados con un auricular Modelo 21098A. Si usted está usando un auricular opcional Modelo 21009A, por favor consulte la Sección “21009A Instrucciones Adicionales del Auricular Opcional”... -
Page 119: Llamada De Tres Vías
Llamada de Tres Vías En la Base 1. Durante una llamada externa, presione el botón PAGE/INT en la base. P_ se muestra en la pantalla. 2. Use el teclado numérico de tonos para ingresar el número de auricular. Usted escuchará un tono de búsqueda y PX se muestra en el indicador donde X es el número de auricular. -
Page 120: Transferencia De Llamadas Externas A Otros
Transferencia de Llamadas Externas a Otros Auriculares Durante una llamada externa, usted puede transferir la llamada externa a otro auricular. En la Base 1. Presione el botón PAGE/INT en la base para colocar una llamada externa en retención, luego busque el auricular receptor. 2. -
Page 121: Para Almacenar Un Nombre Y Número En El
NOTA IMPORTANTE: Los siguientes procedimientos para el auricular SOLO puede ser efectuados con un auricular Modelo 21098A. Si usted está usando un auricular opcional Modelo 21009A, por favor consulte la Sección “21009A Instrucciones Adicionales del Auricular Opcional” en la última parte de esta Guía del Usuario. - Page 122 Use el teclado numérico de tonos para ingresar un nombre (hasta 15 caracteres). Más de una letra está programada en cada una de las teclas de número. Por ejemplo, para ingresar Bill Smith, presione la tecla 2 dos veces para la letra B. Presione la tecla 4 3 veces para la letra I.
-
Page 123: Para Almacenar El Ultimo Número Marcado
13.Presione el botón SELECT para guardar el registro. La unidad emite un bip para confirmar. 14.Para ingresar otro nombre y número en una ubicación de memoria diferente, regrese al paso 4 y repita el proceso. Esta característica le permite asignar una melodía específica para la entrada en el directorio telefónico. - Page 124 NOTA: Si el número de remarcado es mayor que 24 dígitos, el número de remarcado no puede ser almacenado en memoria. En el Auricular Inalámbrico Asegúrese de que su teléfono esté en OFF (no en modo hablar). 1. Presione el botón redial en el auricular para accesar el menú DIALED. 2.
- Page 125 Para Cambiar Archivos Almacenados en la Memoria En la Base 1. Asegúrese de que su teléfono esté en OFF (no en modo hablar). 2. Presione el botón mem para mostrar [ ] en el indicador. 3. Presione el botón de ubicación en memoria deseada (teclas numéricas del 0 al 9). 4.
- Page 126 5. Use los botones o para desplazarse al registro deseado. 6. Presione el botón SELECT para accesar los detalles de registro. 7. Presione el botón SELECT otra vez para entrar al menú opción. 8. Use el teclado numérico de tonos o los botones o para seleccionar 2 BORRAR.
-
Page 127: Marcado En Cadena Desde La Memoria
3. Utilice el teclado numérico para inscribir el número de la localización de memoria (0-9). El número se marcará automáticamente. 1. Asegúrese de que su teléfono esté en OFF (no en modo hablar). 2. Oprima el botón de memoria mem para mostrar [ ]. 3. -
Page 128: Caller Id
4. Presione SELECT para mostrar la lista de registros, el número correspondiente del registro señalado es mostrado en la parte inferior de la pantalla. 5. Seleccione registro “07” (o la entrada del Número de Acceso de Larga Distancia correspondiente.) Presione el botón SELECT. 6. - Page 129 Códigos de Error de la Identificación del Llamador (Caller ID) Varios mensajes de error del Identificador de Llamadas pueden aparecer en la pantalla. Vea la sección de Mensajes de la Pantalla de esta Guía del usuario para mayor información. Para Recibir Archivos del Identificador de Llamadas Cuando usted recibe una llamada, la información es transmitida entre el primero y el segundo timbre.
-
Page 130: Llamadas En La Memoria Interna
Para Almacenar Archivos del Identificador de Llamadas en la Memoria Interna Usted puede almacenar información del Identificador de Llamadas en la memoria interna del teléfono. Usted no puede volver a formatear los archivos del Identificador de Llamadas que han sido almacenados en la memoria. SUGERENCIA: Para evitar que la información del Identificador de Llamadas sea borrada automáticamente, usted puede preferir almacenarla en la memoria del teléfono. - Page 131 NOTA: Dependiendo de (a) cómo estaba formateado cuando se recibió el número telefónico de la persona que llamó y (b) si usted había o no programado su clave de área anteriormente en el menú de programación, usted puede necesitar ajustar el formato del número telefónico de la persona que llamó...
-
Page 132: Acceso Remoto
Para Borrar Todos los Archivos del Identificador de Llamadas: 1. Asegúrese de que su teléfono esté en OFF (no en modo hablar). 2. Presione el botón MENU para accesar el menú opción. 3. Use el teclado numérico de tonos o los botones o para seleccionar 4 BORRARTODO. -
Page 133: Para Tener Acceso Al Sistema Contestador Desde
Cuando el sistema contestador contesta: 1. Oprima el botón SELECT para tener acceso al sistema contestador. 2. Escuche a la persona que llama dejar un mensaje. 3. Presione los botones TALK/END/call back o SPKR para hablar a la persona o presione el botón SELECT para dejar de monitorear la llamada Para Tener Acceso al Sistema Contestador desde Otra Localización... -
Page 134: Cómo Cambiar La Batería
Cómo Cambiar la Batería PRECAUCION: Para reducir el riesgo de fuego o lesión personal, use solamente la batería listada en Información Adicional al reverso de esta Guía del Usuario. 1. Asegúrese de que el teléfono esté desactivado (OFF) (no en modalidad para hablar) antes de cambiar la batería. -
Page 135: Auricular Opcional 21009A Instrucciones
Auricular Opcional 21009A Instrucciones Adicionales 1. Asegúrese de que su teléfono esté en OFF (no en modo hablar). 2. Oprima y suelte el botón int en el auricular. El aparato le pregunta si está localizando la extensión LOCALIZAR EXTENSION?. 3. Utilice el teclado numérico para inscribir el número del auricular al que usted quiere llamar. - Page 136 2. Utilice el teclado numérico para seleccionar Auricular 1 o Auricular 2. Usted escuchará un tono del localizador y LOCALIZANDO aparece en la pantalla del auricular que original la llamada. NOTA: La indicación de localizar “LOCALIZAR DESDE...” aparece en la pantalla del auricular que recibe, y el auricular que recibe oprime el botón page/int o TALK/END/call back y así...
-
Page 137: Revisión Y Marcación Desde Memoria
Revisión y Marcación desde Memoria 1. Asegúrese de que su teléfono esté en ON (en modo hablar) presionando el botón TALK/END/call back. 2. Oprima la tecla mem. La pantalla indica MEMO # - -. 3. Utilice el teclado numérico para inscribir el número de la localización de memoria. El número se marcará... - Page 138 5. Presione el botón cid/vol o para desplazarse a MELODIA VIP. 6. Presione el botón mute/prog para seleccionar la característica de melodía VIP y luego visualizar registro VIP 1. NOTA: Si VIP1 NO contiene número/registros específicos, se visualizará “VACIO”. 7.
- Page 139 Código de Area 1. Presione el botón cid/vol o para moverse al menú CODIGO AREA. 2. Presione el botón mute/prog para entrar al menú. PROG AREA LOCAL - - - se muestra en la pantalla. 3. Use el teclado numérico para ingresar su código de área de 3 dígitos. 4.
-
Page 140: Para Sujetar El Gancho Del Cinturón
Para Borrar Todos los Registros CID 1. Asegúrese de que su teléfono esté en OFF (no en modo hablar). 2. Use el botón cid/vol or para desplazarse a cualquier registro CID. 3. Presione y sostenga el botón del hasta que BORRARTODO? se muestre en la pantalla. -
Page 141: Indicadores De Mensajes
Indicadores de Mensajes Los siguientes mensajes muestran el estado del teléfono, proveen la información del Identificador de Llamadas, o le ayudan a programar y a utilizar su teléfono. INCOMPLETE DATA La identificación de quien llama ha sido interrumpida (DATO INCOMPLETO) durante la transmisión o el teléfono tiene interferencia excesiva. - Page 142 HANDSET NEEDS Indica que usted debe registrar un auricular no REGISTRATION registrado antes de usarlo. (AURICULAR NECESITA REGISTRO) SEARCHING Indica que el auricular está buscando a la base. (BUSCANDO) OUT OF RANGE El auricular está demasiado lejos de la base. Acérquelo a (FUERA DE RANGO) la base.
-
Page 143: Solución De Problemas
Señales Sonoras del Auricular Señal Significado Un tono de gorgeo largo Señala que una llamada está (con timbre encendido) entrando Tres ton cortos Señal del localizador One long beep Tono de la confirmación para la terminación de una función Un “bip” corto (cada 7 segundos) Advertencia de baja batería Un corto sonido de bip Tono de alerta de timbre. - Page 144 El Auricular no Timbra • Asegúrese de que el timbre del auricular esté activado, esto se puede efectuar a través del menú de programación del auricular - Volumen del Timbre • El auricular puede estar fuera del rango de la base. Acérquese a la base. •...
- Page 145 • Desconecte la batería del teléfono y vuélvala a conectar otra vez. Coloque el teléfono en la base por al menos 2 a 3 minutos. • Desconecte la fuente de poder y vuélvala a adaptador conectar. Luego coloque el teléfono en la base por al menos 2 a 3 minutos. El teléfono muestra AURICUL NECESIT REGISTRAR.
-
Page 146: Cuidado General Del Producto
Cuidado General del Producto Para mantener su aparato funcionando adecuadamente y en buenas condiciones, siga las siguientes pautas: • Evite poner el teléfono cerca de calentadores (calefactores) de ambiente y dispositivos que generen interferencia eléctrica ejemplo, motores o lámparas fluorescentes). •... - Page 147 Índice Formato de la Base Acceso Remoto Formato del Auricular Ajuste de Constraste 30 Funciones del Identificador de Llamadas Ajuste de Sonido (Caller ID) Atajo al Timbre hi/low/off – Auricular Auricular Inalámbrico56 Auricular Opcional 21009A Instrucciones Garantía Limitada Adicionales Auto Alerta Idioma Indicaciones para la Instalación 11 Cambio de un Registro de Melodía VIP...
- Page 148 Índice Memoria 60 Memoria Memoria Llena Para Conectar el Cable de Línea Telefónica 13 Memoria Llena Para Conectar el Gancho del Cinturón y Audífonos Opcionales Monitoreo en Habitación Para Conectar la Corriente AC (Eléctrica) Mute 38 Para Conectar los Audífonos Opcionales en el Auricular No Molestar (DND) Para Contestar una Llamada...
- Page 149 Índice Para Sujetar el Gancho del Cinturón Para Tener Acceso al Sistema Contestador Salida desde Otra Localización Servicios/Llamada en Espera Precauciones de Seguridad para la Batería 58 Solución de Problemas Pre-Marcado Programación de Pantalla Tabla de Contenido Programación de Teléfono Tapiz del Escritorio Programación del Teléfono Temporizador de Llamadas...
-
Page 150: Cómo Obtener Servicios De Mantenimiento
Cómo Obtener Servicios de Mantenimiento Si usted experimenta problemas con este equipo, para reparaciones o para información de garantía, comuníquese con el departamento de servicio al cliente al 1-800-448-0329. Si el equipo está causando daños a la red telefónica, la compañía telefónica puede pedirle que desconecte su equipo hasta que el problema haya sido resuelto. -
Page 151: Garantía Limitada
Garantía Limitada Lo que cubre su garantía: • Defectos de materiales o de trabajo. Por cuánto tiempo después de la compra: • Un año, a partir de la fecha de compra. (El periodo de garantía para unidades arrendadas se inicia con la primera renta o 45 días de la fecha del embarque a la firma de arrendamiento, lo que ocurra primero). - Page 152 ATLINKS USA, Inc. 101 West 103rd Street Modelo 21098 Indianapolis, IN 46290 00003687 (Rev 0 E/S ) © 2005 ATLINKS USA, Inc. 05-21 Trademark(s) ® Registered Impreso en China Marca(s) Registrada(s)