TRENDnet TEW-650AP User Manual
150mbps wireless n access point
Hide thumbs
Also See for TEW-650AP:
- Quick start manual (18 pages) ,
- Quick installation manual (18 pages) ,
- Datasheet (3 pages)
Table of Contents
Advertisement
Quick Links
Advertisement
Table of Contents

Related Manuals for TRENDnet TEW-650AP


Summary of Contents for TRENDnet TEW-650AP
- Page 2 Federal Communication Commission Interference Statement This equipment has been tested and found to comply with the limits for a Class B digital device, pursuant to Part 15 of the FCC Rules. These limits are designed to provide reasonable protection against harmful interference in a residential installation. This equipment generates uses and can radiate radio frequency energy and, if not installed and used in accordance with the instructions, may cause harmful interference to radio communications.
- Page 3 Europe – EU Declaration of Conformity This device complies with the essential requirements of the R&TTE Directive 1999/5/EC. The following test methods have been applied in order to prove presumption of conformity with the essential requirements of the R&TTE Directive 1999/5/EC: EN60950-1:2006+A11:2009 Safety of Information Technology Equipment EN50385 : (2002-08)
- Page 4 Hereby, TRENDnet, Inc, declares that this TEW-650AP is in compliance with the essential requirements and other relevant provisions of Directive 1999/5/EC. Español Por medio de la presente TRENDnet, Inc declara que el TEW-650AP cumple con los [Spanish] requisitos esenciales y cualesquiera otras disposiciones aplicables o exigibles de la Directiva 1999/5/CE.
- Page 5 Svenska Härmed intygar TRENDnet, Inc att denna TEW-650AP står I överensstämmelse med de [Swedish] väsentliga egenskapskrav och övriga relevanta bestämmelser som framgår av direktiv 1999/5/EG.
-
Page 6: Table Of Contents
Contents Package Contents ............................7 Minimum System Requirements ....................... 7 Introduction ............................... 8 Features ..............................8 Hardware Overview ..........................9 Installation Considerations ........................11 Getting Started ............................12 Access Point Mode..........................14 AP Client Mode ........................... -
Page 7: Package Contents
Package Contents TEW-650AP wireless n AP CAT-5 Ethernet Cable (the TEW-650AP’s Ethernet ports is Auto-MDIX) Power Adapter (12.0V, 0.5A) CD-ROM with Manual & Wizard Quick Installation Guide Using a power supply with a different voltage than the one included with your product will cause damage and void the warranty for this product. -
Page 8: Introduction
Introduction The 150Mbps Wireless N Access Point, model TEW-650AP, is designed to create a scalable high speed wireless n network or connect a wired device to an existing wireless network. Use multiple 150Mbps Wireless N Access Points together to expand your network using Access Point, Wireless Distribution System (WDS), Repeater, and AP Client modes. -
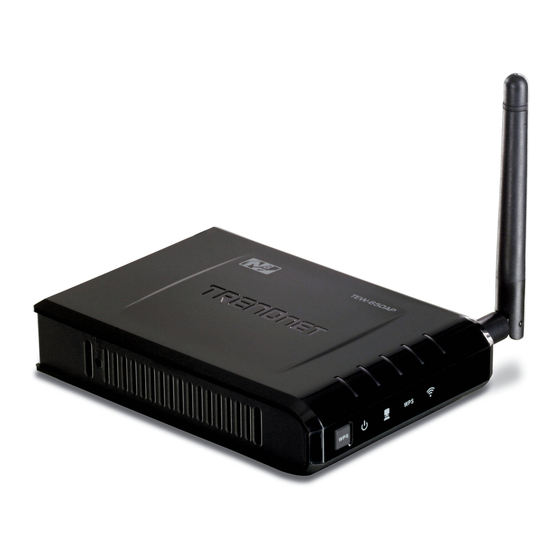
Page 9: Hardware Overview
Power Switch (EU version) On/off Switch DC-IN The DC power input connector is a single jack socket to supply power to the TEW-650AP. Please use the Power Adapter provided on the TEW-650AP package. Power Switch EU Version... - Page 10 WLAN LED Front View A solid light indicates that the wireless segment is ready. This LED blinks green during wireless data transmission. WPS LED This LED blinks green during WPS function is enabled. LAN LED A solid light indicates a connection to a Router on the LAN port.
-
Page 11: Installation Considerations
INSTALLATION CONSIDERATIONS There are a number of factors that can impact the range of wireless devices. 1. Adjust your wireless devices so that the signal is traveling in a straight path, rather than at an angle. The more material the signal has to pass through the more signal you will lose. 2. -
Page 12: Getting Started
The Welcome screen appears on your monitor. Click Setup Wizard button. Read the License Agreement and click Next to continue the installation. Connect an Ethernet cable from the LAN port on your Router to the LAN port on the TEW-650AP, click Next button to continue. - Page 13 Plug in the power adapter of the TEW-650AP and plug in the device that you will be connecting together. Verify the Power & Ethernet LEDs are light. EU Version please make sure the power switch is on the On position Your computer will detect TEW-650AP and the Device List screen appears on your monitor.
-
Page 14: Access Point Mode
ACCESS POINT MODE Access 1. To setup TEW-650AP or add/connect your wireless client to this AP, please select “ Point ” and click Next to continue 2. To attain an IP address automatically, you can select “Dynamic IP address configuration”; to change IP address, you can select “Static IP address configuration” and click Next button to continue. - Page 15 4. Select Wi-Fi Protected Setup to connect your wireless client device to this AP, and click Next button. 5. Use Push Button Method, click Connect button to continue. You also need to enable WPS function of the wireless client device to make connection. 6.
- Page 16 7. To set TEW-650AP security, select Manual setup and click Next button 8. Enter SSID of TEW-650AP, click Next button. 9. Choice Wireless Mode. Page 16...
- Page 17 10. To disable Security Mode, select None and click Next button. 11. To use WEP security, select WEP and click Next button. Select 64-bit or 128-bit WEP key length, and enter your WEP key. For 64-bit encryption, enter 10 hexadecimal characters, For 128-bit encryption, enter 26 hexadecimal characters.
- Page 18 13. Confirm your new settings. It is recommended that you save or print your wireless settings with the Save or Print buttons. Once finished, click Configure to continue. Save you setting to a text file in a desired location. Congratulations you have configured you TEW-650AP. Page 18...
-
Page 19: Ap Client Mode
The Welcome screen appears on your monitor. Click Setup Wizard button. Read the License Agreement and click Next to continue the installation. Connect an Ethernet cable from the LAN port on your Router to the LAN port on the TEW-650AP, click Next button to continue. Page 19... - Page 20 Plug in the power adapter of the TEW-650AP and plug in the device that you will be connecting together. Verify the Power & Ethernet LEDs are light. EU Version please make sure the power switch is on the On position Your computer will detect TEW-650AP and the Device List screen appears on your monitor.
- Page 21 Select “AP Client” option to allow the TEW-650AP to work as a wireless network adapter. Click Next button to continue. Press Refresh and select the Access Point you would like to connect and click Connect. 10. Verify the SSID selected is correct and click Next...
- Page 22 11. Select the 802.11 mode you would like to connect with and click Next. 12. Select the wireless encryption set on the access point you are connecting to. 13. Confirm your new settings. It is recommended that you save or print your wireless settings with the Save or Print buttons.
- Page 23 14. You can also save your setting to a text file in a desired location. 15. Congratulations you have configured you TEW-650AP. Page 23...
-
Page 24: Using The Configuration Menu
Using the Configuration Menu Whenever you want to configure your TEW-650AP, you can access the Configuration Menu by opening the Web-browser and typing in the IP Address of the TEW-650AP. Open the Web browser. Type in the current IP Address of the AP (i.e. http://192.168.10.100). -
Page 25: Operation Mode Setting
Access Point This mode setting allows the TEW-650AP to work as an Access Point. This will allow for wireless connectivity from this device to other wireless clients. This mode also includes the use of the AP mode to connect Local Area Networks (LAN) together (Point to Point bridging) and extend the wireless coverage with Wireless Distribution System (WDS). -
Page 26: Ap Client
AP WDS Mode (multi point) AP Client This mode setting allows the TEW-650AP to work just like a wireless adapter. By using AP Client mode, the TEW-650AP can connect to any device that has an Ethernet port (RJ-45 connector) and support for TCP/IP protocol. -
Page 27: Network Lan Setting
NETWORK LAN SETTING These are the settings of the LAN (Local Area Network) interface for the Access Point. The Access Point's local network (LAN) settings are configured based on the IP Address and Subnet Mask assigned in this section. The IP address is also used to access this Web-based management interface. LAN Connection Type ... -
Page 28: Wireless Basic - Access Point
The Wireless tab provides the following configuration options: Basic, Advanced, MAC Filter, Security, WPS and Station List. Wireless Basic Access Point AP Mode Support AP Mode Support allows you to “repeat” a wireless signal from an existing access point. Select the radio button to enable or disable “AP Mode Support”. When enabled you have the option of defining the specific access point to repeat off of by entering in the remote access points or wireless router’s wireless MAC address into the “AP MAC Addr. - Page 29 802.11b/g/n mixed mode (2.4GHz) - This wireless mode works in the 2.4GHz frequency range and will only allow the use of wireless g client devices to connect and access the TEW-650AP at 11Mbps for wireless b, 54Mbps for wireless g and up to 300Mbps* for wireless n and share access at the same time.
- Page 30 This Access Point support multiple SSID function, you can assign three more SSID for the TEW-650AP. Create virtual SSID wireless networks (WLAN) with different type of wireless security for each virtual WLAN that is created. When using the wireless adapter wireless site survey tool, there will be additional wireless network to connect with once the feature is enabled.
- Page 31 Frequency (Channel) A wireless network uses specific channels in the wireless spectrum to handle communication between clients. Some channels in your area may have interference from other electronic devices. Choose the clearest channel to help optimize the performance and coverage of your wireless network. WDS Mode When WDS is enabled, this access point functions as a wireless bridge and is able to wirelessly communicate with other access points via WDS links.
- Page 32 The "20/40” MHz option is usually best. The other option is available for special circumstances. Guard Interval Using “Auto” option can increase throughput. However, it can also increase error rate in some installations, due to increased sensitivity to radio-frequency reflections. Select the option that works best for your installation.
-
Page 33: Wireless Advanced
Wireless Advanced Beacon Interval Beacons are packets sent by a wireless Access Point to synchronize wireless devices. Specify a Beacon Period value between 20 and 1000. The default value is set to 100 milliseconds. Data Beacon Rate (DTIM) A DTIM is a countdown informing clients of the next window for listening to broadcast and multicast messages. -
Page 34: Wireless Mac Filter
Enable or disable short slot. Default is enabled. Tx Burst Enable or disable Tx burst. Default is enabled. Pkt_Aggregate Enable or disable Pkt aggregate. Default is enabled. *Maximum wireless signal rates are referenced from IEEE 802.11 theoretical specifications. Actual data throughput and coverage will vary depending on interference, network traffic, building materials and other conditions Wireless MAC Filter The MAC address filter section can be used to filter network access by machines based on the unique... -
Page 35: Wireless Security
Wireless Security SSID choice Choose the SSID which need to implement security. Security Mode You can disable security mode, or you can choose following modes to enable security – Disable, WEP-OPEN,WEP-SHARED ,WEP-AUTO, WPA, WPA-PSK, WPA2, WPA2-PSK, WPA-PSK/WPA2-PSK,WPA/WPA2 Page 35... -
Page 36: Wireless Wps
Wireless WPS You can setup security easily by choosing PIN or PBC method to do Wi-Fi Protected Setup. WPS mode Two WPS modes can be selected – PIN & PBC. If PIN is selected, you should enter PIN code of your wireless client device to get wireless connection with this AP. -
Page 37: Wireless Station List
Wireless Station List You can monitor stations which associated to this AP. Page 37... -
Page 38: Wireless Basic - Ap Client
WIRELESS BASIC – AP CLIENT Select the AP Client option to use the TEW-650AP as a wireless network adapter. Use this feature to connect other Ethernet devices and allow them to become wirelessly enabled. Select the option AP Client and apply the setting at the bottom of the window. -
Page 39: Wireless Settings
Wireless settings View the current Link Status of the TEW-650AP in AP Client mode. Profile Create a custom connection to a specific wireless network. Use this option to make custom profiles and store new profile for later use. Configure the setting to connect to a wireless network, selection option for network type, SSID, and wireless security. -
Page 40: Site Survey
Site Survey Use the Site Survey tool to search for wireless networks in the TEW-650AP area. Click on the Scan button to search for wireless networks to join. From this window, you can also add your profile to use with the TEW-650AP. Click on the Connect button to join a wireless network from this site survey window. -
Page 41: Statistics
Statistics View the current operating status of the TEW-650AP, see the Transmit and Receive data. Advance Setting Use this setting to adjust the wireless environment. Page 41... - Page 42 802.11b/g/n mixed mode (2.4GHz) - This wireless mode works in the 2.4GHz frequency range and will only allow the use of wireless g client devices to connect and access the TEW-650AP at 11Mbps for wireless b, 54Mbps for wireless g and up to 300Mbps* for wireless n and share access at the same time.
-
Page 43: Qos
QoS Use this setting to give the TEW-650AP priority over other wireless networking devices. WMM (Wireless Multi-Media) use this feature allows wireless devices to take advantage of the wireless environment over other wireless devices. -
Page 44: Wps
WPS You can setup security easily by choosing PIN or PBC method to do Wi-Fi Protected Setup. Two WPS modes can be selected – PIN & PBC. If PIN is selected, you should enter PIN code of your wireless client device to get wireless connection with this AP. Page 44... -
Page 45: Administrator
ADMINISTRATOR This Administrator section is used to set password for access to the Web-based management, also provide function of firmware upgrade. The Administrator tab provides the following configuration options: Management, Upload Firmware, settings, Management and Status. System Management At this page, you can configure administrator account and password. Page 45... -
Page 46: Upload Firmware
Upload Firmware By assigning firmware location, you can upload firmware at this page. Settings Management You can save system settings by exporting them to a configuration file, restore them by importing the file, or reset them to factory default. Page 46... -
Page 47: Status
Status You can check system information and network configurations on this page. Page 47... -
Page 48: Glossary
Glossary Access Control List ACL. This is a database of network devices that are allowed to access resources on the network. Access Point AP. Device that allows wireless clients to connect to it and access the network Ad-hoc network Peer-to-Peer network between wireless clients Address Resolution Protocol ARP. - Page 49 A program that allows you to access resources on the web and provides them to you graphically CAT 5 Category 5. Used for 10/100 Mbps or 1Gbps Ethernet connections Client A program or user that requests data from a server Collision When do two devices on the same Ethernet network try and transmit data at the exact same time.
- Page 50 Extensible Authentication Protocol Encryption Converting data into cyphertext so that it cannot be easily read Ethernet The most widely used technology for Local Area Networks. File server A computer on a network that stores data so that the other computers on the network can all access it File sharing Allowing data from computers on a network to be accessed by other computers on the network with different levels of access rights...
- Page 51 Host Computer on a network HTTP Hypertext Transfer Protocol is used to transfer files from HTTP servers (web servers) to HTTP clients (web browsers) HTTPS HTTP over SSL is used to encrypt and decrypt HTTP transmissions A networking device that connects multiple devices together ICMP Internet Control Message Protocol IEEE...
- Page 52 Internet Service Provider Java A programming language used to create programs and applets for web pages Kbps Kilobits per second Kbyte Kilobyte Local Area Network Latency The amount of time that it takes a packet to get from the one point to another on a network. Also referred to as delay Light Emitting Diode Legacy...
- Page 53 Maximum Transmission Unit is the largest packet that can be transmitted on a packet-based network like the Internet Multicast Sending data from one device to many devices on a network Network Address Translation allows many private IP addresses to connect to the Internet, or another network, through one IP address NetBEUI NetBIOS Extended User Interface is a Local Area Network communication protocol.
- Page 54 carrier Ping A utility program that verifies that a given Internet address exists and can receive messages. The utility sends a control packet to the given address and waits for a response. Power over Ethernet is the means of transmitting electricity over the unused pairs in a category 5 Ethernet cable Port A logical channel endpoint in a network.
- Page 55 Server A computer on a network that provides services and resources to other computers on the network Session key An encryption and decryption key that is generated for every communication session between two computers Session layer The fifth layer of the OSI model which coordinates the connection and communication between applications on both ends Simple Mail Transfer Protocol Used for sending and receiving email...
- Page 56 Traceroute A utility displays the routes between you computer and specific destination User Datagram Protocol Unicast Communication between a single sender and receiver Universal Plug and Play A standard that allows network devices to discover each other and configure themselves to be a part of the network Upgrade To install a more recent version of a software or firmware product...
- Page 57 wired network Wi-Fi Wireless Fidelity Wi-Fi Protected Access An updated version of security for wireless networks that provides authentication as well as encryption Wide Area Network The larger network that your LAN is connected to, which may be the Internet itself, or a regional or corporate network Wireless ISP A company that provides a broadband Internet connection over a wireless connection...
-
Page 58: Specifications
Specifications Hardware Standards IEEE 802.11n draft 2.0, IEEE 802.11b, IEEE 802.11g, and 802.11e Interface 1 x 10/100Mbps Auto‐MDIX LAN port LED Indicators Power, LAN, WPS, and Wireless Reset button – restores factory default settings Buttons WPS button‐ enables WPS function Power Supply 12 V DC 0.5A external power adapter Dimensions 119 x 25 x 85 mm (4.6 x 1.0 x 3.3 in.) (LxWxH) Weight 113.4 g (4 oz) Temperature Operating: 0° ~ 40°C (32° ~ 104°F), Storage: ‐20°C ~ 60°C (‐4° ~ 140° F) Max. 90% non‐condensing Humidity ... -
Page 59: Limited Warranty
Limited Warranty TRENDnet warrants its products against defects in material and workmanship, under normal use and service, for the following lengths of time from the date of purchase. TEW‐650AP – 3 Years Warranty AC/DC Power Adapter, Cooling Fan, and Power Supply carry 1 year warranty. If a product does not operate as warranted during the applicable warranty period, TRENDnet shall reserve the right, at its expense, to repair or replace the defective product or part and deliver an equivalent product or part to the customer. The repair/replacement unit’s warranty continues from the original date of purchase. All products that are replaced become the property of TRENDnet. Replacement products may be new or reconditioned. TRENDnet does not issue refunds or credit. Please contact the point‐of‐purchase for their return policies. TRENDnet shall not be responsible for any software, firmware, information, or memory data of customer contained in, stored on, or integrated with any products returned to TRENDnet pursuant to any warranty. There are no user serviceable parts inside the product. Do not remove or attempt to service the product by any unauthorized service center. This warranty is voided if (i) the product has been modified or repaired by any unauthorized service center, (ii) the product was subject to accident, abuse, or improper use (iii) the product was subject to conditions more severe than those specified in the manual. Warranty service may be obtained by contacting TRENDnet within the applicable warranty period and providing a copy of the dated proof of the purchase. Upon proper submission of required documentation a Return Material Authorization (RMA) number will be issued. An RMA number is required in order to initiate warranty service support for all TRENDnet products. Products that are sent to TRENDnet for RMA service must have the RMA number marked on the outside of return packages and sent to TRENDnet prepaid, insured and packaged appropriately for safe shipment. Customers shipping from outside of the ... - Page 60 LIMITATION OF LIABILITY: TO THE FULL EXTENT ALLOWED BY LAW TRENDNET ALSO EXCLUDES FOR ITSELF AND ITS SUPPLIERS ANY LIABILITY, WHETHER BASED IN CONTRACT OR TORT (INCLUDING NEGLIGENCE), FOR INCIDENTAL, CONSEQUENTIAL, INDIRECT, SPECIAL, OR PUNITIVE DAMAGES OF ANY KIND, OR FOR LOSS OF REVENUE OR PROFITS, LOSS OF BUSINESS, LOSS OF INFORMATION OR DATE, OR OTHER FINANCIAL LOSS ARISING OUT OF OR IN CONNECTION WITH THE SALE, INSTALLATION, MAINTENANCE, USE, PERFORMANCE, FAILURE, OR INTERRUPTION OF THE POSSIBILITY OF SUCH DAMAGES, AND LIMITS ITS LIABILITY TO REPAIR, REPLACEMENT, OR REFUND OF THE PURCHASE PRICE PAID, AT TRENDNET’S OPTION. THIS DISCLAIMER OF LIABILITY FOR DAMAGES WILL NOT BE AFFECTED IF ANY REMEDY PROVIDED HEREIN SHALL FAIL OF ITS ESSENTIAL PURPOSE. Governing Law: This Limited Warranty shall be governed by the laws of the state of California. Some TRENDnet products include software code written by third party developers. These codes are subject to the GNU General Public License ("GPL") or GNU Lesser General Public License ("LGPL"). Go to http://www.trendnet.com/gpl or http://www.trendnet.com Download section and look for the desired TRENDnet product to access to the GPL Code or LGPL Code. These codes are distributed WITHOUT WARRANTY and are subject to the copyrights of the developers. TRENDnet does not provide technical support for these codes. Please go to http://www.gnu.org/licenses/gpl.txt or http://www.gnu.org/licenses/lgpl.txt for specific terms of each license. PWP05202009v2 Page 60...
- Page 61 Page 61...