Table of Contents
Advertisement
Quick Links
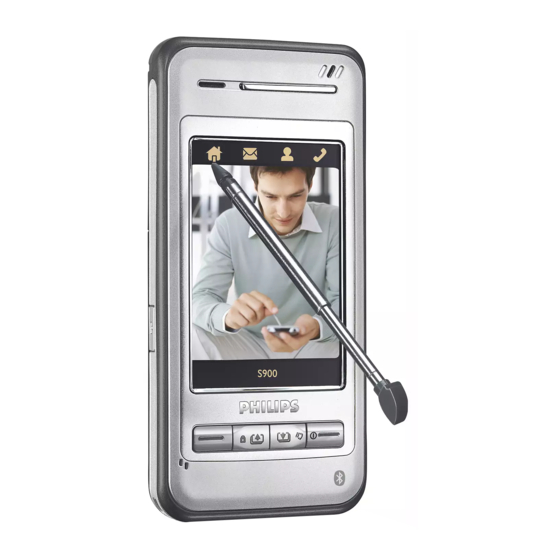
Discover Your Phone
Back of the
phone:
camera lens
Stylus pen
Camera key
Answer key
Up key,
keypad lock
Philips continuously strives to improve its products.
Therefore, Philips reserves the rights to revise this user
guide or withdraw it at any time without prior notice.
Philips provides this user guide "as is" and does not
262000 color
main screen
Charger/USB
connector
Touch screen
Hang up,
Cancel and
On/Off key
Down key, Vibration
on/off key
accept, except as required by applicable law, liability for
any error, omission or discrepancy between this user
guide and the product described. The device is meant to
be connected to GSM/GPRS networks.
Hard keys
Also called Red key or On/Off key.
Hang up key
•
In menu or edit mode, short
press to return to idle screen.
•
During an incoming call or call
in progress, press to end the call
or reject the call.
•
When the phone is switched
off, long press to switch on the
phone.
•
When the phone is switched
on, long press to switch off the
phone anytime.
Also called Green key or Send key:
Answer key
•
Answer a call or dial a phone
number
•
In idle mode, press to view the
dialed calls list.
Advertisement
Table of Contents

Related Manuals for Philips CTS900/AB1UA0HC


Summary of Contents for Philips CTS900/AB1UA0HC
-
Page 1: Discover Your Phone
Therefore, Philips reserves the rights to revise this user guide or withdraw it at any time without prior notice. Philips provides this user guide “as is” and does not accept, except as required by applicable law, liability for any error, omission or discrepancy between this user 262000 color guide and the product described. - Page 2 Up key • Browse the menu/list on the same menu level. Down key • Browse SMS contents or other long text messages. • Scroll to the previous or next picture when viewing pictures. • When there is an incoming call, long press to mute or deactivate vibration alert, but not rejecting the incoming call.
- Page 3 Tap on the fourth hard icon screen, whereby you can tap to enter numbers. Soft key bar There are 3 soft keys, namely, centre and right soft keys. The soft key bar will not appear in idle mode. The 3 permanent soft icons and time display icon In idle mode, there are 3 permanent soft icons at the bottom of the screen.
- Page 4 New message When notification appears on the screen, List soft key to view details of the message, or press idle mode. The notification screen will not appear again once you exit. Organizer Event with the lowest priority level. alert When there is an event of higher priority occuring at the same time, the phone will only emit an alert tone for the organizer event without...
-
Page 5: Table Of Contents
1. Getting Started ... 6 Installing and Removing battery ... 6 Inserting and Removing SIM card ... 6 Remove SIM card ... 7 Charging the battery ... 8 2. Main features ... 9 Switch on the phone ... 9 Enter PIN code ... 9 Switch off the phone ... - Page 6 Ebook ... 56 Stopwatch ... 57 Count-down timer ... 57 Universal time ... 57 14. WAP ...59 Home page (Club Philips) ... 59 Bookmarks ... 59 Resume ... 59 Enter address ... 59 Settings ... 59 Push Inbox ... 60 15.
-
Page 7: Getting Started
1. Getting Started Read the safety instructions in the «Precautions» section before use. To use your phone, you must purchase a SIM card from your network operator. The SIM card contains your mobile number and subscription information. The SIM card can be used on any GSM phone, while your mobile phone number and subscription information remain unchanged. -
Page 8: Remove Sim Card
3. With the metallic contacts of the SIM card facing downwards (towards the phone) and the clipped corner of the card facing outwards, slide the SIM card into the card slot horizontally in the direction as shown on the phone until it locks into place. -
Page 9: Charging The Battery
Charging the battery Warning: Please only use batteries, chargers and accessories that are approved by Philips and compatible with your phone model. Use of other types of batteries, chargers and accessories may violate the warranty terms and conditions, and may cause danger. -
Page 10: Main Features
2. Main features Switch on the phone Long press to switch on the phone. Please ensure that the phone is switched off or that the phone is already switched on before you plug in the USB cable. Do not plug in the USB cable at the same time as you are switching on the phone. -
Page 11: End A Call
End a call Press or tap soft key to end a call. Make an international call 1. Tap "+" to insert it on the dial screen. 2. Tap on the numbers to enter country code. 3. Tap on the numbers to enter area code (usually without the "0"... -
Page 12: Using The Phone As A Modem
successfully established, you can answer, reject or end a call via the bluetooth headset. Before you can start using the bluetooth headset, you need to activate the bluetooth feature of your phone and switch on the bluetooth headset. With the bluetooth headset switched on, place the headset and your phone close together and open the bluetooth menu in your phone to search for bluetooth devices. -
Page 13: Data Connection
3. Data connection Bluetooth Phone settings In stand-by mode, enter the main menu by tapping the soft button in the shape of a house at the top left of the screen, or the centre button bottom of the screen. Then select Bluetooth Phone settings, to enter phone settings for... - Page 14 Note: You must activate bluetooth feature to carry out the above operations. Select Data Connection > Bluetooth > Phone settings > Activate from the main menu. When you have found a device of a certain device type (e.g. data exchange device), if this device also has other features (e.g.
-
Page 15: Device Information
Disconnect If already connected, you can cancel connection by Bluetooth device Voice selecting > device name and then tap the selection box right after Connect option to de-select it. The connection will be cancelled upon confirmation. Trust Trust Similarly, you can tap and set the device as a trusted device. -
Page 16: Infrared
Infrared Your mobile phone features infrared technology (also called IrDA), which allows you to send to or receive data from other IrDA-compliant devices via a wireless connection (e.g., another mobile phone, PC or PDA, printer etc.). Note: Files that are copyright-protected cannot be sent. When connecting with a PC, make sure you have activated its infrared option. -
Page 17: Text Or Number Entry
4 • Text or number entry Input method Your mobile phone provides a number of text editing modes, including Handwriting input, Pinyin input, English input, Numeric input, Symbol input and Phone number input (phone number input is available only under the Contacts menu). You can use soft key to switch among the first five input modes when in editing mode. - Page 18 Onscreen keyboard input Onscreen English keyboard You can input 26 English letters, 10 numbers and other symbols under this mode. Tap the letter or number on the screen and the editor will display the letter or number you have tapped. Under the English input mode, you can tap "a->A"...
-
Page 19: Menu
5. Menu Menu operations Note: You need to insert a valid SIM card before you can use the different menu features that are described in the following chapters. If there is no valid SIM when you switch on the phone, the phone will go into restricted idle screen mode, and the use of the phone features will be limited. -
Page 20: Phonebook
6. Phonebook Your phone supports smart phonebook feature. Not only can you store the frequently used phone numbers on the SIM card, you can also store other contact information such as address, email, etc on the smart phonebook. Note: When you switch on the phone, the phonebook will start to initialize. -
Page 21: Add New
search for pinyin combinations 'ai', 'an', 'ang', 'ao', so on and so forth. If there are matching records in the phonebook, the screen will scroll to the first matching record. 3. If there are no matching records that start with pinyin combination 'a', the phone will search for English names that start with the letter 'a'. - Page 22 Send SMS Send an SMS to the default phone number of the selected record. Send MMS Send an MMS to the default phone number of the selected record. Send namecard Send out the selected record in text format via SMS, infrared or bluetooth.
-
Page 23: Delete All
Delete all Allows you to delete all the records in your SIM card and smart phonebook at once. The records cannot be recovered once they are deleted. Therefore, you will be prompted to confirm before deletion. Copy all SIM to phone As long as the phonebook memory is not full, you will be able to copy the SIM records one after another until every record is copied to the smart phonebook,... -
Page 24: Capacity
Capacity If you select this menu, you will see the following capacity information regarding your SIM card and your mobile phone: • Total capacity • Used capacity • Percent Group setting There are 6 groups by which you can rename them. Own info You can enter display, edit or delete Own information. -
Page 25: Settings
7. Settings Ringer settings Incoming call ringer There are six caller groups in your phonebook. You can assign different ringtones to each of the caller group so that you will know who is calling you when your phone rings. You can tap the arrow on both sides of the group settings to select a group. -
Page 26: Phone Settings
Backlight You can set the backlight to turn off in 10 seconds, 30 seconds or 60 seconds. Color theme You can select your favorite color theme. Touch panel adjust You can tap on the centre of the cross symbol to calibrate the screen. -
Page 27: Call Settings
Call settings Call forward (network dependent) You can forward all your incoming calls to another phone number (or voice mailbox) when it is not convenient for you to answer a call. You can use this menu to set forwarding conditions. This feature is network dependent. -
Page 28: Quick Settings
GPRS call When you are connected using GPRS, whether or not your phone will emit an alert tone to notify you that there is a second incoming call shall be determined by this menu. You can select Set quick call Minute You can select whether or not to use reminder... -
Page 29: Security Settings
Standard Alert type Ringer (including alarm clock) Ringer/alarm volume Volume 3 Organizer alert Ringer Message alert Ringer Keypad/screen sound Connection tone Low battery alert Power on/off alert There are two menus under each mode: Personalize. You can select Enable to activate the current selected mode. -
Page 30: Call Barring
You need to enter the PIN code to turn this feature on or off. Call barring This menu allows you to restrict outgoing and incoming calls of your phone. This feature requires the call barring password supplied by your network operator. -
Page 31: Guard Settings
Guard settings Garbage SMS Settings This menu allows you to carry out the settings relating to garbage SMS. Against Once this feature is set to on, the garbage SMS will be discarded when you receive a SMS from a phone number which is in your this SMS is treated as garbage SMS. -
Page 32: Network Settings
Information privacy You can protect important information on your mobile phone, which includes SMS, phonebook and call records. You can set a password for all the three items, or only for some items, or no password. Tap the selection box at the end of each item to select or cancel selection and Complete then tap... -
Page 33: Register Again
Add existing networks The screen will display a list of existing networks. Select a certain network from the list and tap key. The selected network will be added to the bottom of the preferred network list. Add network code Open the editor, enter the country code and network code of the mobile network in order. -
Page 34: Factory Settings
GSM settings You can set the following: • Data call type: ISDN (digital mode) or analogue [analogue mode] • Phone number: Enter the phone number for dialing. The phone will call this number automatically when mode.[17266] • User name: User name for logging on to WAP server.[wap] •... -
Page 35: Call List
8. Call list There are 3 types of call list: • Missed call (if the call is rejected, it will also be considered as a missed call) • Answered call • Outgoing call (outgoing calls made from your phone regardless of whether or not the call is successful) Each call list can store 20 phone numbers. -
Page 36: Call Timer
Call timer Outgoing call You can check the total duration of your outgoing calls. Incoming call You can check the total duration of your incoming calls. Reset timer Reset the call timer and restart call timing. Call list... -
Page 37: Messages
9. Messages Messages You can enter menu from the main menu, or tap the second hard icon in stand-by screen to enter the menu. The available sub-menus include: SMS, MMS. SMS is a convenient and affordable mode of communication which enables you to send text messages to the other party. - Page 38 can select your preferred location to store your SMS. Once your preferred location is fully occupied (SIM card will reserve 1 empty slot), your SMS will be stored in the non-preferred location. There is an Unread icon on the right of a new message in the Inbox.
-
Page 39: Delete Messages
Settings Service center number This menu allows you to save your SMS center number of your network. This number can be modified. If the SMS center number is empty, you will not be able to send any SMS. Status report You can set delivery report option option allows you to set whether or not to notify you the send status of your messages: successfully sent to... -
Page 40: Broadcast Sms
Call voice mail When you receive a voice mail, the phone will send you an alert. You can then call your voice mailbox number to retrieve your voice mail. If the number is empty, you will be prompted to enter the number. Voice mail number Generally, you can obtain two sets of numbers from your network provider:... -
Page 41: Mms (Multimedia Messages)
MMS (Multimedia messages) New MMS Note: Before you can send MMS, you need to set the correct MMS Center number. You can obtain the address from your network operator. The number in your phone is the default center number. New MMS 1. - Page 42 Add audio/ Sounds Enter Delete audio audio file. When an audio file is added, an icon will be displayed on the MMS editing screen. If an audio file has been added, this option will change to Delete audio can select the audio file on the current page.
- Page 43 Reply all If the Cc field of the MMS you have received is not empty, it implies that the message sender has also sent the message to other recipients in the Cc list. When you select this option, the reply will be sent to all recipients, including those in the Cc list.
- Page 44 Network Select this menu to enter the next settings screen, which contains 3 sub-menus; Network account, Gateway port. You can select an account from network account list, Gateway address edit the port. Validity period Allows you to select the duration by which your MMS will be stored in the MMS center.
-
Page 45: Email
10. Email Your phone supports JAVA Email and you can send emails to your friends using the phone. This menu allows you to compose and send emails. The email feature will be activated automatically when you enter the menu. When successfully activated, you can select an account. -
Page 46: My Files
11. My Files My Files menu organizes the photos, videos, mp3, pictures and audio files in your phone. You can carry out a variety of operations depending on the file type, such as Preview, Play, Delete, Rename, also select the different files, move or copy the files between the phone and the MINI SD card. -
Page 47: Fun
12. Fun Camera and Video recorder Your phone has an integrated digital camera, which allows you to take photos of different resolution, quality and effect, as well as add a frame to the photo. When in Camera and video recorder mode, you can use the quick option bar to switch between the Camera and Video recorder. -
Page 48: Options Menu
default file name. Return to preview mode and you can continue to record video. Quick options bar Enter Camera or Video Recorder mode, tap the icon on the right side of the screen to activate and select quick options in Quick Options Bar. When you select an option, the available settings will be displayed horizontally on the screen, you can tap to select a setting for this option with your stylus pen. -
Page 49: Mp3 Player
Torch You can select to switch the torch on or off when you take photo/ record video. This setting will not be saved. Shutter sound Available only in camera mode. You can select a personalized shutter sound via this option. Photos Available only in camera mode. - Page 50 Short press to select the previous/ next file. During playback, short press to adjust volume, long press key to fast forward, long press to lock/unlock the screen. soft key Open options menu. See the next section for the available options. Tap this soft key to switch to soft key audio player.
-
Page 51: Audio Player
Audio player Your phone features an audio player. You can play MP3 songs via the MP3 player and you can also play other supported audio files via the audio player. The operation of the audio player is similar to the MP3 player. -
Page 52: Picture Browser
Send You can send the selected file to the other devices via MMS, infrared or bluetooth. The file might not be sent if it is too big. Manage file You can copy or move the video files from your phone to a MINI SD card. -
Page 53: Browse Pictures
List view All the pictures will be displayed on the screen as a list. Preview Enter the next screen to preview the selected picture. You can press previous/next picture. You can zoom via the options menu. Delete Delete the selected picture. Rename Rename the selected picture. -
Page 54: Audio Recorder
Options The operations in menu are similar to those described in the previous chapter, except: Zoom This menu allow you to select Enlarge, Shrink, Actual size for the picture. When you enlarge or restore a picture to its actual size, and the size of the picture becomes larger than the screen size, you can tap the arrows on the screen to view other parts of the picture. -
Page 55: Tools
13 • Tools Alarm clock Your phone features a 24-hour alarm clock. There are 3 groups of alarm clock and you can Deactivate them. 1. Select an alarm and tap the check box in front of the alarm to activate or deactivate it. Enter the alarm time in the editing box and select a repeat mode by tapping the arrow at the sides to select. -
Page 56: Calculator
Alert type You can set different alert types. The available alert time, 5 min. before, options include: hour before, 1 day before, 1 week before, No reminder is selected, the phone will not emit any alert when the event is due to occur. However, the event will remain in the events list for review. -
Page 57: Dictionary
You can enter a maximum of 10 digits in the editing window. Dictionary This feature allows you to look up Chinese and English word, select different word library to Remember words, and create New words, etc. Lookup This menu allows you to input Chinese or English word in the editor. -
Page 58: Stopwatch
Open a blank file to edit a new text file. Open Open the selected file for viewing. Delete Delete the selected file. Rename Rename the selected file. Detail View details of the selected file including filename and size, etc. Send Send the selected file to other devices via infrared or bluetooth. - Page 59 If there is a Daylight saving time icon on the city, it indicates that city is in daylight saving status. You can set the foreign city via the options menu: Daylight saving time on or off, or set the foreign city as local city.
-
Page 60: Wap
Before you can start using the WAP browser, you need to configure the WAP settings. Note: Philips is not liable to give prior notification nor shall it bear any consequences for any failures arising from changes in WAP configuration by your network operator or changes in WAP address or contents by the internet content provider. -
Page 61: Push Inbox
Browser options Show images If the web page you are browsing contains images, you can select to show or hide the images using this menu. Enable refresh You can select to enable or disable refresh. Rename profile Allows you to rename the selected profile. The profile name cannot be longer than 40 letters. -
Page 62: Stk
15 • STK The structure and name of the menu available is dependent on your SIM card which is configured by your network provider. The services will vary according to the different STK provider (some SIM cards do not have STK feature) and you cannot modify them. -
Page 63: Icons & Symbols
Icons & Symbols Screen Display This is a candy bar phone with a single LCD screen. It features a 176 (width) x 220 (height) dpi, 262K color TFT display screen. Each character on the display screen is a complete graphic rendering block and the size is font dependent. - Page 64 Vibration - Indicates that the phone will vibrate when there is an incoming call, Call forwarding - Indicates that the call forwarding function is activated. Silent - Indicates that silent mode is activated. Black list - Indicates that the Blacklist feature has been activated.
-
Page 65: Precautions
Precautions Radio wave Your cellular mobile phone is a low power radio transmitter and receiver. When it is operating, it sends and receives radio waves. The radio waves carry your voice or data signal to a base station that is connected to the telephone network. - Page 66 from exposure to radio wave energy. Your cellular telephone complies with all applicable safety standards Radio Telecommunications Terminal Equipment Directive 1999/5/EC. Always switch off your phone Inadequately protected or sensitive electronic equipment may be affected by radio energy. This interference can lead to accidents. Before boarding an aircraft and/or when packing the phone in your luggage: the use of mobile phones in an aircraft may be...
- Page 67 You should only use Philips Authentic Accessories, as the use of any other accessories may damage your phone and will make all guarantees for your Philips phone null and void. Make sure damaged parts are replaced immediately by a qualified technician and that they are replaced with genuine Philips replacement parts.
-
Page 68: Environmental Care
40°C. Environmental care following Philips has marked the battery and packaging with standard symbols designed to promote the recycling and appropriate disposal of your eventual waste. Remember to observe the local regulations... - Page 69 Precautions...
-
Page 70: Troubleshooting
Your battery seems to over heat You might be using a charger that was not intended for use with your phone. Make sure you always use Philips authentic accessory shipped with your phone. Your phone doesn’t display the phone numbers of incoming calls This feature is network and subscription dependent. - Page 71 You can’t send text messages Some networks do not allow message exchanges with other networks. First check that you have entered your SMS centre number, or contact with your operator for detailed information on this subject. You can’t receive and/or store JPEG pictures A picture may not be accepted by your mobile phone if it is too large, if its name is too long, or if it doesn’t have the correct file format.
- Page 72 Your phone is not charging If your battery is completely flat, it might take several minutes of pre-charge (up to 5 minutes in some cases) before the charging icon is displayed on the screen.
-
Page 73: Philips Authentic Accessories
To maximize the performance of your Philips phone maximize and not to void the warranty, always purchase Philips Authentic Accessories that are specially designed for use with your phone. Please purchase Philips Authentic Accessories from Philips authrorized dealers. - Page 74 5. Do not drop, knock or shake your phone. Careless use of the phone will damage the internal circuit boards and the intricate structures. 6. Store the phone and its accessories out of reach of young children. 7. Do not clean your phone with chemical products or cleansing liquid.
-
Page 75: Notice: Sd/Mmc Card Instruction For Use
• Please note that the Mini SD card to be used with your Philips S900 has to be formatted using FAT 16. Hence, we recommend that you use Mini SD card that have FAT-16 format. If your Mini SD card in other formats, you need to reformat it using FAT-16 via a PC, for example. -
Page 76: Trademark Declaration
Trademark declaration JAVA trademark Microsystems, Inc. ® trademark Communications Inc. Tegic Euro. Pat. App. 0842463 Tegic... -
Page 77: Sar Information - International (Icnirp)
SAR Information - International (ICNIRP) Your mobile phone is a radio transmitter and receiver. It is designed and manufactured not to exceed the limits for exposure to radio frequency (RF) energy defined by the international standards. These recommendations have been established by the International Commission on Non-Ionizing Radiation Protection (ICNIRP) that forcast a substantial safety margin for assuring the protection of all persons, regardless of age and health. - Page 78 For body worn operation, this phone has been tested and meets the Federal Communications Commission RF exposure guidelines when used with the Philips accessories supplied. Use of other accessories may not ensure compliance with FCC RF exposure guidelines. The SAR limit set by the Federal Communications Commission of the U.S. Government is 1.6 W/kg.
-
Page 79: Limited Warranty
The limited warranty for original Philips rechargeable battery extends for six (6) months from the date of purchase. 3. What Will Philips Do if The Product is Not Free From Material Defects in Materials and Workmanship During The Limited Warranty... - Page 80 Normal wear and tear or Force Majeure. 5. How Do You Get Warranty Service? a) Return the Product to an authorized service center of Philips. You may contact the local Philips office for the location of the nearest authorized service center.
- Page 81 OF ANY LIMITED REMEDY. This limited warranty represents the complete and exclusive agreement between the Consumer and Philips with respect to this cellular Product and it supercedes all prior agreements between the parties, oral or written, and all other communications between the parties relating to the subject matter of this limited warranty.
- Page 82 Declaration of conformity Philips Electronics Hong Kong Ltd Business Group Mobile Phone 5/F, Philips Electronics Building 5 Science Park Avenue Shatin New Territories Hong Kong declare under our sole responsibility that the product CTS900 Cellular Mobile Radio GSM 900/GSM 1800/...
- Page 83 Addendum Please note that a table concerning the functionality of the camera icons is attached as follows: Icons Name of icons Picture Resolution Quality Effect Environment Exposure Mode DC/DV switch Description Allows you to adjust the image size, such as etc.