Metabo KHE 3250, KHE 3251 - Hammer Manual
- Operating instructions manual (17 pages) ,
- Original instructions manual (61 pages) ,
- Original instructions manual (7 pages)
Advertisement
- 1 Specified Use
- 2 General Safety Instructions
- 3 Special Safety Instructions
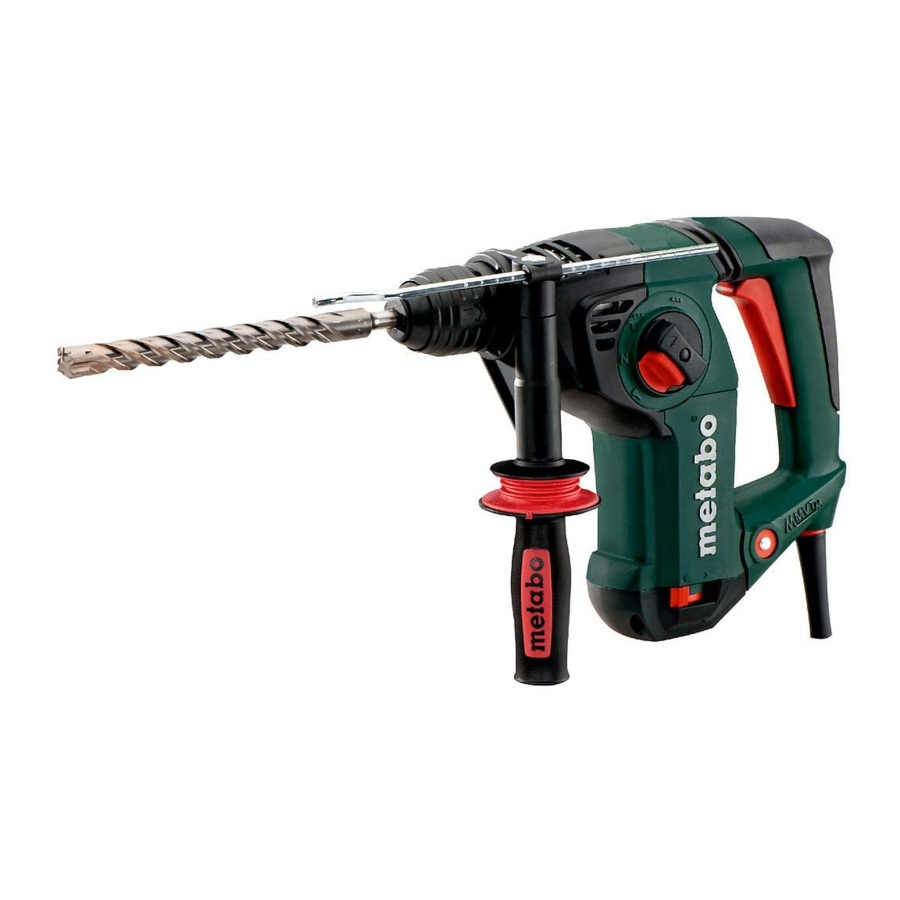
- 4 Overview
- 5 Initial Operation
-
6
Use
- 6.1 Depth Stop Setting
- 6.2 Switching On and Off
- 6.3 Operating mode selection
- 6.4 Adjusting the chisel position
- 6.5 Selecting the direction of rotation
- 6.6 Changing the chuck (not applicable for KHE 3250)
- 6.7 Tool change with SDS chuck
- 6.8 Tool change with keyless chuck (not applicable for KHE 3250)
- 6.9 Metabo VibraTech (MVT)
- 7 Maintenance, cleaning
- 8 Accessories
- 9 Repairs
- 10 Technical Specifications
- 11 Documents / Resources
Specified Use
With the appropriate accessories, the machine is suitable for work with hammer drill bit and chisels in concrete, stone and similar materials and with core cutters in tiles and similar materials, as well as for non-impact drilling into metal, wood etc. and for driving screws.
The user bears sole responsibility for any damage caused by improper use.
Generally accepted accident prevention regulations and the enclosed safety information must be observed.
General Safety Instructions
 For your own protection and for the protection of your power tool, pay attention to all parts of the text that are marked with this symbol!

 Reading the operating instructions will reduce the risk of injury.
Read all safety warnings and instructions. Failure to follow all safety warnings and instructions may result in electric shock, fire and/or serious injury.
Keep all safety instructions and information for future reference.
Pass on your electrical tool only together with these documents.
Special Safety Instructions
Wear ear protectors. Exposure to noise can cause hearing loss.
Use the additional handle supplied with the tool. Loss of control can cause personal injury.
Hold the power tool by insulated gripping surfaces, when performing an operation where the cutting accessory may contact hidden wiring or its own cord. Cutting accessory contacting a "live" wire may make exposed metal parts of the electrical tool "live" and could give the operator an electric shock.
Work only with the additional handle correctly installed.
Always hold the machine with both hands using the handles provided, stand securely and concentrate.
Dust from material such as paint containing lead, some wood species, minerals and metal may be harmful. Contact with or inhalation of the dust may cause allergic reactions and/or respiratory diseases to the operator or bystanders.
Certain kinds of dust are classified as carcinogenic such as oak and beech dust especially in conjunction with additives for wood conditioning (chromate, wood preservative). Material containing asbestos must only be treated by specialists.
- Where the use of a dust extraction device is possible it shall be used.
- The work place must be well ventilated.
- The use of a dust mask of filter class P2 is recommended.
Follow national requirements for the materials you want to work with.
Wear personal protective equipment and always wear safety glasses. Protective equipment such as dust mask, non-skid safety shoes, protective gloves, hard hat, or hearing protection used for appropriate conditions will reduce personal injuries.
Ensure that the spot where you wish to work is free of power cables, gas lines or water pipes (e.g. using a metal detector).
If the safety coupling responds, switch off the machine immediately.
Do not touch the rotating tool!
Secure the workpiece against slipping, e.g. with the help of clamping devices.
Remove chips and similar material only with the machine at standstill.
Caution with hard screwdriving (driving of screws with either a metric or an imperial thread into steel)! The head of the screw may rip off or high restoring torques may be incurred at the handle.
Pull the plug out of the plug socket before any adjustments or servicing are performed.
Safety coupling: If the tool jams or catches, the power supply to the motor is restricted. Due to the strong force which can arise, always hold the machine with both hands using the handles provided, stand securely and concentrate.
A damaged or cracked auxiliary handle must be replaced. Never operate a machine with a defective additional handle.
Overview

- Keyless chuck *
- Keyless chuck sleeve *
- Chuck lock*
- Tool lock
- SDS chuck
- Spindle *
- Additional handle
- Depth stop
- Metabo VibraTech (MVT)
- Trigger
- Lock
- Switch button (for changing the operating mode)
- Rotation selector switch
* depending on model
Initial Operation
Before plugging in the device, check to see that the rated mains voltage and mains frequency, as specified on the rating label, match your power supply.
Always install an RCD with a maximum trip current of 30 mA upstream.
Assembly of the additional handle
For safety reasons, always use the additional handle supplied.
Open the clamping ring by turning the additional handle (7) anticlockwise. Push the additional handle onto the collar of the machine. Insert the depth stop (8). Securely tighten the additional handle at the angle required for the application.
Use
Depth Stop Setting
Loosen the additional handle (7). Set depth stop (8) to the desired drilling depth and retighten additional handle. (7)
Switching On and Off
To start the machine, press the trigger (10). The speed can be changed at the trigger.
Release the trigger (10) to switch off.
Operating mode selection
Press (11) the lock and turn the thumbwheel (12).

Drilling

Hammer drilling (only set if using (5) SDS chuck)

Setting the chiselling position
With this setting, turn the chisel to the required position. Then select "Chiselling" to secure the chisel and prevent it from twisting.

Chiselling
(only set if using SDS chuck (5))
When a chisel is fitted, only operate the machine in the chiselling operating mode .
Avoid levering with the machine when a chisel is fitted.
Adjusting the chisel position
- Insert the chisel.
- Turn the switch button (12) to position
![]() .
. - Turn the chisel to the required position.
- Turn the switch button (12) to position
![]() .
. - Turn the chisel until it engages.
When a chisel is fitted, only operate the machine in the chiselling operating mode .
Selecting the direction of rotation
Do not activate the rotation selector switch (13) unless the motor has completely stopped.
Selecting the direction of rotation:
R = Clockwise (for drilling, hammer drilling, chiselling, inserting screws)
L = Counter-clockwise (for extracting screws)
Changing the chuck (not applicable for KHE 3250)
When changing chucks, make sure that the spindle is clean. (6) Apply a light coating of grease to the spindle. (Special grease: Order No.: 6.31800)
Only attach the Metabo chuck provided.
Removing the chuck:
See fig. C.

- Turn chuck lock (3) as far as it will go (a) in the direction indicated by the arrow, and remove chuck (b).
Replacing the chuck:
See fig. D.

- Place chuck onto spindle (6) (a).
- Turn chuck lock (3) in the direction indicated by the arrow (b) until chuck slides fully onto the spindle. Then release the chuck lock.
- Check to see that the chuck is properly seated.
Note: To prevent the spindle from turning while chucks are being changed, set the switch button (12) to chiselling mode.
Tool change with SDS chuck
Before fitting, clean tool shank and apply special grease (accessories order no. 6.31800)! Use only SDS-Plus tools.
Inserting tools:
- Turn tool and insert until it engages. The tool is locked automatically.
Removing the tool:
See fig. A.
- Pull tool lock (4) backwards in direction indicated by arrow (a) and remove tool (b).
Tool change with keyless chuck (not applicable for KHE 3250)
Use the keyless chuck when non-impact drilling in metal, wood etc. and driving screws.
Tighten the tool (see fig. B):
Turn sleeve (2) in the direction of "AUF, RELEASE" (a). Insert tool as deeply as possible (b) and turn sleeve in the opposite direction, until any perceptible mechanical resistance is overcome (c).

The chuck is not yet fully tightened! Keep turning the sleeve (it must "click" when turning) until it cannot be turned any further - only now is the tool securely clamped.
With a soft tool shank, retightening may be required after a short period of operation.
Note: The grating sound that may be heard after the drill chuck is opened is purely functional; it is stopped by turning the sleeve in the opposite direction.
With a soft tool shank, retightening may be required after a short period of operation.
If the chuck is very securely tightened: Unplug. Hold drill chuck using an open-end spanner at the flats on its head, and turn the sleeve (2) vigourously in the direction of "AUF, RELEASE".
Metabo VibraTech (MVT)
For reduced vibrations and less stress on the hands.
Always apply a moderate amount of pressure to the handle when pushing down the machine and do not force. Vibrations are reduced most effectively at the central position (9).
Maintenance, cleaning
Ventilation slits:
Clean the ventilation slits on the machine occasionally.
KHE 3251:
- Always keep thespindle (6) clean and apply a light coating of grease. (Special grease: Order No.: 6.31800)
- Keyless chuck (1) cleaning:
After prolonged use, hold the chuck vertically, with the opening facing down, and fully close it and open it several times. The dust collected falls from the opening. The application of cleaning spray to the jaws and jaw openings at regular intervals is recommended.
Accessories
Use only genuine Metabo accessories.
Use only accessories which fulfill the requirements and specifications listed in these operating instructions.
For a complete range of accessories, see www.metabo.com or the accessories catalogue.
Repairs
Repairs to electrical tools must be carried out by qualified electricians ONLY!
If you have Metabo electrical tools that require repairs, please contact your Metabo service centre. For addresses see www.metabo.com.
You can download spare parts lists from www.metabo.com.
Technical Specifications

Explanation of details. Subject to changes serving technical progress.
P1 = Rated input
P2 = Power output
n1 = No-load speed
n2 = Load speed
ømax = Maximum drill diameter
smax = Maximum impact rate
W = Single impact force
S = Impact performance
b = Drill chuck chucking capacity
m = Weight without mains cable
D = Collar diameter
Measured values determined in conformity with EN 60745.
![]() Machine in protection class II
Machine in protection class II
~ Alternating current
The technical specifications quoted are subject to tolerances (in compliance with the relevant valid standards).
Emission values
Using these values, you can estimate the emissions from this power tool and compare these with the values emitted by other power tools. The actual values may be higher or lower, depending on the particular application and the condition of the tool or power tool. In estimating the values, you should also include work breaks and periods of low use. Based on the estimated emission values, specify protective measures for the user - for example, any organisational steps that must be put in place.
Vibration total value (vector sum of three directions) determined in accordance with EN 60745:
ah, HD = Vibration emission value (hammer drilling into concrete)
ah, Cheq = Vibration emission value (chiselling)
Kh, HD/Cheq = Uncertainty (vibration)
Typical A-effective perceived sound levels:
LpA = Sound pressure level
LWA = Acoustic power level
KpA, KWA= Uncertainty
During operation the noise level can exceed 80 dB(A).
Wear ear protectors!
Documents / Resources
References
Download manual
Here you can download full pdf version of manual, it may contain additional safety instructions, warranty information, FCC rules, etc.
Advertisement
Thank you! Your question has been received!


Need Assistance?
Do you have a question about the KHE 3250 that isn't answered in the manual? Leave your question here.