Ryobi PCL756 - 18 VOLT SwiftClean SPOT CLEANER Manual
- Operator's manual (24 pages)
Advertisement
- 1 SYMBOLS
- 2 OVERVIEW
- 3 ASSEMBLY
-
4
OPERATION
- 4.1 APPLICATIONS
- 4.2 INSTALLING/REMOVING BATTERY PACK
- 4.3 REMOVING AND FILLING THE SOLUTION TANK
- 4.4 STARTING/STOPPING THE SPOT CLEANER
- 4.5 USING THE SPOT CLEANER
- 4.6 REMOVING/EMPTYING/REATTACHING THE WASTE TANK
- 4.7 CLEANING THE INTAKE NOZZLE
- 4.8 GENERAL MAINTENANCE
- 4.9 CLEANING/REPLACING THE FILTER
- 4.10 CLEANING THE ROLLER BRUSH
- 4.11 STORING THE SPOT CLEANER
- 5 IMPORTANT SAFETY INSTRUCTIONS
- 6 Documents / Resources
SYMBOLS
The following signal words and meanings are intended to explain the levels of risk associated with this product.
| SYMBOL | SIGNAL | MEANING |
 | DANGER: | Indicates a hazardous situation, which, if not avoided, will result in death or serious injury. |
 | WARNING: | Indicates a hazardous situation, which, if not avoided, could result in death or serious injury. |
 | CAUTION: | Indicates a hazardous situation, that, if not avoided, may result in minor or moderate injury. |
| NOTICE: | (Without Safety Alert Symbol) Indicates information considered important, but not related to a potential injury (e.g. messages relating to property damage). |
Some of the following symbols may be used on this product. Please study them and learn their meaning. Proper interpretation of these symbols will allow you to operate the product better and safer.
| SYMBOL | NAME | DESIGNATION/EXPLANATION |
| Safety Alert | Indicates a potential personal injury hazard. |
 | Read Operator's Manual | To reduce the risk of injury, user must read and understand operator's manual before using this product. |
 | Wet Conditions Alert | Do not expose to rain or use in damp locations. |
 | Long Hair | Risk of long hair being drawn into air inlet. |
 | Recycle Symbol | This product uses lithium-ion (Li-ion) batteries. Local, state or federal laws may prohibit disposal of batteries in ordinary trash. Consult your local waste authority for information regarding available recycling and/or disposal options. |
| V | Volts | Voltage |
| min | Minutes | Time |
 | Direct Current | Type or a characteristic of current |
 | No Load Speed | Rotational speed, at no load |
| .../min | Per Minute | Revolutions, strokes, surface speed, orbits etc., per minute |
This is a "household type" product which means it is intended for household use.
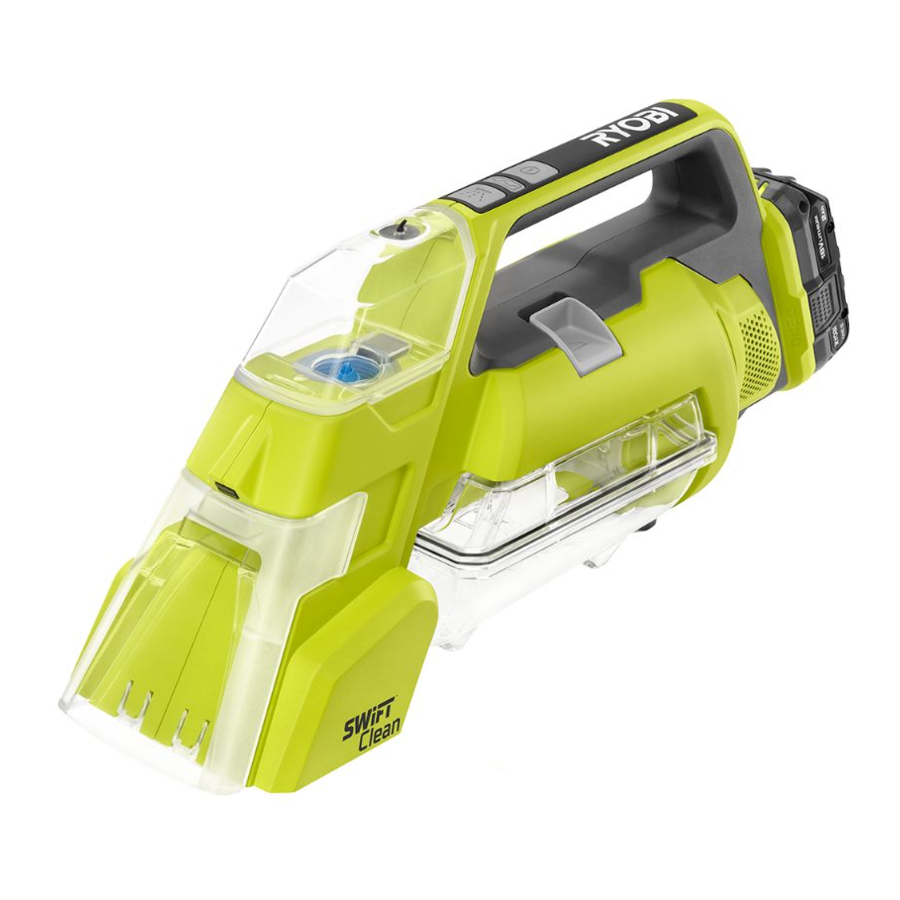
OVERVIEW

- Waste tank
- ON/OFF switch
- Roller brush button
- Spray button
- Solution tank
- Spray nozzle
- Intake nozzle
- Waste tank release button
ASSEMBLY

Do not use this product if it is not completely assembled or if any parts appear to be missing or damaged. Use of a product that is not properly and completely assembled or with damaged or missing parts could result in serious personal injury.
Do not attempt to modify this product or create accessories or attachments not recommended for use with this product. Any such alteration or modification is misuse and could result in a hazardous condition leading to possible serious personal injury.
If any parts are damaged or missing, please call 1-800-525-2579 for assistance.
OPERATION
Do not allow familiarity with this product to make you careless. Remember that a careless fraction of a second is sufficient to inflict serious injury.
Always remove battery pack from the tool when you are assembling parts, making adjustments, cleaning, or when not in use. Removing battery pack will prevent accidental starting that could cause serious personal injury.
Do not clean over electrical outlets located on the floor. Water may drip from the unit after use and can puddle. To avoid damage, do not place the unit on wood or laminate surfaces. If setting unit aside for more than a few minutes, place onto a towel or other absorbent material to catch any drips. Failure to follow these rules may cause serious injury or damage to property.
Do not use any attachments or accessories not recommended by the manufacturer of this product. The use of attachments or accessories not recommended can result in serious personal injury.

Avoid picking up hard, sharp objects with this product, as they may cause damage.
Do not use this appliance to clean or groom animals.
APPLICATIONS
You may use this product for the following purpose:
- Light-duty vacuuming of wet or dry surfaces
- Light-duty cleaning of upholstery
INSTALLING/REMOVING BATTERY PACK

- Battery pack
- Battery port
- Latches
- Insert the battery pack into the product as shown.
- Make sure the latches on each side of the battery pack snap into place and the battery pack is secured before beginning operation.
Make sure the latch on the bottom of the battery pack snaps in place and the battery pack is fully seated and secure in the battery port before beginning operation. Failure to securely seat the battery pack could cause the battery pack to fall out, resulting in serious personal injury.
NOTE: To avoid serious personal injury, always remove the battery pack and keep hands clear of the lock-out button when carrying or transporting the tool.
- Depress the latches on each side of the battery pack.
- Remove the battery pack.
For complete charging instructions, see the operator's manuals for your battery pack and charger.
REMOVING AND FILLING THE SOLUTION TANK

- Solution tank
- Tabs

- Solution tank
- Tab
- Cap
- Cleaning solution
Use the included Oxy Cleaning Solution undiluted to fill the solution tank.
NOTICE
Use only RYOBI brand Oxy solution. Do not use other chemicals as this may damage the internal parts of the unit and void your warranty.
- Remove the solution tank by lifting the tabs on the tank straight up.
- Remove the cap on the tank by rotating counterclockwise.
- Fill the tank with cleaning solution.
NOTE: Wipe off any excess solution that may have spilled onto the outside of the Oxy Cleaning Solution. - Replace the cap on the solution tank by rotating clockwise. Avoid cross-threading the cap and be sure it is tightened securely.
- Align the cap and the tab on the solution tank and press down firmly. You will hear a slight 'click' when the cap has correctly locked into the unit.
NOTE: Be sure the tank is installed properly to avoid any leakage.
STARTING/STOPPING THE SPOT CLEANER

- Spray button
- Roller brush button
- ON/OFF switch
Starting and stopping the vacuum:
- Depress the ON/OFF switch to turn on the vacuum.
- Depress the ON/OFF switch to turn off the vacuum. When the ON/OFF switch is pressed to turn off the vacuum, the roller brush will also be decativated.
To apply the cleaning solution:
- Press and hold the spray button to apply cleaning solution.
- Release the spray button to stop the cleaning solution application.
NOTE: The cleaning solution is applied only while the spray button is being pressed.
Activating the roller brush:
- Press the roller brush button to activate roller brush.
- Press the roller brush button again to deactivate the roller brush.
NOTE: The vacuum will still be activated when the roller brush is turned off. To turn off both the vacuum and roller brush, press the ON/OFF switch.
USING THE SPOT CLEANER


Always hold the unit at an angle with the nozzle of the tool facing down when vacuuming liquids or when the waste tank contains liquid waste. Positioning the unit on its side or holding the unit with its nozzle facing up could allow liquid to enter into the motor or battery. Battery packs exposed to liquids can result in smoke/fire, serious personal injury and/or property damage.
Apply the cleaning solution sparingly to complete the task. Excessive foaming may occur if too much cleaning solution is present.
When using, monitor the amount of liquid waste present in the waste tank. Do not allow the amount of waste liquid to exceed the max fill line. When the waste tank reaches full capacity, turn the unit OFF and empty the waste tank.
When you are finished, remove and clean the filter as described later in this manual. Allow the filter to dry before reassembling the unit.

During use, make sure the unit does not get submerged or doused in liquid, which could cause shock, unit failure, or personal injury.
REMOVING/EMPTYING/REATTACHING THE WASTE TANK

- Waste tank
- Waste tank release button
- Hinge

- Waste tank latch
- Waste tank
The waste tank should be emptied every time the solution tank is filled to avoid exceeding the tank's max fill line. Remove and clean the waste tank after every use.
NOTE: The waste tank is top rack dishwasher safe up to 140°F.
Never allow the amount of waste liquid to exceed the max fill line. Failure to follow this rule may allow liquid to enter inside the unit which could cause shock, property damage, or personal injury.
To remove:
- Remove the battery pack.
- Place the unit on a level surface.
![]()
If the waste tank contains liquid, do not turn the unit upside down as it may enter the motor. - Using your right thumb, press the waste tank release button. The waste tank will release.
- Continue pressing the release button and lift the unit. The waste tank should remain on the level surface.
To empty:
- Move the waste tank over a suitable container or drain.
- Raise the waste tank latch to unlock the tank.
- Empty the contents and rinse the tank.
- Close the lid and be sure it is securely latched.
To reattach:
- Reinstall the tank by inserting it into the unit and press-ing it into place until the waste tank release button locks securely.
NOTE: The hinge of the tank will face toward the front of the unit. The tank should easily lock into place. Do not force it. If the unit will not lock into place, try turning the tank around and trying again.
CLEANING THE INTAKE NOZZLE

- Intake nozzle

- Intake nozzle
The intake nozzle should be cleaned after every use.
NOTE: The intake nozzle is top rack dishwasher safe up to 140°F.
To remove:
- Remove the battery pack.
- Place the unit on a level surface.
- Grasp the handle with your right hand. Place your left hand over the front of the unit.
- Using your thumb and middle finger, pull on both tabs and away from the unit. The nozzle will slide out and away from the unit.
- Clean and rinse the intake nozzle with fresh water.
NOTE: Allow the nozzle to air dry completely before reinstalling when preparing the unit for storage. - To replace, align the nozzle and insert it into the unit.
- Once installed in place, press on both the top and the bottom of the nozzle to make sure both tabs are secure.
This product contains no serviceable parts.
GENERAL MAINTENANCE
Avoid using solvents when cleaning plastic parts. Most plastics are susceptible to damage from various types of commercial solvents and may be damaged by their use. Use clean cloths to remove dirt, dust, oil, grease, etc.
Do not at any time let brake fluids, gasoline, petroleumbased products, penetrating oils, etc., come in contact with plastic parts. Chemicals can damage, weaken or destroy plastic which could result in serious personal injury.
CLEANING/REPLACING THE FILTER

- Filter
- Vent
- Remove the battery pack.
- Remove the waste tank as described earlier in Removing/Emptying/Reattaching the Waste Tank.
- Remove the filter from the bottom of the unit
NOTE: To reassemble, insert filter into filter housing. - Shake or lightly brush any dust or dirt off the filter.
- Wash with clean, fresh water.
- Empty the waste tank; wash if necessary. Before reat-taching to the unit, make sure all pieces are completely dry.
NOTE: Allow 24 hours for parts to dry completely.
When purchasing replacement filter, request recommended part number 904059001.
CLEANING THE ROLLER BRUSH

- Roller brush
- Cap

- Scissors
- Tangled threads and hair
- Roller brush
Sometimes hair or strings can become tangled around the roller brush and prevent it from cleaning properly. Periodic removing and cleaning of the brush will keep the unit at its peak performance.
- Remove the battery pack.
- Using a coin, remove the locking cap by rotating counterclockwise until the arrow aligns to the unlocked position on the head of the unit.
- Pull on the cap to remove the brush from the unit. Some resistance may be felt from the bristles. This is common.
- Use scissors to remove the hair or strings as shown.
- Reinsert the brush.
NOTE: Be sure to align the other end of the brush with the post inside the head of the unit. - Align the arrow on the cap with the unlocked position on the head of the unt.
- Use the coin to push down and rotate clockwise until it is in the locked position and the brush is secured firmly in place.
STORING THE SPOT CLEANER
- Remove the battery pack.
- Remove, rinse, and dry the solution tank and the waste tank, if necessary.
NOTE: Allow 24 hours for parts to dry completely. - Install both tanks onto the unit.
- Store the unit in a dry place out of the reach of children.
NOTE: Always store the unit in a horizontal position to avoid any residual water from entering into the motor. - Store the battery in a separate location and out of the reach of children.
IMPORTANT SAFETY INSTRUCTIONS
When using an electrical appliance, basic precautions should always be followed, including the following:
READ AND UNDERSTAND ALL INSTRUCTIONS BEFORE USING THIS BLOWER. TO REDUCE THE RISK OF ELECTRIC SHOCK, FIRE AND/OR SERIOUS PERSONAL INJURY.
READ ALL INSTRUCTIONS BEFORE USING THIS APPLIANCE
TO REDUCE THE RISK OF ELECTRIC SHOCK DO NOT EXPOSE TO RAIN. STORE INDOORS.
- Dress properly. Do not wear loose clothing or jewelry. Contain long hair. Keep your hair, loose clothing, fingers, and all parts of the body and clothing, away from openings and moving parts. Loose clothes, jewelry, or long hair can be caught in internal moving parts.
- Do not overreach. Keep proper footing and balance at all times. Proper footing and balance enables better control of the hand vac in unexpected situations. Do not use on a ladder or unstable support.
- Use safety equipment. Dust mask must be used for appropriate conditions.
- Do not allow children to operate the product or play with the product as a toy. Close attention is necessary when used by or near children.
- Use this product ONLY for its intended use as described in this manual. Use only the attachments recommended in this manual.
- If the product is not working properly, has been dropped, damaged, left outdoors, or dropped into water, return to your nearest service center.
- Do not handle charger plug or product with wet hands.
- Do not put any objects in ventilation openings. Do not use with any opening blocked. Keep openings free of dust, lint, hair, and anything that may reduce air flow.
- NEVER vacuum materials that are burning or smoking, such as hot coals, cigarette butts, matches, burning or smoking ashes, etc.
- DO NOT use to pick up flammable or combustible liquids, such as gasoline, or use in areas where they may be present.
- Use extra care when using on stairs.
- Do not use without dust bowl and filter in place.
- Do not incinerate this appliance even if it is severely damaged. The batteries can explode in a fire.
- The product does not have to be plugged into an electrical outlet, therefore it is always in operating condition. Be aware of possible hazards when using the product or when changing accessories.
- Remove battery when the vacuum is not in use and before servicing.
- Use this product only with batteries and chargers listed in tool/appliance/battery pack/charger correlation supplement 987000-432.
- Recharge only with the charger specified by the manufacturer. A charger that is suitable for one type of battery pack may create a risk of fire when used with another battery pack.
- Use power tools only with specifically designated battery packs. Use of any other battery packs may create a risk of injury and fire.
- When battery pack is not in use, keep it away from other metal objects like: paper clips, coins, keys, nails, screws, or other small metal objects that can make a connection from one terminal to another. Shorting the battery terminals together may cause sparks, burns, or a fire.
- Always remove battery pack from your tool when you are assembling parts, making adjustments, cleaning, or when not in use. Removing battery pack will prevent accidental starting that could cause serious personal injury.
- Do not use a battery pack or power tool that is damaged or modified. Damaged or modified batteries may exhibit unpredictable behavior resulting in fire, explosion or risk of injury.
- Do not modify or attempt to repair a power tool or battery pack that has been damaged.
- To reduce the risk of serious personal injury, never use or expose battery pack or any cordless product in the presence of an open flame or temperature above 265°F. An exploded battery can propel debris and chemicals. If exposed, flush with water immediately.
- Prevent unintentional starting. Ensure the switch is in the off-position before connecting to power source and/or battery pack, picking up or carrying the product. Carrying battery products with your finger on the switch or energizing battery products that have the switch on invites accidents.
- Under abusive conditions, liquid may be ejected from the battery; avoid contact. If contact accidentally occurs, flush with water. If liquid contacts eyes, additionally seek medical help. Liquid ejected from the battery may cause irritation or burns.
- Do not charge battery tool in a damp or wet location. Do not use, store, or charge battery packs or products in locations where the temperature is less than 50°F or more than 100°F. Do not store outside or in vehicles.
- Protect your lungs. Wear a face or dust mask if the operation is dusty. Following this rule will reduce the risk of serious personal injury.
- Check for misalignment or binding of moving parts, breakage of parts, and any other condition that may affect the hand vac's operation. If damaged, have the product serviced before using. Many accidents are caused by poorly maintained products.
- Use only accessories that are recommended by the manufacturer for your model. Accessories that may be suitable for one product may create a risk of injury when used on another product.
- Always turn off this appliance before connecting or disconnecting motorized nozzle.
- Follow all charging instructions and do not charge the battery pack or appliance outside of the temperature range specified in the instructions. Charging improperly or at temperatures outside of the specified range may damage the battery and increase the risk of fire.
- Do not let gasoline, oils, petroleum-based products, etc., come in contact with plastic parts. They contain chemicals that can damage, weaken, or destroy plastic.
- Have servicing performed by a qualified repair person using only identical replacement parts. This will ensure that the safety of the product is maintained.
- This product contains no serviceable parts.
- Save these instructions. Refer to them frequently and use them to instruct others who may use this hand vac. If you loan someone this hand vac, loan them these instructions also.
REGISTER YOUR TOOLS
http://register.ryobitools.com
1-800-525-2579
Documents / Resources
References
Download manual
Here you can download full pdf version of manual, it may contain additional safety instructions, warranty information, FCC rules, etc.
Download Ryobi PCL756 - 18 VOLT SwiftClean SPOT CLEANER Manual
Advertisement
Thank you! Your question has been received!

Need Assistance?
Do you have a question about the PCL756 that isn't answered in the manual? Leave your question here.