Technics SE-R1 - Stereo Power Amplifier Manual
- Owner's manual (36 pages) ,
- Operating instructions manual (116 pages)
Advertisement
Features of this unit
This unit offers the following features:
Full-digital amplifier with a high-precision jitter reduction circuit and PWM conversion circuit
This unit is a full-digital amplifier. Its specially-designed jitter reduction circuit and high-precision PWM conversion circuit eliminate distortion, noise, and jitter.
LAPC (Load Adaptive Phase Calibration)
Adaptive processing of speaker impedance flattens frequency amplitude and phase characteristics. The result is the reproduction of sound with rich spatial expression.
GaN-FET Driver
High-speed, loss-less switching is required to achieve pure amplification of accurately generated PWM signals. For this reason, this unit is provided with a high-speed GaN-FET Driver with super-low ON resistance.
Recommended devices
We recommend using Technics devices (optional) for superior audio quality.
| Product name | Model number |
| Network Audio Control Player | SU-R1 |
| Speaker System | SB-R1 |
Accessories
- AC power supply cord
(K2CB2YY00107)
![]()

(ONLY FOR CANADA)
The enclosed Canadian French label sheet corresponds to the English display on the unit.
- Product numbers provided in this Owner's Manual are correct as of December 2014. These may be subject to change.
- Do not use AC power supply cord with other equipment.
Unit care
Pull out the AC power supply cord from the outlet before maintenance. Clean this unit with a soft cloth.
- When dirt is heavy, wring a wet cloth tightly to wipe the dirt, and then wipe it with a soft cloth.
- Do not use solvents including benzine, thinner, alcohol, kitchen detergent, a chemical wiper, etc. This might cause the exterior case to be deformed or the coating to come off.
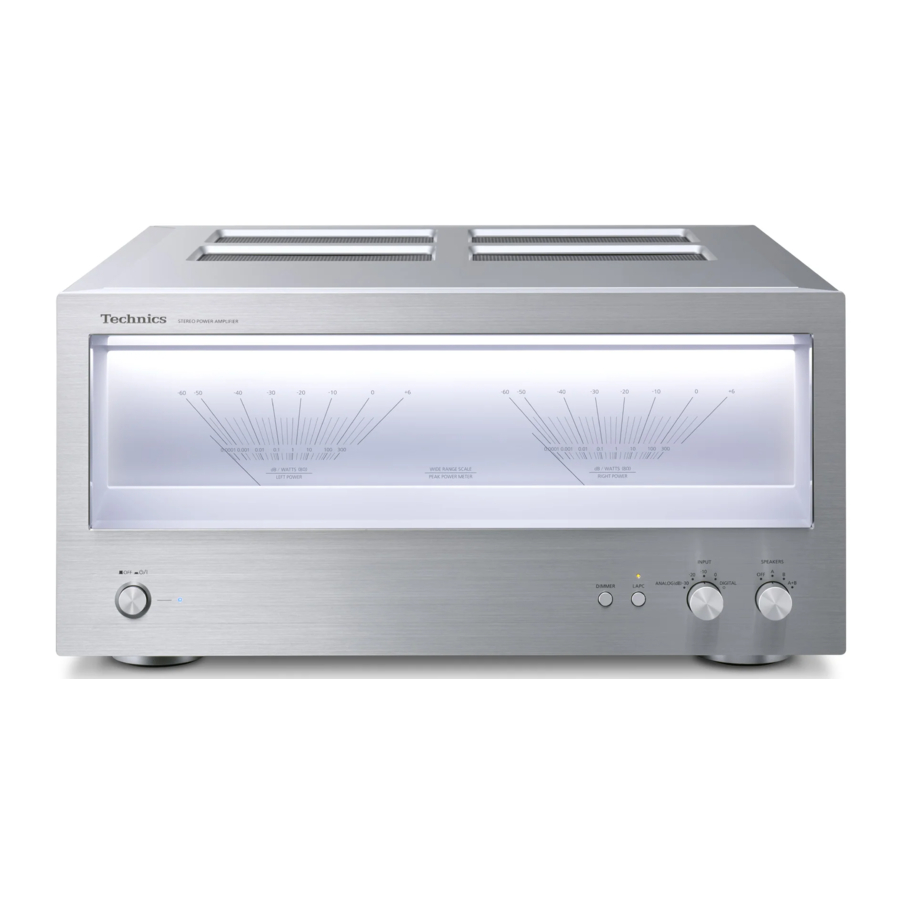
Control reference guide
Front of this unit

- Unit on/off button [
![]() ]
]
Use this button to turn the unit on and off.
[![]() ] (off): The unit is off.
] (off): The unit is off.
[![]() ] (on): The unit is on.
] (on): The unit is on. - The unit is still using a small amount of power in off mode. Off mode uses less power. (See "Specifications")
- Power indicator
 ]
] ] (off): The unit is off.
 ] (on): The unit is on.
 The color of the indicator changes according to the status of this unit.
| Blue | The unit is on. |
| Red | The unit is in standby mode.
|
- Peak power meter
Display the output level. - LAPC indicator (See "Measuring the characteristics of the unit and correcting its output")
- [DIMMER]
Adjust the brightness of the light and the indicators. Each press of this button switches the brightness. - [LAPC] (See "Measuring the characteristics of the unit and correcting its output")
Measure the characteristics of the amplifier and correct its output.- The function does not work when the speaker selector knob is set to [OFF].
- Input selector knob (See "Operations")
Select the input source or gain value. - Speaker selector knob (See "Operations")
Select the output speakers.
Rear of this unit

- Speaker terminals [SPEAKERS] (See "Speaker connection")
- Analog audio input terminal [UNBALANCED] (See "Connecting to analog audio output devices")
- Analog audio input terminal [BALANCED] (See "Connecting to analog audio output devices")
- Analog audio input selector switch (See "Connecting to analog audio output devices")
Switch the analog audio input.- This switch does not work when the input selector knob is set to [DIGITAL].
- System terminal [Technics Digital Link IN] (See "System control connection to an SU-R1")
- Auto off switch [AUTO OFF]
Turn on/off auto off function.- Auto off function:
This unit is designed to conserve its power consumption and save energy. The unit will turn to standby mode automatically if there is no sound and it is not being used for approximately 20 minutes.- To cancel this function, set to [OFF].
- Auto off function:
- Product identification marking
The model number is indicated. - AC IN terminal [AC IN ~] (See "AC power supply cord connection")
Getting started
- Turn off all equipment before connection and read the appropriate operating instructions.
- Do not connect the AC power supply cord until all other connections are complete.
- Insert the plugs of the cables to be connected all the way in.
- Do not bend cables at sharp angles.

RISK OF HAZARDOUS ENERGY! MAKE PROPER SPEAKER CONNECTIONS. CONNECT CABLES AS DESCRIBED IN THIS OWNER'S MANUAL.
Speaker connection
Single wiring connection
e.g.,

- When using single wiring connection, set the speaker selector knob to [A] or [B]. (See "Operations" )
- Turn the knobs to loosen them, and insert the core wires.
![]()
- Tighten the knobs.
![]()


Bi-wiring connection
e.g.,

- When making bi-wiring connections, set the speaker selector knob to [A+B]. (See "Operations" )

- When the connections are completed, pull the speaker cables lightly to check that they are connected firmly.
- Be careful not to cross (short-circuit) or reverse the polarity of the speaker wires as doing so may damage the amplifier.
![]()
- Wire the polarity (+/-) of the terminals correctly. Not doing so may adversely affect stereo effects or cause malfunction.
- For details, refer to the operating instructions of the speakers.

System control connection to an SU-R1
- You can input digital audio signals to this unit and play back music.
- You can automatically link this unit with the SU-R1 and operate them easily with the remote control of the SU-R1. (See "Using the system control function")

- When using the system control function, set the input selector knob to [DIGITAL]. (See "Operations" )
- Use category 7 or above straight LAN cables (STP) when connecting to peripheral devices.
- We recommend using cables with a length of 3 m (9.9 ft) or less.
- Do not connect an SU-R1 in any other way than described above.
Connecting to analog audio output devices
You can input analog audio signals to this unit and play back music.
e.g.,

*1 Select [BALANCED] or [UNBALANCED]. Set the analog audio input selector switch to a position that corresponds to the device you want to play.
*2 We recommend using cables with a length of 3 m (9.9 ft) or less.
- When connecting to an analog audio output device, set the input selector knob to [ANALOG]. (See "Operations" )
To disconnect the XLR cables
Pull out the XLR cables while pressing [PUSH] at the top of the terminals.

AC power supply cord connection
Connect only after all other connections are completed.

To disconnect the AC power supply cord from this unit
Pull out the AC power supply cord while pressing the top and bottom sides of the connector.

![information]() Although the AC power switch is in the [
Although the AC power switch is in the [ ![]() ] position, the unit is not completely disconnected from the mains. Remove the plug from the main electrical outlet if you will not be using the unit for an extended period of time. Place the unit so the plug can be easily removed.
] position, the unit is not completely disconnected from the mains. Remove the plug from the main electrical outlet if you will not be using the unit for an extended period of time. Place the unit so the plug can be easily removed.
 ] position, the unit is not completely disconnected from the mains. Remove the plug from the main electrical outlet if you will not be using the unit for an extended period of time. Place the unit so the plug can be easily removed.
Measuring the characteristics of the unit and correcting its output
To optimize the audio output, you can measure the amplifier characteristics and correct its output when it is connected to the speakers.
- Set the speaker selector knob to a position that corresponds to the connected speakers. (See below)
Test tone emitted during measurement
To ensure the measurement accuracy, the speakers output a test tone at regular intervals. (For approximately 4 minutes)
It is not possible to change the volume of the audio being output while the measurement is in progress.
- Press the unit on/off button to the [
![]() ] position.
] position. - The power indicator lights up in blue.
- Press and hold [LAPC] until the LAPC indicator on this unit starts to blink.
- This unit will start measuring the characteristics of the amplifier. Check that a test tone is output from both the left and right speakers.
- If you press [LAPC], turn the speaker selector knob or operate other controls while the measurement is in progress, it will be canceled. The LAPC indicator on this unit will go off.
- When the measurement is complete, amplifier output correction will be automatically turned on. The LAPC indicator on this unit will light up.
- This unit will start measuring the characteristics of the amplifier. Check that a test tone is output from both the left and right speakers.
Turning on/off the output correction function
Press [LAPC].
Each time you press the button:
| LAPC indicator lights up | On |
| LAPC indicator goes off | Off |
- When the SU-R1 is connected via the system control function, you can operate using the SU-R1's remote control.
- The output correction setting is applied separately to each speaker terminal option (A/B/A+B).
- Depending on the type of the connected speakers, the effect of the output correction function may be minimal.
- The corrected output remains in effect until you measure the characteristics again. When you use other speakers, redo the measurement.
Operations
- Press the unit on/off button to the [
![]() ] position.
] position. - The power indicator lights up in blue.
- Turn the input selector knob.
Select a playback device and gain value.
| ANALOG (dB) (s30/s20/s10/0) | Select an optimal setting for the connected device. (> below) |
| DIGITAL | Select this setting when using the system control function. |
- Turn the speaker selector knob.
Select the speaker terminals from which audio will be output.
| OFF | Does not output audio. |
| A | Outputs audio from the speakers connected to the A terminals. |
| B | Outputs audio from the speakers connected to the B terminals. |
| A+B | Outputs audio from the speakers connected to the A and B terminals. |
- Operate the device to be used for playback.
Input selector knob setting during analog input
- For normal operation, set the value to [0].
- For playback at low volume levels, lower the gain value of this unit by setting the input selector knob to [-30], [-20] or [-10] of [ANALOG (dB)]. This will minimize analog/digital conversion errors that occur on this unit.
Using the system control function
You can automatically link this unit with the SU-R1 and operate them easily with the remote control of the SU-R1.
Preparation
- Connect this unit and the SU-R1 with cables for system control. (See "System control connection to an SU-R1")
- Set the input selector knob to [DIGITAL]. (See "Operations" )
- Press the unit on/off button on this unit and the SU-R1 to the [
![]() ] position.
] position. - If "Digital Link" is set to "Off" on the SU-R1, change the setting to "On".
Switching this unit and the SU-R1 to on/standby simultaneously
- If you point the SU-R1's remote control at the SU-R1 and press [
![]() ] when this unit and the SU-R1 are in standby mode, this unit and the SU-R1 will be turned on simultaneously.
] when this unit and the SU-R1 are in standby mode, this unit and the SU-R1 will be turned on simultaneously. - If you point the SU-R1's remote control at the SU-R1 and press [
![]() ] when this unit and the SU-R1 are turned on, this unit and the SU-R1 will simultaneously enter standby mode.
] when this unit and the SU-R1 are turned on, this unit and the SU-R1 will simultaneously enter standby mode.
 ] when this unit and the SU-R1 are in standby mode, this unit and the SU-R1 will be turned on simultaneously.
Measuring the characteristics of the unit and correcting its output
You can operate using the SU-R1's remote control. (See "Getting started")
![information]() For information on the operations of the SU-R1, please also refer to its operating instructions.
For information on the operations of the SU-R1, please also refer to its operating instructions.
Troubleshooting
Before requesting service, make the following checks. If you are uncertain about some of the check points, or if the solutions indicated in the following guide does not resolve the issue, then consult your dealer for instructions.
To return all settings to the factory defaults
When the following situations occur, reset the memory:
- There is no response when buttons are pressed.
- You want to clear and reset the memory contents.
When the unit is off
- Press and hold [DIMMER].
- While continuing to hold [DIMMER], press the unit on/off button.
- Keep holding [DIMMER] until the power indicator and the LAPC indicator blink twice.
Heat buildup of this unit
- This unit becomes warm when the volume is high. This is not a malfunction.
A humming sound can be heard during playback
- An AC power supply cord or fluorescent light is near the cables. Keep other appliances and cords away from the cables of this unit.
- A strong magnetic field near a TV or other device may adversely affect the audio quality. Keep this unit away from such devices.
- The speakers may output noise when a device nearby is emitting powerful radio waves, such as when a mobile phone is on a call.
No sound
- Check connections to speakers and other equipment. After checking the connections, measure the characteristics of the amplifier. (See "Measuring the characteristics of the unit and correcting its output")
- Check to see if the correct input source is selected.
- Insert the plugs of the cables to be connected all the way in.
- Set the speaker selector knob to other than [OFF]. (See "Operations" )
The peak power meter does not operate
- In the following cases, this meter does not operate:
- When the peak power meter light is turned off by pressing [DIMMER].
- When this unit is muted by pressing [MUTE] on the SU-R1's remote control. (Only when the input selector knob is set to [DIGITAL].)
- When the speaker selector knob is set to [OFF].
The system control function is not working
- Connect the cables to the matching LR terminals on this unit and the SU-R1.
The unit turns off automatically
- Is the auto off function turned on? (See "Control reference guide")
- If the SU-R1 is connected to this unit via the system control function, this unit may automatically enter standby mode when the SU-R1 enters standby mode. (See "System control connection to an SU-R1", "Using the system control function")
- This unit incorporates a protection circuit to prevent damage caused by heat buildup. When you use this unit at a high volume level for a long period of time, it may turn off automatically. Wait for this unit to cool down before turning on this unit again. (For approximately 3 minutes)
Specifications
| |
| Power supply | AC 120 V, 60 Hz |
| Power consumption | 250 W |
| Power consumption in standby mode | Approx. 0.7 W |
| Power consumption in off mode | Approx. 0.3 W |
| Dimensions (WkHkD) | 480 mm x 241 mm x 567 mm (18 7/8" x 9 15/32" x 22 11/32") |
| Mass (Weight) | Approx. 54 kg (119 lbs) |
| Operating temperature range | 0°C to +40°C (+32°F to +104°F) |
| Operating humidity range | 35% to 80% RH (no condensation) |
| |
| FTC output power | 150 W + 150 W (20 Hz to 20 kHz, T.H.D. 0.5%, 8 Ω, 20 kHz LPF) 300 W + 300 W (20 Hz to 20 kHz, T.H.D. 0.5%, 4 Ω, 20 kHz LPF) |
| Frequency response | 1 Hz to 90 kHz (-3 dB, 8 Ω) |
| THD+N | 0.05% (1 kHz, 75 W, 8 Ω, 20 kHz LPF) |
| Input sensitivity/Input impedance | |
| UNBALANCED | 1.2 Vrms / 47 kΩ (ANALOG 0 dB) |
| BALANCED | 1.2 Vrms / 47 kΩ (ANALOG 0 dB) |
| GAIN | 29 dB (ANALOG 0 dB) |
| Load impedance | |
| A or B, Bi-Wire | 4 Ω to 16 Ω |
| A+B | 8 Ω to 16 Ω |
| |
| Analog input | |
| UNBALANCED | Pin jack |
| BALANCED | 3 Pin XLR |
| Digital input | Technics Digital Link |
- Specifications are subject to change without notice.
- Mass and dimensions are approximate.
IMPORTANT SAFETY INSTRUCTIONS
Read these operating instructions carefully before using the unit. Follow the safety instructions on the unit and the applicable safety instructions listed below.
Keep these operating instructions handy for future reference.
- Read these instructions.
- Keep these instructions.
- Heed all warnings.
- Follow all instructions.
- Do not use this apparatus near water.
- Clean only with dry cloth.
- Do not block any ventilation openings. Install in accordance with the manufacturer's instructions.
- Do not install near any heat sources such as radiators, heat registers, stoves, or other apparatus (including amplifiers) that produce heat.
- Do not defeat the safety purpose of the polarized or grounding-type plug. A polarized plug has two blades with one wider than the other. A groundingtype plug has two blades and a third grounding prong. The wide blade or the third prong are provided for your safety. If the provided plug does not fit into your outlet, consult an electrician for replacement of the obsolete outlet.
- Protect the power cord from being walked on or pinched particularly at plugs, convenience receptacles, and the point where they exit from the apparatus.
- Only use attachments/accessories specified by the manufacturer.
- Use only with the cart, stand, tripod, bracket, or table specified by the manufacturer, or sold with the apparatus. When a cart is used, use caution when moving the cart/apparatus combination to avoid injury from tip-over.
![]()
- Unplug this apparatus during lightning storms or when unused for long periods of time.
- Refer all servicing to qualified service personnel.
Servicing is required when the apparatus has been damaged in any way, such as power-supply cord or plug is damaged, liquid has been spilled or objects have fallen into the apparatus, the apparatus has been exposed to rain or moisture, does not operate normally, or has been dropped.

Unit
![burn hazard]()
![shock hazard]()
To reduce the risk of fire, electric shock or product damage,- Do not expose this unit to rain, moisture, dripping or splashing.
- Do not place objects filled with liquids, such as vases, on this unit.
- Use only the recommended accessories.
- Do not remove covers.
- Do not repair this unit by yourself. Refer servicing to qualified service personnel.
- Do not place heavy items on this unit.

AC power supply cord
- The power plug is the disconnecting device.
Install this unit so that the power plug can be unplugged from the socket outlet immediately.

Unit
- Do not place sources of naked flames, such as lighted candles, on this unit.
- Do not put any objects on this unit. This unit becomes hot while it is on.
- Do not touch the output terminals of the speakers with your hands or other objects while the speakers are in use. Depending on the conditions of use, doing so may expose you to high voltage.
Placement
![burn hazard]()
![shock hazard]()
To reduce the risk of fire, electric shock or product damage,- Do not install or place this unit in a bookcase, built-in cabinet or in another confined space. Ensure this unit is well ventilated.
- Do not obstruct this unit's ventilation openings with newspapers, tablecloths, curtains, and similar items.
- More than one person is required to move or carry the unit.
![]()
- Ensure that the placement location is sturdy enough to accommodate the weight of this unit (See "Specifications").
- Do not lift or carry this unit by holding any of its knobs. Doing so may cause this unit to fall, resulting in personal injury or malfunction of this unit.


RISK OF ELECTRIC SHOCK
DO NOT OPEN
TO REDUCE THE RISK OF ELECTRIC SHOCK, DO NOT REMOVE SCREWS.
NO USER-SERVICEABLE PARTS INSIDE.
REFER SERVICING TO QUALIFIED SERVICE PERSONNEL.
 | The lightning flash with arrowhead symbol, within an equilateral triangle, is intended to alert the user to the presence of uninsulated "dangerous voltage" within the product's enclosure that may be of sufficient magnitude to constitute a risk of electric shock to persons. |
 | The exclamation point within an equilateral triangle is intended to alert the user to the presence of important operating and maintenance (servicing) instructions in the literature accompanying the appliance. |
- The illustrations shown may differ from your unit.
If you have any questions, visit:
U.S.A.: www.panasonic.com/support
Canada: www.panasonic.ca/english/support
Register online at www.panasonic.com/register (U.S. customers only)
Documents / Resources
References
![www.panasonic.com]() Panasonic - Official Consumer Product Support
Panasonic - Official Consumer Product Support![www.panasonic.ca]() Panasonic - Official Consumer Product Support
Panasonic - Official Consumer Product Support![www.panasonic.com]() Product Registration
Product Registration
Download manual
Here you can download full pdf version of manual, it may contain additional safety instructions, warranty information, FCC rules, etc.
Advertisement
Thank you! Your question has been received!


Need Assistance?
Do you have a question about the SE-R1 that isn't answered in the manual? Leave your question here.