Advertisement
- 1 Here's What You Can Do
- 2 More Ways to Further Enjoy this Piano
- 3 Quick Operations
- 4 Before You Play
- 5 Playing the Piano, Listening to Songs and Practicing
- 6 Recording a Performance
- 7 Advanced Features
- 8 Connecting the Piano and a Mobile Device via Bluetooth
- 9 Troubleshooting
- 10 USING THE UNIT SAFELY
- 11 IMPORTANT NOTES
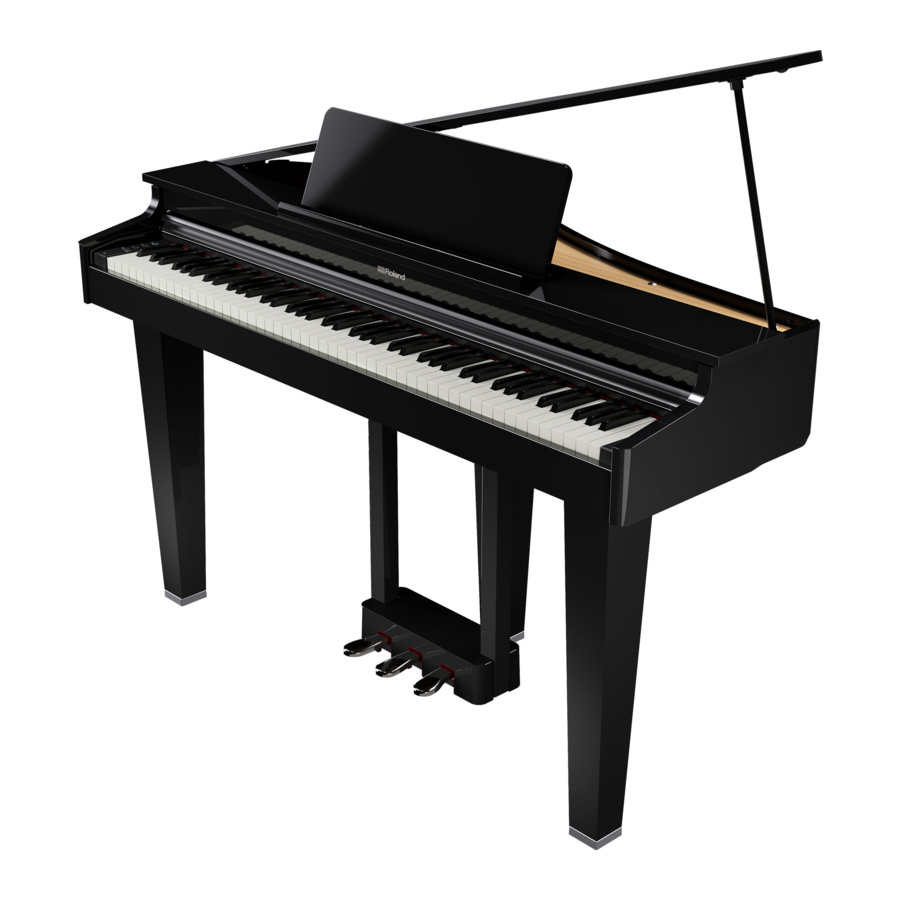
- 12 Main Specification
- 13 Documents / Resources
Here's What You Can Do
Playing the Different Tones
In addition to grand piano tones for use in concerts, this instrument features a wide range of built-in instrument tones. Use these tones as you like according to the song you're playing and the mood. You can also play two tones layered together to discover your own favorite original combinations.
Listening to and Practicing with the Built-in Songs
This piano comes with built-in songs that are well-known in a variety of genres from classical to jazz, as well as songs for practicing and more. You can use these built-in songs as examples when you practice. A built-in metronome is also available to help develop your sense of rhythm when you play.
Recording Your Performance
You can record your own keyboard performance, and then play it back to hear how you did. By listening back to what you played on the spot, you can improve what you did for the next time, or copy your performance to a USB flash drive as a song.
More Ways to Further Enjoy this Piano
Playing music through the piano's speakers (Bluetooth® Audio)
You can connect your smartphone or tablet to this instrument and listen to your favorite songs through the piano's speakers. This lets you "play along" with the performances of the musicians you admire.
Connect to an app to enjoy various added features (Bluetooth® MIDI)
By connecting this piano to an app, you can select even more varied tones, discover new music via Roland Cloud, and use features such as digital sheet music to assist you when you practice... all of which lets you experience a new world of piano performance.
Quick Operations
Hold down the [ ] (settings) button and press the keys to switch between the various functions.
| Select a tone |  | Press one key to select a single tone that plays with each key press. Press two keys at the same time to select two different tones that play together with each key press. This function is called "Dual Play". | |
| Select a song |  | Select the built-in song category. | |
 | Select either a song on the USB flash drive, or a song recorded in internal memory. | ||
 | Select the song to play back. "Internal Song List" "Internal Song List" | ||
| Play back or stop a song |  | Play back all of the songs within the category, or just one. Press the same key again to stop playback. | |
| Specifying the keyboard tone for song playback (SMF play mode) |  | Normally you will use the "Auto-Select" setting. | |
 Setting Setting | Explanation | ||
| Auto-Select (default) | Either "Internal" or "External" is selected automatically depending on the song that you play back. | ||
| Internal | The tone for the song that plays back and the tone you use when playing the keyboard are the same. The tone for the song changes when you change the tone on the GP-3. We recommend this setting when playing the built-in songs. The damper resonance (*1) effect is applied to the piano tone for the song. | ||
| External | A different tone can be used for the song that plays back and for the tone you use when playing the keyboard. The tone for the song doesn't change when you change the tone on the GP-3. We recommend this setting when playing back song files from your computer connected via USB. The damper resonance (*1) effect is not applied to the piano tone for the song. | ||
| (*1) This refers to the overall resonance of the acoustic piano when its damper pedal is pressed (the sound of other strings vibrating in sympathy when you press the damper pedal, and the resonance of the entire instrument). | |||
| Bluetooth settings |  | Turn Bluetooth on to connect to the "Roland Piano App" app. (Default value: On)"Connecting the Piano and a Mobile Device via Bluetooth" | |
| Start and stop the metronome |  | The metronome switches on/off with each key press. | |
| Change the metronome's volume |  | 1–10 (default value: 5) | |
| Change the time signature |  | 0/4 (*2), 2/4, 3/4, 4/4, 5/4, 6/4, 7/4 (default value: 4/4) (*2) Each beat plays with the same sound when the metronome plays. | |
| Change the tempo |  | 10–500 (default: 108) | |
| Add ambience to the sound (Ambience) |  | The reverberation that is characteristic of a performance in a concert hall can be added to the sound. Higher values produce deeper ambience; lower values produce shallower ambience. 0–10 (default value: 1) | |
| Make the ambience sound natural when using headphones ( Piano Reality Headphones Ambience ) |  | You can apply a Piano Reality Headphones Ambience effect that creates the impression that the sound is being heard from the piano itself even when you're using headphones. (Default value: On) * The Piano Reality Headphones Ambience effect applies only to piano sounds; it does not apply to other sounds. | |
| Adjust the brightness of the sound (Brilliance) |  | You can adjust the brightness of the sound when you play the keyboard or when you play back a song. Higher values produce brighter sounds. -10–+10 (default value: 0) | |

| Split the keyboard into two zones (Twin Piano) |  | You can divide the keyboard into left and right zones so that two people can play within the same pitch range. Use this when you want it to sound like two pianos are being played. This splits the keyboard into two zones (left and right), centered around middle C (C4). Select between three ways of playing the sounds. | ||
| Setting | Explanation | |||
| Off (default value) | Cancels the setting for splitting the keyboard. | |||
| Pair | Notes played in the right zone are louder in the right speaker; notes played in the left zone are louder in the left speaker. | |||
| Individual | Notes played in the right zone are heard only from the right speaker; notes played in the left zone are heard only from the left speaker. | |||
 * The left and right tones are the same (concert piano). * The damper pedal works only for the right-side keyboard zone. The soft pedal operates as a damper pedal for the left side. | ||||
| Change the key touch (Key Touch) |  | Sets the key touch when you are playing the keyboard. | ||
| Setting | Explanation | |||
| Very heavy | A heavier setting than "heavy". | |||
| Heavy | With this setting, the keys must be played with more force than the "Standard" setting to achieve fortissimo (ff ) levels, so the keyboard action feels heavier. | |||
| Standard (default) | A "standard" key touch that is closest to that of an acoustic piano. | |||
| Light | With this setting, you can achieve fortissimo (ff ) levels by playing with less force than the "Standard" setting, so the keyboard action feels lighter. | |||
| Very light | A lighter setting than "Light". | |||
| Fixed | The keyboard always plays notes at the same strength, regardless of how hard or soft you play. | |||
| Match the tuning to another instrument (Master Tuning) |  | When playing in an ensemble or other situations with other instruments, you can adjust the reference pitch of this piano to match its tuning with other instruments. The reference pitch is usually expressed as the frequency that is heard when you play the "middle A (A4)" note. When performing in an ensemble with other instruments, the instruments should all be tuned to the same reference pitch for a satisfying sound. The action of matching the reference pitch to other instruments is called "tuning". 415.3 Hz–466.2 Hz (default: 442.0 Hz) | ||
| Transpose (Transpose) |  | The keyboard can be transposed in semitone steps. When accompanying a vocal, or when performing as a singer-instrumentalist, you can transpose the pitch to match the singer's pitch range without changing the fingering of your keyboard playing. -6–5 (default value: 0) | ||
| Export recorded songs |  | You can export the songs that are recorded in the piano's internal memory to a USB flash drive. "Recording Your Performance" | ||
| Change the volume (Song Volume) |  | Adjusts the volume of the song that's playing. 1–10 | ||
| (USB Audio/Bluetooth Volume) |  | Adjusts the volume of the audio signal received via Bluetooth or the USB Computer port. 1–10 (default value: 7) | ||
| Making the power automatically turn off after a time (Auto Off) |  | The power automatically switches off 30 minutes after you stop playing or operating this instrument (at factory settings). If you don't want the power to turn off automatically, change the "Auto Off" setting to "Off" as follows. Off, 10, 30, 240 (min.); default: 30 min. | ||

Before You Play
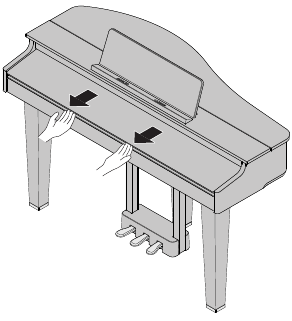
Opening/Closing the Keyboard Cover
Make sure to use both hands when closing or opening the keyboard cover.
* When opening or closing the keyboard cover, take care not to pinch your fingers between the moving part and the piano unit. In places where small children are present, make sure that an adult provides supervision and guidance.
Opening the Keyboard Cover
Use both hands to lift up the edge of the cover, and push it away from you.

* Do not open the cover with objects (such as paper or metal items) lying on top. This might cause the objects to be pushed inside the piano unit, and you may not be able to retrieve them.
Closing the Keyboard Cover
Hold the cover with both hands and gently pull it towards you.
Using the Music Rest
Stabilizing the Music Rest
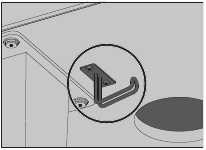
Considerably loosen the screws that fasten the music rest (so that they almost come out), and hook the bottom part of the music rest into the gap between the screws and the piano. While holding the music rest with one hand, use your other hand to turn the screws and stabilize the music rest.

* When attaching, firmly insert the music rest as far as it can go, and grip it with your hand so that it doesn't fall over. Take care not to get your hand pinched. Be careful not to scratch the body of the piano with the metal parts.
* Do not apply excessive force to the music rest.
* When removing the music rest, loosen the screws while holding it with one hand. After you remove the music rest, firmly retighten the screws.
Using the Music Holders
You can use the holders to hold pages in place.

Opening/Closing the Top
Opening the Top
* The top must be opened or closed by an adult.
* When opening the top, take care not to pinch your fingers between the moving part and the body of the unit. In places where small children are present, make sure that an adult provides supervision and guidance.
- Use both hands to firmly grasp the right side of the top (toward the high notes: position A in the illustration), and slowly raise it

* When opening the top, take care not to open it too far. An angle of about 30 degrees is appropriate. Opening the top significantly beyond this angle may damage the piano, or cause the top to fall. Before you open the top, make sure that no one is in the direction toward which the top opens.
* Do not transport the piano with the top opened. Doing so may cause the top stick to come out of its socket, allowing the top to fall. - Using one hand to support the top, raise the top stick and fit it into its socket
* When raising the top stick, please be careful not to get your fingers pinched between the movable part and the panel. In places where small children are present, make sure that an adult provides supervision and guidance. - Move the tip of the top stick to position B of the socket, locking it into place


NOTE
The top stick must be locked into the socket to prevent the top from falling. Do not release the top until the top stick is completely locked.
Closing the Top
To close the top, reverse the procedure by which you opened it.
- Move the tip of the top stick to position C of the socket, and release the lock

- Lower the top stick while supporting the top with the other hand
- Firmly grasp the right side of the top with both hands, and slowly lower it

Connecting Other Devices

Pedal jack
Connect the pedal cord for the dedicated stand here. Refer to the "Leaflet Stand Assembly" for details.
DC In jack
Connect the included AC adaptor to this jack.
USB Computer port
Connect your computer here. Use a USB cable (commercially available) to make this connection.
If your computer is connected, performance data can be transferred between the piano and sequencer software on your computer, allowing you to produce or edit music.

Headphone Hook
Whenever you are not using the headphones, you can hang them on the headphone hook.
* Don't hang anything other than headphones on this hook, and don't apply excessive force to it. Doing so may damage the headphone hook.
Phones jacks
Connect your headphones here. This piano has two headphone jacks, so two people can use headphones at the same time.
USB Memory port
Connect a USB flash drive (commercially available) here. You can play back the songs that you've copied to the USB flash drive
* To prevent malfunction and equipment failure, always turn down the volume, and turn off all the units before making any connections.
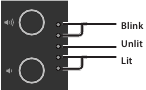
* Never turn off the power, disconnect the USB flash drive or unplug the power cord while this instrument is in the middle of an operation (the topmost three volume indicators blink).
* Never turn off the power or disconnect a USB flash drive or the power cord while the USB flash drive access indicator is blinking.
Basic Operations of the GP-3

Turning the power on/off
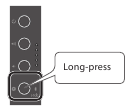
Press the [ ] (power) button to turn on the power. Long-press the [] (power) button to turn the power off.
* You might hear some sound when switching the unit on/off. However, this is normal and does not indicate a malfunction.
Adjusting the Volume
Use the two volume buttons to adjust the volume.
[ ] (volume +) button: raises the volume.
[ ] (volume -) button: lowers the volume. These buttons adjust the built-in speaker volume when you are using the speakers, and the buttons adjust the headphones volume when headphones are connected.
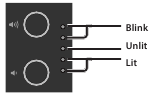
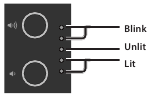
* The indicators to the right of the buttons light up according to the volume (more lights = louder volume). When all of the indicators are lit, the volume is at maximum. When all of the indicators are off, no sound is heard.
Changing the Settings
Hold down the [ ] (settings) button and press the keys to switch between the various functions.
"Quick Operations"
The power to this unit will be turned off automatically after a predetermined amount of time has passed since it was last used for playing music, or its buttons or controls were operated (Auto Off function). If you do not want the power to be turned off automatically, disengage the Auto Off function.
* When the power is turned off, any settings you were editing will be lost. You must save settings that you want to keep
* To restore power, turn the power on again.
Using the Pedals
By pressing the pedals, you can apply effects to the sound of the piano. The pedals on Roland pianos work the same as typical grand piano pedals.
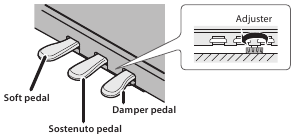
Lower the adjuster located under the pedals so that it comes into contact with the floor If you've placed the piano on a carpet or similar surface, lower the adjuster so that it presses somewhat strongly against the floor
| Damper pedal (right) | While this pedal is held down, the notes sustain without a break in the sound, even if you take your fingers off the keys. The resonance of the sound is affected by how deeply you press the pedal. * The higher notes of the piano (from the highest key down around 1½ octaves) linger for a while after you play them even if the pedal is not pressed, like a grand piano. |
| Sostenuto pedal (center) | When you play a note and then press this pedal before releasing the keys, the sound sustains for only those keys. * This has no effect on notes that you play after pressing the pedal. |
| Soft pedal (left) | This pedal is used to make the sound softer. Playing with the soft pedal depressed produces a sound that is not as strong as when otherwise played with the equivalent strength. The softness of the tone can be varied subtly by the depth to which you press the pedal. * As this is a rather subtle effect, it may be difficult to notice when playing certain tones or in certain performance situations. |
* When operating the pedal, take care not to pinch your fingers between the moving part and the piano unit. In places where small children are present, make sure that an adult provides supervision and guidance.
Playing the Piano, Listening to Songs and Practicing
Selecting a Tone
In addition to piano sounds, the piano lets you enjoy performing with many other sounds.
You can also connect the instrument to an app that give you access to even more tones, such as "Do Re Mi" and GM2 tones.
"Connecting the Piano and a Mobile Device via Bluetooth"
- Hold down the [
![]() ] button and play a key from A0 to B1.
] button and play a key from A0 to B1.
This selects the tone corresponding to the key you pressed.

Tone Name Explanation Concert Piano An extravagant concert grand piano. This is the most recommended piano tone for use in any genre. (A0) Stage Piano (A#0) A piano tone that offers easy expressiveness and a rich reverberating sound when you play strongly. Recommended for jazz and popular music. Mellow Piano (B0) A grand piano with a calm tone. Recommended for songs with a soft, relaxed mood. Bright Piano (C1) A grand piano with a brilliant tone. Recommended for making the piano stand out in an ensemble. Stage EP (C#1) The most popular electric piano tone, featuring a characteristic tremolo effect. Good for pop music and ballads. Pop EP (D1) An electric piano with an attack that stands out, emphasizing the low and high frequencies. Recommended when performing solos in songs and similar situations. Magical Piano (D#1) A piano tone with a bright and sparkling feel, featuring a piano sound plus bell and pad synthesizer sounds. Harpsichord (E1) A classical instrument sound used in baroque music. Produces a characteristically delicate sound that's made by plucking strings with a plectrum. Celesta (F1) A well-known classical instrument sound used in Tchaikovsky's "Nutcracker Suite". Produces a uniquely brilliant and pleasant tone that's like a glockenspiel. Vibraphone (F#1) An instrument that's a larger version of the glockenspiel, with a characteristically spacious and clear tone. Playing in a relaxed way also offers a sound with variation. Pipe Organ (G1) A pipe organ that's used in places like churches. Suitable for playing baroque music. Combo Jz. Organ (G#1) A tonewheel organ. Often used when playing jazz music. SymphonicStr1 (A1) A large string ensemble with a characteristically warm sound. Can be used for both slow and rapid passages. Useful in a variety of situations such as when layered with a piano tone. Soft Pad (A#1) A synthesizer tone with a distinctive spacious sound. Useful when layered with instruments like piano or electric piano, giving a quiet warmth to the sound. Jazz Scat (B1) Vocal sounds that can be triggered in four stages according to how hard you play the keys (Doo, Doot, Bap and Daw). This lets you enjoy playing a cappella-style passages with a thick sound.


MEMO
Press two keys at the same time to select two different tones that play together with each press of a key. This function is called "Dual Play".
Playing Back a Song
Here's how you can listen to the built-in songs. The built-in songs are separated into several categories.
For details on the built-in songs, refer to "Internal Song List".
Selecting a category
- Hold down the [
![]() ] button and play a key from C2 to G#2, or from F3 to F#3.
] button and play a key from C2 to G#2, or from F3 to F#3.
This selects the category corresponding to the key you pressed.

Category name Explanation Listening (C2) Piano songs recommended for listening. Ensemble (C#2) Famous songs, mainly classical pieces. These include piano concertos, duets, and jazz arrangements of classical pieces. Since this collection contains songs that are challenging to play, they are recommended for those at intermediate level or above. Entertainment (D2) Arrangements of well-known songs from around the world, including pop, jazz, and children's songs, in arrangements that can be enjoyed by a wide range of people from the beginner to the advanced player. Do Re Mi Lesson (D#2) You can use these lessons to learn the basics of music, by singing solfege along with the songs or practicing score-reading. Scales (E2) Scales in all keys (major scales, minor scales). Hanon (F2) Exercises No. 1–20 from Hanon's "The Virtuoso Pianist". Beyer (F#2) Beyer's "Vorschule im Klavierspiel" Op.101, No. 1–106. Burgmüller (G2) Burgmüller's "25 Études faciles et progressives" Op.100. Czerny #100 (G#2) Czerny's "100 Progressive Studies" for piano practice. USB Memory (F3) Plays back songs from a USB flash drive. (*1) (*2) Internal Memory (F#3) Plays back a song (only one) that's recorded on the piano.

(*1) The GP-3 can play back data in the following formats.
- SMF formats 0/1
- Audio files (WAV 44.1 kHz, 16-bit linear)
- Audio files (MP3, 44.1 kHz, 64 kbps–320 kbps)
(*2) The song data should be in the root directory of the USB flash drive.
Selecting a playback method
- Hold down the [
![]() ] button and play a key from C3 to C#3.
] button and play a key from C3 to C#3.

Keys to press Explanation Play one song (C3) Plays one song from the given category. Play all songs (C#3) Plays all songs in the given category.

Hold down the [] button and press the same key again to stop playback.
Changing songs
- Hold down the [
![]() ] button and press a key from D3 to E3. C3
] button and press a key from D3 to E3. C3

Keys to press Explanation Previous song (D3) This selects the previous song in the given category. First song (D#3) This selects the first song in the given category. Next song (E3) This selects the next song in the given category.

Practicing with the Metronome
You can play while listening to the metronome. The metronome's tempo and time signature can be changed.
Start and Stop the Metronome
- Hold down the [
![]() ] button and play the C4 key.
] button and play the C4 key.


Changing the Metronome's Volume
- Hold down the [
![]() ] button and play a key from A3 to B3.
] button and play a key from A3 to B3.

Metronome volume 1–10 (default value: 5)

Changing the Time Signature
- Hold down the [
![]() ] button and press a key from D4 to E4.
] button and press a key from D4 to E4.

Time signature 0/4 (*2), 2/4, 3/4, 4/4, 5/4, 6/4, 7/4 (default value: 4/4)

(*) Each beat plays with the same sound when the metronome plays.
Changing the Tempo
- Hold down the [
![]() ] button and press a key from F#4 to B4.
] button and press a key from F#4 to B4.

Tempo 10–500 (default: 108)

Recording a Performance
Recording Your Keyboard Performance
You can record your own keyboard performance, and then play back to check it.
Getting Ready to Record
- Select the tone that you want to play.
- You can sound the metronome if you like.
* The metronome setting is stored in the song, and you can use the same settings during playback.
Starting/Stopping Recording
- Hold down the [
![]() ] button and press the [
] button and press the [![]() ] (volume -) button.
] (volume -) button.
The topmost volume indicator blinks, and the instrument enters record standby.
If you decide to cancel recording, press the [![]() ] button.
] button.
MEMO
Once the instrument enters record standby, only these functions are available until recording stops: adjusting the volume, starting and stopping the metronome, changing the metronome's volume and changing the tempo.
- Hold down the [
![]() ] button and play the C3 key.
] button and play the C3 key.
Recording starts after a one-measure count-in.
The topmost volume indicator blinks rapidly during recording.
MEMO
You can also start recording by playing the keyboard instead of pressing the [![]() ] button and C3 key. In this case, a count is not sounded.
] button and C3 key. In this case, a count is not sounded.
- Play the instrument.
- To stop recording, hold down the [
![]() ] button and press the [
] button and press the [![]() ] (volume -) button again.
] (volume -) button again.
Once all the volume indicators blink, saving is finished.Standby ![]()
Recording ![]()
Now saving the recording ![]()
Save complete ![]()


Listening to the Recorded Performance
- Hold down the [
![]() ] button and play the C3 key.
] button and play the C3 key.
After you record, the newly recorded song is selected.
The recorded song starts playing back.
If You Want to Redo the Recording
- Redo the operations from step 3.
* Only one song's worth of performance data can be recorded to internal memory. To rerecord, you must overwrite the existing data.
Exporting Your Performance to a USB Flash Drive
Here's how to copy your recorded song to a USB flash drive.
- Connect the USB flash drive where you want to copy the data to the USB Memory port.
- Hold down the [
![]() ] button and press the C7 key.
] button and press the C7 key.
The volume indicators light as shown in the illustration.
![]()
- Press the [
![]() ] (volume +) button.
] (volume +) button.
This copies the song.
To cancel, press the [![]() ] (volume -) button or the [
] (volume -) button or the [![]() ] button.
] button. Now copying song ![]()
Copy completed ![]()


* Never turn off the power or disconnect the USB flash drive while a song is being copied.
* You can copy up to 100 songs.
Advanced Features
Outputting Sound from Both Headphones and the Built-in Speakers (Speaker Auto Mute)
By factory default, the built-in speakers are set not to make sound when you connect a pair of headphones into the Phones jack. By changing the settings, you can make sound come from both the headphones and the built-in speakers.
* Changing the settings also changes the tonal character of the sound you hear in your headphones.
- Press the [
![]() ] button while holding down the [
] button while holding down the [![]() ] (volume +) button and the [
] (volume +) button and the [![]() ] (volume -) button.
] (volume -) button. - Press the [
![]() ] button to switch between settings.
] button to switch between settings. When headphones are connected to the Phones jack Volume indicator display Sound comes only from headphones (default setting) ![]()
Sound comes from both headphones and built-in speakers ![]()
- To exit settings, press the [
![]() ] (volume +) button or the [
] (volume +) button or the [![]() ] (volume -) button.
] (volume -) button.


Saving the Settings (Memory Backup)
This piano remembers the "settings that are saved automatically" even when the power is turned off and then on again. If you set the "Memory Backup" setting, the settings saved by memory backup are stored as well. Other settings return to their default values when you turn the power off and on again.
- Hold down the [
![]() ] button and press the [
] button and press the [![]() ] (volume +) button.
] (volume +) button.
![]()
- Press the [
![]() ] (volume +) button.
] (volume +) button.
The current settings are saved.
To cancel, press the [![]() ] (volume -) button or the [
] (volume -) button or the [![]() ] button.
] button. Settings that are saved automatically Speaker volume Headphone volume Bluetooth On/Off USB Audio/Bluetooth Volume Auto-off Settings that are saved by "Memory Backup" Sound ambience (Ambience) Brilliance (Brilliance) Piano Reality Headphones Ambience Key Touch Master tuning Metronome (Volume) SMF Play Mode Speaker Auto Mute
Returning to the Factory Settings (Factory Reset)
Here's how to restore all registrations and internally saved settings to the factory-set condition. This function is called "Factory Reset".
NOTE
When you perform a factory reset, all settings are initialized, and the songs recorded in internal memory are erased.
- Turn on the power while holding down the [
![]() ] (volume +) and [
] (volume +) and [![]() ] (volume -) buttons, and keep holding the [
] (volume -) buttons, and keep holding the [![]() ] (volume +) and [
] (volume +) and [![]() ] (volume -) buttons.
] (volume -) buttons.
Take your fingers off the buttons once the volume indicators light up as shown below.
![]()
- Press the [
![]() ] (volume +) button.
] (volume +) button.
The factory reset is executed.
To cancel, press the [![]() ] (volume -) button or the [
] (volume -) button or the [![]() ] button.
] button. Now executing factory reset ![]()
Completed ![]()


* Never turn off the power while the factory reset is in progress.
- Once the volume indicators show the "Completed" status, turn the power off and then on again.
Connecting the Piano and a Mobile Device via Bluetooth
Here's What You Can Do
Bluetooth functionality creates a wireless connection between a mobile device such as a smartphone or tablet (subsequently referred to as "mobile device") and the piano, letting you do the following.
 Play Music Through the Piano's Speakers
Music data stored on your mobile device can be played wirelessly through the piano's speakers.

Using the Piano with an App
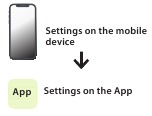
Install the app ("Roland Piano App" by Roland) on your mobile device to exchange data with the piano.

App "Roland Piano App"
Play Music Through the Piano's Speakers
Here's how to configure the settings so that music data saved on your mobile device can be played wirelessly through the piano's speakers.
* Once a mobile device has been paired with the piano, there is no need to pair again. Refer to the steps in "Connecting an Already-Paired Mobile Device".
Initializing the Settings (Pairing)
This example shows how to configure the settings for an iPad. If you are using an Android device, refer to the instructions for settings in the owner's manual that came with your mobile device.
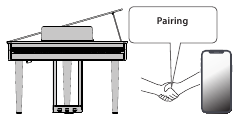
- Place the mobile device that you want to connect near the piano.
- Hold down the [
![]() ] button (
] button (![]() ) on the piano for at least five seconds.
) on the piano for at least five seconds.
![]()
Take your finger off once the [![]() ] button blinks (blue)
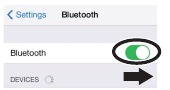
] button blinks (blue) - Turn on the Bluetooth function of the mobile device.
![]()
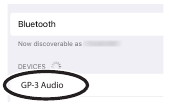
- Tap "GP-3 Audio", shown on the Bluetooth device screen of your mobile device.
![]()
The piano and mobile device are paired. When pairing is completed, information similar to the following is shown.Mobile device "GP-3 Audio" is added in "My Devices". Piano [ ![]() ] button lights up (blue)
] button lights up (blue)
Now you've finished initializing the settings.
Pairing
To use Bluetooth, you must first "pair" the piano with your mobile device to create a one-to-one connection between them.
"Pairing" is the procedure of registering (mutually authenticating) your mobile device with the piano.
Pair the devices by following the steps shown for each function.
The pairing process
Separate pairing is required for "playing music through the piano's speakers" and for "using the piano with an app". Note that these processes are different.
Playing music through the piano's speakers
Using the piano with an app
Connecting an Already-Paired Mobile Device
- Turn on the Bluetooth function of the mobile device.
The piano and mobile device are connected wirelessly.
MEMO
If you were unable to connect using the steps above, tap "GP-3 Audio", displayed in the Bluetooth device screen of the mobile device.
Playing Back Audio
When you play back music data on the mobile device, the sound is heard from the piano's speakers.
Adjusting the volume of Bluetooth audio
Normally, you should adjust the volume on the mobile device that you're using.
If you've done this and you're still unable to adjust the volume the way you want, refer to the operations below.
- Hold down the [
![]() ] button and press the F7, F#7 or G7 keys to adjust the volume.
] button and press the F7, F#7 or G7 keys to adjust the volume. Keys to press Explanation F7 Decreases the volume by -1. F#7 Sets the volume to the default (7). G7 Increases the volume by +1. Setting range 1–10 (default value: 7)
Using the Piano with an App
Here's how to make the settings to use an app installed on your mobile device along with this piano.
Apps You Can Use with This Piano
| App name | Supported OS | Explanation |
 Roland Piano App | iOS Android | This app lets you view sheet music in digital form, practice songs as if you were playing a game, or keep a record of your practicing. |
* Download from the App Store or from Google Play (free).
* In addition to the above, you can also use music apps (such as GarageBand) that are compatible with Bluetooth MIDI.
* The information provided about apps made by Roland was current when this manual was published. For the latest information, refer to the Roland website.
Making the Settings (Pairing)
You can make settings for using the piano together with an app that's installed on your mobile device. This shows the steps for using the "Roland Piano App" app with the iPad as an example.
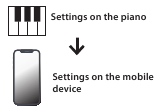
* In the case of "using the piano with an app", settings on the piano are not necessary. Perform operations in the app to pair it with the piano.
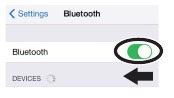
- Turn on the Bluetooth function of the mobile device.
![]()
NOTE
Even if the "DEVICES" field shows the name of the device you're using (such as "GP-3 MIDI"), do not tap it.
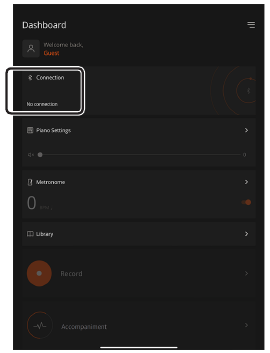
- Start the app that you installed on your mobile device.
- Tap "Connection" at the top of the app screen, and tap "Connect Piano".
![]()
The app screen shows "GP-3 MIDI". - Tap "GP-3 MIDI".
The piano and mobile device are paired. When pairing is completed, information similar to the following is shown.Mobile device "GP-3 MIDI" is added in the "My Devices" field Piano [ ![]() ] button lights up (blue)
] button lights up (blue)
This completes the settings.
If Pairing Doesn't Work
If the pairing process in "Using the Piano with an App" was not successful, try steps 1–4 shown below.
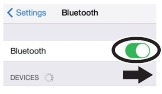
- Make sure that the piano's Bluetooth function is "On"
- Hold down the [
![]() ] button and press the G3 key.
] button and press the G3 key.
The piano's Bluetooth function turns on.
- Hold down the [
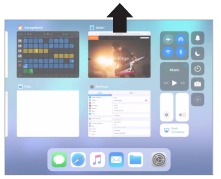
- Exit all apps on your mobile device
Closing the app- Swipe up from the bottom of the home screen, stopping your finger around the middle of the screen. Next, swipe the app screen up.
![]()
* The method for closing apps may differ depending on your mobile device. Use the method that's appropriate for your device to close the apps.
- Swipe up from the bottom of the home screen, stopping your finger around the middle of the screen. Next, swipe the app screen up.
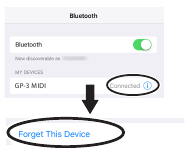
- If already paired, cancel pairing, and turn off the Bluetooth function
Clearing the pairing- In the mobile device's screen, tap the "i" located beside "Connected", and tap "Forget This Device".
![]()
- Turn the Bluetooth switch off.
![]()
- In the mobile device's screen, tap the "i" located beside "Connected", and tap "Forget This Device".
- Restart your mobile device
- Perform the pairing procedure from step 1
MEMO
If you've checked these points and the problem still occurs, please refer to the Roland support website.
https://www.roland.com/support
Troubleshooting
| Problem | Items to check | Cause/Action |
| Problems with the piano's sound | ||
| No sound | Is the volume turned down? | Raise the volume. |
| Could headphones or an adaptor plug be inserted in the Phones jack? | If headphones or an adaptor plug are inserted in the headphones jack, sound is not output from the speakers. | |
| If you want sound to be produced from headphones, is the device connected correctly? | ||
| Could you have made Transpose settings? | Disable transpose in the Transpose settings. | |
| Pitch of the keyboard or song is incorrect | Is the Master Tune setting appropriate? | When shipped from the factory, the reference pitch is set to "442.0 Hz". Check the Master Tuning settings. |
| Sounds are heard twice | Could "Dual Play" be specified, so that two tones are layered? | Hold down the [] (settings) button and press the A0 key to exit Dual Play mode. |
| (doubled) when the keyboard is played | Could the piano be connected to an external sequencer? | If you don't want the piano to be played from another sound module, set your music production software's "soft thru" setting to "Off". |
| Reverberation remains even if you defeat the Ambience effect | This simulates the depth and ambience of the acoustic piano's sound, and is not a malfunction. Even if the Ambience effect is off, the acoustic piano's own resonance remains. | |
| The sound of the higher notes suddenly changes from a certain key | On an acoustic piano, the higher notes of the piano (from the highest key down around 1½ octaves) fully sustain after you play them even if the damper pedal is not pressed. The sound is also different. In this way, this piano faithfully recreates the sound of an acoustic piano. Also, the key range that is unaffected by the damper pedal changes depending on the transpose settings. | |
| When you press a key, the sound of a note you didn't press is also faintly heard | In some cases, a note you play might cause a different note (whose frequency is an integer multiple of the first note) to resonate, producing the sensation that the sound has changed; this is not a malfunction. | |
| High-pitched ringing is heard | If you can hear this in headphones: Some piano tones that feature a brilliant and consistent sound include many high-frequency components, which may include some reverberations that could sound metallic. This is a faithful recreation of the original characteristics of a piano, and is not a malfunction. This kind of reverberation tends to be more audible when the more ambience effect is applied, so you might try reducing the ambience effect to help mitigate this issue. | |
| If you can't hear this through headphones: There may be another issue causing this, such as the sound resonating with the piano unit. Please contact your dealer or a Roland customer service center. | ||
| Low notes sound wrong, or are buzzy | Could the volume be set to maximum? | If the volume is at the maximum, the sound might be distorted depending on how you play the piano. If this occurs, lower the volume. |
| If you can hear this in headphones: It may be that the piano has malfunctioned. Please contact your dealer or a Roland customer service center. | ||
If you can't hear this through headphones: It may be that the objects near the piano are resonating because of the high volume of sound coming from the speakers. You can take the following measures to minimize resonances.
| ||
| The sound is heard differently depending on the tone settings | When using "Dual Play" which layers two tones, the sound you hear may differ depending on the specific combination. For some combinations, the effect is not applied to the left-hand tone. This is not a malfunction. | |
| Problems with the pedals | ||
| Unusual sound is heard when you press the pedal | Could the adjuster located under the pedal not be in contact with the floor? | The adjuster may have loosened as you used the pedal. Lower the adjuster so that it contacts the floor. If you are using the piano on carpet, lower the adjuster so that it presses strongly against the floor. |
| Pedal does not work, or is "stuck" | Is the pedal connected correctly? | Check the pedal jack located on the bottom of the piano. |
| Could you have disconnected or connected the pedal cord while the power was on? | If you disconnect the pedal cord while the piano is powered-on, the pedal effect might remain applied. Connect or disconnect the pedal cord while the piano is powered off. | |
| Could Twin Piano be turned on? | If Twin Piano is on, the right pedal will affect only the right-hand keyboard zone and the left pedal will affect only the left-hand keyboard zone. | |
| Problems with song playback | ||
| Song volume is inaudible or too low | Is the song playback volume set to "1"? | Raise the song playback volume. |
| Changing the "Song Volume" does not change the volume. | Could the SMF Play Mode be set to "Internal"? | Set the SMF Play Mode to "External". |
| The selected sound changes when you play back a song | Could the SMF Play Mode be set to "Internal"? | Set the SMF Play Mode to "External". |
| Can't play back a song saved in USB flash drive | Is the file extension ".WAV" or ".MP3" or ".MID"? | This piano can play back three types of file: WAVE format or MP3 format audio files, and MIDI files. |
| Problems with recording | ||
| Volume differs between recording and playback | Is the song playback volume set too low? | Raise the song playback volume. |
| Other problems | ||
| Can't change the settings | Is the topmost volume indicator blinking rapidly? | If the topmost volume indicator is blinking rapidly, the piano is in record standby mode, or is currently recording. In this state, only these functions are available: adjusting the volume, starting and stopping the metronome, changing the metronome's volume and changing the tempo. |
| Even though you're using headphones to mute the sound, a thumping sound is heard when you play the keyboard | The keyboard of this piano is designed to simulate the mechanism of an acoustic piano. Even on an acoustic piano, a thumping sound is actually being produced when you press a key. Such sounds do not indicate a malfunction. | |
| Power turns off on its own | Could you have made settings so that the power automatically turns off when the piano has not been used for a time? | If you don't need the power to turn off automatically, turn the Auto Off setting "Off". |
| When trying to play an SMF or audio file recorded at an extremely loud volume from a USB flash drive, the protective circuit of this unit may activate and shut off the power. | Lower the song playback volume. | |
| Power does not turn on | Is the AC adaptor connected correctly? | |
| Even-numbered or oddnumbered volume indicators are alternately blinking | A system error has occurred. Turn the piano off and on again. If this doesn't solve the problem, perform a factory reset. | |
| Can't use Roland Cloud | Please be aware that in some countries or regions, it might not be possible to use Roland Cloud at this time. | |
USING THE UNIT SAFELY
INSTRUCTIONS FOR THE PREVENTION OF FIRE, ELECTRIC SHOCK, OR INJURY TO PERSONS
About  and
and  Notices
| | Used for instructions intended to alert the user to the risk of death or severe injury should the unit be used improperly. |
| | Used for instructions intended to alert the user to the risk of injury or material damage should the unit be used improperly. * Material damage refers to damage or other adverse effects caused with respect to the home and all its furnishings, as well to domestic animals or pets. |
About the Symbols
 | The symbol  alerts the user to important instructions or warnings. The specific meaning of the symbol is determined by the design contained within the triangle. In the case of the symbol at left, it is used for general cautions, warnings, or alerts to danger. alerts the user to important instructions or warnings. The specific meaning of the symbol is determined by the design contained within the triangle. In the case of the symbol at left, it is used for general cautions, warnings, or alerts to danger. |
 | The  symbol alerts the user to items that must never be carried out (are forbidden). The specific thing that must not be done is indicated by the design contained within the circle. In the case of the symbol at left, it means that the unit must never be disassembled. symbol alerts the user to items that must never be carried out (are forbidden). The specific thing that must not be done is indicated by the design contained within the circle. In the case of the symbol at left, it means that the unit must never be disassembled. |
 | The  symbol alerts the user to things that must be carried out. The specific thing that must be done is indicated by the design contained within the circle. In the case of the symbol at left, it means that the power-cord plug must be unplugged from the outlet. symbol alerts the user to things that must be carried out. The specific thing that must be done is indicated by the design contained within the circle. In the case of the symbol at left, it means that the power-cord plug must be unplugged from the outlet. |
ALWAYS OBSERVE THE FOLLOWING
Concerning the Auto Off function
The power to this unit will be turned off automatically after a predetermined amount of time has passed since it was last used for playing music, or its buttons or controls were operated (Auto Off function). If you do not want the power to be turned off automatically, disengage the Auto Off function.
Use only the supplied AC adaptor and the correct voltage
Be sure to use only the AC adaptor supplied with the unit. Also, make sure the line voltage at the installation matches the input voltage specified on the AC adaptor's body. Other AC adaptors may use a different polarity, or be designed for a different voltage, so their use could result in damage, malfunction, or electric shock.
Use only the supplied power cord
Use only the attached power cord. Also, the supplied power cord must not be used with any other device.
Use due care when handling the lid
- The lid should be opened and closed only by an adult.
- The lid must not be opened too far (we recommend that you do not open it by more than about 30 degrees). If opened to an extreme degree, you risk damaging the piano or having the lid fall unexpectedly. Also, when opening the lid, make sure that no one is in the way.
Cautions when moving this unit
If you need to move the instrument, take note of the precautions listed below. At least two persons are required to safely lift and move the unit. It should be handled carefully, all the while keeping it level. Make sure to have a firm grip, to protect yourself from injury and the instrument from damage.
- Check to make sure the Screws securing the unit to the stand have not become loose. Fasten them again securely whenever you notice any loosening.
- Disconnect the power cord.
- Disconnect all cords coming from external devices.
- Raise the adjusters on the stand.
- Close the lid.
- Close the top.
- Remove the music rest.
Take care so as not to get fingers pinched

When handling the following moving parts, take care so as not to get fingers, etc., pinched. An adult should always be in charge of handling these items.
- Top
- Music rest
- Top stick
- Lid
Keep small items out of the reach of children
To prevent accidental ingestion of the parts listed below, always keep them out of the reach of small children.
- Included Parts Screws
Use due care when handling the top lid and keyboard cover

- To prevent the lid from dropping, always make sure to lock the top stick in its receptacle. Also, make sure to keep supporting the top lid with your hands until the top stick is securely locked.
- When opening and closing the keyboard cover, use due caution so as not to get your fingers pinched. Whenever a child uses the unit, an adult should be on hand to provide guidance and supervision.
- Do not close the cover if there are any objects, such as sheet music, remaining on top of the keyboard.
- As a safety precaution, always make sure to lower the top lid and close the keyboard cover before moving the piano.
IMPORTANT NOTES

Power Supply
- Place the AC adaptor so the side with the indicator faces upwards. The indicator will light when you plug the AC adaptor into an AC outlet.
Placement
- Do not allow lighting devices that normally are used while their light source is very close to the unit (such as a piano light), or powerful spotlights to shine upon the same area of the unit for extended periods of time. Excessive heat can deform or discolor the unit.
- Do not allow objects to remain on top of the keyboard. This can be the cause of malfunction, such as keys ceasing to produce sound.
Care of the Keyboard
- Do not write on the keyboard with any pen or other implement, and do not stamp or place any marking on the instrument. Ink will seep into the surface lines and become unremovable.
- Do not affix stickers on the keyboard. You may be unable to remove stickers that use strong adhesives, and the adhesive may cause discoloration.
- To remove stubborn dirt, use a commercially available keyboard cleaner that does not contain abrasives. Start by wiping lightly. If the dirt does not come off, wipe using gradually increasing amounts of pressure while taking care not to scratch the keys.
Concerning the Care of the Unit (Mirror Finish)
- The surface of this unit has been polished so as to create a high-gloss, mirror-like finish. Since this beautiful finish is as delicate as that of the highest quality, wood-crafted furniture, it needs to be cared for at regular intervals. Please make sure to observe the following when caring for the unit.
- For routine care, gently clean the surface using a soft cloth or a piano-use feather duster. You must avoid applying any force, since even the tiniest particles of sand or grit can produce scratches if you wipe too hard.
- If the finish loses its luster, use a soft cloth dampened with some polishing liquid to evenly wipe the surface of the unit.
- Avoid using detergents or other cleaners, as they can cause the surface finish to deteriorate. This may lead to the formation of cracks or other imperfections. Also, do not use chemically-enhanced cleaning cloths.
- Precautions concerning the use of polishing agents
- Refer to the instructions that came with the polishing agent for instructions on its proper use.
- Use only polishing agents that are designed specifically for use on the mirror finishes of pianos. By using any other product, you risk causing scratches, deformation, discoloration, etc. To purchase an appropriate product, please consult the nearest musical instrument store.
- Use the product only on the portions of this unit that have a mirror-like finish, and using an even touch, apply it equally over the entire surface. If you apply more force in one place over another, you risk losing some of the luster of the finish.
- Store in a location that is out of the reach of small children. If accidentally ingested, induce vomiting immediately. Then, see a doctor to obtain a diagnosis.
Repairs and Data
- Before sending the unit away for repairs, be sure to make a backup of the data stored within it; or you may prefer to write down the needed information. Although we will do our utmost to preserve the data stored in your unit when we carry out repairs, in some cases, such as when the memory section is physically damaged, restoration of the stored content may be impossible. Roland assumes no liability concerning the restoration of any stored content that has been lost.
Additional Precautions
- Any data stored within the unit can be lost as the result of equipment failure, incorrect operation, etc. To protect yourself against the irretrievable loss of data, try to make a habit of creating regular backups of the data you've stored in the unit.
- Roland assumes no liability concerning the restoration of any stored content that has been lost.
- The sound of keys being struck and vibrations produced by playing an instrument can be transmitted through a floor or wall to an unexpected extent. Please take care not to cause annoyance to others nearby.
- Do not apply undue force to the music rest while it is in use.
Using External Memories
- Please observe the following precautions when handling external memory devices. Also, make sure to carefully observe all the precautions that were supplied with the external memory device.
- Do not remove the device while reading/writing is in progress.
- To prevent damage from static electricity, discharge all static electricity from your person before handling the device.
Caution Regarding Radio Frequency Emissions
- The following actions may subject you to penalty of law.
- Disassembling or modifying this device.
- Removing the certification label affixed to the back of this device.
- Using this device in a country other than where it was purchased
Main Specification
| Sound generator | Piano Sound: Piano Reality Standard Sound Engine |
| Keyboard | Piano Reality Standard Keyboard (88keys): with Escapement, Ivory Feel, and Dynamic Sensor Acceleration Technology |
| Bluetooth | Bluetooth Ver 4.2 Supported profiles: A2DP (Audio), GATT (MIDI over Bluetooth Low Energy) Supported codec: SBC (compatible with SCMS-T content protection) |
| Power Supply | AC Adaptor |
| 10 W (When using the included AC adaptor) | |
| Power consumption | Approximate power consumption when playing the piano at medium volume: 4 W Power consumption when sound has not been played after power-on: 3 W |
| Dimensions | Top opened: 1,394 (W) x 698 (D) x 1,214 (H) mm 54-15/16 (W) x 27-1/2 (D) x 47-13/16 (H) inches Top closed (with music rest): 1,394 (W) x 698 (D) x 1,010 (H) mm 54-15/16 (W) x 27-1/2 (D) x 39-13/16 (H) inches |
| Weight | 57.3 kg/ 126 lbs 6 oz |
| Option | Owner's Manual, Leaflet Stand Assembly, Leaflet "USING THE UNIT SAFELY", AC adaptor, Power cord, Headphone hook |
* This document explains the specifications of the product at the time that the document was issued. For the latest information, refer to the Roland website.
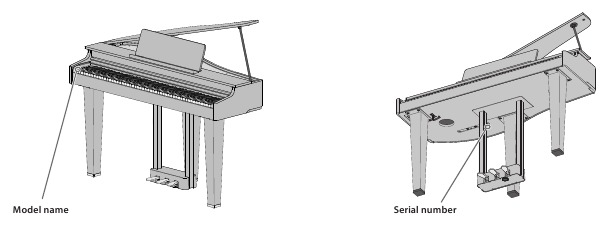
Model Name and Serial Number
The model name and serial number for this instrument are listed in the following locations.

Documents / Resources
References
Download manual
Here you can download full pdf version of manual, it may contain additional safety instructions, warranty information, FCC rules, etc.
Advertisement
Thank you! Your question has been received!


Need Assistance?
Do you have a question about the GP-3 that isn't answered in the manual? Leave your question here.