La Crosse Technology S84107 - Weather Forecast Color Station Manual
- Instruction manual (20 pages) ,
- Faqs (11 pages)
Advertisement
- 1 Let's Get Started
- 2 LCD Features
- 3 Basic Settings
- 4 Atomic Time Signal -WWVB
- 5 Daylight Saving Time (DST) Indicator
- 6 Moon Phases
- 7 Seasonal Changes in Foliage
- 8 Pressure Readings
- 9 Weather Forecast Icons
- 10 Forecast Trend Arrows
- 11 HI | LO Temperature/Humidity
- 12 Temperature/Humidity Trend Arrows
- 13 Set Weather Alerts
- 14 Active Alert
- 15 Backlight (3 intensity levels)
- 16 Low Battery Icon
- 17 Sensor Search
- 18 Station Restart
- 19 Position Sensor
- 20 Position Weather Station
- 21 Help Us, Help You
- 22 Let's Be Social
- 23 Care and Maintenance
- 24 Warranty and Support
- 25 Specifications
- 26 Documents / Resources
Let's Get Started
- Insert 2 AA batteries into your sensor. Observe correct polarity.

- The red LED light will flash when your sensor transmits.
- The TX button lets you manually transmit a signal.
- Insert the 5V power cord into an outlet, and then into your weather station.
Optional: insert 3 AA batteries into you station for time and date backup.

- Configure basic settings.
- After 5 minutes, place your sensor outside in a shaded location.


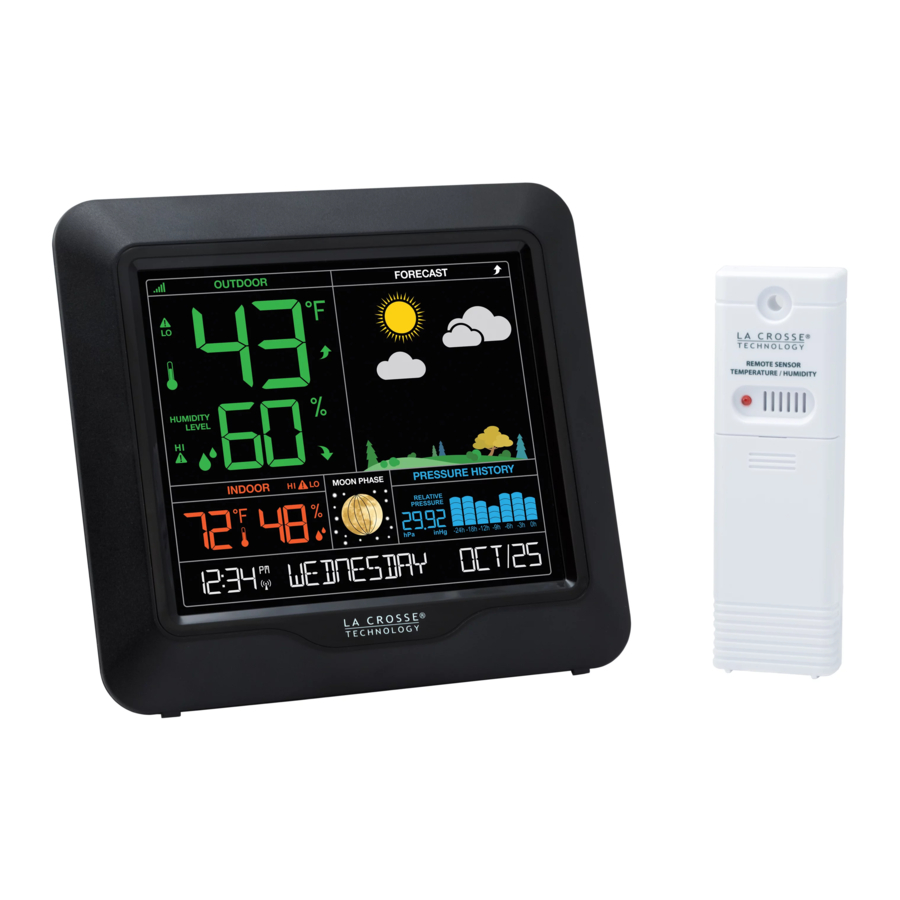
LCD Features

 | Sensor Reception |  | Alert Icon |
 | Fahrenheit | Celsius |  | Low Battery |
 | Trend Arrows |  | Forecast Icons |
 | Temperature |  | Pressure Graph |
 | Humidity Percent RH | PM | AM | PM |
 | Humidity |  | Atomic Time |
| DST | DST Indicator | ||
Basic Settings
- Hold the SET button for 3 seconds to enter basic settings.
- Press and release the + or - button to adjust flashing values. Hold to adjust quickly.
- Press and release the SET button to move to the next menu item or exit the basic settings menu.
- Press the LIGHT button at any time to exit.
Basic Settings Order:
- Language (English, Español, Francais)
![]()
- Beep ON/OFF
![]()
- Atomic ON/OFF
![]()
- DST ON/OFF
![]()
- Time Zone
![]()
![]()
- 12Hr/24Hr Format
![]()
- Hour
![]()
- Minutes
![]()
- Year
![]()
- Month
![]()
- Date
![]()
- Temperature: Fahrenheit/Celsius
![]()
- Pressure units: INHG or HPA
![]()
- Pressure number setting
![]()


Note: When Español or Francais are selected, the settings menu will continue in the language selected.
Note: If you set Atomic Time to OFF, the settings menu will skip the DST and Time Zone settings and continue with 12Hr/24Hr Format.
Note: Weekday will set automatically, when year, month and date are set.
Atomic Time Signal -WWVB
- Your station will search for the atomic signal at UTC 7:00, 8:00, 9:00, 10:00, and 11:00.
- If there is no WWVB signal reception, your station will search every 2 hours until the WWVB time is received.
- The atomic time signal icon (tower) will flash while searching, and be solid when connected.
- Press and release the SEARCH button to manually search for the WWVB atomic time signal.
- For information about WWVB visit:http://bit.ly/AtomicTime
Daylight Saving Time (DST) Indicator
- The letters DST will show when your station has received the atomic time signal and Daylight Saving Time is being observed.
- If you do not observe Daylight Saving Time, turn DST OFF in the settings menu.
Moon Phases
The moon phase is based on the Lunar Calendar and updates when the year, month and date set (manually or by the WWVB atomic time signal).

Seasonal Changes in Foliage
- Your weather station will change to reflect the seasons.
- The trees and foliage will change to give you a fresh look.
- The dates are programmed into your weather station for an automatic foliage change.


Pressure Readings
Your station provides Relative Barometric Pressure in:
- Numbers-programmable in the settings menu
- History Graph- provides pressure trend for the past 24 hours
Pressure number:
- Your station will acclimate to the correct pressure without setting it yourself.
- You also have the option of setting the pressure number to match your local reporting station by using the settings menu.
- In the settings menu you can also select the pressure unit of Inches of Mercury (inHg default) or Hecto Pascal (hPa).

History Graph:
- Read from left to right, your Pressure History Graph indicates the rise and fall in air pressure over the past 24 hours.
- The numbers below represent the hour in which the reading was taken. The "0h" is the current pressure level. "-3h" was the reading taken three hours ago, compared to current pressure.
- The graph will scroll continually. This cannot be turned off.
Weather Forecast Icons
- The forecast icons are determined by your station's barometric pressure reading. Please allow 7-10 days for calibration.
- Six forecast icons use changing atmospheric pressure to predict weather conditions for the next 12-hours.

- When Outdoor temperature is below 32˚F and the forecast shows RAIN or T-STORM, the station will display SNOW.
Forecast Trend Arrows
The arrows by the word FORECAST, indicate the change in pressure over the past 3 hours.
- UP ARROW: Pressure is rising
- RIGHT ARROW: Pressure is unchanged
- DOWN ARROW: Pressure is falling
HI | LO Temperature/Humidity
- All HI/LO temperature/humidity records reset automatically at 12:00 (midnight).
- Press the TEMP button to view HI/LO records, Heat Index and Dew Point.
- Press once to view HI temperature/humidity records.

- Press again to view LO temperature/humidity records.

- Press again to view outdoor Heat Index.
- Press again to view outdoor Dew Point.
- Press once to view HI temperature/humidity records.
- HI/LO records reset automatically at midnight.


Temperature/Humidity Trend Arrows
- The UP and DOWN arrows indicate changes in temperature and humidity over the past hour.
- They update every 15 minutes and compare data from exactly one hour prior.
Temperature: arrow changes every 2 degrees Fahrenheit.
Humidity: arrow changes every 3% RH
Set Weather Alerts
There are 8 programmable weather alerts:
- Outdoor LOW Temperature
- Outdoor HIGH Temperature
- Outdoor LOW Humidity
- Outdoor HIGH Humidity
- Indoor LOW Temperature
- Indoor HIGH Temperature
- Indoor LOW Humidity
- Indoor HIGH Humidity
Note: When you enter the alerts menu, you will first arm the alert you wish to set, then set the alarm value.
Note: If you do wish not arm the alert, simply press the ALERTS button to skip that alert and move to the next alert in the alert menu.
- Hold the ALERTS button to enter alert menu.
- Outdoor LO ALERT ON | OFF will flash.
Alert ON:
- Press the + or - button to arm the alert. Press the ALERTS button to make the armed alerts value flash.
- Press the + or - button to set the alert value (Hold to set quickly).
- Press ALERTS button to move to next alert.
- Press the LIGHT button at any time to exit.

Alert ON: press + or- to adjust
Alert OFF:
- Alerts are OFF unless armed. If you do not wish to set an alert, simply press the ALERTS button again to move to the next alert.

Alert OFF: press + or- to arm
Active Alert
- The alert icon will only show when the alert is active, and will indicate HI or LO alert.
- When armed alert value is reached, station will beep 5 times, once each minute, until out of alert range.
- The flashing alert icon will indicate whether it is a LO or HI alert that is sounding.
- Press any button to stop the alert from sounding.
- The alert icon will still flash while value is in alert range.
Disarm Alert:
- Hold the ALERTS button to enter alert setting menu.
- Press the ALERTS button until you see the alert you wish to disarm.
- Press the + or - button to disarm the alert. The alert will not sound and the alert icon will not show.
- Press the LIGHT button to exit.
Backlight (3 intensity levels)
- When operating with the AC adapter, press and release the LIGHT button to adjust the backlight.
- Intensity Levels: 0% | 20% | 100%
- When operating on battery power only, press the LIGHT button to activate the backlight for 10 seconds at 100%.
Low Battery Icon

- By indoor temperature; replace batteries in station.
- By outdoor temperature; replace batteries in the sensor.
Sensor Search

- If your signal is lost, your station will display its LAST DATA recorded from your sensor for 10 minutes.
- After that 10 minutes if the signal does not come back, dashes will show.
- From the main screen hold the SEARCH button to search for your outdoor sensor.
- The sensor reception icon will animate while searching for your sensor.
- The icon will be solid when the sensor is connected.
- Your station will search for your missing sensor for 3 minutes every hour until signal is found.
Station Restart
A factory restart of your station will return it to its default settings and "out of the box" condition. This may resolve connection issues with your sensor.
- Be sure there are fresh batteries in your sensor and station.
- Hold the ALERTS and LIGHT button together for 5 seconds to restart the station.
Position Sensor
TX141TH-Bv2
- To mount the sensor, use the hole at the top to either hang it from the back using a nail, or insert one mounting screw through the front of your sensor.
![]()
- Mount the TX141TH-Bv2 sensor on a north-facing wall or in any shaded area. Under an eave or deck rail is preferred.
- The maximum wireless transmission range to your weather station is over 330 feet (100 meters) in open air, not including walls or floors.
- Be sure the sensor is mounted vertically, to allow moisture to drain out properly.
- Watch sensor mounting video:
http://bit.ly/TH_SensorMounting

Position Weather Station
- Pull out the stand and place on a flat surface.
- Or use the hanging holes on the back to mount on a wall.
- Choose a location 6 feet or more away from electronics such as cordless phones, gaming systems, televisions, microwaves, routers, etc.
- Place within range of the outdoor sensors (330 ft, 100m open air).
- Obstacles such as walls, windows, stucco, concrete, and large metal objects can reduce the range.
Help Us, Help You
If you have ideas for features or support solutions you'd like to see us make, please let us know! We truly want to make owning a La Crosse Technology product not only a practical experience, but also a fun one.
So email us at: store@lacrossetechnology.com
Let's Be Social
Follow us on our social media outlets for the latest promotions, product support, and awesome giveaways.

Care and Maintenance
- Do not mix old and new batteries.
- Do not mix Alkaline, Standard, Lithium, or Rechargeable Batteries.
- Always purchase the correct size and grade of battery most suitable for intended use.
- Replace all batteries of a set at the same time.
- Clean the battery contacts and also those of the device prior to battery installation.
- Ensure the batteries are installed with correct polarity (+ and -).
- Remove batteries from equipment when it is not used for an extended period of time.
- Promptly remove expired batteries.
Warranty and Support
Before returning a product, please contact our friendly customer support with questions or visit our online help:
Phone: 1-855-605-6888
Online Product Support and Registration:
www.lacrossetechnology.com/support
Specifications
| Indoor | |
| Temperature Range: | 32˚F to 99˚F (0˚C to 37˚C) |
| Humidity Range: | 10% RH to 99%RH |
| Relative Pressure Range: | 23.62 to 32.48 inHg (800 to 1100 hPa) |
| Thermo-hygro Sensor | |
| Temperature Range: | -40°F to 140°F (-40°C to 60°C) Note: When temperatures are colder than -22°F (30°C) it is recommended to use lithium batteries |
| Humidity Range: | 10% RH to 99%RH |
| Power | |
| S84107 Station: | 5.0 Volt 150mA power cord included (Required) AC6: GPU280500150WAOO |
| Optional Battery Backup: | 3-AA batteries not included, backup for time and date |
| TX141TH-Bv2 Sensor: | 2-AA batteries not included |
| Battery Life | |
| S84107 Station: | 48-60 months with power cord use |
| TX141TH-Bv2 Sensor: | over 24 months with reputable batteries. |
| Dimensions | |
| S84107 Station: | 6.89" L x 1.26" W x 6.4" H (17.5 L cm x 3.2 W cm x H-16.32 H cm) |
| TX141TH-Bv2 Sensor: | 1.57" L x 0.79" W x 5.12" H (4.0cm L x 2.0cm W x 13.0cm H) |

For online video support:
http://bit.ly/LaxTechTalk

Documents / Resources
References
![bit.ly]() Tech Talk - Your Questions, Our Answers - YouTube
Tech Talk - Your Questions, Our Answers - YouTubeRadio Station WWVB | NIST
![www.youtube.com]() How To Mount Your Temperature Sensor - YouTube
How To Mount Your Temperature Sensor - YouTube
Download manual
Here you can download full pdf version of manual, it may contain additional safety instructions, warranty information, FCC rules, etc.
Download La Crosse Technology S84107 - Weather Forecast Color Station Manual
Advertisement
Thank you! Your question has been received!


Need Assistance?
Do you have a question about the S84107 that isn't answered in the manual? Leave your question here.