Table of Contents
Advertisement
Quick Links
The color and the appearance may differ depending on the product, and the content
in the manual is subject to change without prior notice to improve the performance.
Recommended hours of use per day of this product is under 16 hours. If the product
is used for longer than 16 hours a day, the warranty may be void.
© Samsung
Contents
Samsung owns the copyright for this manual. Use or reproduction of this manual in
parts or entirety without the authorization of Samsung is prohibited. Trademarks other
than Samsung are property of their respective owners.
Contents
Interactive Display
User Manual
WA65C WA75C WA86C
- 1 -
Advertisement
Table of Contents

Related Manuals for Samsung WA86C


Summary of Contents for Samsung WA86C
- Page 1 16 hours a day, the warranty may be void. © Samsung Contents Samsung owns the copyright for this manual. Use or reproduction of this manual in parts or entirety without the authorization of Samsung is prohibited. Trademarks other than Samsung are property of their respective owners.
- Page 2 I. Introduction 1. Product Information 5. More tools 1.1 Connectivity 5.1 Tool list 1.2 Hardware Specification 5.2 Tools Customize 1.3 Product Layout 5.3 OSD Menu 2. Product Installation 6. System Settings 3. Wall mount kit specifications (VESA) 6.1 Wireless & Network 4.
- Page 3 Introduction SAMSUNG Interactive Display that provides an engaging educational experience for the classroom of the future. As an Android OS-based product, it offers a familiar and intuitive user experience for teachers and students. Teachers can engage students and boost learning thanks to the display’s excellent compatibility with Android devices and intelligent apps that can be added to the custom home screen bar for convenience.
-
Page 4: Hardware Specification
Used for updating OS Firmware Carry multichannel sound via optical signals. Audio output to the external speaker. Microphone audio input. VGA input port. 1.2 Hardware Specification Item WA65C WA75C WA86C 86” Diagonal Size 65" 75" Panel Type Direct, 60Hz - 4 -... - Page 5 Resolution 3,840 x 2,160 (Landscape) Brightness(Typ.) 400cd/m2 Contrast Ratio(Typ.) 1,200:1 Viewing Angle(H/V) 178:178 Response Time(G-to-G) Orientation Landscape Processor A55 X 4 Internal Feature Player Storage 32GB 64GB (Embedded Operating H/W) Android 11 (AOSP) System Sound Speaker Type Built-in Speaker (12W X 2CH) VIDEO HDMI 3(Rear 2, Front 1), USB C(Front), OPS INPUT...
- Page 6 Humidity 10~80% 802.1x(WPA2 Enterprise) Security : EAP-TLS, EAP-TTLS, EAP-PEAP 1.3 Product Layout 1.3.1 Mechanical layout : WA65C 1.3.1.1 Front, Top, Left & Right - 6 -...
- Page 7 1.3.1.2 Rear 1.3.2 Mechanical layout : WA75C 1.3.2.1 Front, Top, Left & Right - 7 -...
-
Page 8: Product Installation
1.3.2.2 Rear 2. Product Installation - 8 -... -
Page 9: Wall Mount Kit Specifications (Vesa)
Warning: The device must be powered off while installing. 3. Wall mount kit specifications (VESA) Samsung wall mount kits contain a detailed installation manual and all parts necessary for assembly are provided. Do not use screws that are longer than the standard length or do not comply with the VESA standard screw specifications. -
Page 10: Remote Control
Samsung is not liable for these kinds of accidents. Samsung is not liable for product damage or personal injury when a non-VESA or non-specified wall mount is used or the consumer fails to follow the product installation instructions. Always have at least two people mount the product on a wall. Standard dimensions for wall mount kits are shown in the table below. -
Page 11: Icon Description
The remote control button function may vary depending on the product. Power On/Off Mute Same as [Windows] button [Alt+F4] to terminate Window [Alt+Tab] to manage Same as [Space bar] Window [Numeric] key Displaying Channel Input Source [Menu] key [Home] key for Android [Freeze] key [Touch Lock] &... - Page 12 User account Basic whiteboard application with 20-points writing, dual pen and variety of tools - Export/Import files from local storage, external storage device (e.g. USB memory driver) and cloud storage services. Note - Handwriting recognition feature transforms handwriting to texts of designed fonts.
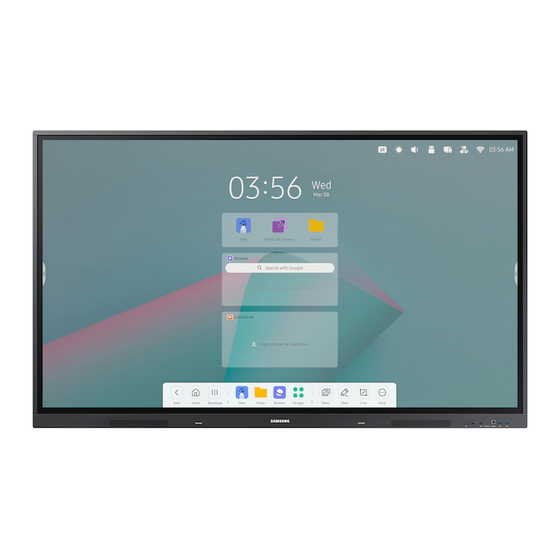
- Page 13 When device is powered on for the first time, basic settings including Language, Region, Network, Date & Time, Device Name are required. Users also need to agree on Privacy & Terms in order to use the device. 2. Home Screen and Widget This is the Home screen that appears when the display is initiated, which provides access to the features and settings of the display.
- Page 14 Displays the status of the device as shown below. ccess to source settings to change input source, display and audio adjustments. OSD Menu Adjust system display brightness levels. ①Status Bar Brightness Adjust system volume levels. Volume Direct access to the USB memory in the file manager. Direct access to hotspot settings page Hotspot Direct access to wired network settings page...
- Page 15 [QR code] using a smartphone camera, you will be given the option to log in with your smartphone. 【Widget before log-in】 After logging in, the login widget on the personalized home screen is changed to be shown below, and the personal profile photo, User ID, [Lock], and [Logout] buttons are provided.
-
Page 16: System Bar
2.1.5 One Key Operation Widget It automatically deletes program access records and account linkage records when the device is terminated, or provides a function that makes it easy to change the source to OPS and terminate the device in the form of a home screen widget. ... - Page 17 When you click icon in the Process window, you can place the dual app screen as shown. 2.2.2 Apps buttons Provides execution and management functions for the entire app list. Item Description ① Default Note, Finder, Browsers are displayed as default Shortcut By clicking all apps, users can see all the installed applications Default Apps included: [Browser],[Cloud Drive],[Finder], [Note],...
-
Page 18: User Account
Apps running in the background are marked by the name of the app in Bold. 2.2.3 Useful tools For the convenience of using the product, various and useful tools can be provided, and shortcut icons can be placed in the system bar for easy accessibility. Item Description ①... - Page 19 3.1 User Log-in In the log-in widget on the main [Home Screen], click the [Login] button or click the [QR code] to go to the log-in page. There is no problem to use Interactive Display even if you do not log in as a user. 3.1.1 User Log-in page Upon entering the user login page, the QR code is displayed so that the user can log in through the smartphone QR code scan function.
- Page 20 You can log in by entering your registered user ID and password, or you can log in using your Google account or Microsoft account. 3.1.2 New account registration If you do not have a registered account, you can register your account and log in through the following procedure.
-
Page 21: User Profile
3.2 User profile If the user login is successful, the user's already configured usage environment and system settings are automatically reflected and changed to individual environments. 3.2.1 Home screen After logging in, the home screen is changed to the shown picture below, and widgets and app icons can be changed to the form desired by the user. - Page 22 Item Description Wallpaper Set the wallpaper of the home screen the user wants. Screen Saver Set the screen saver that the login user wants. Multi-Window Mode Full screen mode and multi window mode can be set. It restart is required system restart to apply change. Swipe up options at the You can use this configuration item to set whether swipe up at the bottom of the screen evokes System bar...
- Page 23 3.2.3.2 Clean files In System Settings, you can configure [Auto Remove Files]. For more details, you may refer to descriptions in [6.6.7 Auto Remove Files] section. 3.2.4 User information synchronization 3.2.4.1 Automatic sync When log-in or log-off, the automatic synchronization between the server and Interactive Display is performing by importing data from server or by saving data to the server.
- Page 24 And the bound cloud drive may release binding through [Unbinding] process. In addition, the end users can conveniently log in to the Samsung Interactive Display through the [Social login] binding using their own Google or Microsoft accounts.
- Page 25 3.5 Account Management Server hiips:// account-sec.ifpserver.com An account management server ( ) is operated to help you log in to Samsung Interactive display, and you can configure [Profile], [Security], [Integrations], and [Privacy] settings and can view some additional information. - 25 -...
-
Page 26: Default Apps
Option Items Description Profile Able to upload photos that correspond to your Photo account. Account Setting for account information such as Email, Information User Name, Country/Region, Language Security Modify Password To modify Login Password Integrations It can be used to bind to and log in to Google, Social Login Microsoft accounts. - Page 27 Button Description Create new blank Note file Open Open the saved Note file Save Save the current Note file Save as Save the current Note into other formats Import resources (Support format : IMG, PDF, SVG, IWB Import Export the current Note to other format such as Imaage, PDF, Export SVG, IWB format.
- Page 28 Erase what’s written on the canvas and adjust the size of the Eraser eraser. Clean Clear everything on the canvas. Ruler Provide multiple types of rulers into the canvas. Shape Insert variety of 2D / 3D shapes into the canvas Insert a table into the canvas.
- Page 29 4.1.3 Ruler Ruler tool can be used to measure or drawing lines, circles, or shapes without use of physical ruler. 4.1.4 Sticky notes The Sticky Notes tools can be used to pin important information to the canvas; which can also be used as a brainstorming tool. 4.1.5 Table Note supports creating multiple tables and displaying them simultaneously.
- Page 30 4.1.6.1 Eraser mode Eraser tool is used to erase any elements on the canvas. Click to adjust the size of the eraser. Option Description Eraser After select the "Eraser" option, When you select the Eraser button in toolbar, it will show a window that can adjust size of eraser and you can erase any elements as an eraser.
- Page 31 4.1.6.3 Automatic brightness It is a function that operates through a built-in ambient light sensor. The brightness of screen will be automatically reduced when start drawing, and it will return to normal gradually after stop drawing. 4.1.6.4 Custom toolbar When Note is full screen, you can select which tools appear in the toolbar and which to hide in the submenu in [MORE].
- Page 32 4.1.7 The extension function of the pen After selecting the handwriting, the handwriting can be intelligently recognized as the beautified font, and the handwriting can be searched and mirrored. If the automatic recognition language is not installed, you must download the corresponding automatic recognition language from the [Menu] →...
- Page 33 4.1.10 Multiple ways to save files In addition to saving files to the local system and USB memory, Note also supports sharing files with mobile phones for saving or sending files to emails. Palette Provides drawing board which contains variety of brush tools and color mix feature so that users can freely create art contents.
- Page 34 Customize color by mixing different colors Palette Step1: Choose 2 different colors in the colorbox Step2: Drag the roller on the pallet by clockwise Provide basic color set which users can directly use or mix on Colorbox the palette Sample Able to copy the color which is on the canvas Fill Able to fill the certain area with the selected color...
- Page 35 Touchpad control Air-Mouse (Gravity Accelerometer) control Remote Camera Show camera of mobile device on IFP Device Management Mobile management – Authorize one mobile device as admin to control away from the Interactive Display Moderator mode – Ask for permission for any incoming request ...
- Page 36 Chrome OS/Browser: Choose “Cast…” from the menu 4.4.3 PC/Mobile App Bidirectional screen share app, which can show up to 9 personal devices on screen, and even broadcast its screen to personal devices (more than 99 devices). How to connect Description Download the “Screen share”...
- Page 37 4.4.3.2 Screen Share App Screen Share main page shows up as following Button Description Settings regarding screen share & miracast is provided inside this application Start For Windows/macOS, you can share one application or window instead of entire desktop, or you can choose to share primary or extended screen.
- Page 38 Annotation could be made by enter the annotation mode from the icon besides the connection code. Touchback is disabled by default for safety consideration, could be enabled from the device management page. Make a group of displays, copy one screen to others to make Screen copy them show the same content.
- Page 39 Button Description One could invite connected device to casting their desktop from the server. Invite to share File on the server could be send to any connected File sharing device. Set one device to administrator to accept or reject Admin authorizes further casting requests.
-
Page 40: Add Account
Able to browse and execute files in local & USB storage, and even able to connect personal cloud drive Button Description Search by entering name of the file. Search Grid To display the resources in the form of icon. List To switch to display the resources in the form of detailed information To change the order of resources. - Page 41 Click the "Set as default" button to set the default account. 4.6.3 Logout Account Click the "logout" button to log out of your account, it would delete the cache file of your account by default. 4.7 Photo Click a picture to open the Photo App. Item Description Zoom in...
-
Page 42: More Tools
4.8 Music Click a music file to open the Music App 4.9 Video Click a video file to open the Video App 5. More tools You can see all other tools in the tool list window. Click the icon to replace the tool icon on the side bar. -
Page 43: Tool List
5.1 Tool list Apps start and manager in System bar, you can find all apps here: Item Description ① Show all input sources, include PC, Android, HDMI, VGA. ② Show more advanced settings, including Menu Audio, Screen, Display, and change the input source. - Page 44 Counts upwards from zero for measuring time Stopwatch A tool for collecting and displaying answers to questions. ① Teachers can invite students to join the interactive activities through QR code or IP AirClass address. ② It include voter, responder, selector, message and other rich activities.
- Page 45 5.2 Tools Customize Supports to create 4 commonly used small tools in System-bar. Teachers can add other tools from 'More' to replace. Step 1: Click or long press the tools icon into editing state. Step 2: Click '-' to remove the display in System bar. Step 3: Click '+' to add the display in System bar.
- Page 46 The home screen allows you to change the external signal source and adjust the system volume and brightness. Item Description General OPS/Android/HDMI1/HDMI2/HDMI3/PC/Type-C. Display Adjust the system backlight brightness. Audio Adjust the system volume. 5.3.2 Display Adjust image display settings. Item Description Auto brightness The system automatically adjusts the backlight...
-
Page 47: System Settings
Volume Adjust a volume. Balance Adjust a balance. Mute Sound volume mute on/off 6. System Settings System settings contain all the related settings used by the system and can be adjusted to suit your preferences and usages. Click on the status bar icon in the upper-right corner of the system home page to access the settings of the corresponding functions. - Page 48 Set the hotspot password. Password Set the hotspot frequency, optional 2.4GHz/5GHz. Frequency Hotspot: a physical location where people can obtain Internet access, typically using Wi-Fi technology, via a wireless local-area network (WLAN) using a router connected to an Internet service provider. 6.1.4 Bluetooth Connect and manage Bluetooth equipment, and view files received through...
-
Page 49: Screen Saver
In addition, other image files can be set as a wallpaper in the image viewer. Open image file using image viewer and select [Settings] → [Set to wallpaper], then the image will be applied for new wallpaper of home screen. 6.2.2 Customize wallpaper logo It may be set so that a user-specified logo may be displayed on the upper left corner of the desktop. - Page 50 6.2.4 Swipe up options at the bottom You can use this configuration item to set whether swipe up at the bottom of the evokes System bar or Source menu window. screen Bottom Sidebar: System bar appears Source Menu: Source Menu bar appears 6.2.5 Multi-Window Mode Multi-Window Mode allows you to switch the system's window mode to full-screen mode or multi-window mode to allows you to open multiple apps on the foreground...
-
Page 51: Input And Output
6.2.7 Show Multi-window Tips If a specific window operates as a full window in Multi-window mode, it provides Tips to guide the window control bar. 6.3 Input & Output 6.3.1 Touch Sound You can use this configuration to set whether or not to enable touch sounds on your device. - Page 52 Here you can view and manage all the applications installed on your device. By default, third-party apps and desktop apps are displayed. You can control whether the rest of the system is displayed or not. In addition, you can restore the default preferences of all applications here.
- Page 53 6.4.5 Memory You can look at your application's memory usage, including average memory usage, frequency of usage, and maximum usage. 6.5 System In the system module, you can set and view the system information of the whole machine, set the screen lock password, log in to the mailbox, connect to the remote and update the system.
- Page 54 〮 Japanese IME 〮 Korean IME Physical 〮 Android Keyboard (ASOP) – English US Keyboard 〮 Google Pinyin Keyboard - Chinese 〮 Japanese IME - Japanese 〮 Korean IME - Korean Because it needs to be adapted to the RTL language, setting the RTL language may result in changing the layout of some applications.
- Page 55 6.5.6 Eye Protection Mode and Automatic Backlight Option Description Eye Protection Mode The system shows warm colors on the screen for eye protection. Automatic Backlight The system automatically adjusts the screen backlight value based on the ambient brightness for energy saving and eye protection.
- Page 56 When the screen lock password is set, you can clear the screen lock password and change the screen lock password. To change the screen lock password, you need to enter the original screen lock password first, and you can reset the screen lock password after verification.
- Page 57 In the startup and shutdown module, there are the settings of the startup channel and the startup plan. You can set default source when turned on, such as last source before powered off, the Android channel, HDMI1, HDMI2, HDMI3, and VGA channels supported by the whole machine.
- Page 58 6.5.12 Security You can view the configured credentials in the system, including trusted and user credentials. Connecting to specific encrypted networks, such as TLS or PEAP requires a specific credential for validation. Item Description Trusted Credentials Certificates of trust User Credentials User-installed certificate Install From Storage Installation certificate from system storage space...
- Page 59 You can remotely boot the device by sending a boot command through a wired network while connecting a network cable. 6.6.3 HDMI CEC All device connected by HDMI can be controlled through the remote controller of the display or connected device, if HDMI-CEC is supported and enabled. 6.6.4 USB Clone Quick setting synchronization is possible by exporting default settings through USB clones or importing settings from other devices.
-
Page 60: Security Lock
6.6.7 Auto Remove Files You can set up files to be removed automatically to prevent system storage space from being over occupied. The specified types of file can be set to be removed (no / 1-day / 7-days / 30-days) automatically. ... - Page 61 About You can view the version information of the device. Item Description Information Third-party licenses Open source licenses 2 System Webview licenses Model Number Displays the model number of the device. Android Version Displays Android OS version. Kernel Version Displays the system kernel version. Serial Number Displays the serial number of the device.
- Page 62 For sound quality settings, provide in the Input Source Switch menu window. Wi-Fi setting The Wi-Fi setting menu is activated when the Wi-Fi module (included separately) is connected to the slot at the bottom of the product F/W Update The system firmware can be upgraded through [Settings]→[System]→...
- Page 63 2. Supported Video Codec - 63 -...
- Page 64 - End of Document - - 64 -...