KitchenAid KCIG550JSS - 30-Inch 5-Element Sensor Induction Cooktop Manual
- User manual (24 pages)
Advertisement
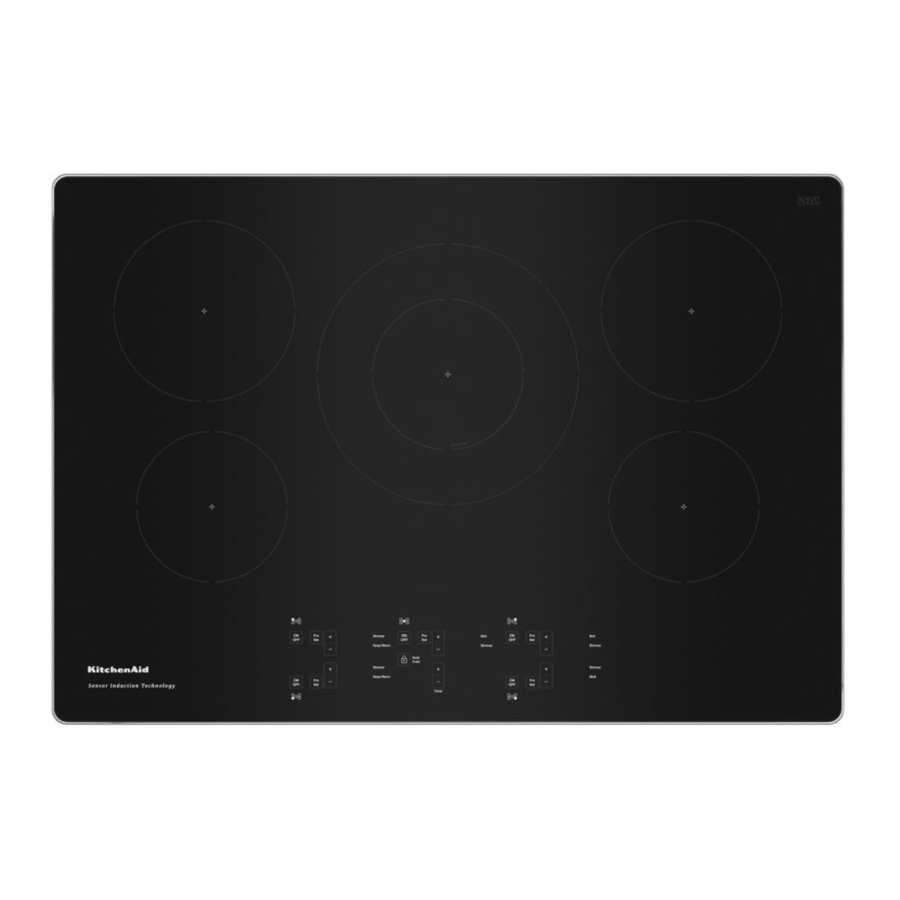
PARTS AND FEATURES
Cooktop

30" (78.2 cm) Touch-Activated Electronic Control Model
- Cooktop
- Control panel
Control Panels

30" (78.2 cm) Touch-Activated Electronic Control Models
- Identifying the cooking zone
- Cooking zone ON/OFF button
- Function active indicator
- Auto Sensor function button
- Cooking level selected
- Key Lock button – 3 seconds
- Auto Sensor function button
- Power adjustment buttons
- Timer buttons
- Timer indicator
- Activation of special functions
Induction Ready Cookware

POTS AND PANS
Only use pots and pans made from ferromagnetic material which are suitable for use with induction cooktop:
- Enameled steel
- Cast iron
- Stainless steel designed for induction cooktops
To determine whether a pot is suitable, a magnet may be used to check whether pots are magnetic.
The quality and the structure of the pot base can alter cooking performance. Some indications for the diameter of the base do not correspond to the actual diameter of the ferromagnetic surface.
Some pots and pans have only a part of the bottom in ferromagnetic material, with parts in another material that is not suitable for induction cooking. These areas may heat up at different levels or with lower temperatures. In certain cases, where the bottom is made mainly of non-ferromagnetic materials, the cooktop might not recognize the pan and therefore not switch on the cooking zone.

To ensure optimum efficiency, always use pots and pans with a flat bottom that distributes the heat evenly. If the bottom is uneven, this will affect power and heat conduction.

Empty pots or pots with a thin base
Do not use empty pots or pans when the cooktop is on.
Proper size of pot/pan base for the different cooking areas
To ensure that the cooktop functions properly, use pots of a suitable minimum diameter.
Always use the cooking zone that best corresponds to the minimum diameter of the bottom of the pot.
Place the pot making sure it is well centered on the cooking zone in use. Use cookware about the same size as the surface cooking area. Cookware should not extend more than 1/2" (1.3 cm) outside the area.

- 4 3/4" (12 cm) minimum
- 4" (10.2 cm) minimum
- 4" (10.2 cm) minimum
- 8 3/4" (22.2 cm) minimum

- Surface cooking area
- Cookware/canner
- 1/2" (1.3 cm) Maximum overhang
First Time Use
POWER MANAGEMENT
At the time of purchase, the cooktop is set to 9 kW.
Adjust the setting in relation to the limits of the electrical system in your home as described in the following paragraph.
NOTE: Depending on the power selected for the cooktop, some of the cooking zone power levels and functions (e.g. boil or quick reheating) could be automatically limited, in order to prevent the selected limit from being exceeded.
To set the power of the cooktop:
Once you have connected the device to the main power supply, you can set the power level within 60 seconds.
Press the timer "+" button for at least 5 seconds. The display shows  .
.
Press the "  " button until the last power level selected appears.
Use the "+" and "−" buttons to select the desired power level. The power levels available are: 4 kW, 6 kW, 7 kW - 9 kW, 11 kW.
Confirm by pressing " ".
The power level selected will stay in the memory even if the power supply is interrupted.
To change the power level, turn your wall breaker power to the cooktop off for at least 60 seconds, then turn the power back on and repeat the steps above. If an error occurs during the setting sequence, the symbol will appear, and you will hear a beep.
If this happens, repeat the operation. If the  error persists, contact the After-Sales Service.
Daily Use

Turn off all controls when done cooking.
Failure to do so can result in death or fire.
POSITIONING
Do not cover the control panel symbols with the cooking pot.
NOTE: In the cooking zones close to the control panel, it is advisable to keep pots and pans inside the markings (taking both the bottom of the pan and the upper edge into consideration, as this tends to be larger).
This prevents excessive overheating of the keypad. When grilling or frying, use the rear cooking zones.

NOTE: Do not set any items on the control panel at any time.
To Use:
Press "ON/OFF" for at least one second to turn on the desired cooking zone. A dash ("-") will be shown on display. Press the "+" or "−" button of the required cooking zone to adjust the power. At first the level "5" will be shown in line with the area.
The Boost function is reached by pressing the power level button until the letter "P" is shown in the digit display. The boost can be activated on all zones.
To deactivate the cooking zones:
Select the "ON/OFF" button of the cooking zone desired.
CONTROL PANEL LOCK
To lock the settings and prevent it from being switched on unintentionally, press and hold the "Key Lock" button for 3 seconds. A beep and an indicator light above the symbol indicates that this function has been activated. The control panel is locked except "ON/OFF" of each cooking zone.
To unlock the controls, repeat the activation procedure.
![]() TIMER
TIMER
The cooktop has a Timer. The Timer can be set in minutes up to 99 minutes.
To Use Timer:
- Press "+" button to select the desired time.
NOTE: Press and hold the "+ or -" buttons for a few seconds to quickly scroll through the time. - After releasing the button, the timer countdown will start in 3 seconds.
- If needed to adjust the time, press "+" button to increase the time or "-" button to decrease the time.
- When countdown is over, timer tone will sound. The display will indicate "00" and chime will play some times. Then the display will turn off.
To Cancel:
Press "-" button until display shows "00" or press simultaneously "-" and "+".
Functions
EXTENDIBLE ZONE (DOUBLE ZONE)
Depending on the diameter of the container, the zone adapts itself automatically, turning on partially (inner zone) or completely (outer zone). For more information, refer to the minimum diameter table.

- Single size
- Dual size

Place the pot making sure that its center corresponds to the center of the cooking zone in use.

 Auto
Auto
The "Auto" button activates the auto cooking functions. Place the pot in position and turn on the cooking zone. Then press the "Auto" button. "A" will appear on the display. The indicator for the first auto cooking feature available for the cooking will light up. Select the desired auto cooking function by pressing the "Auto" one or more times. If no button is pressed the function is activated automatically after 3 seconds. The power level is not editable. The cooktop sets a default power level. To deactivate the special functions, press ON/OFF button or press "Auto" button until you see a dash "-" is visible on the display.
MELT
This function allows you to bring food to the ideal temperature for melting and to maintain the condition of the food. This method does not damage delicate foods such as chocolate, and helps prevent food sticking to the pot/pan.
SIMMER
This function is ideal for maintaining a simmering temperature, allowing you to cook food for long periods. Ideal for long-cooking recipes (rice, sauces, soups) with liquid bases.
BOIL
This function allows you to bring water to a boil and keep it boiling. The water (preferably at room temperature) should be placed in the pot and left uncovered. In all cases, users are advised to monitor the boiling water closely, and check the amount of water remaining regularly. The quantity of the water is defined in the image below on the dimension of the burner.

- 21 cups (5 L)
- 8 cups (2 L)
KEEP WARM

Food Poisoning Hazard
Do not let food sit for more than one hour before or after cooking.
Doing so can result in food poisoning or sickness.
This function allows you to keep your food at an ideal serving temperature, usually after cooking is complete, or can maintain an ideal temperature for reducing liquids very slowly.
Indicators
 POT INCORRECTLY POSITIONED OR MISSING
This symbol appears if the pot is not suitable for induction cooking, is not positioned correctly or is not of an appropriate size for the cooking zone selected. If no pot is detected within 30 seconds of making the selection, the cooking zone switches off.
 RESIDUAL HEAT
If "H" appears on the display, this means that the cooking zone is hot. The indicator lights up even if the zone has not been activated but has been heated due to the use of the adjacent zone, or because a hot pot has been placed on it. When the cooking zone has cooled down, the "H" disappears.
REMEMBER: When cooktop is in use, the entire cooktop area may become hot.
Cooking Table
| POWER LEVEL | TYPE OF COOKING | LEVEL USE (indicating cooking experience and habits) | |
| Maximum power | Boost | Fast heating | Ideal for rapidly increasing the temperature of food to fast boiling in the case of water or rapidly heating cooking liquids. |
| 8 − 9 | Frying − boiling | Ideal for browning, starting to cook, frying deep frozen products, fast boiling. | |
| High power | 7 − 8 | Browning − sautéing − boiling − grilling | Ideal for sautéing, maintaining a lively boil, cooking and grilling (for a short period of time, 5-10 minutes). |
| 6 − 7 | Browning − cooking − stewing − sautéing − grilling | Ideal for sautéing, maintaining a light boil, cooking and grilling (for a medium period of time, 10-20 minutes), preheating accessories. | |
| Medium power | 4 − 5 | Cooking − stewing − sautéing − grilling | Ideal for stewing, maintaining a gentle boil, cooking (for a long period of time), Creaming pasta. |
| 3 − 4 | Cooking − simmering − | Ideal for long-cooking recipes (rice, sauces, roasts, fish) with liquids (e.g. water, wines, broth, milk), creaming pasta. | |
| 2 − 3 | thickening − creaming | Ideal for long-cooking recipes (less than 4 cups [1 L] in volume: rice, sauces, roasts, fish) with liquids (e.g. water, wines, broth, milk). | |
| Low power | 1 − 2 | Melting − defrosting − keeping | Ideal for softening butter, gently melting chocolate, thawing small products and keeping just-cooked food warm (e.g. sauces, soups, minestrone). |
| 1 | food warm − creaming | Ideal for keeping just-cooked food warm, for creaming risottos and for keeping serving dishes warm (with induction-suitable accessory). | |
| Zero power | OFF | Support surface | cooktop in stand-by or off mode (possible end-of-cooking residual heat, indicated by an "H"). |
Ceramic Glass
Cleaning off the induction cooktop before and after each use will help keep it free from stains and provide the most even heating. For more information, see "General Cleaning" section.
- Avoid storing jars or cans above the cooktop. Dropping a heavy or hard object onto the cooktop could crack the cooktop.
- To avoid damage to the cooktop, do not leave a hot lid on the cooktop. As the cooktop cools, air can become trapped between the lid and the cooktop, and the ceramic glass could break when the lid is removed.
- For foods containing sugar in any form, clean up all spills and soils as soon as possible. Allow the cooktop to cool down slightly. Then, while wearing oven mitts, remove the spills while the surface is still warm. If sugary spills are allowed to cool down, they can adhere to the cooktop and can cause pitting and permanent marks.
- To avoid scratches, do not slide cookware or bakeware across the cooktop.
- To avoid damage to the cooktop, do not allow objects that could melt, such as plastic or aluminum foil, to touch any part of the entire cooktop.
- To avoid damage to the cooktop, do not use the cooktop as a cutting board.
- Use flat-bottomed cookware for best heat conduction and energy efficiency. Cookware with rounded, warped, ribbed or dented bottoms could cause uneven heating and poor cooking results.
- Determine flatness by placing the straight edge of a ruler across the bottom of the cookware. While you rotate the ruler, no space or light should be visible between it and the cookware.
- Make sure the bottoms of pots and pans are clean and dry before using them. Residue and water can leave deposits when heated.
PRODUCT CARE
Before cleaning, make sure all controls are off and the cooktop is cool. Always follow label instructions on cleaning products.
Soap, water and a soft cloth or sponge are suggested first unless otherwise noted. Do not use a steam cleaner.
CERAMIC GLASS
Cleaning Method:
To avoid damaging the cooktop, do not use steel wool, abrasive powder cleansers, chlorine bleach, rust remover or ammonia.
- For best results, turn on key lock option to prevent the control panel from turning on while cleaning.
- Remove food/residue with the Cooktop Scraper.
![]()
- For best results, use the Cooktop Scraper while the cooktop is still warm but not hot to the touch. It is recommended to wear an oven mitt while scraping the warm cooktop.
- Hold the Cooktop Scraper at approximately a 45° angle against the glass surface and scrape the residue. It will be necessary to apply pressure in order to remove the residue.

Allow the cooktop to cool down completely before proceeding to Step 2.
- Apply a few dime-sized drops of affresh Cooktop Cleaner to the affected areas.
![]()
- Rub affresh Cooktop Cleaner onto the cooktop surface with the blue Cooktop Cleaning Pad. Some pressure is needed to remove stubborn stains.
- Allow the cleaner to dry to a white haze before proceeding to Step 3.
- Polish with a clean, dry cloth or a clean, dry paper towel.
![]()
- Repeat steps 1 through 3 as necessary for stubborn or burned-on stains.


The Complete Cooktop Cleaner Kit is available for order and includes the following:
- Cooktop Scraper
- Affresh Cooktop Cleaner
- Blue Cooktop Cleaning Pads
See the "Accessories" section for part numbers and information on ordering.
NOTE: During the cleaning process, if the key lock is not activated, some keys may turn on. Activate the key lock function to avoid this.
Do not place any objects on the control panel at any time.
STAINLESS STEEL
(On some models)
To avoid damage to stainless steel surfaces, do not use soapfilled scouring pads, abrasive cleaners, Cooktop Cleaner, steelwool pads, gritty washcloths, or abrasive paper towels.
Rub in direction of grain to avoid damaging.
Cleaning Method:
- All purpose cleaner: Rinse with clean water and dry with soft, lint-free cloth.
- Vinegar for hard water spots.
TROUBLESHOOTING
Try the solutions suggested here st in order to avoid the cost of an unnecessary service call.
Nothing will operate
- Is the cooktop wired properly? See the Installation Instructions for more information.
- Has a household fuse blown, or has a circuit breaker tripped? Replace the fuse or reset the circuit breaker. If the problem continues, call an electrician.
The unit will not operate
- Is the cooktop control set correctly? Touch the display area on the control panel to select a cooking surface before selecting a function.
- Is the "Key Lock" Cooktop Lockout set? See "Control Lock" section.
- Has the cooktop turned off by itself? The power off key was unintentionally touched. Press power key again. Reset the cooktop.
Excessive heat around cookware on cooktop
- Is the cookware the proper size? Use cookware about the same size as the surface cooking area. Cookware should not extend more than 1/2" (1.3 cm) outside the cooking area.
Product cooking results not what expected
- Is the proper cookware being used? See "Cookware" section.
- Is the cooktop control set to the proper heat level? See "Function" section.
- Is the cooktop level? Level the cooktop. See the Installation Instructions.
Display shows messages
- Is the display flashing "F" and numbers? If "F" and a number are alternately flashing on the display, refer to the following table for possible solutions.
| DISPLAY CODE | DESCRIPTION | POSSIBLE CAUSES | SOLUTION |
| F0E1 | Cookware is detected but it is not compatible with requested operation. | The cookware is not well positioned on the cooking zone, or it is not compatible with one or more cooking zones. | Press ON/OFF button twice to remove the F0E1 code and restore the functionality of the cooking zone. Then, try to use the cookware with a different cooking zone, or use different cookware. |
| F0EA | The control panel switches off because of excessively high temperatures. | The internal temperature of electronic parts is too high. | Wait for the hob to cool down before using it again. |
| F0E2, F0E4, F0E6, F0E8, F0EC, F1E1, F6E1, F7E5, F7E6 | Disconnect the hob from the power supply. Wait a few seconds then reconnect the hob to the power supply. If the problem persists, call the service centre and specify the error code that appears on the display. | ||
e.g. BOILING:  - - | The hob does not allow a special function to be activated. | The power regulator limits the power levels in accordance with the maximum value set for the hob. | See paragraph "Power management". |
e.g.  [Power level lower than level requested] | The hob automatically sets a minimum power level to ensure that the cooking zone can be used. | The power regulator limits the power levels in accordance with the maximum value set for the hob. | See paragraph "Power management". |
Operational cooktop sounds
- Is there a low humming? This occurs when cooking at high power. The cause of this is the amount of energy that is transmitted from the appliance to the cookware. This sound will quiet or go away when the power is turned down.
- Is there a crackling? This sound occurs when cookware is used that consists of different materials. The noise is caused by vibrations in the joint faces between the different layers. It may change depending on the amount and type of food being cooked
- Is there a fan noise? The electronics require a controlled temperature in order to function reliably. The cooktop is fitted with a fan that runs at various speeds according to the temperature detected. The fan may also continue to run even after the cooktop has been switched off, if the temperature it detects is too high.
PRODUCT SAFETY
Your safety and the safety of others are very important.
We have provided many important safety messages in this manual and on your appliance. Always read and obey all safety messages.
 This is the safety alert symbol.
This symbol alerts you to potential hazards that can kill or hurt you and others.
All safety messages will follow the safety alert symbol and either the word "DANGER" or "WARNING." These words mean:
 | You can be killed or seriously injured if you don't immediately follow instructions. |
| You can be killed or seriously injured if you don't follow instructions. |
All safety messages will tell you what the potential hazard is, tell you how to reduce the chance of injury, and tell you what can happen if the instructions are not followed.
IMPORTANT SAFETY INSTRUCTIONS


To reduce the risk of fire, electrical shock, injury to persons, or damage when using the cooktop, follow basic precautions, including the following:
![]()
Danger of fire: Do not store items on the cooking surfaces. Never leave anything on the surface when unattended and not in use. Never place flammable or plastic items on or near the surface.![]()
Do not store items of interest to children in cabinets above a cooktop – Children climbing on the cooktop to reach items could be seriously injured.- Proper Installation – Be sure your cooktop is properly installed and grounded by a qualified technician.
- Never Use Your Cooktop for Warming or Heating the Room.
- Do Not Leave Children Alone – Children should not be left alone or unattended in area where cooktop is in use. They should never be allowed to sit or stand on any part of the cooktop.
- Wear Proper Apparel – Loose-fitting or hanging garments should never be worn while using the cooktop.
- User Servicing – Do not repair or replace any part of the cooktop unless specifically recommended in the manual. All other servicing should be referred to a qualified technician.
- Do Not Use Water on Grease Fires – Smother fire or flame or use dry chemical or foam-type extinguisher.
![]()
Use Only Dry Potholders – Moist or damp potholders on hot surfaces may result in burns from steam. Do not let potholder touch hot heating elements. Do not use a towel or other bulky cloth.![]()
DO NOT TOUCH SURFACE UNITS OR AREAS NEAR UNITS – Surface units may be hot even though they are dark in color. Areas near surface units may become hot enough to cause burns. During and after use, do not touch, or let clothing or other flammable materials contact surface units or areas near units until they have had sufficient time to cool. Among those areas are the cooktop and surfaces facing the cooktop.- Use Proper Pan Size – This cooktop is equipped with one or more surface units of different size. Select utensils having flat bottoms large enough to cover the surface unit heating element. The use of undersized utensils will expose a portion of the heating element to direct contact and may result in ignition of clothing. Proper relationship of utensil to burner will also improve efficiency.
- Never Leave Surface Units Unattended at High Heat Settings – Boilover causes smoking and greasy spillovers that may ignite.
- Glazed Cooking Utensils – Only certain types of glass, glass/ceramic, ceramic, earthenware, or other glazed utensils are suitable for cooktop service without breaking due to the sudden change in temperature.
![]()
Utensil Handles Should Be Turned Inward and Not Extend Over Adjacent Surface Units – To reduce the risk of burns, ignition of flammable materials, and spillage due to unintentional contact with the utensil, the handle of a utensil should be positioned so that it is turned inward, and does not extend over adjacent surface units.![shock hazard]() Do Not Cook on Broken Cooktop – If cooktop should break, cleaning solutions and spillovers may penetrate the broken cooktop and create a risk of electric shock. Contact a qualified technician immediately.
Do Not Cook on Broken Cooktop – If cooktop should break, cleaning solutions and spillovers may penetrate the broken cooktop and create a risk of electric shock. Contact a qualified technician immediately. ![]()
Clean Cooktop With Caution – If a wet sponge or cloth is used to wipe spills on a hot cooking area, be careful to avoid steam burn. Some cleaners can produce noxious fumes if applied to a hot surface.

 Do Not Cook on Broken Cooktop – If cooktop should break, cleaning solutions and spillovers may penetrate the broken cooktop and create a risk of electric shock. Contact a qualified technician immediately.
 For units with ventilating hood
- Clean Ventilating Hoods Frequently – Grease should not be allowed to accumulate on hood or filter.
- When flaming foods under the hood, turn the fan on.
For units with coil elements
- Make Sure Reflector Pans or Drip Bowls Are in Place – Absence of these pans or bowls during cooking may subject wiring or components underneath to damage.
![burn hazard]()
![shock hazard]()
Protective Liners – Do not use aluminum foil to line surface unit drip bowls, except as suggested in the manual. Improper installation of these liners may result in a risk of electric shock, or fire.- Do Not Soak Removable Heating Elements - Heating elements should never be immersed in water.
- Do not place metallic objects such as knives, forks, spoons and lids on the cooktop surface since they can get hot.
SAVE THESE INSTRUCTIONS
This induction cooktop may cause interference with television or radio reception. If interference occurs, the user should try to correct the interference by:
Relocating the receiving antenna of the radio or television.
Increasing the distance between the cooktop and the receiver.
Connecting the receiver into a different outlet.
It is the user's responsibility to correct any interference.
NOTE: People with a pacemaker or similar medical device should use care when standing near this induction cooktop while it is on. The electromagnetic field may affect the pacemaker or similar device. Consult your doctor, or the manufacturer of the pacemaker or similar medical device for additional information about its effects with electromagnetic fields of the induction cooktop.
ASSISTANCE OR SERVICE
Before calling for assistance or service, please check "Troubleshooting." It may save you the cost of a service call. If you still need help, follow the instructions below. When calling, please know the purchase date and the complete model and serial number of your appliance. This information will help us to better respond to your request.
If you need replacement parts
If you need to order replacement parts, we recommend that you use only factory specified parts. These factory specified parts will fit right and work right because they are made with the same precision used to build every new KitchenAid appliance.
To locate factory specified parts in your area, call us or your nearest KitchenAid designated service center.
In the USA
Call the KitchenAid Customer eXperience Center toll free: 1-800-422-1230.
Our consultants provide assistance with:
- Features and specifications on our full line of appliances.
- Installation information.
- Use and maintenance procedures.
- Accessory and repair parts sales.
- Specialized customer assistance (Spanish speaking, hearing impaired, limited vision, etc.).
- Referrals to local dealers, repair parts distributors and service companies. KitchenAid designated service technicians are trained to fulfill the product warranty and provide after warranty service, anywhere in the United States.
To locate the KitchenAid designated service company in your area, you can also look in your telephone directory Yellow Pages.
For further assistance
If you need further assistance, you can write to KitchenAid with any questions or concerns at:
KitchenAid Brand Home Appliances
Customer eXperience Center
553 Benson Road
Benton Harbor, MI 49022-2692
Please include a daytime phone number in your correspondence.
In Canada
Call the KitchenAid Canada Customer eXperience Centre toll free: 1-800-807-6777.
Our consultants provide assistance with:
- Features and specifications on our full line of appliances.
- Use and maintenance procedures.
- Accessory and repair parts sales.
- Referrals to local dealers, repair parts distributors and service companies. KitchenAid Canada designated service technicians are trained to fulfill the product warranty and provide afterwarranty service, anywhere in Canada.
For further assistance
If you need further assistance, you can write to KitchenAid Canada with any questions or concerns at:
Customer eXperience Centre
KitchenAid Canada
200 - 6750 Century Ave.
Mississauga, Ontario L5N 0B7
Please include a daytime phone number in your correspondence.
Accessories
Cooktop Cleaner
(ceramic glass models)
Order Part Number 31434
Cooktop Protectant
(ceramic glass models)
Order Part Number 31463
Cooktop Scraper
(ceramic glass models)
Order Part Number WA906B
Stainless Steel Cleaner and Polish
(stainless steel models)
Order Part Number 31462
All Purpose Appliance Cleaner
Order Part Number 31682
For questions about features, operation/performance, parts, accessories, warranty or service, call: 1-800-422-1230, or visit our website at www.kitchenaid.com.
In Canada, call: 1-800-807-6777, or visit our website at www.kitchenaid.ca.
In Mexico, call: 01 800 0022 767, or visit our website at www.kitchenaid.mx.
Get Started with your cooktop. Scan to see top features, tips and how-to videos.


Documents / Resources
References
![www.kitchenaid.com]() Kitchen Appliances to Bring Culinary Inspiration to Life | KitchenAid
Kitchen Appliances to Bring Culinary Inspiration to Life | KitchenAid![www.kitchenaid.ca]() Premium Major & Small Kitchen Appliances | KitchenAid
Premium Major & Small Kitchen Appliances | KitchenAid![www.kitchenaid.mx]() http://www.kitchenaid.mx
http://www.kitchenaid.mx
Download manual
Here you can download full pdf version of manual, it may contain additional safety instructions, warranty information, FCC rules, etc.
Download KitchenAid KCIG550JSS - 30-Inch 5-Element Sensor Induction Cooktop Manual
Advertisement
Thank you! Your question has been received!


Need Assistance?
Do you have a question about the KCIG550JSS that isn't answered in the manual? Leave your question here.