Table of Contents
Advertisement
Quick Links
Advertisement
Table of Contents

Related Manuals for VTech Drill & Learn Workbench


Summary of Contents for VTech Drill & Learn Workbench
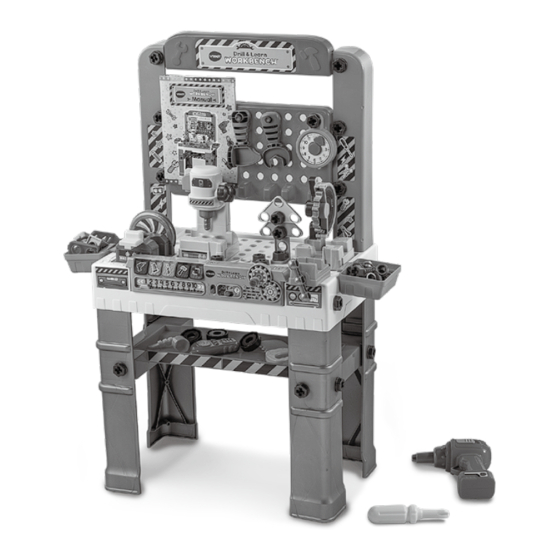
- Page 1 Instruction Manual Drill & Learn Workbench...
- Page 2 INTRODUCTION Thank you for purchasing the Drill & Learn Workbench ™ Let’s build! Get ready for role-play fun with the included workbench, working toy drill, hammer, wrench, sander, saw and screws. It’s time to tackle the to-do list! Off/Low/ 5 Tool High Volume Buttons Selector...
-
Page 3: Included In The Package
INCLUDED IN THE PACKAGE • 1 Workbench top • 1 Electronic panel • 1 Back panel • 1 Back panel top • 2 Panel supports • 4 Legs • 2 Trays • 1 Left leg support • 1 Right leg support •... - Page 4 • 1 Sander base • 1 Sander top • 1 Drill press top • 1 Drill press base • 1 Project Guide holder • 1 Clock • 1 Drill • 1 Wrench • 1 Hammer • 1 Walkie-Talkie • 1 Saw •...
- Page 5 • 1 Vise • 1 Screwdriver • 1 Large gear • 17 Building pieces • 4 Toy pegs & 4 Toy Wheels • 10 Blue toy screws & nuts • 5 Toy bolts For Workbench Assembly • 19 Gray toy screws & nuts •...
- Page 6 • 1 Label sheet • Project Guide • Quick Start Guide...
- Page 7 WARNING All packing materials such as tape, plastic sheets, packaging locks, removable tags, cable ties, cords and packaging screws are not part of this toy, and should be discarded for your child’s safety. NOTE Please save this Instruction Manual as it contains important information.
- Page 8 CAUTION: Adult assembly required. This package contains small parts. For your child’s safety, do not let your child play with the toy until it is fully assembled. ATTENTION : Ce jouet contient des petites vis. Il doit être assemblé par un adulte. Pour la sécurité de votre enfant, ne pas le laisser jouer avec tant qu’il n’est pas complètement assemblé...
-
Page 9: Battery Instructions
BATTERY INSTRUCTIONS Battery Removal and Installation 1. Make sure the unit is turned Off. 2. Find the battery cover located on the back of the electronic panel, use a screwdriver to loosen the screws, and then open the battery cover. 3. -
Page 10: Rechargeable Batteries
RECHARGEABLE BATTERIES: • Remove rechargeable batteries (if removable) from toy before charging. • Rechargeable batteries are only to be charged under adult supervision. • Do not charge non-rechargeable batteries. IMPORTANT : INFORMATIONS CONCERNANT LES PILES Les piles fournies avec le produit permettent de tester le jouet en magasin mais ne sont pas des piles longue durée. -
Page 11: Label Application
LABEL APPLICATION Please securely stick the labels to the toy as indicated below:... - Page 13 WORKBENCH ASSEMBLY INSTRUCTIONS Please refer to images on pages 3, 4 and 5. Use the included L-Wrench to screw a Gray Toy Nut to a Gray Toy Screw. Repeat for all 19 Gray Toy Nuts and Gray Toy Screws. 2. Use the included Drill or Screwdriver to tighten 8 Gray Toy Screws and Nuts to attach the Right and Left Leg Supports where the center tray will rest on the left and right legs.
- Page 14 4. Insert the Large Gear into the Electronic Panel. Insert the Electronic Panel into the slot of the Workbench Top. Use four of the Real Screws and your own screwdriver to securely attach the Electronic Panel. 5. Use four of the Real Screws and your own screwdriver to securely attach the Vise.
- Page 15 7. Use the remaining two Real Screws to attach the Project Guide Holder to the Back Panel of the Workbench. 8. Use four of the Gray Toy Screws and the included Drill or Screwdriver to tighten the Back Panel of the Workbench to the Panel Supports.
- Page 16 10. Insert the Panel Supports into the Workbench Top and use two of the Gray Toy Screws and the included Drill or Screwdriver to tighten the supports. 11. Clip the two Trays into the slots to the left and right of the Workbench Top.
- Page 17 POWER TOOL ASSEMBLY INSTRUCTIONS Circular Saw, Drill Press and Sander Insert the Drill Press Top into the Drill Press Base. You will hear the pieces snap into place when properly inserted. 2. Insert the Circular Saw Top into the Circular Saw Base. You will hear the pieces snap into place when properly inserted.
- Page 18 Activating Normal Play Mode The first time the Drill & Learn Workbench™ is used, you will need to exit Try-Me mode and activate Normal Play mode. 1. Turn the unit On. 2. Place a Power Tool on the Power Tool Zone. You will hear a sound indicating that the unit is in Normal Play mode.
- Page 19 Circular Saw Place the Circular Saw in the Power Tool Zone. • Connect two rectangular Building Pieces together. • Place the Building Piece on the Circular Saw base. • Press down the gray handle of the Circular Saw to “cut” •...
-
Page 20: To Begin Play
TO BEGIN PLAY Move the Off/Low/High Volume Selector to Low or High to turn on the unit, then move the Mode Selector to select a game to play. PRODUCT FEATURES 1. Off/Low/High Volume Switch To turn the unit On or adjust the volume, slide the Off /Low High... - Page 21 4. Tool Buttons Press the Tool Buttons to learn about colors and tools facts, listen to sing-along songs or to answer the activity questions. The light will flash or light up with the songs and melodies. 5. Ruler Move the ruler slider to learn about numbers and ruler facts, listen to sing-along songs or answer the activity questions.
- Page 22 ACTIVITIES 1. Music Mode Move the Mode Selector to Music Mode to hear fun songs. Press the buttons, or insert the circular saw, drill press, or sander tools in the Power Tool Zone, or move the ruler slider to listen to sing-along songs about tools and number facts.
-
Page 23: Care And Maintenance
8697 in Canada, or by going to our website at vtechkids. com and filling out our Contact Us form located under the Customer Support link. Creating and developing VTech products is accompanied by a responsibility that ® we take very seriously. We make every effort to ensure the accuracy of the information, which forms the value of our products. - Page 24 5. If the unit still does not work, install a new set of batteries. CAUTION Changes or modifications not expressly approved by the party responsible for compliance could void the user’s authority to operate the equipment. NOTE This equipment has been tested and found to comply with the limits for a Class B digital device, pursuant to Part 15 of the FCC Rules.
- Page 25 Trade Name: VTech® Model: 5600 Product Name: Drill & Learn Workbench ™ Responsible Party: VTech Electronics North America, LLC Address: 1156 W. Shure Drive, Suite 200, Arlington Heights, IL 60004 Website: vtechkids.com THIS DEVICE COMPLIES WITH PART 15 OF THE FCC RULES.
- Page 26 Visit our website for more information about our products, downloads, resources and more. vtechkids.com vtechkids.ca Read our complete warranty policy online at vtechkids.com/warranty vtechkids.ca/warranty TM & © 2023 VTech Holdings Limited. All rights reserved. IM-560000-000 Version: 0...