Table of Contents
Advertisement
Quick Links
Advertisement
Table of Contents

Related Manuals for Focusrite Scarlett 4i4 4th Gen


Summary of Contents for Focusrite Scarlett 4i4 4th Gen
- Page 1 Scarlett 4i4 4th Gen User Guide...
-
Page 2: Table Of Contents
Scarlett 4i4 4th Gen User Guide Table of Contents Overview ........................................... . . 4 Introduction . - Page 3 Scarlett 4i4 4th Gen User Guide Standalone Mode ........................................35 Focusrite Control 2 .
-
Page 4: Overview
• Remote control your preamps using our Focusrite Control 2 software. To check Focusrite Control 2 is supported on your operating system (OS) please use our Help • Record straight out of the box with Easy Start and a complete suite of studio software Centre’s compatibility articles:... -
Page 5: Getting Started
During Easy Start, you'll install Focusrite Control 2 . After you install and open Focusrite Control 2, click 'Update Scarlett 4i4'. Do not disconnect your Scarlett while Focusrite Control 2 updates it. After the Focusrite Control 2 update is complete, the Scarlett no longer appears as a Mass Storage Device on your computer. -
Page 6: Mac
During Easy Start, you'll install Focusrite Control 2 . After you install and open Focusrite Control 2, click 'Update Scarlett 4i4'. Do not disconnect your Scarlett while Focusrite Control 2 updates it. After the Focusrite Control 2 update is complete, the Scarlett no longer appears as a Mass Storage Device on your computer. -
Page 7: What Is Focusrite Control 2
Focusrite Control 2 is compatible with most major screen reader software, allowing you to control the features on your Scarlett. Installing Focusrite Control 2 You can install Focusrite Control 2 on Windows and Mac. To download and install Focusrite Control 2: 1. Go to the Focusrite downloads website: focusrite.com/downloads... -
Page 8: Manual Registration
After you've been through Easy Start, installed and opened Focusrite Control 2, your Scarlett is no longer in Easy Start mode. If your Scarlett 4i4 is still in Easy Start mode, or you have chosen not to install Focusrite Control 2 to disable Easy Start Mode: 1. -
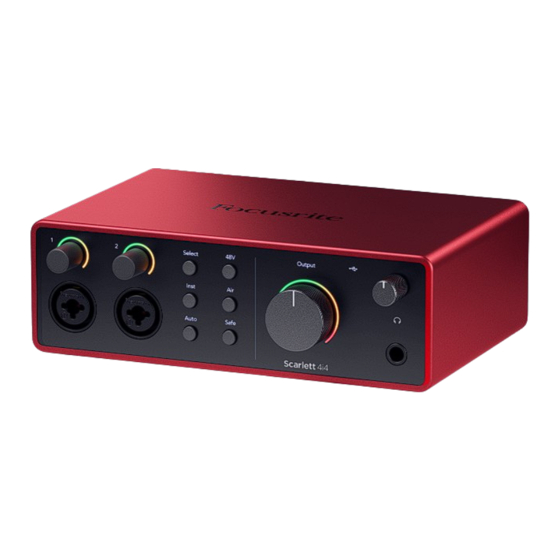
Page 9: Hardware Features
Scarlett 4i4 4th Gen User Guide Hardware Features Front Panel 1. Input 1 Gain Control and Gain Halo - The Gain control sets the input level and the Gain 7. Air button - Press to turn on AIR mode (see AIR). - Page 10 Scarlett 4i4 4th Gen User Guide Back Panel - Kensington Lock, use a lock to secure your Scarlett and deter theft. 2. 5V DC - an optional USB-C connector to supply power to your Scarlett 4i4 if your computer can't supply 1.5A USB-C power to your Scarlett 4i4.
-
Page 11: Front Panel In Depth
Front Panel In Depth Software Gain Control You can also control the preamp gain remotely using Focusrite Control 2. This section covers all the features on your Scarlett 4i4's front panel, what they do, how you might use them and how they work in Focusrite Control 2. - Page 12 Focusrite Control 2 to set the correct preamp gain. from green through to amber before the entire Gain Halo flashes red to show you the input has As the signal gets louder the meter in Focusrite Control 2 lights from green to amber (pre-clip). clipped.
-
Page 13: Microphone Inputs
Scarlett 4i4 4th Gen User Guide Select Button Many front panel controls on your Scarlett 4i4 are shared across the preamp inputs. The Select button moves the preamp controls to different inputs. At least one preamp is always selected, to change which preamp(s) the controls are affecting, press the Select button. -
Page 14: Button (Phantom Power)
48V (Phantom Power) Software Control Linking Preamps To enable 48V (Phantom Power) from Focusrite Control 2 click the +48V button. This is the same as pressing the 48V button on the Scarlett 4i4 hardware. To link preamps from Focusrite Control 2: Hover over the preamp you want to link. -
Page 15: Inst (Instrument) Button And Line Level Inputs
• Keyboards • Drum Machines • External Microphone Preamps Instrument/Line Software Control To change between instrument and line from Focusrite Control 2 click the Inst button once. Line Instrument Note When you switch between Inst and Line, the gain remains at the last level you set. -
Page 16: Auto Gain
10 seconds and let the Scarlett set a good level for your preamps. If you find the levels aren't right, you can adjust the gain controls manually to fine-tune the levels before Click the Auto Gain button in Focusrite Control 2. recording. -
Page 17: Multichannel Auto Gain
Scarlett 4i4 4th Gen User Guide The Gain Halo turned red Multichannel Auto Gain If the input signal is unsuitable for Auto Gain (for example no signal), after ten seconds, Auto Auto Gain allows you to send a signal into your Scarlett 4i4 (for example singing, or playing your Gain stops and the Gain Halo lights red for a second. -
Page 18: Clip Safe Button
1. Press the Select button to move your preamp controls to the correct preamp. To enable AIR from Focusrite Control 2 click the Air button. This is the same as pressing the Air 2. Press the Safe button on the interface or the corresponding software button. -
Page 19: Output Control And Level Meter
Scarlett 4i4 4th Gen User Guide Headphone Output Note Air Presence & Drive is only available at up to 96kHz, you cannot use it at quad-band (176.4kHz and 192 kHz) sample rates. Output Control and Level Meter The headphone output is a 6.35mm (¼”) TRS jack. Many headphones have a 3.5mm TRS jack, to connect them to your Scarlett 4i4 you must use a TRS 6.35mm to 3.5mm adaptor. -
Page 20: Back Panel In Depth
The MIDI IO doesn't require any setup for your to use your Scarlett 4i4 as a USB MIDI interface, The connection to your computer provides USB power, two-way audio communication, and a however, to use MIDI you must install and open Focusrite Control 2. The Scarlett 4i4's MIDI ports connection to Focusrite Control 2. -
Page 21: Daw (Recording Software) Setup
Scarlett 4i4 4th Gen User Guide DAW (Recording Software) Setup The Scarlett is compatible with any ASIO-supported DAW on Windows and any Core Audio- supported DAW on macOS. To help you get started, we've put together steps to set up your interface and start recording in the most common DAWs. -
Page 22: Ableton Live
Click Options > Preferences..Go to the Audio tab on the left-hand side of the Preferences window. Set the Driver Type to ASIO, and Audio Device to Focusrite USB ASIO. Click OK. Do the same for the Output Config, if you are using multiple outputs from your Scarlett 4i4. - Page 23 Live. You will see up to six channels. Click Live in the top menu bar. Click Settings. Go to the Audio tab on the left-hand side of the Preferences window. Set the Audio Input Device and Audio Output Device to Scarlett 4i4 4th Gen.
- Page 24 Scarlett 4i4 4th Gen User Guide 10. Close the Preferences Window. Getting sound into Ableton Click to highlight an Audio Track in Live's main window. Live had two views (Session and Arrangement), so depending on which view you are in, please see the following screenshots.
- Page 25 Scarlett 4i4 4th Gen User Guide When you're ready to record, click the record button in Ableton's transport bar.
-
Page 26: Logic And
Scarlett 4i4 4th Gen User Guide Logic and GarageBand To get set up in Logic Pro and GarageBand follow these steps: Open Logic Pro or GarageBand on your computer (you may be prompted to Choose a project, you can choose an Empty Project or use a template). -
Page 27: Pro Tools
Click the main Record Enable button at the top of the Pro Tools window, it turns red when enabled Select Focusrite USB ASIO (Windows) or Scarlett 4i4 4th Gen in the Playback Engine Click the Play button to begin recording. -
Page 28: Reaper
Scarlett 4i4 4th Gen User Guide Select ASIO in the Audio system: dropdown. Reaper Select Focusrite USB ASIO in the ASIO Driver: dropdown. To get set up in Reaper, follow these steps: Click OK. Windows Click Track (top menu) > Insert New Track. - Page 29 Scarlett 4i4 4th Gen User Guide Click the red record-armed button. If you don't see the pop-up, go to Options (top menu) > Settings > Device Click the Input 1 box to select your input on your Scarlett 4i4. Choose Scarlett 4i4 in the Audio Device dropdown menu.
-
Page 30: Fl Studio
If you're not sure which option to choose, please see FL Studio's help files. Set the Device to Scarlett 4i4 4th Gen (or Focusrite USB ASIO on Windows) in the When you're ready to record, press the play button in the transport section. -
Page 31: Cubase
Configure the track type as Audio and set the Audio Input to the channel you're using on your interface. Click Audio System on the left-hand side. Set the ASIO Driver to Focusrite USB ASIO. Click Add Track. 10. Click the Record Enable and Monitor buttons... - Page 32 In the top menu bar click Studio > Studio Setup... Configure the track type as Audio and set the Audio Input to the channel you're using on your interface. Change the ASIO Driver to Scarlett 4i4 4th Gen. Click Add Track. Click Switch.
-
Page 33: Examples Of Use
Scarlett 4i4 4th Gen User Guide Examples of Use Connecting Inputs and Outputs The following diagram shows how to connect a range of inputs and outputs to the Scarlett 4i4. 1. Connect instruments such as guitars, bass, electro-acoustic guitars and other You can also connect line-level devices to Input 1 or 2, where you can use the gain instruments with pickups to Input 1 or 2 the 6.35mm jack input on the front panel. -
Page 34: Using Outboard Gear
The setup below shows how you can connect your outboard equipment to your Scarlett 4i4 and use Focusrite Control 2's Mixer to route the signal. To get the signal out of your DAW, most DAW software will have a guide on using an external processor as an insert or as a Send and Return effect. -
Page 35: Loopback
To setup Standalone mode: Connect your Scarlett's power socket to mains power. Connect your Scarlett 4i4 to a computer running Focusrite Control 2. In Focusrite In your DAW, make sure the input to your insert, or your send's return, is set to the Control 2 's mixer page route the Scarlett 4i4's inputs to the outputs you'd like to use. -
Page 36: Focusrite Control 2
Focusrite Control 2 Mixer Mixes At the top of Focusrite Control 2's Mixer you can see the different Mixes you have available listed Your Scarlett 4i4 contains a mixer controllable from the Mixer page in Focusrite Control 2. You can as Mix A, Mix B, etc. -
Page 37: Using The Mixer Channels
Each Output can only be fed from one Mix. For example, your headphones can't be fed 2. Pan from Mix A and Mix B simultaneously. When you're choosing Mix destinations Focusrite Moves a mono channel's position in the stereo image from left to right or changes Control 2 shows you if an output already has a feed from a different Mix. -
Page 38: Focusrite Control 2 Settings
Some features, listed below, are not available at quad-band sample rates (176.4 and 192kHz). • Air Harmonic Drive • Clip Safe Analytics Use this tick box to opt into usage analytics to help us make Focusrite Control 2 better. Please see Privacy Policy for more information. -
Page 39: Updating
Find your Scarlett on the Downloads website. There are two ways to make sure you have the latest Focusrite Control 2 version: Download Focusrite Control 2 for your operating system (Windows or Mac). 1. Use the updater in Focusrite Control 2: Open the Downloads folder on your computer and double-click the Focusrite Control 2 installer. -
Page 40: Updating Your Scarlett
To update your Scarlett: Open Focusrite Control 2. If there is an update available, Focusrite Control 2 tells you when you open it. Your Scarlett 4i4 is now up to date and you can continue to use it as normal. -
Page 41: Specifications
Scarlett 4i4 4th Gen User Guide Specifications These specifications allow you to compare your Scarlett 4i4 with other devices and make sure Instrument Inputs they’ll work together. If you’re not familiar with these specifications, don’t worry you don’t need Input Impedance 1MΩ... -
Page 42: Physical And Electrical Characteristics
Scarlett 4i4 4th Gen User Guide Physical and Electrical Characteristics Environmental Operating Temperature 40°C / 104°F Maximum ambient operating temperature Analogue Inputs Channel Order Connectors Two front panel Neutrik® XLR combo connectors Two rear panel Neutrik® 6.35mm (1/4”) jack sockets... -
Page 43: Notices
For all troubleshooting queries, please visit the Focusrite Help Centre at support.focusrite.com. Copyright & Legal Notices Focusrite is a registered trademark and Scarlett is a trademark of Focusrite Group PLC. All other trademarks and trade names are the property of their respective owners. -
Page 44: Credits
Scarlett 4i4 4th Gen User Guide Credits Focusrite would like to thank the following Scarlett 4th Gen team members for their hard work in bringing you this product: Aarron Beveridge, Adam Watson, Adrian Dyer, Adrien Fauconnet, Alex Middleton-Dalby, Alice Rizzo, Alistair Smith, Andy Normington, Andy Poole, Andy West, Arne Gödeke, Bailey Dayson,...