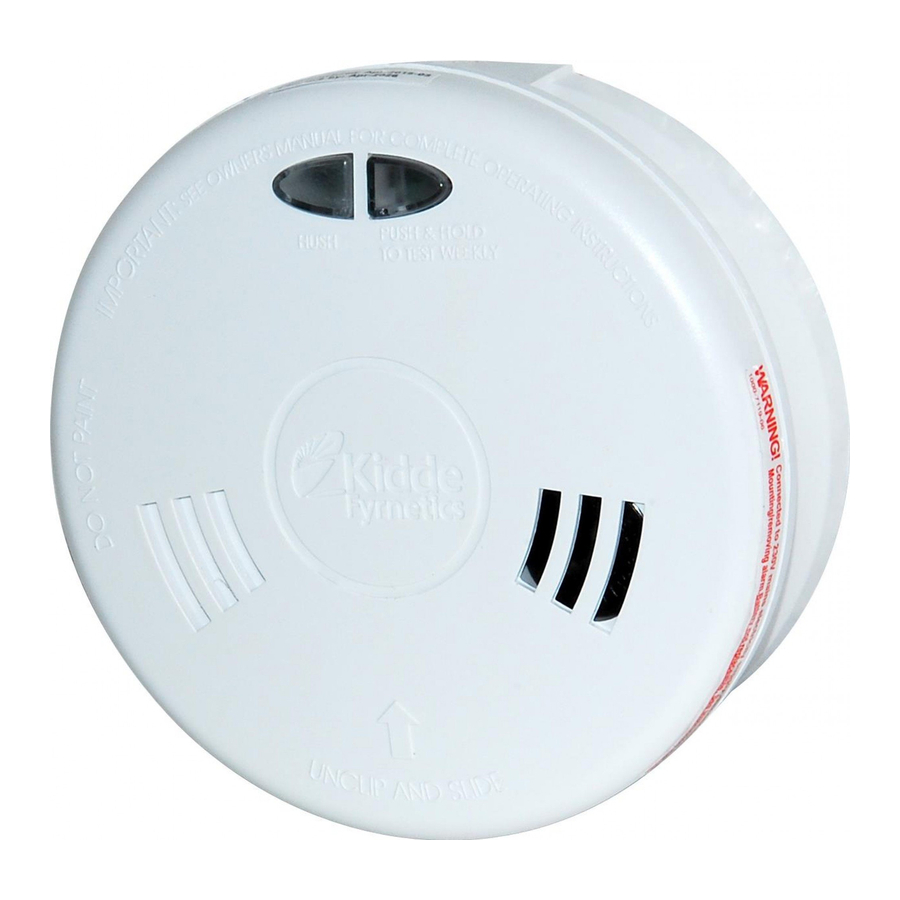
Kidde SLICK 1SFW, 1SFWR, 2SFW, 2SFWR, 3SFW and 3SFWR - Smoke and Heat Alarm Manual
- Installer's manual (10 pages) ,
- Owner's manual (10 pages)
Advertisement
- 1 Introduction
- 2 Installation Instructions – Introduction
- 3 Recommended Locations for Smoke/Heat Alarms
- 4 Locations to be Avoided (Smoke Alarms)
- 5 Installing Alarm
- 6 Loose Battery Models
- 7 Initial Testing and Checking of Alarm
- 8 Interconnecting
- 9 Timing of Installing/Decorating
- 10 Decorating
- 11 L.E.D. Status
- 12 Ongoing Maintenance
- 13 Battery Replacement (AC models with loose battery only)
- 14 Repair/Servicing
- 15 Limitations of Smoke/Heat Alarms
- 16 Troubleshooting
- 17 Documents / Resources
Introduction
Please read through our guide in full.
Leading authorities recommend that both ionisation and photoelectric smoke alarms be installed to help insure maximum detection of the various types of fires that can occur within the home. Ionisation sensing alarms may detect invisible fire particles (associated with fast flaming fires) sooner than photoelectric alarms. Photoelectric sensing alarms may detect visible fire particles (associated with slow smoldering fires) sooner than ionisation alarms. Heat alarms are useful in areas with condensation/dust/high humidity, such as kitchens and lofts.
Heat alarms MUST ALWAYS be interconnected to smoke alarms.
Electrical rating 230V AC, 50Hz 80mA max per alarm (maximum 80mA for originating unit with 24 Devices interconnected).These alarms may be used with the Kidde Wireless base accessory, enabling interconnection between alarms, wirelessly. The Remote, Test & Hush accessory will also work with alarms on Wireless bases.
 |  |  |
| EN14604: 2005 Licence No. KM738872 | 2797-CPR-535595 11 EN14604: 2005 | 103.0001 21 EN 14604:2005+AC:2008 AB:0086 |
 | | |
| BS 5446: Pt. 2: 2003 Lic No: KM738879 *Applicable to 1SF & 2SF Series | +Applicable to 3SF Series | |
KIDDE SAFETY EUROPE LTD, ASH HOUSE, LITTLETON ROAD, ASHFORD, TW15 1TZ, UK.
www.kiddefyrnetics.co.uk
The additional user guide should be left in a safe place for the property owner. e.g. near Consumer Unit.
Installation Instructions – Introduction
This alarm is designed for installation by a qualified electrician, in accordance with the latest I.E.E. Regulations and in regard to relevant Building Regulations.
 Read these instructions thoroughly before proceeding. Peopleʼs lives depend on it.
This installer's guide is supplied for your guidance and should not be left with the property owner. This is for use by qualified electricians.
 AC alarms must be powered by a constant 230V AC, 50Hz supply that is not controlled by any form of switch.
Grade ʻDʼ – AC with secondary power e.g. Alkaline battery/rechargeable cells. Recommended to connect to dedicated circuit that is separately electrically protected. This helps minimise interference (EMI) on alarm interconnect line from CFL's, dimmers, LV transformers etc.
Only interconnect to the identical brand of smoke/heat or C.O. alarm. Do not connect to any other brand of alarm/auxilary device unless approved by Kidde.
The Earth terminal is provided to facilltate wiring termination of the Earth wire, which plays no part in the safety protection of the alarm.
When testing the alarm, stand back so your hearing is not damaged by the 85dB sounder.
In new build or refurb projects, protect the alarm with a dust cap to prevent insects or dust contamination by following trades. The property owner or other responsible person must be advised to remove them for the alarms to operate correctly. (Ideally, fit alarms at latest stage possible onto pre-installed mounting base.)
| Do NOT subject the alarm circuit to insulation resistance testing with the alarm base units connected. Failing to do so will cause damage outside the terms of the guarantee provisions. |

electrical shock hazard!
Never restore power supply until all alarms are completely installed.
Doing so before hand can cause serious injury.
Do not install in a dripping, water splashing, very humid area.

This alarm cannot be operated from power derived from a square wave or modified sine wave inverter. These types of inverters are sometimes used to supply power to the structure in off grid installations, such as solar or wind derived power sources. These power sources produce high peak voltages that will damage the alarm.
Recommended Locations for Smoke/Heat Alarms
- Locate the first alarm in the immediate area of the sleeping rooms. Try to protect the exit path as the sleeping rooms are usually farthest from the exit. If more than one sleeping area exists, locate additional alarms in each sleeping area.
- Locate additional alarms to protect any stairway as stairways act like chimneys for smoke and heat.
- Locate at least one alarm on every floor level.
- Locate an alarm in every sleeping room.
- Locate an alarm in every room where electrical appliances are operated (i.e. portable heaters or humidifiers).
- Locate an alarm in every room where someone sleeps with the door closed. The closed door may prevent the alarm from waking the sleeper.
- Smoke, heat and combustion products rise to the ceiling and spread horizontally. Mounting the smoke alarm on the ceiling in the centre of the room places it closest to all points in the room. Ceiling mounting is preferred in ordinary residential construction.
- When mounting an alarm on the ceiling, locate it at a minimum of 30cm (12") from the side wall and 60.96cm (2 feet) from any inside corner (see DIAGRAM A).
- When mounting the alarm on the wall, use an inside wall with the top edge of the detection element a minimum of 15cm (6") and a maximum of 30cm (12") below the ceiling, and at least 61cm (2 feet) from any inside corner (see DIAGRAM A).
- Install smoke alarms on sloped, peaked or cathedral ceilings at or within 0.9m (3ft) of the highest point (measured horizontally). Smoke alarms in rooms with ceiling slopes greater than 0.3m in 2.4m (1 foot in 8 feet) horizontally shall be located on the high side of the room. A row of detectors shall be spaced and located within 0.9m (3ft) of the peak of the ceiling measured horizontally.(see DIAGRAM "C")
- Put smoke alarms at both ends of a bedroom hallway or large room if the hallway or room is more than 9.1m (30 feet) long.

- In homes that are not well insulated, extreme heat or cold can be transferred from the outside to the inside through poorly insulated walls and roof. This may create a thermal barrier which can prevent the smoke from reaching an alarm mounted on the ceiling. If you are not sure about the insulation in your home, or if you notice that the outer walls and ceiling are either hot or cold, install the alarm on an inside wall. In such homes, install the smoke alarm with the top edge of the alarm at 15cm (6") and a maximum of 30cm (12") below the ceiling,
- Install Smoke Alarms on tray-shaped ceilings (coffered ceilings) on the highest portion of the ceiling or on the sloped portion of the ceiling within 30cm (12") vertically down from the highest point (see DIAGRAM "D").

Locations to be Avoided (Smoke Alarms)
 In the garage. Products of combustion are present when you start your car. Only a HeatAlarm is suitable in such locations
In front of forced air supply ducts used for heating and air conditioning, near ceiling fans, orother high air flow areas.
Less than 10cm (4") from the peak of an ʻAʼ frame type ceiling.
In an area where the temperature may fall below 0°C or rise above 40°C. Such as garagesand unfinished attics; this should also include electrical boxes exposed to these environments.
Do not install where the ventilation openings in the unit could be impeded by items such asnewspapers, table-cloths, curtains, etc.
In dusty areas. Dust particles may cause nuisance alarm or failure to alarm.
In very humid areas. Moisture or steam can cause nuisance alarms.
In areas where the Relative Humidity (RH) is above 93%, non-condensing.
Near fluorescent lights or CFL lamps.. Electronic "noise" may cause nuisance alarms.
In insect infested areas
Smoke alarms should not be installed within 0.9m (3ft) of the following: the door to akitchen, the door to a bathroom containing a tub or shower, ceiling or whole house ventilating fans orother high air flow areas..
Kitchens: Normal cooking may cause nuisance alarms. Only Heat Alarms are suitable foruse in Kitchens; they should also be fitted in integral garages.
Smoke alarms are not to be used with detector guards unless the combination (alarm and-guard) has been evaluated and found suitable for that purpose.
Installing Alarm
- These are mains powered alarms, so isolate the mains supply before commencing installation. They are for installation by a qualified electrician in accordance with the current I.E.E. regulations.
- Select suitable location having regard to earlier advice.
- Bring house wiring through a dry lining box into back of alarm; side entry, via mini trunking is also possible by carefully knibbling away edge on trim-plate. Make good joint, with white sealant, if necessary.

- If alarm is not being interconnected, interconnect cable terminal (I/O) on alarm is unused.
![]()
- Care should be taken to insure the wires are pressed firmly into the appropriate holes on the terminal block (Do not use slots for wire retention, see figure d). Pull back lightly on each wire to verify it is seated well.)


- Wire in house cabling to appropriate terminals after prying off terminal cover block, ensuring that the minimum space possible is taken up by incoming cabling, otherwise terminal cover may not shut; this then prevents alarm from properly locating on base. To comply outer sheathing must remain where cables come through ceiling.
- Carefully replace cover by locating leg as shown and then gently levering clip to full close.
- If necessary the alarm can be unclipped from its base plate, by depressing whereshown(Figure b above) and just the base installed, at 1st fix. The alarm can then be slid on to the hinge, and then slid home as illustrated below(2).
Loose Battery Models
- The alarm will not locate without a battery in the compartment
Never remove or connect cable harness, without having disconnected mains power, or arcing could occur, damaging the alarm.

On rechargeable models there is no battery compartment - type of alarm is indicated on alarm.

- Reinstall on alarm base plate affix to ceiling and push (and hold) test button to verify battery operation.
![]()

Battery Changing
- Loose battery models (battery changing) See section 12
- Reconnect mains supply and check green L.E.D. is lit – red L.E.D. will flash intermittently.


Initial Testing and Checking of Alarm
- Before powering up/testing CHECK THAT WIRING POLARITY is correct & all connections are tight. REVERSING POLARITY will fatally damage all interconnected alarms, and damage is not covered by the Guarantee. Slide alarm fully home on base plate before powering up, to prevent arcing across the contact blades.
- Having energised circuit, press and hold the test button again – the alarm should sound and other interconnected ones also, within a few seconds.
- Do this for all alarms.
- If any do not sound, isolate mains and recheck cabling.
- If the red L.E.D. blinks every 30-40 seconds and the alarm chirps in between, it indicates failure of the sensing chamber. Press and hold the test button to perform a rest but if the unit re-enters error mode replace the alarm.
- Advise the house-holder (if present) as to how to test the alarms.
Interconnecting

* Interconnect only — if single alarm installation, leave unconnected the I/O terminal.
These are double insulated products and do not need earthing: never use earth conductor to interconnect – use 3 core and earth cable. Use black in 3 core & earth cabling, for interconnect line.
If installing using old cabling (different colors), take great care / follow IEE Reqs.
- • A maximum of 24 Kidde devices may be interconnected in a multiple station arrangement. The interconnect system should not exceed 12 Smoke Alarms and/or 18 Alarms total (Smoke, Heat, CO and etc). With 18 alarms interconnected up to 6 alarm accessories (relay modules, visual signaldevice and etc.).
 Crossing line and neutral connections or line and interconnect connections will fatally
All interconnected alarms must be powered off the same fuse/circuit breaker.
Total cable length between alarms must not exceed 250m (273yds) and be 1.0mm in diameter, 3 core and earth (BS6243Y). Wiring must conform to the IEE regulations - BS7671, or latest edition.
These smoke/heat alarms are Interconnectable with Kidde Rechargeable CO Alarm models 423D/9hir & 423/9hir.but will not respond to a CO interconnect alarm signal. These alarms will trigger the interconnected hard wired CO alarms with a deferential sounder
Timing of Installing/Decorating
- Install the base plate (and surface pattress if used) at 1st fix.
- Do not install alarm until following trades have finished e.g. plasterers/painters/carpet fitters etc..
- Do not install alarms until property has stabilized at a habitable environment to avoid alarm contamination.
- Dust and other contaminants e.g. paint fumes, will enter the alarm causing possible nuisance alarms and damage the sensitive components within.
- Never plug in or remove cabling when circuit is live as you could short circuit it and invalidate the guarantee.
- After installation, cover the alarm with the supplied dust cover – this must be removed just prior to occupation for the alarm to function.
Decorating
- Never paint the alarm.
- During redecoration, all alarms should be covered with the supplied dust cover or a plastic bag to prevent contamination by fumes. (These can permanently damage the alarm). Do not uncover until the surrounding paintwork is thoroughly dried.
- Whilst covered, the alarm cannot operate. Remove covering as detailed above.
L.E.D. Status
- Green L.E.D. is lit when AC power is present.
- Red L.E.D. blinks to indicate normal operation of alarm function. (If model with battery back-up, also indicates healthy battery.) In alarm state (i.e. triggered), L.E.D. will flash rapidly. When interconnected, only triggering alarm will have this state.
- If interconnected to other alarms only the triggering alarm will have a rapidly flashing L.E.D..
- If the red L.E.D. blinks every 30-40 seconds and the alarm chirps in between, it indi-cates failure of the sensing chamber. Press and hold the test button to perform a rest but if the unit re-enters error mode replace the alarm. Householders should consult User Guide or installer/landlord.
- The alarm sounder and flashing L.E.D. will remain whilst the alarm continues to detect smoke (or excessive heat in a heat alarm).
Ongoing Maintenance
- Alarms are sensitive electrical devices. The test button should be pushed (and held) once a week to verify operation.
- Once a month the alarm should be wiped with a mildly damp cloth, having previously vacuumed the outside of the unit, especially through the grill area. The mains supply should first be isolated.
Battery Replacement (AC models with loose battery only)

- If the alarm type has replaceable battery cells, they should be replaced annually. (If using alkaline, this can be extended to 2 years).
- A chirp once every 30 - 40 seconds at the same time as the red LED flashes indicates the battery needs replacement. Do this as soon as possible.
- Mains power should be disconnected at the Consumer Unit/fuse box.
- Insert screwdriver in slot indicated to release locking tab. Whilst inserted push alarm hard with palm of hand in direction of arrow shown on alarm front.
- Replace with an alkaline battery such as Duracell MN1604, Duracell Ultra MX1604; Energizer 6LR61, (Do not use rechargeable cells.)
- If a chirping noise is present after this, wait for 10 minutes to elapse. On rechargeable models there are no user replaceable components.
NOTE: TEST ALARM USING TEST BUTTON AFTER BATTERIES ARE REPLACED.
NOTE: Do not use lithium batteries in these units.
Repair/Servicing
- If the alarm is not functioning, first check the troubleshooting section. If this does not rectify the problem:
- Consult your installer, wholesale distributor or landlord for advice if property is rented.
- There are no user serviceable parts, except for models with loose batteries.
- Do not attempt to dismantle the alarm – this will invalidate the guarantee.
- At the end-of-life for recycling purposes, contact Kidde for instructions on removing the rechargeable batteries from models so equipped as these batteries are not designed for user removal."
Limitations of Smoke/Heat Alarms
Smoke alarms are devices that can provide early warning of possible fires at a reasonable cost; however, alarms have sensing limitations. Leading authorities recommend that both ionisation and photoelectric smoke alarms be installed to help insure maximum detection of the various types of fires that can occur within the home. Ionisation sensing alarms may detect invisible fire particles (associated with fast flaming fires) sooner than photoelectric alarms. Photoelectric sensing alarms may detect visible fire particles (associated with slow smoldering fires) sooner than ionisation alarms.
Heat alarms are useful in areas with condensation/dust/high humidity, such as kitchens and lofts. Heat alarms MUST ALWAYS be interconnected to smoke alarms.
Heat alarms are triggered when a temperature of approximately 57°C is reached - they are not suitable for use as a fire safety device independently, they must always be used in conjunction and interconnected to smoke alarms.
Loose batteries, where fitted must be of the specified type, in good condition and installed properly.
AC only powered alarms will not operate if AC power has been cut off such as by an electrical fire, an open fuse or loss of mains supply.
All alarms must be tested regularly to make sure the batteries and the alarm circuits are in good operating condition.
Life safety from fire in residential occupancies is based primarily on early notification to occupants of the need to escape, followed by the appropriate egress actions by those occupants. Fire warning systems for dwelling units are capable of protecting about half of the occupants in potentially fatal fires. Victims can be involved with the fire, too old or young, or physically or mentally impaired such that they cannot escape even when warned early enough that escape should be possible. For these people, other strategies such as protection-in-place or assisted escape or rescue are necessary.
Smoke alarms cannot provide an alarm if smoke does not reach the unit. Therefore, smoke alarms may not sense fires starting in chimneys, walls, on roofs, on the other side of a closed door or on a different floor. If the alarm is located outside the bedroom or on a different floor, it may not wake up a sound sleeper. Equally heat alarms will only be triggered if they are correctly sited to detect heat. The use of alcohol or drugs may also impair ones ability to hear the alarm. For maximum protection a smoke alarm should be installed in each sleeping area on every level of a home. Hearing impaired occupiers should consider fitting additional strobe accessories to give a visual alarm.
Although smoke/heat alarms can help save lives by providing an early warning of a fire, they are not a substitute for an insurance policy. Home owners and renters should have adequate insurance to protect their property.
If after reviewing this Installer's Guide or User Guide you feel that your smoke alarm is defective in any way, do not tamper with the unit. Refer to Repair/Servicing Section. Contact your Installer, Wholesale Distributor or Landlord
Fire-warning equipment for residential occupancies are capable of protecting about half of the occupants in potentially fatal fires. Victims are often intimate with the fire, too old or too young, or physically or mentally impaired such that they cannot escape even when warned early enough that escape should be possible. For these people, other strategies such as protection-in-place or assisted escape or rescue would be necessary. If the alarm is located outside the sleeping room or on a different floor, it may not wake up a sound sleeper.
The use of alcohol or drugs may also impair oneʼs ability to hear the smoke alarm. For maximum protection, a smoke alarm should be installed in each sleeping area on every level of a home.
Troubleshooting
Always turn off the mains supply to AC alarms before checking connections etc..
| Symptom | Possible cause/solutions |
Green L.E.D. not lit |
|
Frequent nuisance alarms | See sections 2,3,4 and 7. If sited incorrectly/not regularly cleaned as section 11, nuisance alarms can occur. |
Alarm chirps every 30-40 seconds | Verify green LED is lit continuously the see section 5 to replace battery if applicable. If unit has rechargeable battery or problem persists after installing a new battery, contact customer service. |
| See parts 1a and 1b above. Have installer re check wiring if Green LED is illuminated, but alarm does not appear to function. If no Green LED check consumer unit. Alarm will still function on battery power, if battery is in serviceable state. <Red LED will blink about once a minute to confirm>. Check via Test Button. |
| Consult a qualified electrician or your Landlord to remedy as soon as possible. |
Consult our website for additional information and help www.smoke-alarms.co.uk
Service
If after reviewing this Installer's Guide or User Guide you feel that your smoke alarm is defective in any way, do not tamper with the unit. Refer to Repair/Servicing Section. Contact your Installer, Wholesale Distributor or Landlord.

Documents / Resources
References
Home Fire Safety Products (smoke & carbon monoxide alarms, fire extinguishers, etc.) from Kidde - Kidde
Home Fire Safety Products (smoke & carbon monoxide alarms, fire extinguishers, etc.) from Kidde - Kidde
Download manual
Here you can download full pdf version of manual, it may contain additional safety instructions, warranty information, FCC rules, etc.
Download Kidde SLICK 1SFW, 1SFWR, 2SFW, 2SFWR, 3SFW and 3SFWR - Smoke and Heat Alarm Manual
Advertisement
Thank you! Your question has been received!


Need Assistance?
Do you have a question about the SLICK 1SFW that isn't answered in the manual? Leave your question here.