Table of Contents
Advertisement
Quick Links
Advertisement
Table of Contents

Related Manuals for Doro 1881


Summary of Contents for Doro 1881
- Page 1 Doro 1881 English...
-
Page 2: Table Of Contents
English Contents Overview ......................1 Congratulations on your purchase ..............2 Getting started ....................3 Unbox your new phone ................. 3 Insert SIM card, memory card and battery ........... 3 Charge the phone................... 5 Save energy .................... 6 Turn the phone on and off..............6 Get to know your phone................ - Page 3 English Message settings.................. 21 Camera ......................26 Alarm ......................27 Torch......................28 Organiser ..................... 28 Calendar ....................28 My files ....................29 Media ......................30 Gallery ....................30 FM radio ....................30 Sound recorder ..................31 Settings......................32 General ....................32 Display ....................
- Page 4 English Specifications ....................53 Copyright and other notices ..............54 Hearing aid compatibility..............55 Specific Absorption Rate (SAR) ............55 Recycle....................55 Correct disposal of this product ............56 Correct disposal of batteries in this product ........56 EU Declaration of Conformity.............. 56 Ecodesign declaration, energy efficiency for external power supply .
-
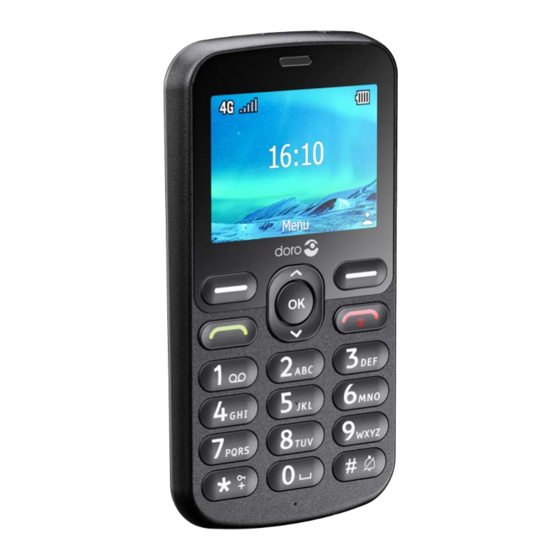
Page 5: Overview
You can obtain addi- tional accessories from your local Doro deal- er. The supplied accessories provide the best performance with your phone. -
Page 6: Congratulations On Your Purchase
11. Right selection button Congratulations on your purchase Doro 1881 is an easy 4G mobile phone with wide display. The keypad's widely spaced, convex keys make dialling and texting easier, and a built-in assistance button provides extra peace of mind. There's an FM-radio for lis- tening to news and entertainment, and a built-in torch for lighting the way. -
Page 7: Getting Started
Appearances and specifications are subject to change without prior • notice. • You can purchase additional accessories from your local Doro retailer. • Make sure accessories are compatible with the device before purchase. •... - Page 8 English Remove the battery cover IMPORTANT! Turn off the phone and disconnect the charger before removing the battery cover. Be careful not to damage your fingernails when you remove the battery cover. Do not bend or twist the battery cover excessively as it may get damaged.
-
Page 9: Charge The Phone
English Insert the battery Insert the battery by sliding it into the battery compartment. Replace the battery cover. Charge the phone While it is possible that your phone will already come with enough power to be turned on right out of the box, we recommend charging the device fully before using it. -
Page 10: Save Energy
English Note! To protect the environment we might not provide chargers and USB- cables with all our products. Your device supports charging with a USB-C cable and a USB charger that is compliant with applicable country regulations and international and regional safety standards, such as UKCA or CE. -
Page 11: Get To Know Your Phone
English Get to know your phone Assistive functions Use the symbols below to guide you through supporting sections in the manual. Seeing Handling Hearing Safety Start-up Wizard When starting the device for the first time, a Start-up Wizard will be initi- ated to set some basic settings. - Page 12 English • Enter the call log. End call/Power on and off End calls or return to the start screen. • Long press to power on or off. • Options Press to see more options available in selected menu. In different menus and features it will display available options for that feature.
-
Page 13: Keypad Lock
English Silent mode You can also set your device to silent mode: press and hold # until pears. To re-enable ring and message tones, press and hold # until dis- appears. See also Alert type, p.45 to switch off notification sounds. Headset Note! Youmust use a headset with a 3.5 mm stereo plug. -
Page 14: Enter Text
English Enter text Enter text manually Select character Press a numerical key repeatedly until the desired character is shown. • Wait a few seconds before entering the next character. Press Clear to erase characters. Special characters Press * for a list of special characters. Select the desired character using the Navigation keys and press to enter it. -
Page 15: Hearing Aid Compatible
English Note! See Writing language, p.33 for more information. New word means that you can manually enter a word if its not found in the dictionary. The entered word will however not be saved in the dictionary for future use. Input mode Press # to change input mode. -
Page 16: Connect The Phone To A Computer
English hearing aid—for example, placing the receiver slightly above the ear may result in better performance for hearing aids with microphones positioned behind the ear. T: To use your hearing aid in this mode, make sure that your hearing • aid is set to "T-mode"... -
Page 17: Call From The Phonebook
English Press to make a call. Press to end the call. Tip: For international calls, always use + before the country code for best operation. Press * twice for the international prefix +. Call from the phonebook Press to open the phonebook. Scroll through the phonebook, or quick search by pressing the key cor- responding to the first letter of the entry, see Enter text , p.10. -
Page 18: Sos Calls
English Options During a call the options button ( ) give access to additional functions. Add call to call another number. When the second party is connected • you can again press and then press: • Merge calls/Split call conference to merge the two calls into a conference call and then split them again if needed. -
Page 19: Contacts
English Incoming call Outgoing call Missed call Select wanted entry and press to dial. Alternatively, select an entry and press Details to show details for the selected call. • • Call to call the selected number/contact. • Send message to send a text message. •... - Page 20 English • Add to Top 10 to set the entry as one of the first listed contacts in the phonebook. • Delete to delete the selected contact. Press Yes to confirm. • Delete multiple to delete multiple contacts. Select or search and select the contacts you want to delete.
-
Page 21: Ice (In Case Of Emergency)
English ICE (In Case of Emergency) First responders can access additional information such as medical infor- mation from your phone ICE in case of emergency. In the event of a trauma, it is critical to have this information as early as possible to increase the chances of survival. -
Page 22: Assistance Button
English When done with My details, press Save. Assistance button If you need help, the assistance button allows easy access to contact your predefined Helpers. Make sure that the assistance function is activated and configured before use, enter recipients (Helpers) in the numbers list and edit the text message. - Page 23 English Helpers Add numbers to the list that is called when the assistance button is pressed. IMPORTANT! Always inform recipients in the numbers list that they are listed as your assistance contacts. Press Menu Assistance Helpers. Press Add Manual to add names/numbers manually. Alternatively, press Contacts to add a contact from the phonebook.
-
Page 24: Messages
English Dialling duration Select for how long the phone will dial one Helper number before moving on to the next number in the list. Set the dial duration to be shorter than the activation time for an answering service. Press Menu Assistance Dialling duration. -
Page 25: Read And Handle Messages
English • Add contact to add a contact as a vcf-file from your phonebook. Add audio file to add a recorded audio from your library. • Preview to preview the message before sending. • Add to add more items to the message. •... - Page 26 English Press Menu Messages Settings Message center. Press and enter the service center number. Note! The service center number is normally preset on your SIM card and it might not be possible to change. Press to confirm. SMS validity period If the recipient mobile phone is offline, an SMS message is stored tempora- rily in the SMS center.
- Page 27 English Input method With Input method you can select to write your text messages with special, distinguishing language specific characters (Unicode) or to write with more simple characters. Auto allows special characters. Special characters takes up more space and the size of each message might be reduced to 70 char- acters.
- Page 28 English • Auth type to specify the type of authentication to be used if your service provider has an APN with user name and password. IP type to specify the protocol which the device must use to • access the Internet, through cellular data. •...
- Page 29 English • Languages to select for what languages broadcast messages should be displayed. • Channel settings for channel settings: Check related channel to receive messages on that channel. Press for channel handling: • Add channel to add a new channel to receive broadcast messages on.
-
Page 30: Camera
English Enable/disable message type with button. Set Voice mail If your subscription includes an answering service, callers can leave a voice- mail message when you are unable to answer a call. Voice mail is a net- work service and you may need to subscribe to it first. For more information and for the voicemail number, contact your service provider. -
Page 31: Alarm
English Flash Auto to automatically use the flash/lamp depending on the sur- • rounding light. Off to force the flash/lamp to off regardless of the surrounding • light. • On to force the flash/lamp to on regardless of the surrounding light. -
Page 32: Torch
English • Once for a single occurrence of the alarm. Daily for daily repetition of the alarm. • Working days check to repeat the alarm for the selected • day(s) of the week. • Set a name for the alarm. •... -
Page 33: My Files
English • Set the reminder ringtone. Set the options for Repeat mode if the event should be repeated. • Once for a single occurrence of the event. • Daily for daily repetition of the event. • Weekly check to repeat the event for the selected day(s) of •... -
Page 34: Media
English Photos Image file types like: JPG, GIF, PNG, BMP Video file types like: 3GP, MP4, AVI, FLV Video vCard, with file format VCF (Virtual Contact File), is the standard for vCard electronic business cards. vCards can be sent via Multimedia Mes- saging Service (MMS) or Bluetooth. -
Page 35: Sound Recorder
English Tip: Press to return to standby mode. The radio will continue to play. Disconnecting the headset will turn off the radio. Options Press Menu Media FM radio. The phone will automatically search for available radio stations. Switch between stations with Press for options: Auto save channels to search for available radio stations. -
Page 36: Settings
English • Set as ringtone to use the recording as ringtone for incom- ing calls or as alarmtone. • Send to send the recording via MMS or Bluetooth. • Delete to delete the current recording. • Details to view detailed information about the file, e.g. date, size, type. - Page 37 English Select 12 hours or 24 hours and press Date format Press Menu Settings General Time & date Date format. Select the wanted format and press Set automatic time and date update Press Menu Settings General Time & date Automatic date &...
-
Page 38: Display
English See the current battery status. Restore settings Press Menu Settings General Restore settings. All the changes that you have made to the phone settings will be reset to default settings. Enter the phone code and press to reset. Tip: The default phone code is 1234. Restore factory settings Press Menu Settings... -
Page 39: Security
English Press Menu Settings Display Backlight. Select the how long time the display is lit. Press to confirm. Note! Longer time with backlight activated will consume more battery power. Main menu You can select different styles for the main menu. Press Menu Settings Display... - Page 40 English IMPORTANT! If you deactivate the PIN code and the SIM card is lost or stolen, it is unprotected and must be blocked by your service provider. Press Modify PIN to change you SIM PIN code. Enter the current PIN and press Enter new PIN and press .
- Page 41 English Incoming calls can be answered by pressing even if the keypad is locked. During the call, the keypad is unlocked. When the call is ended or rejected, the keypad is locked again. • Press and hold * to lock/unlock the keypad. See also Unlock mode, p.37.
- Page 42 English Note! You can save parts of phone numbers. For example, if you save 01234, allows calls to all numbers starting with 01234. It is possible to place an SOS call by entering the main local emergency number followed even when fixed dial is activated. When fixed dial is activated you are not allowed to view or manage any phone numbers saved on the SIM card.
-
Page 43: Calls
English Calls Call divert You can divert calls to an answering service or to another phone number. Select a call condition, press Activate and then select whether to divert call to voicemail or enter number to activate the call diversion. You can also se- lect Off to deactivate or Check status. -
Page 44: Connections
English Press Menu Settings Calls Call barring. Mark the type of calls that you want to restrict: All outgoing calls to block all outgoing calls, but be allowed to • answer incoming calls. All incoming calls to block all incoming calls, but be allowed to •... - Page 45 English Press On to activate it. Press Off to deactivate. Network account The network account has the Access Point Name (APN) which is the name of a gateway between a mobile network and another computer network, mostly the public Internet. The APN settings are used by services that com- municates using other computer networks.
- Page 46 English • Network type to set the network type. Select between WAP and HTTP. • Press Save when done. • Search to search all available network accounts (APN). • Delete to delete the selected network account (APN). • Edit to edit the selected network account (APN). Data service Use data service to access mobile data services.
- Page 47 English IMPORTANT! Using data services while roaming can be costly. Contact your service provider for data roaming rates before you use data roaming. Network selection Your phone automatically selects the network operator that you have a subscription with. When roaming or if you otherwise have no signal you can try to manually select a network.
-
Page 48: Sound
English Press Menu Settings Connections VoLTE. Check SIM to activate it. Note! Your network operator also needs to support this feature. Sound Audio setup If you use a hearing aid or have hearing difficulties when using the device in a noisy environment, you can adjust the audio settings. Press Menu Settings Sound... -
Page 49: Bluetooth
English • Power on: select On to enable the startup sound or Off to disable. • Power off: select Off to enable the shutdown sound or Off to disable. Vibration: select vibration duration Short or Long. • Volume Adjust the volume settings for various sounds on your device. Press Menu Settings Sound... - Page 50 English Note! You can have several Bluetooth devices paired, but only one connected at the time. So, if one connection is active, this might block a connection from another device. Bluetooth settings Visibility to other devices Note! To prevent other devices from finding your device, select Off. Even if you select Off, paired devices can still detect your device.
-
Page 51: Start-Up Wizard
English • Delete to delete the device from the list. Delete all to delete all devices from the list. • Device details to view detailed information about the device, e.g. • device number (MAC address), device type, and supported serv- ice (Bluetooth profiles). -
Page 52: Additional Functions
English depending on Internet connection. We recommend that you always update your device to the latest software version to get optimal performance and the latest enhancements. You need to have a working data connection to be able to perform the update with the firmware over-the-air (FOTA) serv- ice. -
Page 53: Display Main Symbols
English Flight mode activated Headset connected Data transmission Display main symbols Charger connected Charger removed Query Error Warning Done (confirmed) Processing, please wait Battery level low Assistance button call Safety instructions CAUTION The unit and the accessories can contain small parts. Keep all of the equipment out of the reach of small children. -
Page 54: Areas With Explosion Risk
English instructing you to turn off the unit while you are there, you should comply. Hospitals and other health care facilities sometimes use equipment that can be sensitive to external ra- dio signals. Implanted medical devices To avoid potential interference, manufacturers of implanted medical devices recommend a minimum separation of 15 cm between a wireless device and the medical device. -
Page 55: Protect Your Hearing
English Protect your hearing This device has been tested to comply with the Sound Pressure Level requirement laid down in the applicable EN 50332-1 and/or EN 50332-2 standards. WARNING Excessive exposure to loud sounds can cause hearing damage. Exposure to loud sounds while driving may distract your attention and cause an accident. -
Page 56: Care And Maintenance
English Check your accounts regularly for unapproved or suspicious use. If you find any sign • of misuse of your personal information, contact your service provider to delete or change your account information. • In the event your device is lost or stolen, change the passwords on your accounts to protect your personal information. -
Page 57: Warranty
This guarantee does not apply if batteries other than DORO original batteries are used. Device OS software warranty By using the device, you accept to install any OS software updates provided by Doro, at earliest possibility. By updating your device, you help to maintain your device secure. -
Page 58: Copyright And Other Notices
Doro reserves the right to revise this document or withdraw it at any time without prior notice. -
Page 59: Hearing Aid Compatibility
Recycle Doro takes responsibility for the entire life cycle of our products including how they are recycled at end of their life. Your previous product can still be useful for someone else and, if it has reached its end of life, materials that can be used for new products. We rec- ommend to first-hand reuse, repair or refurbish your device, and if this is not possible leave it for recycling according to local regulations. -
Page 60: Correct Disposal Of This Product
EU Declaration of Conformity Hereby, Doro declares that the radio equipment type DFB-0460 (Doro 1881) is in compli- ance with Directives: 2014/53/EU and 2011/65/EU including delegated Directive (EU) 2015/863 amending Annex II. -
Page 61: Uk Declaration Of Conformity
English UK Declaration of Conformity Hereby, Doro declares that the radio equipment type DFB-0460 (Doro 1881) is in compli- ance with the relevant UK legislation. The full text of the UK declaration of conformity is available at the following internet ad- dress: www.doro.com/dofc... - Page 62 DFB-0460 (Doro 1881) English Version 1.0 ©2023 Doro AB. All rights reserved. www.doro.com REV 21234 — STR 20211104...