Advertisement
Introduction
This guide is designed to make installing and using this product as easy as possible. Information in this document has been carefully checked for accuracy at the time of printing; however, Cambridge Audio's policy is one of continuous improvement, therefore design and specifications are subject to change without prior notice.
This document contains proprietary information protected by copyright. All rights are reserved. No part of this manual may be reproduced by any mechanical, electronic or other means, in any form, without prior written permission of the manufacturer. All trademarks and registered trademarks are the property of their respective owners.
What's included with the AXR100D?
Inside the box of your AXR100D you will receive:

- AXR100D Stereo Receiver
- Remote Control
- 2x AAA Batteries
- FM/DAB antenna
- UK power cord, EU power cord
- Quick Start Guide
- Safety Guide
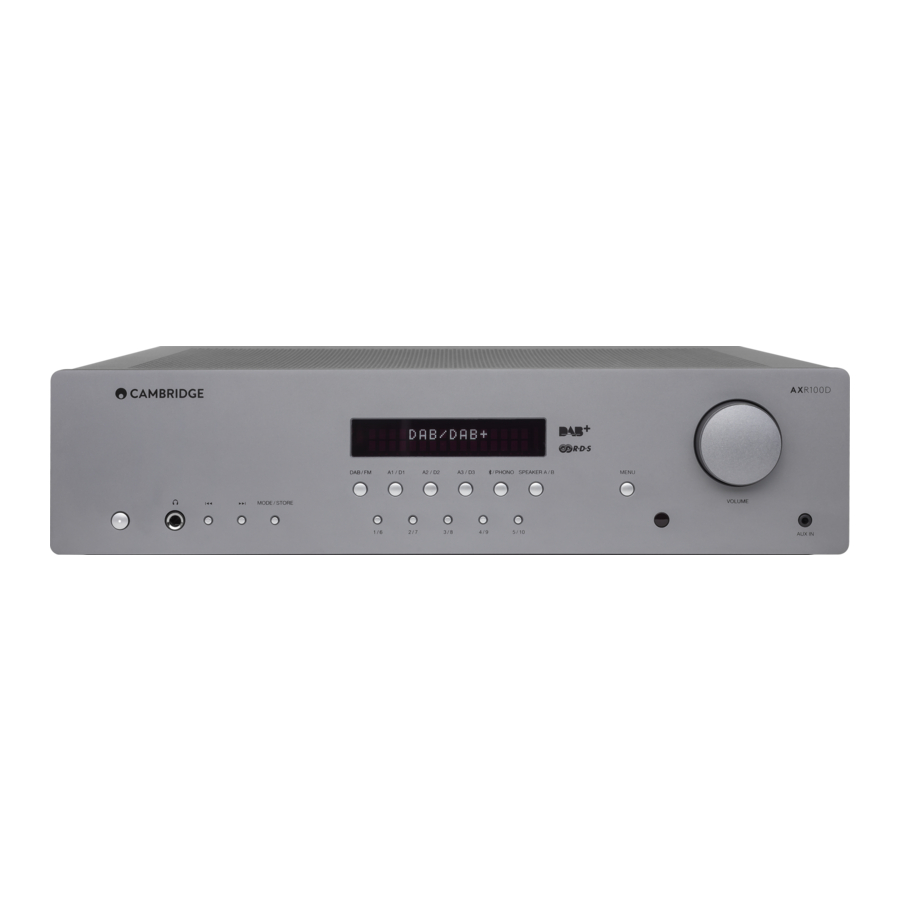
Front panel controls

- POWER BUTTON - Switches the unit between Standby mode (indicated by dim power LED) and On (indicated by bright power LED). Standby is a low power mode where the power consumption is less than 0.5 Watts. The unit can be left in Standby mode when not in use.
Auto Power Down (APD) – You can enable and disable the unit's APD setting. This can be done by using the rotary dial to choose the 'On' or 'Off' option and then pressing the rotary dial to select the desired option.
Select the 'Menu' button > go to 'APD Settings' > set to 'On'.
The product will then automatically switch to standby mode after inactivity of 20 minutes.
Note: Make sure the unit is On, before making changes to the APD function. - HEADPHONES SOCKET - Allows for the connection of stereo headphones with a quarter inch jack plug. Headphones with an impedance of between 32 and 600 ohms are recommended.
Note: Plugging in headphones will automatically mute the loudspeaker outputs. - SKIP/SCAN BUTTONS - The skip scan buttons are used when the DAB/FM tuner is selected. These buttons have different uses depending on the mode selected.
In Preset mode - Steps up or down through the user-stored presets.
In Auto mode - Searches for the previous or next available station. The unit stops at the next strong signal it finds.
In Manual mode - Allows manual stepping up or down of the frequency.
Note: When Preset mode is activated, the unit will automatically tune to the first available preset. - MODE/STORE BUTTON - Used for DAB/FM mode.
In FM: Press to cycle the tuning mode between Preset, Auto and Manual modes.
In DAB: Press to cycle between Auto scan, Preset and Service list modes.
Follow the 'Storing Radio Presets' guide in the 'Operating Instructions' section for full details on storing presets. - INPUT SOURCE BUTTONS (DIGITAL INPUTS D1, D2, D3) - Press the relevant source button to select the desired input source.
Note: There will be no sound from the receiver if the correct input source button isn't selected. - PRESET BUTTONS - Used for DAB/FM modes. The preset buttons are used to select user-stored station presets.
- Pressing a preset button once will select one of the first 5 preset.
- Pressing and holding will select the later 5 presets.
- These presets are stored separately for each waveband i.e. there are 10 for FM and 10 for DAB. Press the DAB/FM button to switch between bands and sets of 10 presets.
Note: As well as these 10 per band available directly from the front panel buttons, a further thirty presets (11-40) per band can also be accessed by using the 'Skip/Scan' buttons to cycle through all 40 presets.
- DISPLAY - Used to display information such as the selected input source, volume and tone/balance levels. When the FM or DAB tuner input is selected, the radio frequency or RDS station name will be displayed.
Note: When first purchased, the display will have a protective film over the top. Peel this off for a clear display. - SPEAKER A/B BUTTON - The Speaker A/B button toggles between the two sets of loudspeaker terminals. The options are speaker A only, speaker B only, speaker A and B together, and both sets of speakers off.
Note: 'Speaker off' is different to the mute function, as the Rec Out and Headphones outputs are still enabled. - MENU BUTTON - Pressing this once will display the menu item. Pressing a second time will return to the previous menu. The menu options are:
- System Info
- Tone Setting
- APD Setting
- Factory Reset
- Upgrade
The Treble, Bass and Balance options can be found in Tone setting. When one of these options is selected, the volume control will adjust the level.
If nothing is pressed for a while, the source will be displayed and the volume control will go back to controlling the volume level.
- INFRARED SENSOR - Receives IR commands from the supplied remote control. An unobstructed line of sight between the remote control and the sensor is required.
- VOLUME CONTROL - Use to increase or decrease the level of the sound from the outputs of the unit.
This controls the volume level of the loudspeakers, Sub-out and headphones.
Note: It does not affect the level of the 'Rec Out' output, as this has a fixed level.
The volume control will also change the level of Bass, Treble and Balance in the menu options. - AUX INPUT SOCKET - This source input allows you to connect a portable audio device, such as a smart phone directly into the front of the unit using a 3.5mm stereo-jack. Once plugged in, this input is automatically selected.
Rear panel connections

- DIGITAL INPUTS - TOSLINK and S/P DIF co-axial digital inputs.
Note: To obtain the best results from your system we recommend using only high quality Cambridge Audio interconnects. This will ensure that you hear your system as we designed it. Please ask you dealer for details. - AUDIO INPUTS - These inputs are suitable for any 'line level' source equipment such as the audio outputs of CD players, BD/DVD players, etc.
- PHONO INPUT - This input has a built-in phono stage.
Record players fitted with Phono Cartridges of the Moving Magnet (MM) or high output Moving Coil (MC) type (between 2-6mV output and 30-50k Ohm load impedance) can be used.
Low output Moving Coil types (<1mV and usually 10-1000 Ohm load impedance) cannot be directly connected and will require a matching transformer or Phono pre-amp.
Note: The 'ground' terminals on both the record player and the AXR100D should be connected (where possible) with a ground wire for lowest noise/hum pickup.
Due to stray magnetic fields, turntables should not be located in close proximity due to possible interference. - REC OUT - Connect to the recording input of a tape deck, CD recorder input, etc.
This output provides a constant high level output that does not fluctuate with the volume of the main unit. For this reason, the AXR100D cannot be used as a Preamplifier only and the Rec Out can't be connected to a Subwoofer. - SUB-OUT - Connection to the input socket of an active subwoofer.
Note: There is a 2nd order low pass filter of 200Hz applied to the Sub Out, which will filter out frequencies above 200Hz.
The frequency of the connected speakers is not adjusted when the Sub Out is in use, they will still be sent the full frequency range. - DAB/FM ANTENNA - Tuner aerial connections for picking up radio signals. Refer to the 'Connections' section of this manual.
For permanent use, outdoor DAB/FM aerials are highly recommended. - SERVICE PORT - For servicing use only. Do not connect anything here as it may result in damage to the unit.
- BLUETOOTH ANTENNA - Used for wireless streaming Bluetooth (A2DP/AVRCP) audio capability directly from most phones, tablets and laptops.
Refer to the operating instructions section of this manual - LOUDSPEAKER TERMINALS
Note: When using a banana plug, make sure the speaker terminals are completely tightened before inserting the plug.

Two sets of loudspeaker terminals are available:
- (main loudspeaker terminals, top row) and
- (secondary switchable loudspeaker terminals, bottom row).
Connect the wires from your left channel loudspeaker to the Left positive and negative terminals, and the wires from the right channel loudspeaker to the Right positive and negative terminals.
In each case, the red terminal is the positive output and the black terminal is the negative output.
Care should be taken to ensure no stray strands of wire are shorting speaker outputs together. Please ensure that the loudspeaker terminals have been tightened adequately to provide a good electrical connection. It is possible for the sound quality to be affected if the screw terminals are loose.
The use of A and B speakers affords you an easy and inexpensive way to create a simple multi-room system.
Note: The speaker terminals will need to have the round dust caps removed before you can insert a banana plug into them.
Note: When using two pairs of speakers, use speakers with a nominal impedance of 8 ohms.
- HEAT TUNNEL VENT GRILLE - Allows cooling of internal circuitry via the heat tunnel. DO NOT OBSTRUCT.
- VOLTAGE SELECT SWITCH - For servicing use only.
- AC POWER SOCKET - Once all connections are complete, plug the AC power cable into an appropriate mains socket and turn the unit on. Please only use the power lead supplied with the unit.
Remote control
The AXR100D is supplied with a remote control that operates this unit and its built-in tuner. In addition, the buttons with Blue coloured icons can operate a matching AX CD player. The supplied AAA batteries must be fitted before the remote control can be used

- POWER BUTTON - Switches the unit between Standby mode and On.
- MUTE - Mutes audio on the unit. Press again to cancel mute.
- CD (BLUE COLOURED ICONS) - To operate the AXC players only. For more information refer to the AX CD user's manual.
- SPEAKER A/B - Toggles between the selected loudspeaker terminals: speaker A only, speaker B only, speaker A and B together, or all speakers off.
- STEREO/MONO - Used only when FM is selected. Toggles between FM stereo output and FM mono output.
For low quality stereo FM signals, selecting mono can usually reduce the noise.
Note: Some FM stations are mono only, and selecting Stereo will have no effect on these. - MODE - Used for DAB/FM mode. Press to cycle the tuning mode between Preset, Auto, and Manual modes.
- VOLUME - Increases or decreases the volume of the unit. Also used to change the bass, treble and balance settings when these are selected.
- SKIP/SCAN - Used when the DAB/FM tuner is selected.
In Preset mode – Steps up or down through the user-stored presets.
In Auto mode – Search for the previous or next available station with a strong signal.
In Manual mode – Adjusts the frequency in steps, for fine tuning. - MENU - This menu displays some system info, Tone setting, APD setting, Factory reset and Upgrade items.
Pressing a second time will return to the previous menu.
Use the volume buttons to change the level of the selected option. - PRESET BUTTONS (1/5, 2/6, 3/7, 4/8) - Used when FM or DAB is selected. These select user-stored station presets.
Pressing a preset button once will select one of the first 4 presets.
Pressing and holding will select the later 4 presets.
8 presets are available directly from the remote, further presets can be selected in Preset mode by using the Skip/Scan buttons. - SOURCE BUTTONS (D1, D2, D3, A1, A2, A3/Aux, Phono, DAB/FM) - Press the relevant button to select the desired music source.
Getting connected
USING BARE WIRE CONNECTIONS
Prepare the speaker cords for connection by stripping off approximately 10mm (3/8") or less of the outer insulation. More than 10mm could cause a short circuit. Twist the wires tightly together so there are no loose ends. Unscrew the speaker terminal, insert the speaker cable, tighten the terminal and secure the cable.
Note: All connections are made using standard loudspeaker cable.

USING BANANA PLUGS
We recommend using Banana plugs with our units to establish a secure connection and ensure there are no loose strands of wire that may cause unwanted noise or interference.
Once you have stripped the outer insulation of the cable and twisted the wires as indicated below, securely connect these to your banana plugs, remove the dust cap from the end of the speaker terminal and push the plug in as far as possible without applying excessive force.

Notes:
- When using a banana plug, make sure the speaker terminals are completely tightened before inserting the plug.
- The speaker terminals will need to have the round dust caps removed before you can insert a banana plug into them.
BASIC CONNECTIONS
Any 'line level' source equipment can be connected to the audio inputs on the AXR (A1 to A3).
The diagram below shows the basic connection of the AXR100D to a CD player using the A1 analogue input and a pair of loudspeakers.

The diagram below shows the basic connection of the AXR100D to a turntable via the Phono input.
This unit has a built-in Phono preamplifier (Phono Stage), so if your turntable does not possess its own Phono Stage, you may connect the record player to the input on the rear of the unit marked 'Phono'.
If your turntable does have a built-in Phono stage or you are using an external version, you should connect to any of the other analogue inputs, as the 'Phono' input may produce an unwanted distortion.
Note: Do not connect a non-phono source to the phono input.

The Sub Out is for connecting to the LFE/Sub input of an active subwoofer.
The diagram below shows how to connect the AXR100D to an active subwoofer via the LFE/Sub input on the subwoofer.

SPEAKER B CONNECTIONS
The Speaker B connections on the back of the amplifier allow for a second set of speakers to be used (i.e. speakers located in another room).
The Speaker A/B button on the front panel and remote control allows the two sets of speakers to be toggled on and off. Refer to the Front Panel or Remote Control section of this manual for more information on the Speaker A/B operation.
Either A or B, or both A and B may be selected for use.
Note: When using two pairs of speakers, use speakers with a nominal impedance of 8 ohms each.

BI-WIRE CONNECTIONS
If your loudspeakers are equipped with two sets of terminals, then it is possible to connect them in the bi-wire configuration.
Bi-wiring sends the bass and treble frequencies down separate speaker cables, resulting in a clearer, more focused sound.
Note:

- Speaker A and B must both be selected on the front panel of the unit for this type of connection to work.
- Remove the bi-wire link on the speaker terminals before connecting. Refer to your speaker's manual for more information.
Aerials

Note: The AXR100D is supplied with a temporary aerial for initial use. For permanent use, outdoor aerials are highly recommended.
DAB/FM AERIAL
- Extend and move the aerial until you get the best reception.
- AXR100D has an F-type screw connection and the attached aerial can be removed and replaced with an optional outdoor DAB & FM aerial if required.
To remove the aerial:

- Feed the supplied aerial key through the aerial.
- Turn the key counter-clockwise.
Operating instructions
After making any connections to your unit, activate the AXR100D by pressing the Power On button on the front of the unit.
SELECTING THE SOURCE
Press the Source button on the front of the unit corresponding to your desired source. Alternatively, you may use the appropriate button on the remote control.
Note: There will be no sound from the receiver if the correct input source button isn't selected.
BLUETOOTH
To connect a Bluetooth device to AXR:
- Press the Bluetooth/Phono button on the front panel or the Bluetooth button on the remote.
"PAIRING" will show on the display.
![]()
- Consult the instructions of the Bluetooth device to connect to AXR100D. When successfully connected the display will show your device name.
Note: To add another Bluetooth device, Press and hold the Bluetooth/Phono button to disconnect the current connection and repeat step 2.
The AXR100D will store up to 8 paired Bluetooth devices.

Bluetooth troubleshooting guide
If you are having problems connecting your Bluetooth device to the AXR100D, please try the following troubleshooting steps:
- Ensure that the Bluetooth source has been selected and the AXR100D is in 'Pairing' mode.
- Ensure that your Bluetooth device is in pairing mode and not already connected to another Bluetooth unit.
- Forget the AXR from your devices' list of discoverable Bluetooth items and start the pairing process again.
- Perform a factory reset on the AXR (see 'Factory Reset' section below).
ADJUSTING THE VOLUME
Use either the Volume Up/Down buttons on the remote control, or the Volume control on the front of your unit system to change the volume level.
The newly selected level will be indicated briefly on the front display.
The volume is displayed in minus dB where 0dB is the highest level.
A progressively larger negative number indicates the volume is being reduced.

ADJUSTING THE TONE SETTINGS
Adjustments to the bass, treble and balance can be made as follows:
- To enter the Tone setting menu, press either the Menu button on the front of the unit or on the remote control.

- Step through the available settings by pressing the Menu button. The settings available are in order Bass, Treble and Balance.
- When you wish to make an adjustment for bass, treble or balance, simply rotate the Volume control or use the Volume control buttons on the remote control.

- To exit, wait for five seconds, until the unit returns to normal mode.


TUNING AND LISTENING TO THE BUILT IN TUNER
Select the Tuner source using the DAB/FM button on the front of the unit, or directly by pressing the DAB/FM button on the remote.

DAB MODE
When selecting DAB mode for the very first time, the unit will initiate an 'Auto Scan', Repeatedly pressing the DAB/FM button on the front of the unit switches between DAB and FM modes. This can also be done using the DAB/FM button on the remote.
Pressing the Mode/Store button will cycle through:
- DAB/DAB+
- Auto Scan
- Preset
- Service List
AUTO SCAN
Press the Mode/Store button to switch to "Auto Scan". Use the reverse 'Skip/Scan' or forward 'Skip/Scan' buttons to perform a full station scan.
A scanning percentage appears on the display while scanning for stations. When scanning is completed, AXR100D will automatically play and display the station information if a signal is found.

PRESET
STORING RADIO PRESETS
Radio stations can be stored into the memory presets for easy access. You can store up to 40 presets for each band (i.e. 40 presets for the DAB band plus 40 presets for the FM band).
To assign a radio station to a preset, follow the below steps, whilst listening to the frequency or station you wish to store:

- Press and hold the 'Mode / Store' button.
- Use the 'Skip / Scan' button or 'Preset Buttons' to select the preset location for the station to be stored to.
- Press the 'Mode / Store' button again to confirm your selection.
- The radio station will now be assigned to your chosen preset.
Note: You can store up to 40 presets for each band (i.e. 40 presets for the DAB band plus 40 presets for the FM band).
You can only access stored presets 1-8 on the remote preset buttons. You can access stored presets 1-10 on the front panel preset buttons.
To access all presets, set the mode to 'Preset' mode with the 'Mode' button on the remote control or 'Mode/ Store' button on the front panel, and use the reverse or forward 'Skip/Scan' buttons.
This will allow access to the full 40 DAB stored presets or 40 FM stored presets.
Note: In 'Store' mode, if no button is pressed for a while, the unit will come out of 'Store' mode and the preset will not be saved.
SERVICE LIST
Once a scan has been performed, use Mode/Store button to switch to "Service list" and use the reverse 'Skip/Scan' or forward 'Skip/Scan' buttons to browse through the available stations.
FM MODE
Note: For ease of tuning on first time use, we recommend that you set the AXR100D to 'Auto' mode. Press the Mode/Store button on the front of the unit. This button cycles through Preset, Auto and Manual modes.

When Auto mode has been selected, press the reverse 'Skip/Scan' button to scroll down through the station frequencies or press the forward 'Skip/Scan' button to scroll up through the station frequencies.
The tuner will stop at the first strong signal it finds. To move to another station press the reverse or forward 'Skip/Scan' button again.
Menu options
Pressing the 'Menu' button on the remote control or the front panel of the unit will access the following menu options:
- System Info
- Tone Setting
- APD Setting
- Factory Reset
- Upgrade
SYSTEM INFO
This menu item displays some version numbers for your AXR100D.
- Device Name.
- MCU version
- BT version
TONE SETTING
The Treble, Bass and Balance options can be found in Tone setting.
When one of these options is selected the volume control will adjust the level. If nothing is pressed for a while, the source will be displayed and the volume control will go back to controlling the volume level.
APD SETTING
Turn the rotary dial to choose the 'On' or 'Off' option. Press the rotary dial to select the desired option.
With APD set to 'On', the product will automatically switch to standby mode after inactivity of 20 minutes.
FACTORY RESET
Press the rotary dial to select a factory reset.
Performing a factory reset will restore the AXR to its factory settings and clear all stored presets.
UPGRADE
This menu item contains a setup configuration as shown below.
- MCU Upgrade.
- BT Upgrade.
Any new firmware updates for the AXR100D can be found on our support site here. To upgrade the firmware of the AXR100D, please follow the steps below:
- Download and copy the firmware.bin file from the support site page above to a USB drive (copy to the root of the drive, not inside a folder, anddo not rename the file).
- Insert the USB drive into the service port on the rear of the unit.
- Insert power cable and switch on the unit.
- Enter the menu by pressing the menu button.
- Using the volume control, navigate to 'Upgrade', pressing the volume control to enter, then 'MCU upgrade' or 'BT Upgrade' (depending on thetype of upgrade), then 'Yes'.
- The unit will then automatically detect the file on the USB drive and update automatically. The unit will then switch off. (If 'No File' message isdisplayed then restart at Step 1)
- Switch the unit on.
Note: It is recommended to perform a factory reset after the completing the upgrade. Please note that a reset will restore the AXR to its factory settings and clear all stored presets.

It is very important that once the Firmware upgrade has started you do not switch off the power to the AXR100D until the operation is complete, otherwise the AXR100D may become permanently damaged.
Do not connect/disconnect the USB dongle when the unit is still upgrading.
Troubleshooting
THERE IS NO POWER
- Ensure the AC power cord is connected securely.
- Ensure the plug is fully inserted into the wall socket and is switched on.
- Check fuse in the mains plug or adaptor.
- Check the power is on at the front of the unit.
THERE IS NO SOUND
- Check the correct input source is selected on the front panel.
- Check that the speakers are connected correctly.
- If using the tuner, check aerial connections and an available station is selected.
- Check the unit is not in mute mode.
- Check the Speaker A/B configuration matches your speakers.
THE SOUND IS DISTORTED
- Check aerial connections and placements.
- Check speaker connections.
- Check that an appropriate source is connected to the selected input. (I.e. no line level source connected to the phono input.)
THERE IS A HUM COMING FROM THE SPEAKER
- Ensure that all cable connections are secure, particularly ground/shield connections for turntables.
THERE IS UNWANTED BACKGROUND NOISE AND INTERFERENCE
- Move the unit away from other electrical equipment that is likely to cause interference.
- Re-orientate the aerial.
- Ensure that all cable connections are secure, particularly ground/shield connections for turntables.
THE REMOTE HANDSET WILL NOT FUNCTION
- Check that the batteries have not expired.
- Ensure that nothing is blocking the remote sensor.
- Ensure you are not using the buttons with blue coloured icons that are only to operate a matching AX CD player. (See the 'Remote Control' section.)
OVER TEMPERATURE PROTECTION
- The unit has an over temperature and shutdown protection. If the unit is continuously used for a long period and overheats, the unit will shut down. Leave the unit 'OFF' for 10 minutes to cool down, then turn the unit on to continue listening.
- If the problem persists, then the unit is being over driven. Reduce the volume level, and ensure the unit is in an open ventilated area to resolve the problem.
- Use of two pairs of speakers which are less than 8 Ohms can cause overloading and is not recommended.
UNABLE TO STORE RADIO PRESETS
- Follow the 'Storing Radio Presets' guide in the 'Operating Instructions' section.
THERE IS NO AUDIO/SIGNAL WHEN PLAYING RADIO
- Ensure that an appropriate DAB/FM antenna is securely connected.
- Select the Tuner source using the DAB/FM button on the front of the unit.
ONLY ABLE TO SCAN AND STORE A LIMITED AMOUNT OF DAB STATIONS
We have developed a fix for an issue where some users are only able to scan and store 60 DAB stations.
If your AXR100D is experiencing this issue, follow the steps outlined on our support site here.
Note: Only carry out these steps if your AXR100D is experiencing this issue.
Technical specifications
Power output:
100 watts (into 8Ω)
THD (unweighted):
- <0.01% @ 1kHz, 80% of rated power
- <0.15% 20Hz - 20kHz, 80% of rated power
Frequency response (+/-1dB): 5Hz - 50kHz
S/N ratio (ref 1W):
>82dB (unweighted)
Input impedances:
47k ohms
Power Amp damping factor:
>50
Standby power consumption:
<0.5W
Max. power consumption:
550W
Bass/Treble controls:
Shelving, ultimate boost/cut +/- 10dB @ 100Hz and 20kHz
Subwoofer output:
200Hz 2nd order L+R, Level follows volume setting
Digital inputs:
- PCM 16-24-bit
- S/P DIF Co-axial 32-192kHz
- TOSLINK Optical 32-192kHz
Dimensions:
110 x 430 x 340mm (4.3 x 16.9 x 13.4")
Weight:
8.1kg (17.8lbs)
Bluetooth:
5.0 A2DP/AVRCP supporting SBC
TUNERS
Bands:
European
DAB/DAB+:
- (174.928 -239.20MHz )Band III
FM:
- (87.5-108MHz)
Aerial inputs:
75 ohms
Signal to noise:
60dB typical (FM), 90dB typical (DAB)
Distortion (TUNER):
- <0.4% @ 1kHz 50kHz deviation (FM mono)
- <0.05% @ 1kHz (DAB)
Frequently Asked Questions (FAQ)
What amplifier class is the AXR100D?
The AXR100D uses class AB amplification.
Can I use 4 or 6 Ohm speakers with the AXR100D?
You can use a pair of 4 or 6-ohm speakers, but we do not recommend using two pairs of 4 or 6-ohm speakers with the AXR as this could result in the amplifier overheating, which in the long run could damage the unit.
© Copyright Cambridge Audio Ltd 2022
For upcoming news on future products, software updates and exclusive offers, make sure you register your product at https://www.cambridgeaudio.com/register
Documents / Resources
References
![casupport.cambridgeaudio.com]() Firmware Information
Firmware Information![casupport.cambridgeaudio.com]() AXR100D - DAB radio station scan limited
AXR100D - DAB radio station scan limited![www.cambridgeaudio.com]() Register your product | Cambridge Audio UK
Register your product | Cambridge Audio UK
Download manual
Here you can download full pdf version of manual, it may contain additional safety instructions, warranty information, FCC rules, etc.
Download Cambridge Audio AXR100D - 100-Watt Stereo Receiver with Bluetooth Manual
Advertisement
Thank you! Your question has been received!


Need Assistance?
Do you have a question about the AXR100D that isn't answered in the manual? Leave your question here.