Omron BP4350 - Wrist Blood Pressure Monitor Manual
- Instruction manual (45 pages)
Advertisement
- 1 Introduction
- 2 Safety Instructions
- 3 Important Safety Information
- 4 Know Your Monitor
- 5 Preparation
- 6 Using Your Monitor without a Smart Device
- 7 Using Your Monitor with a Smart Device
- 8 Using Memory Function
- 9 Other Settings
- 10 Error Messages and Troubleshooting
- 11 Maintenance
- 12 Specifications
- 13 Documents / Resources
Introduction
Thank you for purchasing the OMRON BP4350 Wrist Blood Pressure Monitor. This blood pressure monitor is to be worn on your wrist.
This new blood pressure monitor uses the oscillometric method of blood pressure measurement. When the cuff inflates, this monitor senses the pressure pulsations of the artery underneath the cuff. The pulses are called oscillometric pulses. The electronic pressure sensor displays a digital reading of blood pressure.
Safety Instructions
This instruction manual provides you with important information about the OMRON BP4350 Wrist Blood Pressure Monitor. To ensure the safe and proper use of this monitor, READ and UNDERSTAND all of the safety and operating instructions. If you do not understand these instructions or have any questions, contact 1-800-634-4350 before attempting to use this monitor. For specific information about your own blood pressure, consult with your physician.
Intended Use
The device is a digital monitor intended for use in measuring blood pressure and pulse rate in adult patient population with wrist circumference ranging from 5.3 inches to 8.5 inches (13.5 cm to 21.5 cm). The device detects the appearance of irregular heartbeats during measurement and gives a warning signal with readings.
Environments of Use: Home
Patient Population: Adult
Receiving and Inspection
Remove this monitor from the packaging and inspect for damage. If this monitor is damaged, DO NOT USE and contact 1-800-634- 4350.
Symbols Glossary
For symbol information, visit: OmronHealthcare.com/symbols-glossary
Contraindications
- This monitor is contraindicated for use in ambulatory environments.
- This monitor is contraindicated for use on aircraft.
Important Safety Information
Please read the Important Safety Information in this instruction manual before using this monitor.
Please follow this instruction manual thoroughly for your safety. Please keep for future reference. For specific information about your own blood pressure, CONSULT WITH YOUR PHYSICIAN.

Indicates a potentially hazardous situation which, if not avoided, could result in death or serious injury.
- DO NOT use this monitor on infants, toddlers, children or persons who cannot express themselves.
- DO NOT adjust medication based on readings from this blood pressure monitor. Take medication as prescribed by your physician. ONLY a physician is qualified to diagnose and treat high blood pressure.
- DO NOT use this monitor on an injured wrist or a wrist under medical treatment.
- DO NOT apply the wrist cuff on your wrist while on an intravenous drip or blood transfusion.
- DO NOT use this monitor in areas containing high frequency (HF) surgical equipment, magnetic resonance imaging (MRI) equipment, computerized tomography (CT) scanners or in oxygen rich environments. This may result in incorrect operation of the monitor and/or cause an inaccurate reading.
- Consult with your physician before using this monitor if you have common arrhythmias such as atrial or ventricular premature beats or atrial fibrillation; arterial sclerosis; poor perfusion; diabetes; pregnancy; pre-eclampsia or renal disease. NOTE that any of these conditions in addition to patient motion, trembling, or shivering may affect the measurement reading.
- NEVER diagnose or treat yourself based on your readings. ALWAYS consult with your physician.
- This product contains small parts that may cause a choking hazard if swallowed by infants, toddlers or children.
Data Transmission
- This product emits radio frequencies (RF) in the 2.4 GHz band. DO NOT use this product in locations where RF is restricted, such as on an aircraft or in hospitals. Turn off the Bluetooth feature in this monitor and remove batteries when in RF restricted areas. For further information on potential restrictions refer to documentation on the Bluetooth usage by the FCC/IC.
Battery Handling and Usage
- Keep batteries out of the reach of infants, toddlers or children.

Indicates a potentially hazardous situation which, if not avoided, may result in minor or moderate injury to the user or patient, or cause damage to the equipment or other property.
- Stop using this monitor and consult with your physician if you experience skin irritation or discomfort.
- Consult with your physician before using this monitor on a wrist where intravascular access or therapy, or an arterio- venous (A-V) shunt, is present because of temporary interference to blood flow which could result in injury.
- Consult with your physician before using this monitor if you have had a mastectomy.
- Consult with your physician before using this monitor if you have severe blood flow problems or blood disorders as cuff inflation can cause bruising.
- DO NOT take measurements more often than necessary because bruising, due to blood flow interference, may occur.
- ONLY inflate the wrist cuff when it is applied on your wrist.
- Remove the wrist cuff if it does not start deflating during a measurement.
- DO NOT use this monitor for any purpose other than measuring blood pressure.
- During measurement, make sure that no mobile device or any other electrical device that emit electromagnetic fields is within 12 inches (30 cm) of this monitor. This may result in incorrect operation of the monitor and/or cause an inaccurate reading.
- DO NOT disassemble or attempt to repair this monitor or other components. This may cause an inaccurate reading.
- DO NOT use in a location where there is moisture or a risk of water splashing this monitor. This may damage this monitor.
- DO NOT use this monitor in a moving vehicle such as in a car.
- DO NOT drop or subject this monitor to strong shocks or vibrations.
- DO NOT use this monitor in places with high or low humidity or high or low temperatures. Refer to chapter
- Ensure this monitor is not impairing blood circulation by observing the wrist while measurement is occurring.
- DO NOT use this monitor in high-use environments such as medical clinics or physician offices.
- DO NOT use this monitor with other medical electrical (ME) equipment simultaneously. This may result in incorrect operation of the monitor and/or cause an inaccurate reading.
- Avoid bathing, drinking alcohol or caffeine, smoking, exercising and eating for at least 30 minutes before taking a measurement.
- Rest for at least 5 minutes before taking a measurement.
- Remove tight-fitting, thick clothing and any accessories from your wrist while taking a measurement.
- Remain still and DO NOT talk while taking a measurement.
- ONLY use this monitor on persons whose wrist circumference is within the specified range of the cuff.
- Ensure that the monitor has acclimated to room temperature before taking a measurement. Taking a measurement after an extreme temperature change could lead to an inaccurate reading.
- DO NOT crease the wrist cuff excessively.
Data Transmission
- DO NOT replace batteries while your reading is being transferred to your smart device. This may result in the incorrect operation of this monitor and failure to transfer your blood pressure data.
Battery Handling and Usage
- DO NOT insert batteries with their polarities incorrectly aligned.
- ONLY use 2 "AAA" alkaline batteries with this monitor. DO NOT use other types of batteries. DO NOT use new and used batteries together.
- Remove batteries if this monitor will not be used for a long period of time.
- If battery fluid should get in your eyes, immediately rinse with plenty of clean water. Consult with your physician immediately.
- If battery fluid should get on your skin, wash your skin immediately with plenty of clean, lukewarm water. If irritation, injury or pain persists, consult with your physician.
- DO NOT use batteries after their expiration date.
- Periodically check batteries to ensure they are in good working condition.
- ONLY use batteries specified for this monitor. Use of unsupported batteries may damage and/or may be hazardous to this monitor.
Know Your Monitor
Contents
Monitor, 2 "AAA" alkaline batteries, storage case, instruction manual, quick start guide
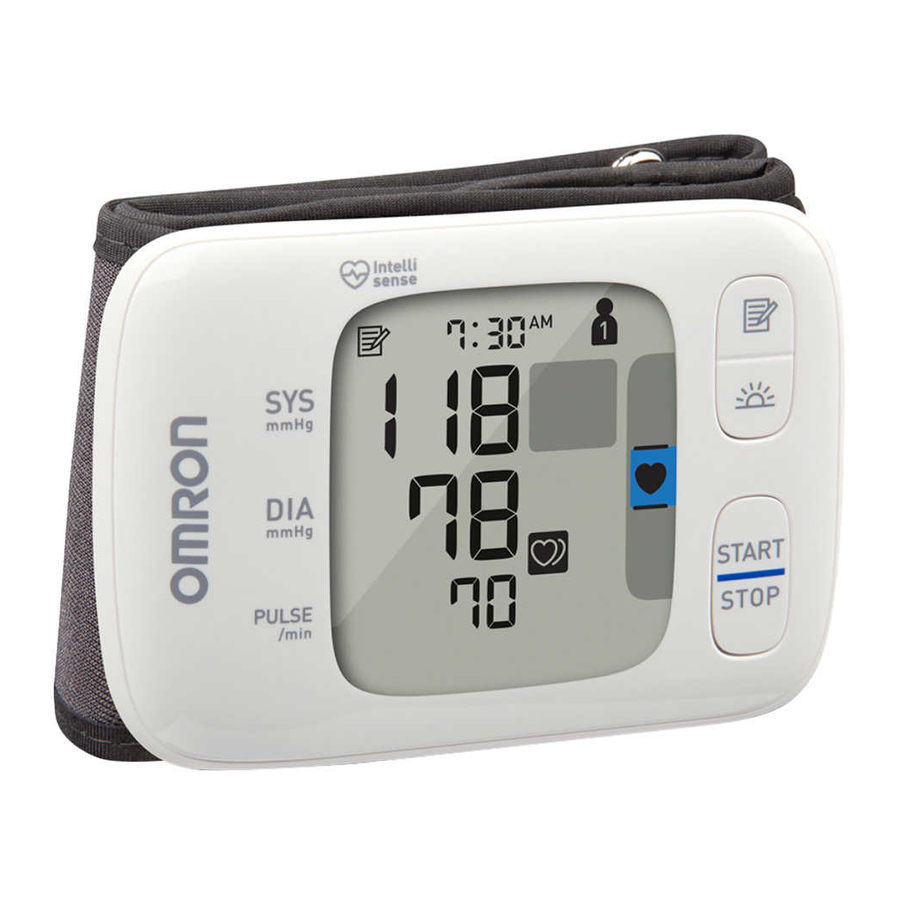
Monitor

- Wrist cuff
(Wrist circumference 5.3" to 8.5" (13.5 cm to 21.5 cm)) - Display
- Battery compartment
- [User ID selection] switch
- [Memory] button
- [Morning average] button
- [START/STOP] button
- [Connection] button
Display

Display Symbols
| A | Date and time display | |
| B |  | Average value symbol Appears when viewing the average readings of the latest 2 or 3 readings taken within 10 minutes span. |
| C |  | Memory symbol Appears when viewing readings stored in the memory. |
| D | Systolic blood pressure reading | |
| E | Diastolic blood pressure reading | |
| F | Pulse display / Memory number Pulse rate appears after the measurement. When pressing the for approximately one second before the pulse rate appears on the display.button, the memory number appears | |
| G |  | Deflation symbol Flashes during cuff deflation. |
| H |  | Heartbeat symbol Flashes while taking a measurement. |
| I |  | Sync symbol Flashes when your data needs to be transferred because the stored memory is either almost, or completely full. Once you pair your monitor with a smart device, transfer your readings immediately before your monitor deletes the oldest readings. Up to 100 readings can be stored in the internal memory per user. |
| J |  | OK symbol Flashes when your monitor is connected to the smart device or readings are transferred successfully. |
| K |  | Morning average symbol Appears when viewing the weekly average readings taken in the morning. Weekly averages for the measurement taken in the morning within 4 weeks appear on the display. |
| L |  | User ID symbol The user ID number appears when selecting the user with [User ID selection] switch. |
| M |  | Hypertension symbol The " " symbol appears if your systolic blood pressure is 135 mmHg or above and/or the diastolic blood pressure is 85 mmHg or above. |
 | Morning hypertension symbol The " " symbol appears when the morning weekly average is 135/85 mmHg or above. | |
| N |  | Heart zone indicator The " " symbol lights in blue when your monitor is at the correct position relative to your heart during a measurement. When your monitor is higher or lower position relative to your heart, the heart position locator bar will appear up above, or below the heart symbol to guide correct wrist positioning. |
| O |  | Irregular heartbeat symbol Appears along with readings when an irregular rhythm is detected 2 or more times during a measurement. 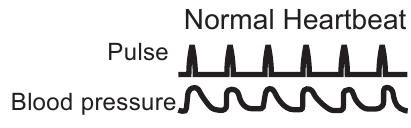 An irregular heartbeat rhythm is defined as a rhythm that is 25% less or 25% more than the average rhythm detected while your monitor is measuring the systolic and diastolic blood pressure. If it continues to appear, we recommend you to consult with and follow the directions of your physician.  |
| P |  | Movement error symbol Appears along with readings when your body is moving during a measurement. If it appears, remove the wrist cuff, and wait for 2 to 3 minutes. Then, remain still and take another measurement. |
| Q |  | Cuff wrap guide symbol Appears if the wrist cuff is not wrapped around the wrist correctly while taking a measurement. It also appears when viewing past readings. |
| R |  | Battery symbol (low) Appears when batteries are low. |
 | Battery symbol (depleted) Appears when batteries are depleted. | |
| S |  | Bluetooth ON symbol Appears when Bluetooth is enabled. |
 | Bluetooth OFF symbol Appears when Bluetooth is disabled. | |
2013 ESH/ESC* Guidelines for the management of arterial hypertension
Definitions of hypertension by office and home blood pressure levels
| Office | Home | |
| Systolic Blood Pressure | ≥ 140 mmHg | ≥ 135 mmHg |
| Diastolic Blood Pressure | ≥ 90 mmHg | ≥ 85 mmHg |
These are from statistical values for blood pressure.
* European Society of Hypertension (ESH) and European Society of Cardiology (ESC).
- NEVER diagnose or treat yourself based on your readings.
ALWAYS consult with your physician.
Preparation
Installing Batteries
- Push down the hook of the battery cover and pull downward.

- Insert 2 "AAA" alkaline batteries as indicated in the battery compartment.

- Close the battery cover.


Note
- When the "
![]() " symbol appears on the display, it is recommended you replace batteries.
" symbol appears on the display, it is recommended you replace batteries. - To replace batteries, turn your monitor off and remove all batteries. Then replace with 2 new alkaline batteries at the same time.
- As soon as batteries are correctly installed, the year flashes on the date and time display to set the date and time.
- Replacing batteries will not delete previous readings.
- The supplied batteries may have a shorter life than new batteries.
- Disposal of used batteries should be carried out in accordance with local regulations.
Setting the Date and Time
Note
- Set your monitor to the correct date and time before taking a measurement for the first time.
- As soon as batteries are correctly installed, the year flashes on the display of your monitor.
- The date and time will automatically be set when the monitor is paired with OMRON connect US/CAN app. Refer to Pairing Your Monitor with a Smart Device.
- Press the
![]() or
or ![]() button once to adjust the year.
button once to adjust the year.
Press and hold down the![]() button to quickly advance the years. Press and hold down the
button to quickly advance the years. Press and hold down the ![]() button to quickly go backwards through the years.
button to quickly go backwards through the years. - Press the [START/STOP] button to confirm the year and the month will flash. Repeat the same steps to adjust the month, day, hour, and minute.

- Press the [START/STOP] button to store the setting. It automatically turns off after 3 seconds.
 or
or  button once to adjust the year.

Note
- If you need to reset the date and time, replace batteries or press the
![]() button until the year flashes, and set the date and time as above steps.
button until the year flashes, and set the date and time as above steps.
Blood Pressure Measurement Tips
To help ensure an accurate reading, follow these directions:
- Stress raises blood pressure. Avoid taking measurements during stressful times.
- Measurements should be taken in a quiet place.
- It is important to take measurements at same times each day. Taking measurements in the morning and in the evening is recommended.
- Remember to have a record of your blood pressure and pulse readings for your physician. A single measurement does not provide an accurate indication of your true blood pressure. You need to take and record several readings over a period of time.
- Avoid bathing, drinking alcohol or caffeine, smoking, exercising and eating for at least 30 minutes before taking a measurement.
- Rest for at least 5 minutes before taking a measurement.
Applying the Wrist Cuff
Note
- Following steps are for applying the wrist cuff to your left wrist. When you take a measurement on the right wrist, apply the wrist cuff using the same steps as on the left wrist.
- The blood pressure can differ between the right wrist and the left wrist, and the measured blood pressure values can be different. OMRON recommends to always use the same wrist for measurement. If the values between both wrists differ substantially, please check with your physician as to which wrist to use for your measurements.
- Remove tight-fitting, thick clothing and any accessories from your wrist while taking a measurement.
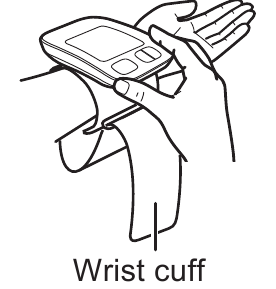
- Apply the wrist cuff to your left wrist.
Roll up sleeve. Make sure your sleeve is not rolled up too tightly on your arm. This may constrict the flow of blood in your arm.

- Put your wrist through the cuff loop. Your palm and monitor display should both face upward.
![]()
- Position the wrist cuff leaving a clearance of 0.5 inch (1 to 2 cm) between the cuff and the bottom of your palm.

- Wrap the wrist cuff firmly around your wrist. Do not apply over clothing.
Check to make sure that there is no gap between your wrist and the cuff.


Note
- Make sure your wrist cuff does not cover the protruding part of the wrist bone on the outside of your wrist.

- If the wrist cuff comes out of the metal ring, slide it back through as shown in the figure to the right.


Sitting Correctly
To take a measurement, you need to be relaxed and comfortably seated in a room with a comfortable temperature. Place your elbow on the table to support your arm.
- Sit in a chair with your legs uncrossed and your feet flat on the floor.
- Sit with your back and arm being supported.
- The distance from the top of your seat measuring to the top of the table you are sitting at, should be 12 plus or minus 2 inches (30 ± 5 cm). If the distance measured between the top of your seat and table do not fall within this parameter, correct your seat or table height.
If you are unable to make any seat or table adjustments, please turn off the heart zone indicator and position your wrist at heart level by yourself. Refer to Disabling/Enabling Heart Zone Indicator. - Your monitor must be approximately the same level as your heart. If the monitor is too high above your heart, your blood pressure will be artificially low. If the monitor is too low below your heart, your blood pressure will be artificially high.
- Relax your wrist and hand. Do not bend your wrist back, clench your fist, or bend your wrist forward.


Selecting a User ID
Your monitor is designed to take measurements and store the readings in the memory for 2 people using the [user ID selection] switch.
- Select your user ID (1 or 2).


Using Your Monitor without a Smart Device
Taking a Measurement
You can use your monitor without pairing to a smart device. To pair your monitor with a smart device, refer to Pairing Your Monitor with a Smart Device.

Note
- To stop the measurement, press the [START/STOP] button once to deflate the wrist cuff.
- DO NOT use this monitor with other medical electrical (ME) equipment simultaneously. This may result in incorrect operation of the monitor and/or cause an inaccurate reading.
- Remain still and DO NOT talk while taking a measurement.
- Press the [START/STOP] button.
All symbols appear on the display before starting the measurement. - Check the Heart Zone Indicator.
Your monitor has a built-in heart zone indicator that is used as an aid in determining if the monitor is at the correct height. It has been designed to work with most people so that when your wrist is at the correct position relative to your heart, the "![]() " symbol will light in blue. When your wrist is higher or lower position relative to your heart, a locator bar will appear according to the wrist position. Due to difference in individual size and physique, this feature may not be helpful in all cases and you may wish to disable this feature. If you feel the position of the wrist according to heart zone indicator's guidance does NOT match your heart level, disable this feature and follow your judgement. To disable it, refer to Disabling/Enabling Heart Zone Indicator.
" symbol will light in blue. When your wrist is higher or lower position relative to your heart, a locator bar will appear according to the wrist position. Due to difference in individual size and physique, this feature may not be helpful in all cases and you may wish to disable this feature. If you feel the position of the wrist according to heart zone indicator's guidance does NOT match your heart level, disable this feature and follow your judgement. To disable it, refer to Disabling/Enabling Heart Zone Indicator.

 " symbol will light in blue. When your wrist is higher or lower position relative to your heart, a locator bar will appear according to the wrist position. Due to difference in individual size and physique, this feature may not be helpful in all cases and you may wish to disable this feature. If you feel the position of the wrist according to heart zone indicator's guidance does NOT match your heart level, disable this feature and follow your judgement. To disable it, refer to Disabling/Enabling Heart Zone Indicator.
| Monitor height | Heart Zone Indicator | |
 | Wrist is too high | Any locator bar (-) above the " " symbol appears. " symbol appears. |
| Proper position | The "" symbol lights in blue. | |
| Wrist is too low | Any locator bar (-) below the "" symbol appears. |

Note
- After 5 seconds from pressing the [START/STOP] button, even if your monitor is not positioned properly, your monitor will start the measurement and the wrist cuff will start to inflate.
- Remain still and do not move or talk until the entire measurement process is completed.
As the cuff inflates, your monitor automatically determines your ideal inflation level. This monitor detects your blood pressure and pulse rate during inflation.
The "![]() " symbol flashes at every heartbeat.
" symbol flashes at every heartbeat.

Note
- When the "
![]() " symbol is displayed, the wrist cuff is not applied correctly. Press the [START/STOP] button to turn your monitor off, then apply the cuff correctly.
" symbol is displayed, the wrist cuff is not applied correctly. Press the [START/STOP] button to turn your monitor off, then apply the cuff correctly.
After your monitor has detected your blood pressure and pulse rate, the cuff automatically deflates. Your blood pressure and pulse rate are displayed.
If either the Systolic or the Diastolic reading is high (refer to Display Symbols), the "  " symbol appears.

Press the [START/STOP] button to turn your monitor off.

Note
- Your monitor will automatically turn off after 2 minutes.
- Wait 2-3 minutes between measurements. The wait time allows the arteries to decompress and return to their pre- measurement form. You may need to increase the wait time depending on your individual physiological characteristics.
Using Your Monitor with a Smart Device
Pairing Your Monitor with a Smart Device
The date and time on your monitor will automatically be set when you pair your monitor with your smart device.
Review the list of compatible smart devices at OmronHealthcare.com.
- Enable Bluetooth on your smart device.
- Download and install the free "OMRON connect US/ CAN" app onto your smart device.
![www.apple.com]()
![play.google.com]()
If you already have the "OMRON connect US/CAN" app and have created your account, open the app and add your new monitor. - Open the app on your smart device. Press the [
![]() ] button (found on the back of your monitor) for more than 2 seconds to start pairing. Then follow the instructions.
] button (found on the back of your monitor) for more than 2 seconds to start pairing. Then follow the instructions.


 ] button (found on the back of your monitor) for more than 2 seconds to start pairing. Then follow the instructions.
Note
- Make sure that your monitor is turned off. If it is on, press the [START/STOP] button to clear the LCD screen.
- Confirm that your monitor is connected successfully.
When your monitor is connected successfully to your smart device, the "OK" symbol flashes.


Note
- If the "Err" symbol appears, follow the message of the app.
- Your monitor automatically turns off after 10 seconds without any operations.
- Your monitor can store 2 user's readings, however the app can only store 1 user's readings. Each user will need his/her own OMRON connect account to transfer their readings.
- Any readings currently saved in the memory of your monitor are automatically transferred to the app after successful completion of the pairing process.
- Please be aware that OMRON will not be responsible for the loss of data and/or information in the app.
- Read the utilization method and usage instruction within the app for details.
Taking a Measurement
Refer to Taking a Measurement to start a measurement. The readings will be transferred to your smart device.
Disabling/Enabling Bluetooth
- This product emits radio frequencies (RF) in the 2.4 GHz band. DO NOT use this product in locations where RF is restricted, such as on an aircraft or in hospitals. Turn off the Bluetooth feature in this monitor and remove batteries when in RF restricted areas. For further information on potential restrictions refer to documentation on the Bluetooth usage by the FCC/IC.
Bluetooth is enabled as default.
- When your monitor is off, press and hold onto the [
![]() ] button for more than 10 seconds.
] button for more than 10 seconds. - "oFF" appears on the display.

- When the Bluetooth is disabled, the following symbol appears.

- "oFF" appears on the display.
 ] button for more than 10 seconds.


Note
- To enable the Bluetooth, press and hold on the [
![]() ] button for more than 2 seconds. "on" appears on the display.
] button for more than 2 seconds. "on" appears on the display. - Your monitor will automatically turn off within 3 seconds after the completion.
Using Memory Function
Your monitor automatically stores up to 100 readings per user.
Viewing the Readings Stored in Memory
- Select your User ID.
- Press the
![]() button.
button.

Alternating date/time display
The Memory number appears for one second before the pulse rate is displayed. The most recent reading set is numbered
 button.

Note
- If the heart zone indicator is enabled before the measurement, the heart zone indicator is displayed with the readings.
- If the reading is high (refer to Display Symbols), the "
![]() " symbol appears.
" symbol appears. - If there are no readings stored in the memory, the screen to the right is displayed.
- If the memory is full, the monitor will delete the oldest readings.
- Press the
![]() button repeatedly to scroll through the previous readings stored in the memory.
button repeatedly to scroll through the previous readings stored in the memory.
 button repeatedly to scroll through the previous readings stored in the memory.
Viewing the Average Reading
Your monitor can calculate an average reading based on the latest 2 or 3 readings taken within 10 minutes span.
- Select your User ID.
- When your monitor is off, press and hold the
![]() button for more than 2 seconds.
button for more than 2 seconds.


 Note
Note
- If there are only 2 readings in the memory for that period, the average will be based on these 2 readings.
- If the average reading is high (refer to Display Symbols), the "
![]() " symbol appears.
" symbol appears.
Viewing Morning Weekly Averages
Your monitor calculates and displays weekly averages for the measurements taken in the morning for 4 weeks per user.
- Select your User ID.
- Press the
![]() button once.
button once.
The morning weekly average for the current week "THIS WEEK" appears on the display. If the morning weekly average is high (refer to Display Symbols), the "![]() " symbol appears.
" symbol appears.
![]()
- Continue to press the
![]() button to display the average for the previous weeks.
button to display the average for the previous weeks.
Your monitor displays "-1 WEEK" for the previous week's average, to "-3 WEEK" for the oldest set of averages. - Press the [START/STOP] button to turn off your monitor.
 button once.
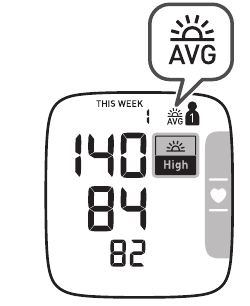
Morning Weekly Average Calculation
This is the average for the measurements taken during the morning (4:00am - 9:59am) between Sunday and Saturday. Only the first 3 measurements taken in the morning between 4:00am - 9:59am will be used to calculate the morning average for each day.

Other Settings
Disabling/Enabling Heart Zone Indicator
The heart zone indicator is enabled as default.
- Select your user ID.
- When your monitor is off, press and hold the
![]() button for more than 10 seconds.
button for more than 10 seconds.


Note
- Your monitor will automatically turn off after 3 seconds from the completion.
- To enable the heart zone indicator, follow the same steps as above.
Deleting All Readings Stored in Memory
- Select your user ID.
- Press the
![]() button, then the "
button, then the "![]() " symbol appears.
" symbol appears. - While holding the
![]() button down, press and hold the [START/ STOP] button for more than 2 seconds.
button down, press and hold the [START/ STOP] button for more than 2 seconds.

 button, then the "
 " symbol appears.

Note
- All readings will be deleted. You cannot partially delete the readings stored in the memory.
Restoring Your Monitor to the Default Settings
To delete all the information stored in your monitor, follow the instructions below. Make sure that your monitor is turned off.
- While holding the button down, press and hold the [START/STOP] button for more than 5 seconds.


Note
- Reverting to its default setting of your monitor does not delete the information in the app.
- Your monitor will automatically turn off after 3 seconds.
- You will need to re-pair your monitor when using the monitor again. Without re-pairing, your readings will not be transferred to your app.
Error Messages and Troubleshooting
In case of any of the below problems occur during measurement, first check that no other electrical device is within 12 inches (30 cm). If the problem persists, please refer to the table below.
| Display/ Problem | Possible Cause | Solution |
 appears or the wrist cuff does not inflate. appears | The wrist cuff is not applied correctly. | Apply the wrist cuff correctly, then take another measurement. Refer to Applying the Wrist Cuff. |
| Air is leaking from the wrist cuff. | Contact customer service. | |
| The wrist cuff is overinflated exceeding 300 mmHg. | Do not touch the wrist cuff while taking a measurement. | |
 appears | You move or talk during a measurement. Vibrations disrupt a measurement. | Remain still and do not talk during a measurement. Refer to Using Your Monitor without a Smart Device. |
 appears | The pulse rate is not detected correctly. | Apply the wrist cuff correctly, then take another measurement. Refer to Applying the Wrist Cuff. Remain still and sit correctly during a measurement. Refer to Sitting Correctly. If the "  " symbol continues to appear, we recommend you to consult with your physician. " symbol continues to appear, we recommend you to consult with your physician. |
 / / appears | ||
 appears | ||
 appears | Your wrist is moved up and down during a measurement. | Do not move your wrist, then take another measurement. Refer to Refer to Using Your Monitor without a Smart Device. |
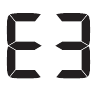
 appears | The monitor is malfunctioned. | Press the [START/ STOP] button again. If "Er" still appears, contact customer service. |
 appears | The monior cannot connect to a smart device or transmit data correctly. | Follow the instructions shown in the "OMRON connect US/CAN" app. If the "Err" symbol still appears after checking the app, contact customer service. |
 flashes | The [ ] button is pressed and held to pair with a smart device. ] button is pressed and held to pair with a smart device. | Appears when pairing to the smart device. |
 flashes | The [] button is pressed to transfer your readings. | Flashes when transferring your readings to the "OMRON connect US/ CAN" app. |
 flashes | More than 80 readings are not transferred. | Pair or transfer your readings to the "OMRON connect US/ CAN" app so you can keep them in memory in the app, and this error symbol disappears. |
| This monitor is ready for pairing or transferring your readings. | ||
appears | 100 readings are not transferred. | |
 The heart symbol in the heart zone indicator does not light and a locator bar does not appear. | The "heart zone indicator" is disabled. | Enable the "heart zone indicator". Refer to Disabling/Enabling Heart Zone Indicator. |
 flashes | Batteries are low. | Replacing all batteries with 2 new alkaline batteries is recommended. Refer to Installing Batteries. |
 appears or the monitor is turned off unexpectedly during a measurement | Batteries are depleted. | Immediately replace all batteries with 2 new alkaline batteries. Refer to Installing Batteries. |
| No power. Nothing appears on the display of the monitor. | Batteries are completely depleted. | |
| Battery polarities are not properly aligned. | Check the battery installation for proper placement. Refer to Installing Batteries. | |
| Readings appear too high or too low. | Blood pressure varies constantly. Many factors including stress, time of day, and/or how you apply the wrist cuff, may affect your blood pressure. Review Blood Pressure Measurement Tips - Sitting Correctly and Refer to Using Your Monitor without a Smart Device | |
| Any other communication issue occurs. | Follow the instructions shown in the smart device. If the problem still persists, contact customer service. | |
| Any other problems occurs. | Press the [START/STOP] button to turn the monitor off, then press it again to take a measurement. If the problem continues, remove all batteries and wait for 30 seconds. Then reinstall batteries. If the problem still persists, contact customer service. | |
Maintenance
To protect your monitor from damage, please follow the directions below:
- Changes or modifications not approved by the manufacturer will void the user warranty.
- DO NOT disassemble or attempt to repair this monitor or other components. This may cause an inaccurate reading.
Storage
Keep your monitor and other components in the storage case when not in use.
- Store your monitor and other components in a clean, safe location.
Do not store your monitor and other components: - If your monitor and other components are wet.
- In locations exposed to extreme temperatures, humidity, direct sunlight, dust or corrosive vapors such as bleach.
- In locations exposed to vibrations or shocks.
Cleaning
- Do not use any abrasive or volatile cleaners.
- Use a soft dry cloth or a soft cloth moistened with neutral soap to clean your monitor and wrist cuff, and then wipe them with a dry cloth.
- Do not wash or immerse your monitor and wrist cuff or other components in water.
- Do not use gasoline, thinners or similar solvents to clean your monitor and wrist cuff or other components.
Disposal
Dispose of your monitor and other components according to applicable local regulations.
Unlawful disposal may cause environmental pollution.
Specifications
| Model | BP4350 HEM-6232T-Z HEM-6232T-Z |
| Display | LCD digital display |
| Cuff pressure range | 0 to 299 mmHg |
| Blood pressure measurement range | SYS: 60 to 260 mmHg DIA: 40 to 215 mmHg |
| Pulse measurement range | 40 to 180 beats / min. |
| Accuracy | Pressure: ±3 mmHg Pulse: ±5% of display reading |
| Inflation | Automatic by electric pump |
| Deflation | Automatic rapid deflation |
| Measurement method | Oscillometric method |
| Transmission method | Bluetooth ® low energy technology |
| Wireless communication | Frequency range: 2.4 GHz (2400 - 2483.5 MHz) Modulation: GFSK Effective radiated power: <20 dBm |
| IP classification | IP 22 |
| Rating | DC3 V 3.0 W |
| Power source | 2 "AAA" alkaline batteries 1.5V |
| Battery life | Approximately 300 measurements (using new alkaline batteries) |
| Durable period (Service life) | 5 years |
| Operating conditions | +50°F to +104°F (+10°C to +40°C) / 15 to 90% RH (non-condensing) / 800 to 1060 hPa |
| Storage / Transport conditions | -4°F to +140°F (-20°C to +60°C) / 10 to 90% RH (non-condensing) |
| Weight | Approximately 3.2 oz. (90 g) not including batteries |
| Dimensions | Approximately 3.6" (w) × 2.5" (h) × 0.5" (l) (91.0 mm × 63.4 mm × 13.4 mm) (not including the wrist cuff) |
| Measurable wrist circumference | 5.3" to 8.5" (13.5 to 21.5 cm) |
| Memory | Stores up to 100 readings per user |
| Contents | Monitor, storage case, 2 "AAA" alkaline batteries, instruction manual, quick start guide |
| Protection against electric shock | Internally powered ME equipment |
| Applied part | Type BF (wrist cuff) |

Note
- These specifications are subject to change without notice.
- In the clinical validation study, K5 was used on 85 subjects for determination of diastolic blood pressure.
- This monitor is clinically investigated according to the requirements of ISO 81060-2:2013.
- IP classification is degrees of protection provided by enclosures in accordance with IEC 60529. This monitor is protected against solid foreign objects of 12.5 mm diameter and greater such as a finger, and against oblique falling water drops which may cause issues during a normal operation.
Pictogram on the Product
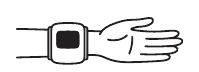
Indicates the correct positioning for the monitor on the wrist.
About a wireless communication interference
This product operates in an unlicensed ISM band at 2.4 GHz. In the event this Product is used near other wireless devices such as microwave and wireless LAN, which operate on the same frequency band as this Product, there is a possibility that interference may occur. If interference occurs, stop the operation of the other devices or relocate this Product away from other wireless devices before attempting to use it.

Documents / Resources
References
Download manual
Here you can download full pdf version of manual, it may contain additional safety instructions, warranty information, FCC rules, etc.
Advertisement
Thank you! Your question has been received!


Need Assistance?
Do you have a question about the BP4350 that isn't answered in the manual? Leave your question here.