
Related Manuals for Omega OM-ES-020


Summary of Contents for Omega OM-ES-020
- Page 1 QUICK START Shop online at omega.com ® e-mail: info@omega.com For latest product manuals: omegamanual.info OM-ES-020 Ethernet-to-Serial Device Server...
- Page 2 OMEGA will add the CE mark to every appropriate device upon certification. The information contained in this document is believed to be correct, but OMEGA accepts no liability for any errors it contains, and reserves the right to alter specifications without notice.
-
Page 3: Table Of Contents
Contents 1. Box Contents Check List 2. Hardware 3. Network IP Addressing 4. Connecting your OM-ES-020 5. Installing your OM-ES-020 Device on Windows 6. Configuring your OM-ES-020 Device 7. Default Settings 8. Pin outs 9. LED information For more information, please refer to Product Manual on CD... -
Page 4: Box Contents Check List
1. Box Contents Check List Thank you for purchasing an OM-ES-020 Ethernet to Serial product. This quick start guide will help you set up your OM-ES-020 device so that you can begin experiencing the benefits of Ethernet to Serial technology. -
Page 5: Hardware
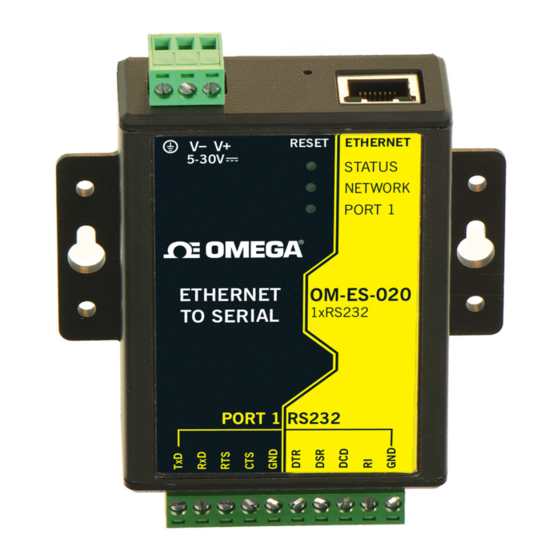
2. Hardware 1. Screw terminal block connec- Reset button (use unfolded pa- tion perclip to press) 2. Wall mount screw hole Ethernet port connection - 10BaseT / 100BaseTX 3. Serial Port LED Status LED 4. Ethernet LED DIN Rail kit holes 5. -
Page 6: Network Ip Addressing
If no DHCP Server is detected (e.g. you are using a direct cable connection to the PC), the OM-ES-020 device will default to an IP address of 192.168.127.254 within 60 seconds. Please ensure the PC you’re using for configuration can communicate with the... -
Page 7: Connecting Your Om-Es-020
Connect the serial cable from your serial device to the serial port on the OM-ES-020 device. Refer to Section 8 of this Quick Start Guide for pin outs. Make a note of device MAC address (on side panel, 00-0a-4f-XX-XX-XX) as... -
Page 8: Installing Your Om-Es-020 Device On Windows 7
5. Installing your OM-ES-020 Device on Windows 1. Insert the CD into your PC. This should launch the Boost.LAN Navigation Page automatically. Note: If the navigation page does not auto load, go to Start g My Computer g Right Click the CD and select Explore. - Page 9 5. Installing your OM-ES-020 Device Continued... 3. Follow the on screen instructions to install the Boost.LAN software. Note: Boost.LAN software requires the Microsoft .NET framework to be installed on your machine. If it is not already installed, the Setup.exe will install it automatically.
- Page 10 5. Installing your OM-ES-020 Device Continued... 6. You can find your Omega OM-ES-020 device by selecting a device and matching it with the corresponding MAC address available on the left hand panel. 7. Once found, select the device and scroll to the "Tasks" section on the left hand panel.
-
Page 11: Configuring Your Om-Es-020 Device
6. Configuring your OM-ES-020 Device Firewall Exceptions and Port Numbers When using the OM-ES-020 devices with a firewall you may need to manually add the exception entries and port numbers to the firewall list. Listed below are the default port numbers and the firewall exceptions. -
Page 12: Default Settings
7. Default Settings Network Settings Device Network Address DHCP mode Web Server Port Port Settings -RS232 Baudrate 115200 Databits Stop Bits Parity Flow Control None Duplex Mode Protocol Settings Telnet + COM port control Mode (Server) TCP/UDP Port Numbers Device Web Server 80 (TCP) Serial Ports 1-8 9001-9008 (TCP) -
Page 13: Pin Outs
8. Pin Outs Serial Terminal Block Pin outs / Power Terminal Block Pin outs OM-ES-020 Pin 1 Pin 1 V+ Power Supply Pin 2 Pin 2 V- Power Supply Pin 3 Pin 3 Earth/Chassis Ground Pin 4 Pin 5 Pin 6... -
Page 14: Led Information
Serial Port LED Green light on Port Open Flashing light on Data RX/TX Ethernet LED Green light on Link established Flashing Green Data RX / TX For further configuration details, or technical information on the OM-ES-020 product, please refer to Product Manual on CD... - Page 15 Authorized Return (AR) number immediately upon phone or written request. Upon examination by OMEGA, if the unit is found to be defective, it will be repaired or replaced at no charge. OMEGA’s WARRANTY does not apply to defects resulting from any action of the purchaser, including but not limited to mishandling, improper interfacing, operation outside of design limits, improper repair, or unauthorized modification.
- Page 16 Where Do I Find Everything I Need for Process Measurement and Control? OMEGA... Of Course! Shop online at omega.com TEMPERATURE DATA ACQUISITION Thermocouple RTD & Thermister Probes Data Acquisition & Engineering Software Connectors, Panels & Assemblies ...