Table of Contents
Advertisement
Quick Links
Advertisement
Table of Contents

Related Manuals for PURE Evoke D4 Mio


Summary of Contents for PURE Evoke D4 Mio
- Page 1 D4 Mio with Bluetooth...
- Page 3 D4 Mio with Bluetooth Thank you for choosing Evoke D4 Mio with Bluetooth. This manual will get you up and running in no time and explains how to make the most of Evoke’s great features. If you need additional help with topics not covered in this manual, please visit the Pure support pages at support.pure.com.
- Page 4 Safety Instructions Read these instructions – All the safety and operating instructions should be read before this product is operated. Keep these instructions – The safety and operating instructions should be retained for future reference. Heed all warnings – All warnings on the appliance and in the operating instructions should be adhered to. Follow all instructions –...
-
Page 5: Table Of Contents
14 Options and settings Digital radio settings FM radio settings General settings Clock settings Display settings Bluetooth settings 18 Appendix Installing the ChargePAK F1 Changing Evoke’s removable covers and handle trim Help and advice Technical specifications 23 Pure Warranty Statement for Australia... -
Page 6: Introduction
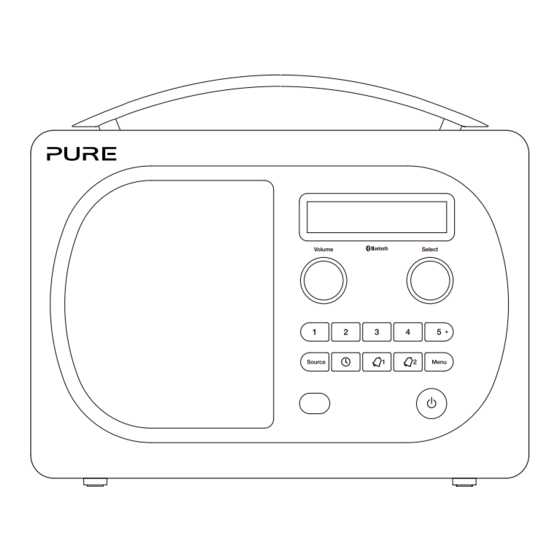
Introduction Front panel controls SnoozeHandle Tap to snooze the alarm Volume dial Adjust and mute Select dial volume (see Turn and press to browse page 6) and select radio stations (see page 8), select and adjust menu options or Volume Select pause and control scrolling text (see page 9) -
Page 7: Rear Connectors
Rear connectors 9V DC Stereo Speaker Aux in Stereo Speaker Stereo Speaker Stereo Speaker Stereo Speaker V DC 9V DC 9V DC 9V DC Aux in Aux in Aux in Aux in Connect to supplied 3.5 mm stereo Analogue stereo Mini-B type USB mains adapter only headphone socket... -
Page 8: Switching Between Sleep, Standby And On
Switching between Sleep, Standby and On Evoke has three power modes, Standby, Sleep and On. In Standby, Evoke uses minimal power and displays the clock. In Sleep mode, Evoke is ready to stream music using Bluetooth. See page 11 for more information. -
Page 9: Getting Started
Getting started Quick set up Note: If you have a ChargePAK F1 rechargeable battery (sold separately) fit it now before plugging in Evoke. See page 18 for more information. • Unclip the aerial and fully extend it (steps A and B). •... -
Page 10: Changing Digital Radio Stations
Changing digital radio stations Using the front panel controls Turn the Select dial left or right to browse through the list of available digital stations. Push the Select dial to change the station. Select Select Station list BBC Radio 6Music BBC Radio 6Music Now playing: Race For T Using the remote control... -
Page 11: Pausing And Controlling Scrolling Text
Pausing and controlling scrolling text Using the front panel controls When ‘Scrolling text’ information is displayed in either digital or FM radio, push the Select dial to pause the scrolling text. Select BBC Radio 6Music BBC Radio 6Music Playing: Race For Th Now playing: Race For T Turn the Select dial right and left to scroll forwards and backwards through the text. -
Page 12: Storing And Selecting Presets
Storing and selecting presets Store up to 15 digital and 15 FM radio stations for quick access. To quick-store a station to a preset BBC Radio 6Music Now playing: No Cars G button (1–4) Tune to the digital or FM radio station you want to store. Press and Preset 1 stored hold one of the numbered Preset buttons (1–4) for two seconds until you see a message to confirm that the preset has been stored on the... -
Page 13: Using Bluetooth
Using Bluetooth If your phone or tablet is capable of storing audio files, you can use Bluetooth to stream any music stored on your phone or tablet to Evoke. Note: Adding a Bluetooth device varies on different mobile devices. See your Bluetooth mobile device manual for specific information. -
Page 14: Setting The Alarms And Timers
Setting the alarms and timers Setting an alarm Alarm 1 Setup Evoke has two alarms which can switch the radio on and tune to a digital or FM radio station or sound an alarm tone. Press the button. Turn and press the Select dial to select ‘On’. The alarm is now Alarm time active. - Page 15 Changing the alarm snooze time Set snooze time 5 minutes Press Menu. Turn and press the Select dial to choose ‘Clock’. Turn and press the Select dial to choose ‘Set snooze time’. Turn and press the Select dial to change the snooze time between 1 and 59 minutes.
-
Page 16: Options And Settings
Options and settings Digital radio settings Autotune You can use the autotune function to automatically scan for new digital radio stations and remove inactive ones. Note: Autotune is only available when you have selected ‘Digital radio’ as the radio source. To carry out an autotune: Press Menu. -
Page 17: General Settings
Software updates for your Evoke may be made available in the future. If you register your product and include a valid e-mail address you will receive notification of software updates (register at www.pure.com/ register). Alternatively, visit http://support.pure.com at any time to check for available software updates. -
Page 18: Clock Settings
Clock settings Setting the time and date The time and date on Evoke are automatically set by the FM or digital radio signal. If the time/date does not update automatically, you can manually set it using this option. Note: Any time or date updates received by an FM or a digital broadcast will override manual settings, if clock synchronization is enabled (see below for more information). -
Page 19: Display Settings
Display settings Adjusting the display You can adjust the brightness and time-out duration of the display for when the unit is switched on and in standby. To change display options: Press Menu, scroll to ‘Display settings’ and push the Select dial. Now choose either ‘Active’... -
Page 20: Appendix
Appendix Installing the ChargePAK F1 Note: Switch Evoke off and disconnect from the mains power supply before installing ChargePAK F1. Aerial Evoke D4 Mio 9V DC Aux in Aerial Aerial Evoke D4 Mio 9V DC Aux in 9V DC Aux in Note: If you are charging ChargePAK for the first time or after an extended period of inactivity it is recommended that it is charged for around 24 hours to ensure full battery power. -
Page 21: Changing Evoke's Removable Covers And Handle Trim
Changing Evoke’s removable covers and handle trim Note: Switch Evoke off and disconnect from the mains power supply before changing the removable covers. 9V DC Aux in... -
Page 22: Help And Advice
Help and advice Secondary and inactive stations (<</>>) Secondary digital radio services Some stations have accompanying secondary services which provide extra information or alternative content and may only be broadcast at certain times. If a station has a secondary service available, the station shows ‘>>’... -
Page 23: Technical Specifications
180mm high x 215mm wide x 115mm deep Aerial Captive telescopic aerial Approvals CE marked. Hereby, Pure, declares that this Band II LPD device is in compliance with the essential requirements and other relevant provisions of Directive 1999/5/EC. The Declaration of Conformity may be consulted at http://www.pure.com/R&TTE-DoC. - Page 24 Please visit www.pure.com/register to register your product with us. Should you have a problem with your unit please contact your supplier or contact Pure Support at the address shown on the rear of this manual.
-
Page 25: Pure Warranty Statement For Australia
If you have any questions about your warranty you can call us toll free 1800 988 268. What’s covered by this warranty? • Pure agrees to refund, repair or replace, at your election, without charge to you, any part found to be defective during the warranty period. - Page 27 Pure UK Headquarters Pure Australasia Pty Ltd Imagination Technologies Limited PO Box 5049 Home Park Estate Wonga Park Kings Langley Victoria 3115 Herts, WD4 8LZ Australia United Kingdom sales.au@pure.com www.pure.com http://support.pure.com/au http://support.pure.com...
- Page 28 105UP...