Advertisement
- 1 Features
- 2 Advantages
- 3 Before using for the first time
- 4 Setting the clock
- 5 Using the control panel
- 6 Heating performance
- 7 BAKE function
- 8 CONVECTION BAKE function
- 9 BROIL/Grill function
- 10 TOAST function
- 11 DEFROST function
- 12 Expert Controlled Cooking function (FBC3 - FBC4 models only)*
- 13 Expert Controlled Cooking Function (model FBC412)
- 14 Cleaning and care
- 15 Expert Heat ReflectorTM - The stainless steel crumb tray
- 16 Documents / Resources
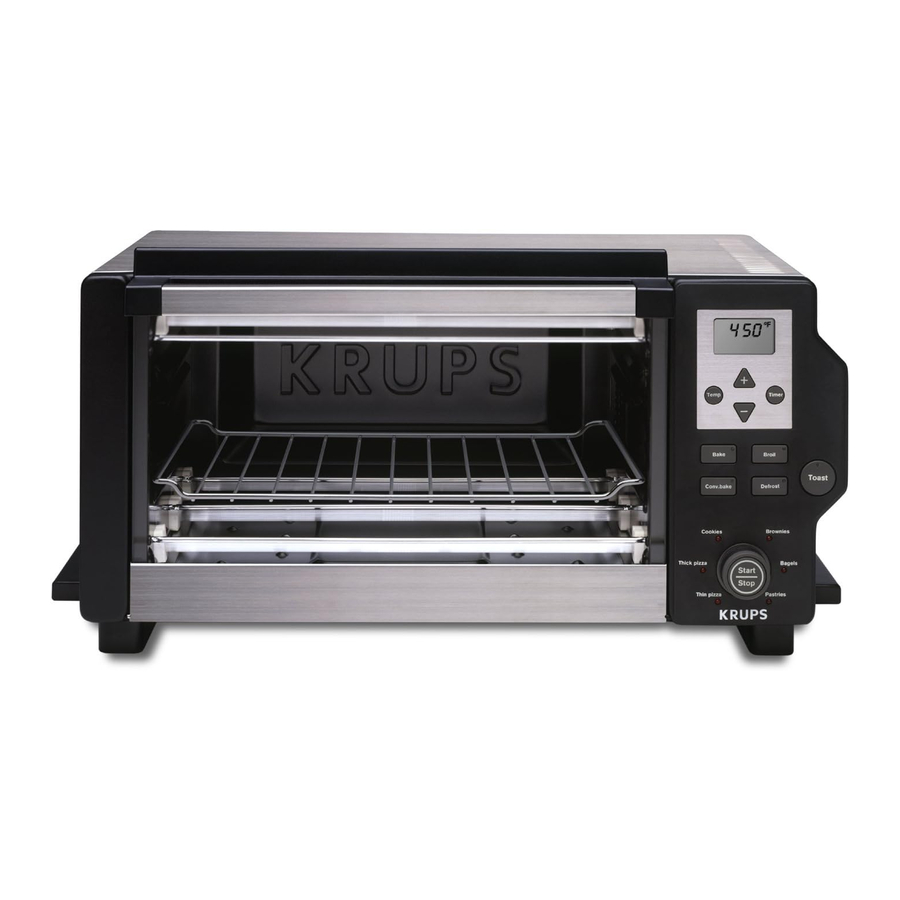
Features

- Door handle
- Control panel
- Display
- Temperature setting
- Cooking time setting
- "+" or "-" adjustment button
- BAKE function, cooking
- BROIL function, grilling
- CONVECTION BAKE cooking
- DEFROST function
- TOAST function, toasting
- START/STOP button
- Expert Controlled Cooking* selector switch: (thin pizza, thick pizza, cookies, brownies, bagels, pastry)
- Ventilation slots
- Non stick side-walls*
- Quartz top elements
- Crumb tray / Expert Heat Reflector
- Quartz bottom elements
- Shelf supports
- Non-stick broil pan*
- Non-stick bake sheet*
- 2 reversible shelves*
- Bread tongs*
Advantages
- Large capacity allows toasting of up to 6 slices of bread, and provides space to heat more of your favorite foods.
- Versatility to bake, reheat, toast, broil and defrost.
- Convection Bake cooking function uses a fan to distribute hot air throughout the oven for fast results.
- Patented "Expert Quartz Cycling Technology" cooks faster, and toasts better than other ovens.
- 4 shelf positions allow you to vary the distance of the food from the top or bottom heating elements to customize your results.
- Electronic thermostat can be precisely adjusted from 100°F to 450°F (in 25°F increments).
- Electronic browning control for toast to your taste.
- Six pre-programmed recipes*.
- Stainless steel crumb tray reflects heat during cooking and pulls out for easy cleaning.
- User-friendly electronic display with digital clock and easy-to-use soft touch controls.
*Depending on model
Before using for the first time
- Unpack the appliance and remove packaging including the self-adhesive display sticker on the LCD screen and product information tags from door handle (not on all models).
![]()
- Read all the instructions for use and the important safeguards and follow them carefully.
- Remove all accessories and wash them in warm, soapy water. Rinse and dry carefully.
- Unroll the power cord completely.
- Wipe the outside of the appliance with a damp cloth and dry.
![]()
- Plug in the toaster oven. It will beep.


In order to remove any possible residues from manufacturing, run the appliance empty for 15 minutes.
Select the temperature
- Press the "Bake" button. The "Bake" indicator lamp will light.
![]()
- The default temperature of 350°F will be shown blinking on the display.
- Press on "+" to select a temperature of 450°F.

Select the cooking time
- Press the "Timer" button.
![]()
- The default cooking time of "0:30" (30 minutes) will be shown blinking on the display.
- Set the cooking time to 15 minutes by pressing the "-" button.
- Press "Start". The appliance will beep and the oven will start.
![]()
- The time will be counted down in one-minute intervals.
- At the end of the cooking time, the appliance will beep five times and the oven will turn off.


 You may observe smoke escaping from the oven. This is normal and will gradually disappear with use.
Setting the clock
- When the oven is first plugged in "12:00" appears on the display.
- Press the "Timer" button twice. The display will begin to blink "12:00".
- Adjust the time in steps of one minute by pressing the "+" or "-"buttons.
![]()
- If you hold the button pressed down for more than 6 seconds, the time will change quicker.
![]()
- Press the "Timer" button to enter the time in the system.
![warning]() If you do not press the "Timer" button, the time will be entered automatically after 30 seconds.
If you do not press the "Timer" button, the time will be entered automatically after 30 seconds.


Using the control panel
Cooking time and temperature can be adjusted before or during the cooking cycle.
To adjust cooking times: Press « Timer » button once. Time remaining will be displayed, blinking. Cooking time can be adjusted in 1 minute increments up to a maximum of 1 hour 30 minutes, using the « + » and « - » buttons. Press « Timer » again to set new time.
To adjust temperature: Press « Temp ». Current temperature setting will be displayed, blinking. Temperature can be adjusted in 25 increments up to a maximum of 450° using the « + » and « - » buttons.
Press « Temp » again to set new temperature.
SHELF POSITIONS
- For all functions the position of the cooking shelf will play an important role in the final result.
- Note that there are 4 separate positions for the cooking shelf.
- Place your food in the center of the tray or on the shelf at the desired height.
Shelf position:

Shelf position #1: best for frozen pizza, and many baking and reheating uses.
Shelf position #2: best for cookies, brownies, toasting bread, and many baking and reheating uses.
Shelf position #3: best for toasting bagels, and broiling meats, or bacon.
Heating performance
This toaster oven employs Krups patented Expert Quartz Cycling Technology™. The top 3 heating elements and bottom 3 heating elements are powered alternately at full power to heat food more quickly and provide ultra precise temperature control. Monitor results carefully as cooking time can be reduced by as much as 30%.
It is normal for one set of elements to turn off while the other set is heating at full power.
The ends of each heating element will glow more brightly than the middle of the element. This is normal. The elements are specially designed to produce a balanced level of heat throughout the chamber.
During baking, quartz elements heat even if they are not lighting up.
BAKE function
Never leave unattended during use.
Select the temperature
- Press the "Bake" button. The "Bake" indicator lamp will light.
![]()
- The default temperature of 350°F will be shown blinking on the display.
- Press the "+" and "-" buttons to select the desired temperature. The temperature can be changed in steps of 25°F.
- The display will continue to blink.

Select the cooking time
- Press the "Timer" button.
![]()
- The default cooking time of "0:30" (30 minutes) will be shown blinking on the display.
- Set the cooking time according to your recipe by pressing the "+" and"-" buttons, up to a maximum of 1 hour 30 minutes.
- Press "Start". The appliance will beep and cooking will start.
- The time will be counted down in one-minute intervals.
- At the end of the cooking time, the appliance will beep five times and cooking will stop.
- You can stop the cooking at any time by pressing the "Stop" button.

Changing the temperature or cooking time

- You can change the cooking time or temperature at any time during a baking cycle.
- Press « Timer » or « Temp » and use the « + » and « - » buttons to change settings.
- Press « Timer » or « Temp » again to confirm the new setting.
CONVECTION BAKE function
Convection bake uses an internal fan to circulate heated air around the food. This function produces fast, even cooking results. Please note: The convection function will reduce cooking times. Some foods may not be ideal for convection bake.
- The "Conv. Bake" indicator lamp will light.
![]()
- Select a temperature using the « + » and « - » buttons.
- Select a cooking time by pressing « Timer » then use the « + » and « - » buttons.
- Press Start.

BROIL/Grill function
(Only the top heating elements are used. There are two broil settings: "High" and "Low").
Never leave oven unattended when in use.
The Broil tray is designed to drain grease and fats away from meats for healthier cooking.
- Place the broil tray on the bake sheet.
![]()
- Use shelf position #3.
- There must be a minimum space of 1 inch (2 cm) between the food and the top element.
- Close the door.

Choosing the grill setting
- Press the "Broil" button. The "Broil" indicator lamp will light.
![]()
- The default setting of "High" (fast broiling), will appear on the display.
- If you wish to reduce the broiling temperature, press the "-" button and "Low" will appear on the display.
- The display will blink.
- The default "broil" time is set at 10 minutes.
- You can adjust the cooking time by pressing « Timer », then the « + » and « - » buttons.
![]()
- To change broil temperature at any time press the « Temp » button and use « + » and « - » buttons to choose high or low.


For best results turn the food once during broiling.
For example try broiling meats for 10 minutes on HIGH, turning the food over after 7 minutes, and then broiling for another 3 minutes.
TOAST function
(the top and bottom heating elements operate alternately).
Never leave oven unattended when in use.
Shelf position for toasting bread and bagels
Shelf position:
For toasting bread:
- Use shelf position #2. The shelf is inverted and placed in the lower guides. This centers the bread in the chamber.
![]()

For toasting bagels:
- Use shelf position #3. The shelf is placed in the upper guides.
- The bagels should be arranged with cut side facing up. This causes the cut side to be toasted while the crust is warmed.
- For best results on bagels use a higher browning setting. Try browning settings between 6 – 9.
Results of toasting will vary depending on the bread type, freshness and browning level selected.
Browning level
- Press the "Toast" button. The "Toast" indicator lamp will light.
![]()
- The default setting, "4" will appear on the display. Press the "+"and "-" buttons to select the desired toasting setting.
![]()
- There are 9 possible toasting settings. Adjust the browning level to your preference and considering the type, thickness and freshness of bread.
- Browning levels increase between setting 1, which is warmed, and setting 9, which is very toasted. The toast settings 1-9 do not refer to the number of minutes for each setting. The oven will adjust the time for each setting depending on heat already present in the chamber.
- Press "Start"; the appliance will beep and toasting will start.
- The remaining time will be counted down in one-second intervals.
- At the end of the cooking time, the appliance will beep five times and cooking will stop.
- You can stop the toasting at any time by pressing the "Stop" button.


DEFROST function
The defrost function uses the convection fan and minimal heat to thaw frozen foods gently and evenly without cooking.
- Use shelf position #1.
- Use the broil tray together with the bake pan to catch water as the food is defrosted.
- Press the "Defrost" button.
![]()
- The default defrost time of 45 minutes will be shown blinking on the display.
- You can adjust the defrosting time required by pressing the "+"and "- " buttons.
![]()


The time needed to defrost is dependant on the thickness and the quantity of the frozen food. Examples:
| Frozen food item | Defrost time |
| 2 chicken cutlets | 45-50 minutes |
| 1 1/2 lbs. steak tips | 60-65 minutes |
| 4-6 slice of bread | 5 minutes |
- Press "Start". The appliance will beep and defrosting will begin.
- The time will be counted down in one-minute intervals.
- At the end of the defrosting time, the appliance will beep five times and defrosting will stop.
- You can stop defrosting at any time by pressing the "Stop" button.
Changing the time during defrosting
- The defrosting time is counting down.
- Press the "Timer" button; the time display will start to blink.
![]()
- Set the new defrosting time as desired by pressing the "+" and "-" buttons.
- Press the "Timer" button again to enter the time in the system.
- The display will show the new remaining defrosting time.

Expert Controlled Cooking function (FBC3 - FBC4 models only)*
6 different programmed cooking cycles, each with preset cooking times and temperatures.
When first using each preset function monitor the cooking carefully to ensure good result.
Changes to the preset cooking times and temperatures may be necessary depending on the recipe, the amount of food and your personal taste.
Cooking results are significantly affected by the position of the cooking shelf.
We highly recommend using the shelf position proposed for each type of food listed.
Turn the Expert Controlled Cooking dial to one of 6 food selections:
Thin Pizza, Thick Pizza, Cookies, Brownies, Bagels, or Pastries.
To adjust any preset recipe cooking times and temperatures
- Press « Timer », and use the « + » and « - » buttons to adjust cooking time in one-minute increments.
![]()
- Press « Timer » again to confirm again to confirm the new time. *Depending on model
- Press « Temp » and use the « + » and « -» buttons to adjust cooking temperature in increments of 25°.
![]()
- Press « Temp » again to confirm the new temperature.


You can stop the cooking at any time by pressing the "Start/Stop" button.
Thin pizza
- Preset: 450°F - 10 minutes – Use shelf position #1.
![]()
- The Thin Pizza program is for cooking frozen pizza, approximately 10 '' diameter.
- We recommend you to adjust the time and/or temperature according to the size of your pizza and your taste.
For 8 '' frozen pizza subtract 1 minute.
For 12'' frozen pizza, add 1 minute. - For best results always rotate the pizza 180º halfway through the cooking cycle.

Thick pizza
- Preset: 450°F - 15 minutes – Use shelf position #1.
![]()
- The Thick pizza program is for a cooking frozen pizza, (or deep dish) approximately 8 '' diameter.
- Due to the variety of fresh and frozen pizza on the market were commend you to adjust the time and/or temperature according to the size of your pizza and to your taste.
- For best results always rotate the pizza 180º halfway through the cooking cycle.

Cookies
- Preset: 300° - 10 minutes – Use shelf position #2.
![]()
- Cookies can be made using the non-stick bake pan included in your toaster oven. If you choose to use an aluminium pan you will need to decrease the cooking time.
- Cooking times vary depending on:
- The starting temperature of the dough (refrigerated or fresh).
- The amount of dough per cookie.
- The thickness of each portion of dough.
- We recommend you to adjust the time and/or temperature according to the type of cookies and the browning you prefer.

Brownies
- Preset: 300° - 30 minutes – shelf position #2.
![]()
- The brownies program is based on typical packaged brownie mix, baked in a nonstick 8" x 8" pan. Aluminium pans will require less cooking time.
- Adjustments to time and temperature will be necessary when using a larger bake pan (ie. 9'' x 9'') or for larger amounts of mix.

Bagels
- Use shelf position #3.
![]()
- Arrange bagels directly on the shelf with cut side facing up. Do not use the bake pan.
- There are 9 possible browning settings.
- The default browning level is 4, but you can adjust it to your taste by pressing "+" or "-".
- For best results use a browning level between 6 – 9.

Pastry
- Preset: 450°F - 20 minutes. Use shelf position #1 (for the Apple tart recipe below).
![]()
- The pastry function alternates quickly between heating with top and bottom heating elements. The function can be used for baking breads, pies and pastries, with your customized adjustments to time and temperature. Try this Apple Tart recipe listed below.

| APPLE TART | |
Ingredients:
|
|
Expert Controlled Cooking Function (model FBC412)
Preselected recipe table - You may have to adjust time + temperature to your taste.

| Function | Temperature | Shelf position | Time |
| Thin pizza | 450°F | 1 | 10 min |
| Thick pizza | 450°F | 1 | 15 min |
| Cookies | 300°F | 2 | 10 min |
| Brownies | 300°F | 2 | 30 min |
| Bagels | 1 to 9 | 3 | varies |
| Pastry | 450°F | 1 | 20 min |
Cleaning and care
Never touch or clean the quartz heating elements.

Do not allow grease to accumulate in the appliance.
- Before cleaning, care or storage disconnect the appliance and leave it to cool.
- A quick wipe with a sponge is sufficient to clean the outside of the appliance.
![]()
- Do not use cleaning products intended for metals (for stainless steel, copper etc.).
- Clean the door, enameled or lacquered surfaces and translucent parts with a damp sponge and a mild detergent.

Do not use aggressive cleaning products (especially oven cleaners or metal or abrasive pads).
- The inside walls of the oven are non-stick and will clean easily with water and detergent.
![]()
- All accessories* (shelf, bake sheet, broiling pan) can be cleaned with water and detergent.

*Depending on model
Expert Heat ReflectorTM - The stainless steel crumb tray
Do not wash the crumb tray in the dishwasher.
- Leave the crumb tray in place while the appliance is in operation.
- Do not touch the metal part of the crumb tray during or immediately after operation. Allow to cool completely.
- The crumb tray should be cleaned in warm soapy water.
![]()
- Do not use abrasive scouring pads to avoid damaging the highly polished surface.

*Depending on model

Documents / Resources
References
Download manual
Here you can download full pdf version of manual, it may contain additional safety instructions, warranty information, FCC rules, etc.
Advertisement
Thank you! Your question has been received!


Need Assistance?
Do you have a question about the FBC413 that isn't answered in the manual? Leave your question here.