Advertisement
Available languages
Available languages
Quick Links
NOTE:
Please read all instructions
carefully before using this
product
NOTA:
Por favor lea atentamente
las instrucciones antes de
utilizar este producto
Table of Contents / Índice
Safety Notice / Aviso de
seguridad
Important Assembly
Information / Información
importante de montaje
Care and Maintenance /
Cuidado y mantenimiento
Parts List / Lista de piezas
Warranty / Garantía
Ordering Parts / Solicitud de
piezas
Model / Modelo
PM-10110
Retain This Manual for
Reference / Conserve
este manual para
futura referencia
221222
OWNER'S
MANUAL / MANUAL
DEL USUARIO
BANCO DE EJERCICIOS
IMPORTANT:
Please read this manual before commencing
assembly of this product.
IMPORTANTE:
Por favor lea este manual antes de comenzar a
montar este producto.
2801 South Towne Avenue, Pomona, California 91766
Tel: (800) 999-8899 Fax: (626) 961-9966
MARCY PRO
PM-10110
IMPEX
INC.
®
www.marcypro.com
support@impex-fitness.com
Advertisement

Related Manuals for Impex MARCY PRO PM-10110


Summary of Contents for Impex MARCY PRO PM-10110
- Page 1 IMPORTANTE: Por favor lea este manual antes de comenzar a montar este producto. OWNER'S MANUAL / MANUAL IMPEX INC. ® DEL USUARIO 2801 South Towne Avenue, Pomona, California 91766 Tel: (800) 999-8899 Fax: (626) 961-9966 www.marcypro.com...
- Page 2 WARRANTY ORDERING PARTS BEFORE YOU BEGIN Thank you for selecting the MARCY MULTI PURPOSE UTILITY BENCH PM-10110 by IMPEX ® INC. For your safety and benefit, read this manual carefully before using the equipment. As a manufacturer, we are committed to provide you with complete customer satisfaction.
- Page 3 BEFORE BEGINNING ANY EXERCISE PROGRAM, CONSULT YOUR PHYSICIAN. THIS IS ESPECIALLY IMPORTANT FOR INDIVIDUALS OVER THE AGE OF 35 OR PERSONS WITH PRE-EXISTING HEALTH PROBLEMS. READ ALL INSTRUCTIONS BEFORE USING ANY FITNESS EQUIPMENT. IMPEX INC. ASSUMES RESPONSIBILITY PERSONAL INJURY PROPERTY DAMAGE SUSTAINED BY OR THROUGH THE USE OF THIS PRODUCT.
- Page 4 EXECISE GUIDELINES Building Muscle and Gaining Weight Unlike aerobic exercise, which emphasizes endurance training, anaerobic exercise focuses on strength training. A gradual weight gain can occur while building the size and strength of muscles. While developing muscle mass, your body adapts to the stress placed upon it. You can modify your diet to include foods such as meat, fish and vegetables.
- Page 5 Beginning a Strength Building Program Warming Up To begin strength training, it is important to stretch and perform light exercise for 5 to 10 minutes. This helps prepare the body for more strenuous exercise by increasing circulation, raising your body temperature and developing more oxygen to your muscles.
- Page 6 WARNING LABEL PLACEMENT The warning and caution labels are shown here have been placed on the Front Support, Rear Support, and Main Seat Support. If the labels are missing or illegible, please call customer service at 1-800-999-8899 for replacements. Apply the labels in the location shown. ©MPEX INC.
- Page 7 IMPORTANT ASSEMBLY INFORMATION Tools Required for Assembling the Bench: Two Adjustable Wrenches and Allen Wrenches. NOTE: It is strongly recommended that this equipment be assembled by two or more people to avoid possible injury. Ensure Carriage Bolts are inserted through the SQUARE holes on components that need to ...
- Page 8 CARE AND MAINTENANCE 1. Lubricate moving parts with WD-40 or light oil periodically. 2. Inspect and tighten all parts before using the equipment. 3. The equipment can be cleaned using a damp cloth and mild non-abrasive detergent. DO NOT use solvents. 4.
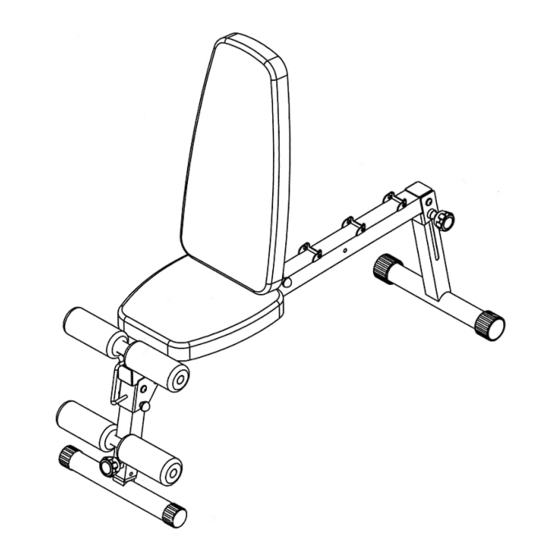
- Page 9 BENCH COMPONENTS 1. Remove all components from carton. 2. Inspect each component and check with below component list. 3. Please contact customer service if damaged or missing component occurred. PART NO. DESCRIPTION QUANTITY COMPONENT LIST Bench Foam Tube Foam Roll Lock Knob Lock Pin ©MPEX INC.
- Page 10 BENCH SET UP Bench should be placed on flat surface. The incline or decline of surface should be limited to 3% or less for best performance and safety. UNFOLD FRONT SUPPORT A.) Pull out the Lock Pin (#18). B.) Pull Front Support (#7) forward. C.) Insert back the Lock Pin completely to Front Support.
- Page 11 LOCKING BACKREST BOARD AND LEG SUPPORT A.) Pull out Lock Pin (#18). Flip up Backrest Board (#9). B.) Place the end of Incline Support onto selected slot; insert Lock Pin (#18) completely through the hole on slot and end of Incline Support to lock Incline Support safely to the slot. C.) Insert the two Lock Knobs (#12) to lock Main Seat Support and Leg Support Frame into position.
- Page 12 FOAM ROLL INSTALLATION A.) Insert Foam Tube (#8) into the opening on Main Seat Support (#1). Slide two Foam Rolls (#11) onto the Tube from each end. B.) Slide two Foam Rolls onto the tube on Leg Support Frame from each end. C.) Loosen the Lock Knob (#12) on Leg Support Frame, select height of Front Support and fasten the Lock Knob to securely lock Front Support in position at selected height.
- Page 13 SET UP AS SLANT BOARD Push Rear Support all the way into the Main Seat Support until the orange color line reach the edge of the locking block on Main Seat Support. ©MPEX INC. www.marcypro.com...
- Page 14 SET UP AS FLAT BENCH A.) Loosen the Lock Knob (#12) on the Main Seat Support (#1). B.) Pull out the Rear Support (#3) from Main Seat Support (#1). C.) Fold the Rear Support to stand vertically. Fasten the Lock Knob. D.) Thread the front Lock Knob into the bottom hole on Front Support.
- Page 15 TRANSPORT 1. Flatten the Backrest Board and Rear Support. 2. Fold the Front Support. 3. Grab the handle on Front Support and use the Rear Support Roller Cap to transport. PM-10110 PARTS LIST PART DESCRIPTION SIZE QUANTITY ©MPEX INC. www.marcypro.com...
- Page 16 Main Seat Support Front Support Rear Support Left Backrest Support Right Backrest Support Incline Support Leg Support Frame Foam Tube Backrest Board Seat Pad Foam Roll Lock Knob Rear Support Roller Cap Sleeve 1 ¾” x 1 ½” End Cap 2”...
- Page 17 ©MPEX INC. www.marcypro.com...
- Page 18 All returns must be pre-authorized by IMPEX. Pre-authorization may be obtained by calling IMPEX Service Centers. All freights on products returned to IMPEX must be prepaid by the customer. This warranty does not extend to any product or damage to a product caused by or attributable to freight damage, abuse, misuse, improper or abnormal usage or repairs not provided by an IMPEX authorized service center or for products used for commercial or rental purposes.
- Page 19 GARANTÍA PEDIDO DE REPUESTOS ANTES DE EMPEZAR Gracias por elegir el BANCO DE EJERCICIOS MARCY UTILITY BENCH PM-10110 de IMPEX ® INC. Para su seguridad y beneficio, lea atentamente este manual antes de utilizar el equipo. Como fabricantes, estamos comprometidos en brindarle a usted una completa satisfacción. Si tiene alguna consulta, o ha encontrado piezas faltantes o dañadas, le...
- Page 20 PERSONAS MAYORES DE 35 AÑOS O PERSONAS CON PROBLEMAS DE SALUD PREEXISTENTES. LEA TODAS LAS INSTRUCCIONES ANTES DE UTILIZAR CUALQUIER EQUIPO DE EJERCICIOS. IMPEX INC. NO ASUME NINGUNA RESPONSABILIDAD POR LESIONES PERSONALES O DAÑOS MATERIALES SUFRIDOS POR O MEDIANTE EL USO DE ESTE PRODUCTO.
- Page 21 DIRECTRICES DE EJERCICIO Crear músculo y aumentar el peso A diferencia del ejercicio aeróbico, que hace hincapié en el entrenamiento de resistencia, el ejercicio anaeróbico se centra en el entrenamiento de fuerza. Un aumento de peso gradual puede ocurrir mientras crea el tamaño y la fuerza de los músculos. Mientras se desarrolla la masa muscular, su cuerpo se adapta a la tensión colocada sobre él.
- Page 22 Iniciar un programa de musculación Calentamiento Para comenzar el entrenamiento de fuerza, es importante estirarse y realizar ejercicio ligero por 5 a 10 minutos. Esto ayuda a preparar el cuerpo para ejercicios más intensos aumentando la circulación, elevando la temperatura de su cuerpo y desarrollando más oxígeno a los músculos. Entrenamiento En cada sesión de ejercicio, tenga en cuenta que el dolor muscular que se prolonga durante un largo periodo no es deseable y puede significar que se ha lesionado.
- Page 23 UBICACIÓN DE ETIQUETAS DE ADVERTENCIA ©MPEX INC. www.marcypro.com...
- Page 24 Las etiquetas de advertencia que se muestran aquí han sido colocadas en el estabilizador trasero y en el poste frontal. Si las etiquetas faltan o están ilegibles, por favor llame a servicio al cliente al número 1-800-999-8899 para obtener reemplazos. Aplique las etiquetas en las ubicaciones que se indican. INFORMACIÓN IMPORTANTE SOBRE EL MONTAJE ...
- Page 25 CUIDADO Y MANTENIMIENTO 1. Lubrique las partes móviles con WD-40 o con aceite leve periódicamente. 2. Revise y ajuste todas las piezas antes de utilizar el equipo. 3. Los equipos pueden limpiarse con un paño húmedo y un detergente suave no abrasivo. NO utilice solventes.
- Page 26 COMPONENTES DEL BANCO 1. Remueva todos los componentes de la caja. 2. Inspeccione cada componente y compárelo con la lista de abajo. 3. Favor de contactar al centro del servicio al cliente si tiene algún componente dañado o faltante. PART NO. DESCRIPTION QUANTITY Bench...
- Page 27 CONFIGURACIÓN DEL BANCO El banco debe de estar colocada en una superficie plana. La inclinación o declive de la superficie debe limitarse a 3% o menos para obtener el mejor rendimiento y seguridad. DESDOBLAR DEL SOPORTE DELANTERO A. Saque el Pasador de seguridad (#18). B.
- Page 28 BLOQUEO DEL RESPALDO Y EL SOPORTE DE LAS PIERNAS A. Saque el Pasador de seguridad (#18). Levante el Tabla de respaldo (#9). B. Coloque el extremo de Inclinación del Respaldo en la ranura seleccionada; Inserte completamente el Pasador de seguridad (#18) a través del orificio en la ranura y el extremo de Inclinación del Respaldo para fijar la inclinación del Respaldo con seguridad en la ranura.
- Page 29 INSTALACIÓN DEL ROLLO DE ESPUMA A. Inserte el Tubo de Espuma (#8) en la abertura del Soporte Principal del Asiento (#1). Deslice 2 Rodillos de espuma (#11) en el Tubo por cada extremo. B. Deslice 2 Rodillos de espuma en el tubo del Marco de Soporte de las Piernas por cada extremo.
- Page 30 CONFIGURACIÓN DE INCLINACIÓN DEL RESPALDO Empuje el Soporte de respaldo hasta el tope del asiento principal hasta que la línea de color naranja alcance el borde del bloqueo del Soporte Principal del Asiento. ©MPEX INC. www.marcypro.com...
- Page 31 CONFIGURACIÓN PLANA DEL BANCO A. Afloje la Perilla de seguridad (#12) en el Soporte Principal del Asiento (#1). B. Saque el Soporte de respaldo (#3) del Soporte Principal del Asiento. C. Doble el Soporte de respaldo para se quede verticalmente. Ajuste la Perilla de seguridad. D.
- Page 32 TRANSPORTE 1. Aplane el Respaldo y el Soporte de respaldo. 2. Doble el Poste frontal. 3. Agarre la manija del Poste frontal y use la Tapa Giratoria del el Soporte de respaldo para transportar. PM-10110 LISTA DE PIEZAS PART DESCRIPTION SIZE QUANTITY ©MPEX INC.
- Page 33 Soporte Principal del Asiento Poste frontal Soporte de respaldo Soporte del respaldo izquierdo Soporte del respaldo derecho Soporte de inclinación Soporte de piernas Tubo de espuma Tabla de respaldo Asiento acolchado Rodillos de espuma Perilla de seguridad Tapa del extremo del pie estabilizador Manguito 1 ¾”...
- Page 34 PM-10110 DIAGRAMA EXPANDIDO ©MPEX INC. www.marcypro.com...
- Page 35 Todas las devoluciones deben ser previamente autorizadas por IMPEX. La autorización previa puede obtenerse llamando al Centros de servicio de IMPEX . El envío de los productos devueltos a IMPEX deberá ser pagado por adelantado por el cliente. Esta garantía no se extiende a ningún producto o daños al producto causados por o atribuibles a daño de envío, abuso, mal uso, uso indebido o anormal o reparaciones no proporcionadas por un centro de servicio autorizado por IMPEX o para los productos utilizados para fines comerciales o de alquiler.
- Page 36 Costa Rica Nombre: Repuestos Romano e hijos 175m oeste de la plaza de deportes Dirección Frente Central de Mangueras, Rotulo completa: TVROMANO, San Jose La Uruca Teléfono de Oficinas Centrales: 506 2221-5151 contacto: Sucursal del Este: 506 2223-5151 Sucursal del Heredia: 506 2262-5151 Mail de servicioalcliente@tvromano.com contacto:...