Fishman Loudbox Artist - Amplifier Manual
- User manual (21 pages) ,
- User manual (17 pages)
Advertisement
Hear This
The Loudbox Artist amplifier is capable of cleanly reproducing the sound of your instrument at very high volume levels. Prolonged repeated exposure to high sound pressure levels (SPLs) without protection can cause permanent hearing loss. OSHA has set guidelines and specified permissible sound-exposure limits for those who work in high SPL environments.
| Permissible noise exposures | |
| Duration per day, hours | Sound level dBA slow response |
| 8 | 90 |
| 6 | 92 |
| 4 | 95 |
| 3 | 97 |
| 2 | 100 |
| 1 ½ | 102 |
| 1 | 105 |
| ½ | 110 |
| ¼ or less | 115 |
To ensure against permanent hearing loss, wear hearing protection when you perform with amplification.
 NOTE: Operate the amplifier only at the voltage indicated in the check box on the rear panel. Do not defeat the ground prong on the AC cable; the safe operation of this amplifier depends on a proper ground connection.
Getting Started

Here are some basic setup tips to help get you going. To operate the Loudbox Artist safely, please read the entire manual, especially the Important Safety Instructions.
If your amplifier has an operating voltage of 120V, plug the provided AC line cord into the back of the amplifier.
If your amplifier operates at 230V, you must supply your own detachable power cord. The cord you supply must have an IEC-style 320 connector at one end and a male AC plug appropriate for your area at the other.
- Locate the Power switch (above the rear panel power cord terminal) and switch it off (down position), then connect the power cord.
- Plug the Loudbox Artist into an electrical outlet with the appropriate AC voltage.
- Turn down the Master Volume control and turn on the Power switch.
- Connect your instrument to the Channel 1 input with a shielded ¼" cable.
- Play aggressively and raise Channel 1 Gain until the Clip LED (inside the Pad button) flashes, then back off the Gain until no clipping occurs.
- Set the tone controls "flat" as illustrated below.
- Push the Mute switch (turning off its yellow light) and slowly raise the Master Volume to the desired level.
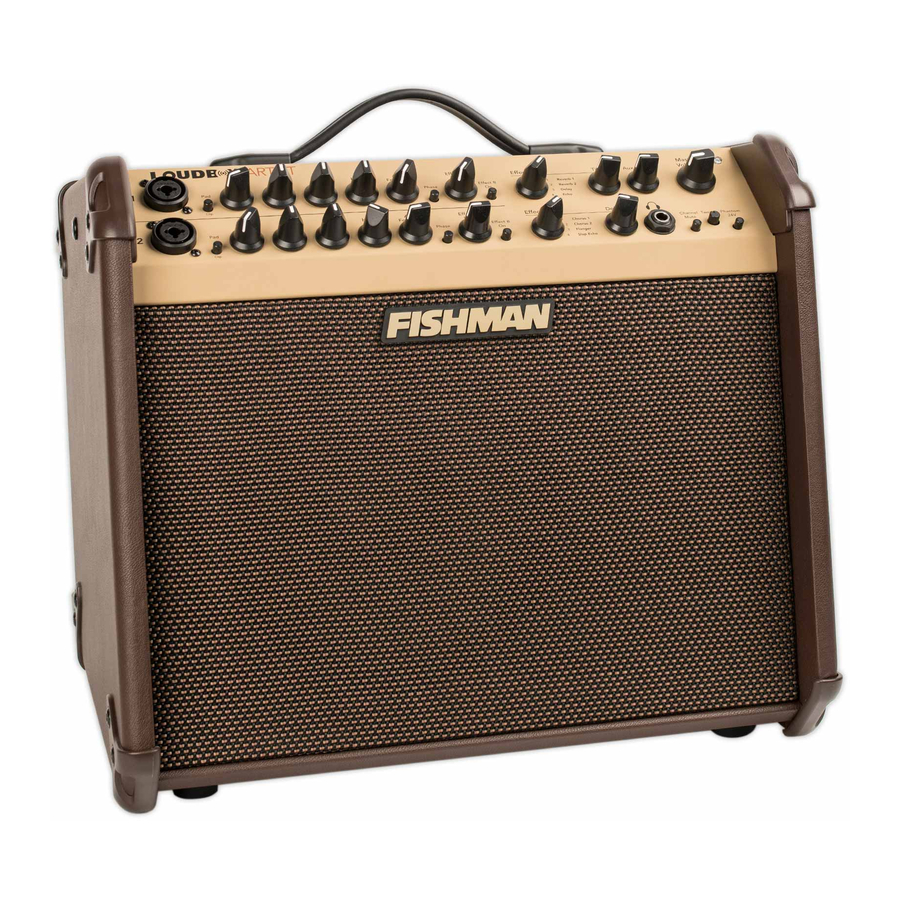
Front Panel


Controls 1 through 10 are identical for both channels.
- Channel 1 Input
The 1/4" input accepts all types of passive or active acoustic pickups. Plug a balanced mic into the XLR input for vocal or instrument use. - 10db Pad & Clip LED
If you have a high output pickup and the Clip LED (located in the center of the Pad button) comes on at low Gain settings, push this switch in to put your pickup level into a more useable range. - Gain
Use the Gain knob to set the level of the signal. - Low
Boost here to add weight to the sound. In general, boost bass at low volumes and flatten it out (or cut) at higher levels. With the dial set at 12 o'clock, the control is effectively out of the circuit. - Mid
This control affects how well the instrument blends in or stands out in the mix. At loud volumes a midrange cut will achieve a more natural sound. With the dial set at 12 o'clock, the control is effectively out of the circuit. - High
Boost highs to add "air" to the sound of the instrument. With the knob set at 12 o'clock, the control is effectively out of the circuit. - Anti-Feedback
If you encounter low-frequency feedback, sweep this control to isolate and eliminate it. To learn more about acoustic feedback. - Phase
Use the Phase switch in conjunction with the Anti-Feedback filter to eliminate acoustic feedback. To read more about acoustic feedback. - Effect A Level
Controls the amount of Effect A in the input channel. - Effect B On
When this button is lit, the input channel's audio is processed by Effect B. - Effect A
Use this control to select one of four effects for Effect A. - Effect A "Time"
Determines the length of time for the delay or reverb effects. - Effect B
Use this control to select one of four effects for Effect B. - Effect B "Depth"
Adjusts the intensity of Effect B. - Aux Level
Use this to control the level of an audio device plugged into the Aux input. Note that the Aux channel is independent of the Mute switch, so you can play pre-recorded music on your breaks. - Master Volume
Set the overall level of the Loudbox Artist with the Master Volume. In general put the Master Volume as high as possible (2 o'clock to 5 o'clock) to achieve the cleanest sound. - Power
Lights up when the amplifier power is on. - Headphone Jack
When you plug in stereo headphones here, the speakers shut off. This output monitors Channels 1 & 2 and the Aux input, so you can play along with pre-recorded music through the headphones. - Channel Mute
The Channel Mute switch shuts off the signals from Channels 1 and 2 to the speakers and all XLR outputs. The Channel Mute does not affect the Aux Inputs or the effects sends. When mute is active, its button LED will be lit. - Tweeter Level
Turn this control to attenuate the tweeter's output level to where it sounds best to you. - Phantom Power
Provides 24V to the XLR input on each input channel to power a condenser microphone. When phantom power is active, its button LED will be lit.
Most condenser and dynamic microphones, as well as some preamps, can be used safely with phantom power.
However, phantom power can damage some audio devices including some unbalanced mics, preamps or stompboxes that have been modified for balanced XLR use. Whenever there is doubt, contact the manufacturer to confirm compatibility.
Rear Panel

- Power switch
Lower the Master Volume before you turn on the amp. Flip the power switch to the up position. - AC power
Operate the amplifier only at the voltage indicated on the rear panel.
For 120V amplifiers purchased in the USA, Canada and Mexico, plug in the supplied detachable AC power cable.
For 100V and 230V amplifiers purchased outside the USA and Canada, you will need to supply your own detachable AC cable. This cable must have an IECstyle 320 connector at one end, and a male AC plug appropriate for your region at the other.
![warning]() Disconnect device is AC inlet or power switch.
Disconnect device is AC inlet or power switch. - Mute Foot Switch
Plug a Fishman dual foot switch into this jack for remote access to Channel Mute and Effect B Mute. - Aux Input - 1/4" & 1/8"
Plug in a line level stereo audio source such as a CD or MP3 player in either input. Both inputs may be used at the same time. They are stereo (TRS) inputs, however the left and right signals are mixed to mono. - Mix D.I. (Post)
Plug in here when you wish to send signals from both Channel 1 and 2 to a mixing console or a slave amplifier. This post-EQ output is always ground isolated to prevent ground loop hum. - Channel 2 Effects Loop (serial)
Patch an external effect through these jacks. Use a standard ¼" shielded instrument cable to connect the Channel 2 Send to the input of the effect. Connect the Channel 2 Return jack to the output of the effect. The Channel 2 loop is located post-EQ and is compatible with battery-operated stompboxstyle effects processors. - Channel 2 D.I. out (Pre-EQ)
Use this output when you want a flat D.I. signal to send to a mixing console. This pre-EQ output is always ground isolated to prevent ground loop hum. - Channel 1 Effects Loop (serial)
Patch an external effect through these jacks. Use a standard ¼" shielded instrument cable to connect the Channel 1 Send to the input of the effect. Connect the Channel 1 Return jack to the output of the effect. The Channel 1 loop is located post-EQ and is compatible with battery-operated stompboxstyle effects processors. - Channel 1 D.I. out (Pre-EQ)
Use this output when you want a flat D.I. signal to send to a mixing console. This pre-EQ output is always ground isolated to prevent ground loop hum.
Set up
For reference, start with the tone controls flat (straight-up, twelve o'clock). In this position, there is no equalization applied to your sound. Begin at a very low volume and work your way up. As you turn up, try adjusting the Loudbox Artist's tone controls as recommended below.
- Low volume
At a low volume (just above conversation level) our ears are not very sensitive to bass and treble, so give the Low and High controls a good boost.

- Medium volume
At intermediate levels, when you need to raise your voice to be heard over the music, the human ear is quite sensitive to midrange. Cut the Mid control to about ten o'clock or to your taste. At this level our perception of bass and treble starts to catch up to the rest of the tonal spectrum, so you can back off the Low and High controls slightly for good tonal balance.

- High volume
At loud levels, when you must shout to be heard over the music, your ears (and your audience) will benefit from a deep midrange cut. Set the Mid dial between nine and seven o'clock. Our perception of bass and treble "flattens out" at high volumes, so you won't need much, if any, Low or High boost. Set the Low and High knobs to between twelve and one o'clock.


About Acoustic Feedback
Feedback usually occurs in the lowest octave of your instrument, generally with two notes about a half step apart. The lower type of feedback (cavity resonance) starts when the sound pressure coming out of the speakers excites the resonant air chamber inside your instrument. We have found that it is effective to tune out an instrument's cavity resonance feedback with the Anti-Feedback (notch filter) in the Loudbox Artist. For acoustic guitar this occurs at G# on the low E-string, or at about 100Hz. Turn the Anti-Feedback knob to about 11 o'clock to dial out this resonance. Note that the circuit can be effectively defeated by moving the dial to the Off (7 o'clock) position.
The higher range of feedback (top resonance) usually starts about a half or whole step above cavity resonance of the instrument. Top resonance feedback happens when the sound pressure coming off the speakers excites the resonant frequency of the soundboard of your instrument. For acoustic guitar, this occurs at A and above on the low E-string. Push the Phase switch in and out until you find the position that subdues top resonance feedback.

Block Diagram

Technical Specifications
| Input Impedance: | |
| 1/4" Input | 5MOhm |
| XLR Input | 2.4kOhm Balanced |
| Aux Input (stereo) | 10kOhm |
| Phantom Power | |
| XLR Input | 24VDC / 1.2kOhm DC source impedance per pin |
| Tone Controls and Anti-Feedback: | |
| Low | ±12.5dB @ 50Hz (resonant) |
| Mid | ±10.5dB @ 750Hz (resonant) |
| High | ±12.5dB @ 15kHz (shelving) |
| Anti Feedback range | -14dB @ 15Hz – 330Hz (Hi-Q resonant notch) |
| Channel 1 & 2 D.I. output: | |
| Output Impedance | 440Ohm balanced |
| Phantom power tolerant, ground isolated | |
| Channel 1 & 2 Effects Sends: | |
| Output Impedance | 2.2kOhm |
| Operating Level | -10dBV Nominal |
| Channel 1 & 2 Effects Returns: | |
| Input Impedance | 28k Ohm |
| Input Voltage | -10dBV Nominal |
| (Sends and returns are compatible with battery operated effects processors) | |
| Mix D.I. output: | |
| Output Impedance | 600Ohm balanced |
| Phantom power tolerant, ground isolated | |

Documents / ResourcesDownload manual
Here you can download full pdf version of manual, it may contain additional safety instructions, warranty information, FCC rules, etc.
Advertisement
Thank you! Your question has been received!


Need Assistance?
Do you have a question about the Loudbox Artist that isn't answered in the manual? Leave your question here.