Table of Contents
Advertisement
Quick Links
Installation
Start-Up
Maintenance
Parts
Warranty
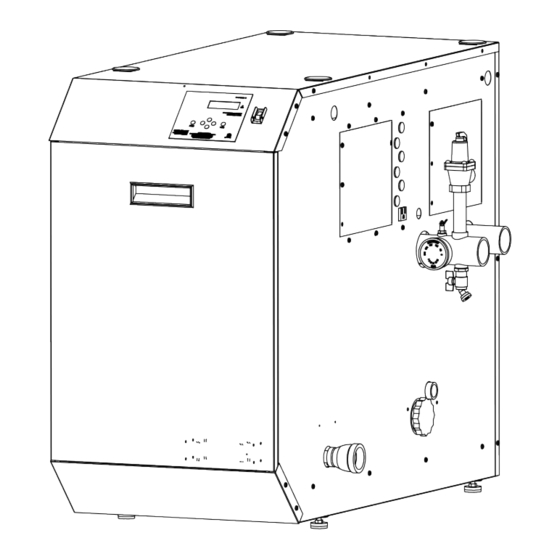
WBCMC**500 / 700 / 850 Models*
* "NG" Denotes Natural Gas Operation
"LP" Denotes Propane Gas Operation
"HL" Denotes Installed High and Low Gas Pressure Switches
"FS" Denotes Installed Flow Switch
"WL" Denotes Installed High Temperature Water Limit
This manual must only be used by a qualified installer / service technician. Read all instructions in this manual before installing.
Perform steps in the given order. Failure to do so could result in substantial property damage, severe personal injury, or death.
Improper installation, adjustment, alteration, service, or maintenance could void product warranty and cause property
damage, severe personal injury, or death.
California Proposition 65 Warning: This product contains chemicals known to the State of California to cause cancer, birth
defects, or other reproductive harm.
Westinghouse reserves the right to make product changes or updates without notice and will not be held liable for
typographical errors in literature.
NOTE TO CONSUMER: PLEASE KEEP ALL INSTRUCTIONS FOR FUTURE REFERENCE.
www.westinghousewaterheating.com
Commercial
Gas Fired Boilers
This Manual For Use With Boilers Manufactured After
August 13, 2013
Heat Exchanger Bears the ASME "H" Stamp
whl-445 Rev. 000 Rel. 014 Date 7.21.20
Advertisement
Table of Contents

Related Manuals for Westinghouse Premium WBCMC 500 Series


Summary of Contents for Westinghouse Premium WBCMC 500 Series
- Page 1 California Proposition 65 Warning: This product contains chemicals known to the State of California to cause cancer, birth defects, or other reproductive harm. Westinghouse reserves the right to make product changes or updates without notice and will not be held liable for typographical errors in literature.
- Page 2 WARNING: If the information in these instructions is not followed exactly, a fire or explosion may result causing property damage, personal injury or death. • Do not store or use gasoline or other flammable vapors and liquids in the vicinity of this or any other appliance. WHAT TO DO IF YOU SMELL GAS •...
- Page 3 AHJ. DANGER indicates an imminently hazardous situation which, if NOTE: Westinghouse reserves the right to modify product technical not avoided, will result in serious personal injury or death. specifications and components without prior notice.
-
Page 4: Table Of Contents
In accordance with Section 325 (f) (3) of the Energy Policy and D. Clearances for Service Access Conservation Act, Westinghouse has provided this boiler with E. Residential Garage and Closet Installations multiple features designed to save energy by reducing the F. -
Page 5: Part 1 - General Safety Information
Part 10 - Start-Up Procedure Act of God, and IS NOT covered under product warranty. A. Control Overview Altering any Westinghouse boiler with parts not manufactured by B. Navigation of the Display Westinghouse WILL INSTANTLY VOID the boiler warranty and could C. -
Page 6: Improper Combustion
B. How the Boiler Operates sediment. The high-efficiency heat exchanger can be damaged Condensing technology intelligently delivers highly efficient by build-up or corrosion due to sediment. Westinghouse hydronic heating while maximizing efficiency by measuring data recommends a suction strainer in this type of system. -
Page 7: Optional Equipment
Monitors storage tank temperature. • NOTE: To prevent condensing in the fan, it is recommended to avoid prolonged exposure to temperatures below 45 C. Optional Equipment Optional equipment available from Westinghouse (and Part #): • System Sensor (7250P-324) • Indirect Tank Sensor (7250P-325) This boiler has a condensate disposal system that may freeze if •... -
Page 8: Flooring
• Electrical power • Condensate drain Use extreme care not to drop the boiler or cause bodily injury 3. Check area around boiler. Remove any combustible materials, while lifting the boiler. gasoline, and other flammable liquids. Gas conversion should be performed BEFORE the boiler is installed. -
Page 9: Clearances For Service Access
Figure 3 - Recommended Service Clearances E. Residential Garage and Closet Installations Check with your local Authority Having Jurisdiction for requirements Figure 2 - Correct and Incorrect Leveling when installing the boiler in a garage or closet. Please read the entire manual before attempting installation. -
Page 10: Direct Vent Of Exhaust And Intake
The exhaust discharged by this boiler may be very hot. Avoid Failure to provide an adequate supply of fresh combustion air can touching or other direct contact with the exhaust gases of the vent cause poisonous flue gases to enter the living space, resulting termination assembly. -
Page 11: Removing A Boiler From A Common Vent System
dampers, and any other gas burning appliances to their previous Areas Likely Have Products to Avoid condition of use. Contaminants 7. Any improper operation of the common venting system should Spray cans containing Dry cleaning / laundry areas be corrected to conform to the National Fuel Gas Code, ANSI Z223.1. fluorocarbons and establishments When resizing any portion of the common venting system, the... - Page 12 • Total Dissolved Solids (TDS) less than 500 ppm (mg/L) scale build-up throughout the system. Water below 5 grains/ gallon (85 mg/L) may be over softened. • Total dissolved solids are minerals, salts, metals, and charged particles that are dissolved in water. •...
-
Page 13: Technical Specifications
K. Technical Specifications Model Installation Indoor, Floor Standing, Fully Condensing Minimum / Maximum Input (Btu/Hr) 100,000 / 500,000 170,000 / 700,000 170,000 / 850,000 Heating Capacity (MBH) Flue System Category IV, Sealed Combustion Direct Vent, Power Vent Minimum Combined Vent Run 16 feet Maximum Combined Vent Run 4”... -
Page 14: Part 4 - Piping
The boiler may be connected to an indirect water heater to supply technician to ensure that the product has not been affected domestic hot water. Westinghouse offers indirect water heaters in by corrosive water conditions and to ensure that the valve and either stainless steel or glass-lined construction. -
Page 15: Circulators
Expansion Tank Sizing* Model Heat Exchanger Volume (Gallons) The boiler should not be operated as a potable hot water heater. The boiler should not be used as a direct hot water heating device. 700/850 Table 3 - *Add Required Storage Tank Gallon Size to Heat Exchanger Volume - 119 and 175 Gallon Tanks Available 2. -
Page 16: Circulator Sizing
G. Circulator Sizing In addition, the boiler heat exchanger has a minimum total water volume that must be taken into account when sizing the circulator. Minimum boiler flow rates are listed in the table below. Minimum Boiler Flow Rates Model Minimum Flow (GPM) 700/850 Table 4 - Minimum Flow Rates... -
Page 17: Check / Control Water Chemistry
The chart below represents the combined flow rates and pipe sizes when using multiple boilers to design the manifold system for the primary circuit. To size, simply add up the number of boilers and the required flow rates for the system design temperature. Example: (5) Mod Con 500 boilers with a design of 30 F temperature rise with each boiler having an individual flow rate of 33 GPM. -
Page 18: Plumbing
Pressure Relief Valve Upon completion, make sure that the fill valve is in the automatic Factory supplied on boiler. The pressure relief valve is sized to ASME position and each zone balance and purge or shut off is in an open specifications. -
Page 19: Applications
Piping shown Primary/ Secondary. 6. The minimum pipe size for connecting an Westinghouse indirect fired water heater is 1”. 7. The minimum pipe size for connecting a Mod Con boiler is 2”. 8. System flow (Secondary Loop) must be greater than the boiler’s Primary Loop flow. - Page 20 *NOTE: Systems shown are primary/secondary piping systems. These recommended systems have a primary (boiler) loop, and secondary circuits for heating. The primary loop and secondary circuits have separate circulators. The use of other near boiler piping configurations could result in improper flow rates, leading to inadvertent boiler high limit shutdowns and poor system...
-
Page 21: Part 5 - Venting
Part 5 - Venting The boiler must be vented as detailed in this section. Ensure exhaust vent and intake piping complies with these instructions regarding vent system. Inspect finished exhaust vent and intake piping thoroughly to ensure all joints are well secured, airtight, and comply with all applicable code requirements, as well as the instructions provided in this manual. -
Page 22: Approved Materials For Exhaust Vent And Intake Pipe
B. Approved Materials for Exhaust Vent and Intake Pipe Standards for Installation In: Item Material United States Canada Pipe and Fittings Approved for Intake ONLY ABS* ANSI/ASTM D2661 ANSI/ASTM D2661 PVC Schedule 40/80 UL-1738 or ANSI/ASTM D1785 PVC-DWV Schedule 40/80 UL-1738 or ANSI/ASTM D2665 UL-1738 or ULC-S636 Pipe Approved for... -
Page 23: Exhaust Vent And Intake Pipe Location
D. Exhaust Vent and Intake Pipe Location INSIDE CORNER DETAIL FIXED OPERABLE CLOSED FIXED CLOSED OPERABLE LP-179-CC 03/28/17 Intake Pipe Terminal Exhaust Vent Terminal Area Where Intake Terminal Is Not Permitted Figure 10 - Exit Terminals for Direct Vent Systems - ANSI Z223.1 / NFPA 54 for US and CAN/CSA B149.1 for Canada DESCRIPTION CANADA Clearance above grade, veranda, porch, deck, or balcony... -
Page 24: Exhaust Vent And Intake Pipe Sizing
Standard E. Exhaust Vent and Intake Pipe Sizing Increased Vent Size Vent Connection and Reducing 1. The exhaust vent and intake pipe size is 4” for the 500 model and and Maximum Total Maximum Total Coupling 6” for the 700/850 models. Equivalent Length Equivalent Length 2. -
Page 25: Applications
instructions reference snow levels in establishing a minimum height H. Applications for the installation of exhaust vent or air intake terminations. Snow 1. Direct Vent Installation of Exhaust and Intake levels shall be determined as follows: If installing a direct vent option, combustion air must be drawn a. - Page 26 Two Pipe Sidewall Venting EXTERIOR WALL with Intake (Elbow) and Coupling (Exhaust) 1" MIN. 12" MIN. EXHAUST Insert Intake/Exhaust Screen into Coupling MAINTAIN 12" MINIMUM CLEARANCE ABOVE HIGHEST ANTICIPATED SNOW LEVEL OR GRADE, WHICHEVER IS GREATER (TYP) INTAKE LP-505-A Insert Intake/Exhaust Screen 06/23/15 into Open End of Elbow Sidewall Venting...
- Page 27 Figure 15 - Unbalanced Venting - Roof Exhaust and Sidewall Intake NOTE: These drawings are meant to demonstrate system venting only. The installer is responsible for all equipment and detailing required by local codes. Ensure the terminations are screened to prevent blockage caused by debris or birds.
-
Page 28: Room And Indoor Combustion Ventilation Requirements
2. Room and Indoor Combustion Ventilation Requirements When using an indoor combustion air installation, the mechanical room MUST be provided with properly sized openings, and/or be of sufficient volume to assure adequate combustion air and proper ventilation for all gas fired appliances in the mechanical room to assure adequate combustion air and proper ventilation. -
Page 29: Part 6 - Condensate Removal
To avoid long term damage to the drainage system and to meet failure IS NOT covered under warranty. local code requirements, Westinghouse recommends neutralizing EXHAUST FANS: Any fan or appliance which exhausts air from the condensate with a Condensate Neutralizer Kit (Part # 7350P-611). The... -
Page 30: Part 7 - Wiring
or deterioration. 3. A frozen condensate line could result in a blocked vent condition. It is very important to protect the condensate line from freezing Electrical Shock Hazard - Turn off electrical power supply at service temperatures or any type of blockage. In installations that may entrance panel before making any electrical connections. -
Page 31: Alarm Connections
J. Optional 0-10 Volt Building Control Signal a thermostat type aquastat installed in the indirect tank, or an Westinghouse 7250P-325 tank sensor. When a tank sensor is used, 1. A signal from a building management system may be connected the control will automatically detect its presence and a demand for to the boiler to enable remote control. -
Page 32: Optional High Gas Pressure Switch
Avoid running communication cables parallel and close 4. Disconnect red wire on the low water cut off probe and connect it to or against high voltage (120 volt or greater) wiring. Westinghouse to the red wire from the wire harness (included in kit). -
Page 33: Cascade Master Pump And Sensor Wiring
P. Cascade Master Pump and Sensor Wiring Q. Cascade Follower Pump and Sensor Wiring 1. Place the cascade master overlay sticker onto the field connection 1. If it is desired to have the boiler control the boiler pump, connect board on the boiler designated as the cascade master. the boiler pump to the BOILER HOT, BOILER NEUT, and BOILER GND 2. - Page 34 Figure 26 - Cascade Master and Follower Wiring whl-445 Rev. 000 Rel. 014 Date 7.21.20...
-
Page 35: Part 8 - Gas Connections
W I RING CONNEC T ION DIAGR AM 120 VAC LINE 500, 700 and 850 ALARM 120V J7-1 POWER J7-3 SWITCH J6-1 J8-3 J6-3 CONDENSATE NEUT RECEPTICAL J8-4 J8-1 X6-2 X6-4 X6-1 J6-2 ORANGE SPARK CABLE TO SPARK ELECTRODE J6-4 X5-7 FLAME RECTIFICATION X6-5... -
Page 36: Gas Piping
The gas connection on the boiler is 1 1/2” for the 500 model and 2” for the 700/850 models. It is mandatory that this fitting is used for connection to a field fabricated drip leg as shown in the illustration per the National Fuel Gas Code. -
Page 37: Check Inlet Gas Pressure
Westinghouse. Failure to use a conversion kit when converting 1. IMPORTANT! Before you connect to the inlet pressure, shut off the the boiler to fire on Natural or Propane gas will result in extremely gas and electrical power to unit. -
Page 38: Boiler Gas Valve
D. Boiler Gas Valve Figure 29 - 500 Model Gas Valve Figure 30 - 700/850 Model Gas Valve whl-445 Rev. 000 Rel. 014 Date 7.21.20... -
Page 39: Part 9 - Start-Up Preparation
NOTE: Boiler failure due to improper water chemistry is not Part 9 - Start-Up Preparation covered by warranty. B. Check for Gas Leaks Thoroughly clean and flush any system that has used glycol before installing the boiler. Provide the customer with a material safety data Before starting the boiler, and during initial operation, smell near sheet (MSDS) on the fluid used. -
Page 40: Purge Air From Water System
Westinghouse (554200). This pump is equipped with two leads that h. Disconnect the wires that are connected to the THERMOSTAT can be connected to an alarm or another type of warning device to terminals of the customer connection board. -
Page 41: Setting Up A Cascaded System
from the combustion chamber. In addition, the pump will run for a individually regulate firing rates to maintain the master set point pump post purge interval. The control will then be in standby, waiting temperature (tank set point + installer #4) at the individual supply to process the next demand for heat. -
Page 42: Part 10 - Start-Up Procedure
One of the zeroes will be blinking. Use the ^ v arrow keys to change the Part 10 - Start-Up Procedure blinking digit to the correct value. Use the < > arrow keys to select the next digit to change and again use the ^ v keys to change the value. Repeat until the correct code is entered. -
Page 43: Programming The System Setting
Boiler Setting Program Navigation E. Programming the System Setting Once the code is confirmed, the user can start to set the Boiler Settings. System Setting Program Access Use the arrow keys on the display to navigate through the Boiler Note: Programming the boiler control is not possible when the Settings. - Page 44 Function 9 Max Supply Temp Function 19 Boiler DHW Temp Sets the maximum design supply Allows the user to program the temperature based on the minimum boiler supply water temperature to MAX SUPPLY TEMP BOILER SUPPLY DHW outdoor design temperature. the indirect heat exchanger during Default: 190 F (Range: 77...
- Page 45 MONTH 00/00/2000 34 Function 30 Extra Heater Mode will need to program 10,000 hours, if required. Allows for a non Westinghouse boiler to be controlled when the Hours EXTRA BOILER MODE cascade output has risen above the Allows the user to set the middle two...
-
Page 46: Resetting The Maintenance Schedule
Press v once. Displays the current tank temperature set point on the top line. The actual temperature measured by the tank or return sensor (Westinghouse 7250P- 325) is displayed on the bottom line. DHW SET If a mechanical aquastat is used in place of the recommended sensor, the second line will display ‘OFF’... - Page 47 This screen displays boiler flame This screen displays the third oldest FLAME 0.0uA current on the top line. The second boiler control lockout fault. The top FAN SPEED 3497 RPM line displays boiler fan speed. line will alternate between the words FAULT HISTORY ‘FAULT HISTORY’...
-
Page 48: Cascade Menu
This screen displays the tenth oldest This screen displays information boiler control lockout fault. The top about cascade status. The TT in the line will alternate between the words center of the top line shows that FAULT HISTORY ‘FAULT HISTORY’ and the actual fault cascade demand is coming from 08/28/2009 Fr 5:19A... -
Page 49: Boiler Test Mode
pump to run in an attempt to cool the boiler. C. Boiler Test Mode 2. Note the displayed fault code and refer to Section D for an This function is intended to simplify gas adjustment. The following explanation of the message along with several suggestions for tables include recommended combustion settings by fuel type and corrective actions. -
Page 50: User Interface Display
D. User Interface Display Cascade Control Fault Codes Screen Description Possible Remedy Disconnect the system sensor from the wiring and measure it’s resistance. Compare the measured resistance E03 indicates a problem with the system to the table in this manual to see if it corresponds to the sensor circuit. - Page 51 1. Check line voltage. It must be between 100 and 128 volts. 2. If available, connect a PC and use Westinghouse service software to check the 24v supply display in the lower left corner of the screen. The number displayed here must be greater than 128 and should be no greater than 250.
- Page 52 F02 indicates the supply temperature sensor 1. Check the electrical connection to the thermistor on of the boiler has failed. The boiler will not the outlet manifold. Verify 5 VDC by checking the Molex restart until a technician replaces the sensor connector.
- Page 53 1. Watch the igniter through the observation window. 2. If there is no spark, check the spark electrode for the proper .196” (5.0 mm ± 1mm) gap. See below. 3. Remove any corrosion from the spark electrode and flame rectifier probe. 4.
- Page 54 1. Check flue system for obstructions. 2. Check proper communication between boilers. FLAP CLOSED Flapper valve physically stuck closed. 3. Check operation of flapper valve. 4. Check wiring between valve and controller. 5. Replace valve-flapper. 1. Check flue system for obstructions. 2.
-
Page 55: Part 13 - Maintenance
E19 indicates the line voltage frequency is Inspect power wiring to the boiler and repair as out of range. This could happen if the boiler necessary. If connected to line voltage, notify the power LINE VOLTAGE is being powered from a small gasoline company. -
Page 56: Cleaning Water Side Of Heat Exchanger
g. Turn boiler power back on and create a heat demand. When boiler is lit observe condensate flow from the boiler. Be sure the boiler is operating properly. h. Reconnect the condensate piping to the outside condensate connection. Do not use solvents to clean any of the burner components. The components could be damaged, resulting in unreliable or unsafe boiler operation, substantial property damage, severe personal injury, or death. -
Page 57: Part 14 - Installation Checklist
Part 14 - Installation Checklist Light Off Activities Date Completed: Check all piping and gas connections. Verify all are tight. Pressurize system (12 - 15 psi). Add water to prime condensate cup. 1. Fill the Heating System Verify near boiler piping is properly supported. - Page 58 Inspection Activities Date Last Completed Piping 1st Year 2nd Year 3 Year 4th Year* Check boiler and system piping for any sign of leakage; make sure Near boiler piping pipes are properly supported. Check condition of all vent pipes and joints. Ensure the vent piping Vent terminations are free of obstructions and blockages.
-
Page 59: Part 16 - Replacement Parts
Part 16 - Replacement Parts 500 Models Figure 32 - 500 Model Combustion System Replacement Parts - *Not Shown whl-445 Rev. 000 Rel. 014 Date 7.21.20... - Page 60 700 and 850 Models Figure 33 - 700/850 Model Combustion System Replacement Parts Model Control Board Part Numbers Model Control Board Part Numbers 7350P-1300 7350P-1302 Table 32 - Control Board Replacement Part Numbers whl-445 Rev. 000 Rel. 014 Date 7.21.20...
- Page 61 Figure 34 - Water Side Replacement Parts - All Models whl-445 Rev. 000 Rel. 014 Date 7.21.20...
- Page 62 See Table Figure 35 - Cabinet Replacement Parts - All Models whl-445 Rev. 000 Rel. 014 Date 7.21.20...
-
Page 63: Limited Warranty
Westinghouse warrants this boiler and its components to be free H. It is expressly agreed between Westinghouse and the Owner that from defects in material and workmanship according to the following repair, replacement, or refund are the exclusive remedies of the terms, conditions, and time periods. - Page 64 NOTE: Any components or boilers returned to Westinghouse for warranty analysis will become the property of Westinghouse and will not be returned, even if credit is denied. If all warranty conditions are satisfied, Westinghouse will provide replacement components to the retailer.
-
Page 65: Maintenance Notes
Maintenance Notes whl-445 Rev. 000 Rel. 014 Date 7.21.20... -
Page 66: Customer Installation Record Form
Customer Installation Record Form The following form should be completed by the qualified installer / service technician for you to keep as a record of the installation in case of a warranty claim. After reading the important notes at the bottom of the page, please also sign this document. Customer’s Name Date of Installation Installation Address...