Table of Contents
Advertisement
Quick Links
Advertisement
Table of Contents

Related Manuals for TRENDnet TPE-TG50ES


Summary of Contents for TRENDnet TPE-TG50ES
- Page 1 Cover Page TRENDnet User’s Guide...
-
Page 2: Table Of Contents
Add static unicast entries to the switch ............. 21 Using the Utility ......................43 Add static multicast entries to the switch ............22 Launching the Utility ..................43 Configure IGMP Snooping Settings ..............23 Discovery List ..................... 44 © Copyright 2018 TRENDnet. All Rights Reserved. - Page 3 Table of Contents TRENDnet User’s Guide Monitor List ....................... 44 Device Setting ....................45 Main Menu Options ................... 46 Technical Specifications..............47 Troubleshooting ................49 Appendix ..................50 © Copyright 2018 TRENDnet. All Rights Reserved.
-
Page 4: Product Overview
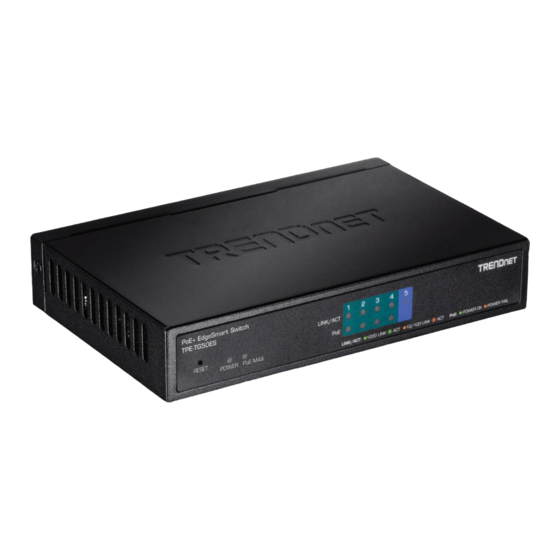
TRENDnet User’s Guide Features Product Overview TRENDnet’s 5-Port Gigabit EdgeSmart PoE+ Switch, model TPE-TG50ES, is a cost- effective desktop managed switch solution for high-speed gigabit PoE+ applications. This 5-port smart PoE+ switch features the most commonly used managed switch features, reducing unnecessary switch complexity. -
Page 5: Product Hardware Features
Gigabit Ethernet PoE+ Ports (1-4) – Connect either PoE+ or non-PoE devices. Gigabit Ethernet Port (5) – Connect a non-PoE device. © Copyright 2018 TRENDnet. All Rights Reserved. -
Page 6: Basic Installation
Row LED Class/PowerLimit restrictions in the PoE configurations. When the LED is off, the respective port is Off: either not connected to a PoE device or is disconnected. © Copyright 2018 TRENDnet. All Rights Reserved. - Page 7 6. Click Save Settings to Flash, then click OK. Note: This step saves all configuration changes to the NV-RAM to ensure that if the switch is rebooted or power cycled, the configuration changes will still be applied. © Copyright 2018 TRENDnet. All Rights Reserved.
-
Page 8: Connect Additional Devices To Your Switch
Note: If you encounter issues connecting to your network, there may be a problem with your computer or device network settings. Please ensure that your computer or device network settings (also called TCP/IP settings) are configured properly within the network subnet your switch is connected. © Copyright 2018 TRENDnet. All Rights Reserved. -
Page 9: Configure Your Switch
Runtime Image: The current software or firmware version your switch is running. Note: User Name and Password are case sensitive. Boot Loader – The current boot loader version your switch is running. © Copyright 2018 TRENDnet. All Rights Reserved. - Page 10 IP Address – Displays the current IPv4 address assigned to your switch. Subnet Mask – Displays the current IPv4 subnet mask assigned to your switch. Default Gateway – Displays the current gateway address assigned to your switch. © Copyright 2018 TRENDnet. All Rights Reserved.
-
Page 11: System
30 characters. System Contact - Specifies the name of the network administrator responsible for managing the switch. This contact name is optional and may contain up to 30 characters. 4. Click Apply. © Copyright 2018 TRENDnet. All Rights Reserved. -
Page 12: Set Your Ipv4 Settings
DHCP server on your network. switch is rebooted or power cycled, the configuration changes will still be applied. DHCP Retry Time: Enter the number of seconds your device will retry to connect to a DHCP server. © Copyright 2018 TRENDnet. All Rights Reserved. -
Page 13: Change Administrator Password And Add Accounts
New Password: Enter the new password you wish to change it to Confirm Password: Enter the password again to confirm the change Note: The password consists of up to 12 alphanumeric characters. 4. In the left hand panel, click on Save © Copyright 2018 TRENDnet. All Rights Reserved. -
Page 14: Change Web Idle Login Timeout Settings
Port Link Down: Enable this to turn on SNMP trap settings for downlink ports ColdStart: Enable this to turn on SNMP ColdStart function for switch power reboot alert. WarmStart: Enable this to turn on SNMP WarmStart function for switch software reboot. © Copyright 2018 TRENDnet. All Rights Reserved. -
Page 15: Set The Snmp Community Settings
The SNMP Community Table Settings screen allows network managers to define the SNMP Community Name and the access right 1. Log into your switch management page (see “Access your switch management page” on page 6). © Copyright 2018 TRENDnet. All Rights Reserved. -
Page 16: Configure The Snmp Trap Management
SNMP Community Table page. If you enter a Community Name that has not been pre-defined, the Trap Host entry is displayed, but agent/manager communication fails. 4. Click Apply. The new host is added to the table. © Copyright 2018 TRENDnet. All Rights Reserved. -
Page 17: View Statistics
5. Click Save Settings to Flash, then click OK. Note: This step saves all configuration changes to the NV-RAM to ensure that if the switch is rebooted or power cycled, the configuration changes will still be applied. © Copyright 2018 TRENDnet. All Rights Reserved. -
Page 18: Network
Flow Ctrl: Flow Control, This parameter reflects the current flow control setting Ethernet frames. on the port. The switch uses a special pause packet to notify the end node to stop transmitting for a specified period of time. The possible values are: © Copyright 2018 TRENDnet. All Rights Reserved. -
Page 19: Configure Spanning Tree (Stp, Rstp)
1. Log into your switch management page (see “Access your switch management page” on page 6). © Copyright 2018 TRENDnet. All Rights Reserved. -
Page 20: Configure Spanning Tree Protocol Port Settings
5. Click Save Settings to Flash, then click OK. Note: This step saves all configuration changes to the NV-RAM to ensure that if the switch is rebooted or power cycled, the configuration changes will still be applied. © Copyright 2018 TRENDnet. All Rights Reserved. -
Page 21: Configure Port Trunk Settings (Trunk/Link Aggregation)
3. Select Enabled from the drop down menu under Link Aggregation Global Settings. 3. Review the settings. For each trunk group, click Apply to save changes. For each Trunk ID/Group, select the number of ports to add to each Trunk ID and click Apply. © Copyright 2018 TRENDnet. All Rights Reserved. -
Page 22: Configure Port Mirror Settings
Ingress: This parameter allows configuration of the inbound traffic to the selected port. Egress: This parameter allows configuration of the outbound traffic to the selected port. Ingress/Egress: This parameter allows configuration of the inbound and outbound traffic to the selected port. © Copyright 2018 TRENDnet. All Rights Reserved. -
Page 23: Enable Loopback Detection
5. Click Save Settings to Flash, then click OK Note: This step saves all configuration changes to the NV-RAM to ensure that if the switch is rebooted or power cycled, the configuration changes will still be applied. © Copyright 2018 TRENDnet. All Rights Reserved. -
Page 24: Add Static Unicast Entries To The Switch
You can also click Delete All to delete all the entries in the list. If the entries span multiple pages, you can navigate page number in the Page field and click Go or you can click First, Previous, Next, and Last Page to navigate the pages. © Copyright 2018 TRENDnet. All Rights Reserved. -
Page 25: Add Static Multicast Entries To The Switch
In the list, you can click Modify to modify an entry or click Delete or delete the entry. If the entries span multiple pages, you can navigate page number in the Page field and click Go or you can click First, Previous, Next, and Last Page to navigate the pages. © Copyright 2018 TRENDnet. All Rights Reserved. -
Page 26: Configure Igmp Snooping Group Settings
In addition, the table shows the IGMP group entries. To delete a specific entry, click the Delete button to delete the specified Group ID. © Copyright 2018 TRENDnet. All Rights Reserved. -
Page 27: Configure Storm Control
5. Click Save Settings to Flash, then click OK Note: This step saves all configuration changes to the NV-RAM to ensure that if the switch is rebooted or power cycled, the configuration changes will still be applied. © Copyright 2018 TRENDnet. All Rights Reserved. -
Page 28: Set Egress Rate Limiting
Note: This step saves all configuration changes to the NV-RAM to ensure that if the not members (Forbidden) of the new VLAN. switch is rebooted or power cycled, the configuration changes will still be applied. © Copyright 2018 TRENDnet. All Rights Reserved. - Page 29 Select the untagged VLAN ports to add to the new VLAN. Select the not member ports to restrict from the new VLAN. Click Apply to save the new VLAN to the table. © Copyright 2018 TRENDnet. All Rights Reserved.
-
Page 30: Configure Vlan Port Settings
Note: This step saves all configuration changes to the NV-RAM to ensure that if the Asymmetric VLAN mode (SVL). Asymmetric VLAN allows the configuration of switch is rebooted or power cycled, the configuration changes will still be applied. © Copyright 2018 TRENDnet. All Rights Reserved. -
Page 31: View The Switch Vlan Dynamic Forwarding Table
5. Click Save Settings to Flash, then click OK Note: This step saves all configuration changes to the NV-RAM to ensure that if the switch is rebooted or power cycled, the configuration changes will still be applied. © Copyright 2018 TRENDnet. All Rights Reserved. - Page 32 OUI. If the OUI of the remaining phones from that manufacturer is the switch ports should be configured as Static tagged ports within the voice VLAN. same, then no other IP phone MAC addresses need to be entered into the configuration. © Copyright 2018 TRENDnet. All Rights Reserved.
-
Page 33: Create A Voice Vlan
CoS - This parameter is CoS priority level assigned to the voice data packets received on each voice VLAN port. For the COS priority to be 3. Review the settings. effective, QoS must be Enabled. © Copyright 2018 TRENDnet. All Rights Reserved. - Page 34 To delete a specific OUI that had already been entered in the table at the bottom of the page, click on Delete in the Action column of the table. The specific OUI will be deleted from the table. © Copyright 2018 TRENDnet. All Rights Reserved.
-
Page 35: Qos (Quality Of Service)
User Priority column. Click Apply to save the settings. 3. In QoS Status, select Enabled and then click Apply. 4. In the left hand panel, click on Save 4. In the left hand panel, click on Save © Copyright 2018 TRENDnet. All Rights Reserved. -
Page 36: Set Dscp (Differentiated Services Code Point) Class Mapping Settings
1. Log into your switch management page (see “Access your switch management page” on page 6). 2. Click on QoS and click on Scheduling Algorithm. 3. Review the settings. Click Apply to save the settings. © Copyright 2018 TRENDnet. All Rights Reserved. - Page 37 5. Click Save Settings to Flash, then click OK Note: This step saves all configuration changes to the NV-RAM to ensure that if the switch is rebooted or power cycled, the configuration changes will still be applied. © Copyright 2018 TRENDnet. All Rights Reserved.
-
Page 38: Poe Configuration
Critical and High 4.0W 0.44W to 3.84W levels are already receiving power. This 7.0W 3.84W to 6.49W level is the default setting. 15.4W 6.49W to 12.95W 34.2W 25.5W to 38.9W © Copyright 2018 TRENDnet. All Rights Reserved. -
Page 39: Configure Poe Settings
Power(W) - Indicates the Power in watts that the port is supplying power to the PD. Voltage (V) - Indicates the Voltage in volts as measured at the port when the port is supplying power to the PD. © Copyright 2018 TRENDnet. All Rights Reserved. - Page 40 5. Click Save Settings to Flash, then click OK Note: This step saves all configuration changes to the NV-RAM to ensure that if the switch is rebooted or power cycled, the configuration changes will still be applied. © Copyright 2018 TRENDnet. All Rights Reserved.
-
Page 41: Switch Maintenance
6). TRENDnet may periodically release firmware upgrades that may add features or fix problems associated with your TRENDnet switch model and version. To check if there is 2. Click on Tools, click on Firmware Upgrade. a firmware upgrade available for your device, please check your TRENDnet model and version using the link. -
Page 42: Backup And Restore Your Switch Configuration Settings
4. A separate file navigation window should open. 5. Select the switch configuration file to restore and click Restore. (Default Filename: config.bin). If prompted, click Yes or OK. 6. Wait for the switch to restore settings. © Copyright 2018 TRENDnet. All Rights Reserved. -
Page 43: Reboot/Reset To Factory Defaults
2. Click on Tools and click on Reboot. 3. Click the Reboot Type drop-down list and select Normal and click Apply to initiate a reboot. Wait for the switch complete the rebooting process. © Copyright 2018 TRENDnet. All Rights Reserved. -
Page 44: Using The Edgesmart Switch Management Utility
Factory Default: Resets all switch configuration settings to factory defaults including the IP address. 2. Extract the files from the zip file and run the TRENDnet Management Utility- Factory Default Except IP: Resets all switch configuration settings to factory 3.5.4.exe file. - Page 45 TPE-TG50ES TRENDnet User’s Guide 4. At the Install Location installation window, click Next. 6. In the Completion window, click Finish. 5. At the Installation, click Install. © Copyright 2018 TRENDnet. All Rights Reserved.
-
Page 46: Using The Utility
You can also click Exit at the bottom of the utility user interface to exit the application. You can also launch the utility from the Start Menu programs. Start > Programs (or All Programs) > TRENDnet Management Utility > TRENDnet Management Utility.exe © Copyright 2018 TRENDnet. All Rights Reserved. -
Page 47: Discovery List
Add Item: To add a device to the Monitor List manually, enter the IP Address of Group Interval: the device that you want to monitor. Delete Item: To delete the device in the Monitor List. © Copyright 2018 TRENDnet. All Rights Reserved. -
Page 48: Device Setting
“Set” to process the data change immediately. The default password of TRENDnet Web Smart Switches is “admin”. Access Web: Double click the device in the Monitor List or select a device in the Monitor List and press this “Web Access”... -
Page 49: Main Menu Options
Choose 15 secs, 30 secs, 1 min, 2 min and 5 min to select the time of monitoring. Group Interval: 120~1225 In the “Help TAB”, there is About function, it will show out the version of the Web Management Utility. © Copyright 2018 TRENDnet. All Rights Reserved. -
Page 50: Technical Specifications
Port-based VLAN 802.1Q Tagged VLAN Performance Packet Buffer: 125KB Up to 32 VLAN groups, ID Range 1-4094 Switch Fabric: 10Gbps Private VLAN MAC Address Table: 2K entries © Copyright 2018 TRENDnet. All Rights Reserved. - Page 51 Enable/disable 802.3az Power Saving Lifetime Wall mountable Power Input: 110-240V AC, 50/60Hz, 0.75A Output: 48V DC, 0.8A external power adapter Max. consumption: 34W PoE budget: 31W © Copyright 2018 TRENDnet. All Rights Reserved.
-
Page 52: Troubleshooting
Then click Use the following IP address, and make sure to assign your network adapter an IP address in the subnet of 192.168.10.x. Click OK Note: If you are experiencing difficulties, please contact your computer or operating system manufacturer for assistance. © Copyright 2018 TRENDnet. All Rights Reserved. -
Page 53: Appendix
From the Location drop-down list, select Automatic. 2. In the Network Preference window, next to "Show:", select Network Status. You'll see d. Select and view your Ethernet connection. your network status and your IP address settings displayed. © Copyright 2018 TRENDnet. All Rights Reserved. - Page 54 1. Apple Menu > System Preferences > Network 2. Select Ethernet from the list on the left. 3. Click the Advanced button. 3. On the Ethernet tab, the Ethernet ID is your MAC Address. © Copyright 2018 TRENDnet. All Rights Reserved.
- Page 55 20cm between the radiator & your body. This transmitter must not be co-located or operating in conjunction with any other antenna or transmitter. Country Code selection feature to be disabled for products marketed to the US/CANADA © Copyright 2018 TRENDnet. All Rights Reserved.
- Page 56 An RMA number is required in order to initiate warranty service support the event that the RMA unit needs to be replaced, TRENDnet may replace it with a for all TRENDnet products. Products that are sent to TRENDnet for RMA service must refurbished product of the same or comparable model.
- Page 57 OF SUCH DAMAGES, AND LIMITS ITS LIABILITY TO REPAIR, REPLACEMENT, OR REFUND evidence of the original purchaser's date of purchase. Replacement products may be OF THE PURCHASE PRICE PAID, AT TRENDNET'S OPTION. THIS DISCLAIMER OF LIABILITY refurbished or contain refurbished materials. If TRENDnet, by its sole determination, is...