Advertisement
Quick Links
Download this manual
See also:
User Manual
Quick Start User Guide
1
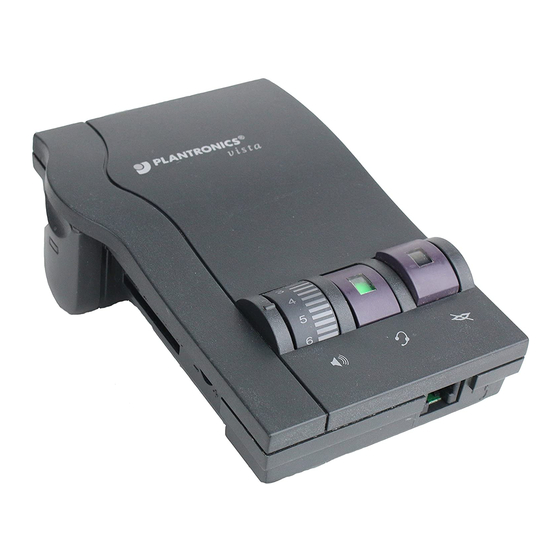
TOP VIEW
Identify the
Components
Battery Door
1
Telephone/Amplifier
2
Compatibility Slide
Switch
Compatibility Slide
3
Switch Cover
Speak Volume Control
4
Telephone Jack
10
BACK VIEW
Handset Jack
11
AC Power
12
Supply Jack
Screwdriver
10
6
Make a
Test Call
6.1 Ensure you have a dial tone by having
the telephone handset set off hook and
resting on the desk.
6.2 Use your telephone keypad to call a
friend or colleague.
6.3 Adjust the listen volume using the listen
volume control
5
. (1 is the quietest and 9 is
the loudest)
6.4 If your friend cannot hear you, or you
hear a buzz or hum, try changing the
compatibility slide switch (Step 5.4).
6.5 If necessary, adjust the speak volume
control by using the plastic screwdriver to
turn the speak volume control
until the
4
person on the other end can hear your voice
at an appropriate level.
6.6 Snap in the compatibility slide
switch cover
by positioning the two
3
alignment guides into their slots and then
pushing in and down until it snaps shut.
The raised bumps on the access door will
allow you to push in and slide it open at
another time.
6.7 After completing the call, return the
handset to its cradle.
6.8 To receive a call, remove the handset from its
cradle, depress the headset button
and begin
6
talking through your headset.
Universal
WELCOME
Headset
Amplifier
to the M12 Universal Headset Amplifier from Plantronics
The M12 Universal Headset Amplifier connects your single or multi-line
telephone to a Plantronics headset. The M12 Amplifier provides precise
levels of listening and talking comfort, superior protection, and excellent
audio performance.
Note:
The M12 Amplifier is not designed to work on telephones that
have the dial pad in the handset or on cordless telephones.
This side of the user guide provides the following steps to quickly set up
and use your amplifier:
1.
Identify the components
2.
Install the batteries
3.
Attach to telephone and headset
4.
Check the default settings
5.
Set telephone/amplifier compatibility slide switch
6.
Make a test call
The other side has more details:
Examine other features
Troubleshooting
Technical Support Center Information
FCC Information
Parts and Accessories
Warranty and Service
Q
M12
UICK START GUIDE
Listen Volume
5
Control
Headset/
6
Handset
Selector Button
Mute Button
7
Headset
8
Jack
AC Power Supply
13
(Optional)
Amplifier to Quick
14
Disconnect (QD) Coil
Cable (Long Cord)
(included)
Amplifier to
15
Telephone Coil Cable
(Short Cord)
(included)
Two AA Batteries
16
(included)
6.1
5
6.2
5.1 Put on headset and have amplifier
in the default settings (Step 4).
5.2 Lift the telephone's handset off the
cradle and place it on your desk.
6.3
5.3 If you hear a clear dial tone, you
can proceed to Step 6.
5.4 If you don't hear a dial tone, adjust
the compatibility slide switch
following this process:
6.4
6.5
1 Slide out the flat, plastic
screwdriver
the amplifier.
2 Use the screwdriver to slide the
compatibility slide switch
you hear a clear dial tone.
Experimenting with various switch
settings will not harm the amplifier or
your telephone.
6.6
2
2.1
Install the
Batteries
The M12 Amplifier requires
power to work with most
phones.
2.1 Slide both batteries
into the side of the M12
Amplifier as shown in the
illustration.
An outline of the battery '+'
2.3
and '–' orientation is also
shown on the panel that
separates the two batteries
(top positive, bottom negative).
2.2 Use the battery door
to push down on
1
both batteries.
2.3 Then slide the door into a locked position.
(The door does not snap in.)
2.4 When the batteries are low, you will hear
three "beeps" through the headset or you
will notice that the sound quality is not good.
2.5 An optional AC power supply can be
purchased and plugged into the AC power
supply jack. (See Parts and Accessories.)
5.1
Set Telephone/
Amplifier
5.2
Compatibility
Slide Switch
2
5.4
1
10
from the bottom of
until
2
5.4
IMPORTANT SAFETY
INSTRUCTIONS
When using your telephone equipment, basic safety precautions
should always be followed to reduce the risk of fire, electric shock, and
®
injuries to persons.
1.
This product can get its power from the telephone line. Please note
that a spark can occur if the cord is damaged.
2.
Do not allow anything to rest on the telephone cord. Do not locate
this product where persons walking on it could damage the cord.
3.
Unplug this product before cleaning. Do not use aerosol or liquid
cleaners. Use a damp cloth for cleaning.
4.
Do not locate or use this product in wet environments.
5.
Do not install this product during a lightning storm. Do not damage
or take apart this product.
6.
Use all normal precautions that would apply to telephones or other
electrical appliances.
SAVE THESE INSTRUCTIONS
3
Attach
Telephone
Headset
3.1 Unplug your telephone's handset
cord from the telephone base.
3.2 Plug your telephone's handset
cord into the M12 Amplifier handset
jack
.
11
3.3 Plug one end of the short cord
into the telephone jack
and the
10
other end into the telephone handset
2.2
jack on the telephone base.
3.4 Connect the telephone plug end
of the the long cord
into the front
14
of the M12 Amplifier and attach the
Quick Disconnect (QD) module end to
any Plantronics H-Series professional
headset.
The QD allows you to disconnect the
headset from the amplifier when you
are not using the telephone, or need to move away from your
telephone without removing your headset.
14
4
Check the
Default
Settings
Always start with these settings to use
your headset.
4.1 Headset /handset selector button
is depressed (colored indicator showing).
4.2 Mute button
is released (colored
7
indicator not showing).
4.3 Listen volume control
5
4.4 The speak volume control
pre-set. You can adjust it in Step 6.5.
4.5 Compatibility slide switch
position 5.
2
3.1
15
3.2
3.3
15
3.4
4.2
4.1
6
is set to 4.
4.3
has been
4
in
2
4.5
4.4
Advertisement

Related Manuals for Plantronics M12


Summary of Contents for Plantronics M12
- Page 1 Note: The M12 Amplifier is not designed to work on telephones that have the dial pad in the handset or on cordless telephones. This side of the user guide provides the following steps to quickly set up...
- Page 2 I hear three ‘beeps’ in the headset. If you are using batteries to power the M12 Amplifier, three ‘beeps’ tell you that the batteries are low and need to be replaced. See “Install Batteries”...