Focusrite Clarett 8PreX - Audio Interface Manual
- User manual (20 pages) ,
- User manual (19 pages)
Advertisement
OVERVIEW

Excessive sound pressure levels from earphones and headphones can cause hearing loss.
This equipment must only be connected to Thunderbolt™ ports.
Introduction
Thank you for purchasing this Clarett 8PreX, one of the family of Focusrite professional Thunderbolt™ audio interfaces incorporating newly-designed, high quality Clarett analogue pre-amplifiers with the unique AIR function. In conjunction with the Focusrite Control application, you now have a highly versatile and professional solution for routing high quality audio to and from your computer recording system with extremely low latency.
You can also use the Clarett 8PreX as a "stand-alone" interface to any other type of recording device, once you have configured it using Focusrite Control software.
This User Guide provides a detailed explanation of the hardware to help you achieve a thorough understanding of the product's operational features. We recommend you take the time to read through the Guide, whether you're new to computer recording or a more experienced user, so you are fully aware of all the possibilities the Clarett 8PreX has to offer.

As well as this User Guide, you will need the Focusrite Control Software Guide which can be downloaded from focusrite.com/downloads.
This contains full details of Focusrite Control, the software application designed specifically for use with the Focusrite Clarett range of interfaces.
If either User Guide does not have the information you need, please go to support.focusrite.com, where you can find articles and tutorials beyond the scope of this user guide.
System Requirements
Please visit the following link for up-to-date information on computer and operating system compatibility for all Clarett products: support.focusrite.com
Features
The Clarett 8PreX hardware interface allows you to connect microphones, musical instruments, line level audio signals and digital audio signals to a computer through the computer's Thunderbolt™ port. The signals at the physical inputs can be routed to your audio recording software/digital audio workstation (referred to throughout this user guide as the "DAW"); similarly, the outputs from the DAW can be configured to appear at the unit's physical outputs.
Audio sources – mics, instruments, etc., can be recorded into your DAW and then played back through amplifiers, powered monitors, headphones, a mixer or any other equipment you wish to use. Although all inputs and outputs on the Clarett 8PreX are, by default, routed directly to and from your DAW for recording and playback, you can configure the routing within the Focusrite Control application to meet your needs. Please see the Focusrite Control user guide for more info on routing.
The Clarett 8PreX simultaneously provides 26 inputs and 28 outputs. In addition to providing a high quality interface for analogue signals, the Clarett 8PreX also handles multichannel digital audio in ADAT optical format – sixteen channels at 44.1/48 kHz sample rate, eight at 88.2/96 kHz or four at 176.4/192 kHz. S/PDIF I/O is also included.
The Clarett 8PreX can be easily synchronised with other items of digital audio equipment in your studio, either as a follower to an external word clock signal, or by acting as the leader clock source itself. It also has standard DIN connectors for sending and receiving MIDI data.
An important feature of all models in the Clarett range is the new design of analogue preamplifier. In addition to their class-leading dynamic range and ability to provide all the gain you're ever likely to need, the circuitry now includes an exciting new AIR function. Individually selectable on each channel, AIR subtly modifies the pre-amp's frequency response to model the impedance and resonance characteristics of Focusrite's classic transformer-based ISA mic preamps. When recording with good quality microphones, you will notice an enhanced clarity and definition in the important mid frequency range, just where it is most needed for vocals and many acoustic instruments.
The accompanying software, Focusrite Control, is designed to require a minimal amount of interaction, letting you configure the Clarett 8PreX with signal routings appropriate for the most common recording tasks. For more complex situations, it provides extensive routing and monitoring, as well as the ability to control global hardware settings such as sample rate and synchronisation.
All inputs on the Clarett 8PreX are routed directly to your DAW software for recording, but Focusrite Control also allows you to route these signals internally within the device to the outputs so you can monitor the audio signals with ultra-low latency - before they arrive at your DAW.
Box Contents
Along with your Clarett 8PreX you should have:
- AC mains cable with IEC connector
- Getting Started Guide, with codes for accessing the following on-line resources:
- Focusrite Red 2/Red 3 Plug-in Suite
- Optional bundled software.
GETTING STARTED
Please ensure you install the Focusrite Control before connecting the interface to your computer.
Software Installation
All software required by the Clarett 8PreX, including several powerful and useful extras, is available for download from the Focusrite website (focusrite.com/downloads). The Important Information provided with your Clarett 8PreX contains validation codes if you wish to register your Clarett and access the optional bundled software.

- Using your usual browser, go to www.focusrite.com/register/
- Follow the on-screen instructions, entering the "Bundle Code" into the form where prompted. Your Bundle Code can be found on the back of the Getting Started Guide packed with the unit.
- Enter the unit's serial number, which can also be found on the back of the Getting Started Guide.
- You will then be able to access the "My Products" page, where the software products to which your registration entitles you are available for download, complete with activation codes where applicable.
- Download and install Focusrite Control, which contains the necessary drivers for this interface. Follow all on-screen instructions.
- When the installation is complete, you will be prompted to restart your computer.
- After restart, connect the Clarett 8PreX to your computer with a Thunderbolt cable.
- If you are having trouble getting started please watch our video guide here - focusrite.com/get-started
Hardware Features
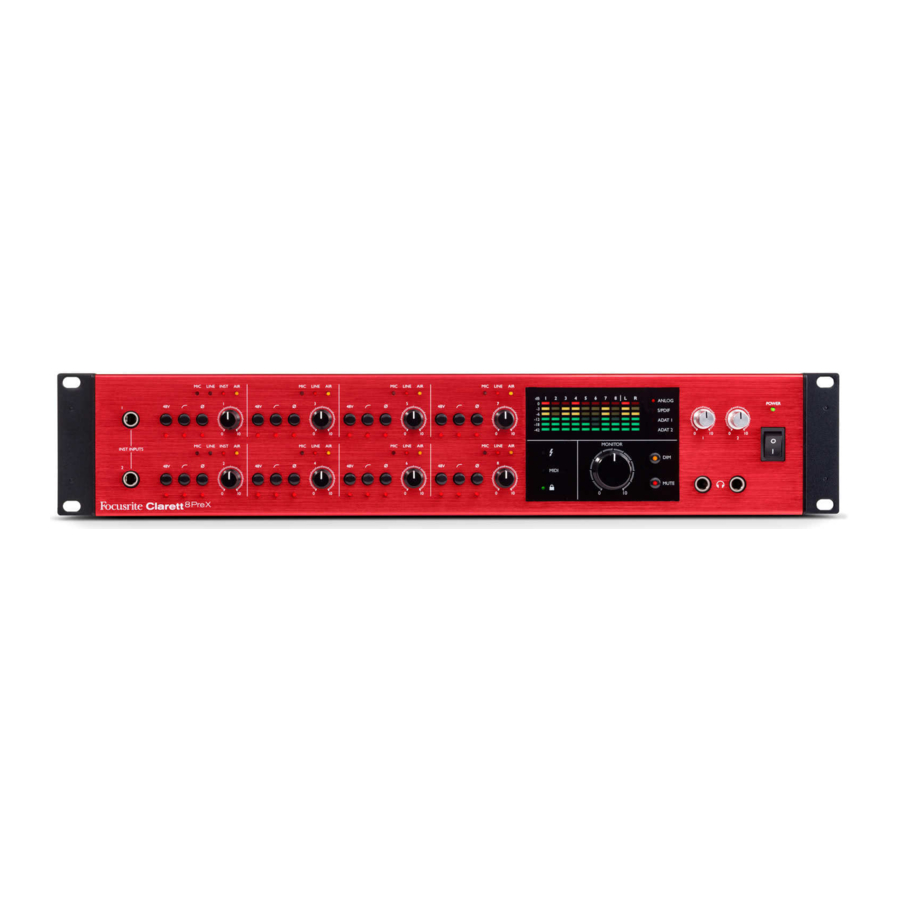
Front Panel

The front panel includes all the input gain controls and monitoring controls as well as two input sockets for instrument jacks and two headphones sockets.
- INST INPUTS – 2 x high impedance inputs on ¼" TS jack sockets for Channels 1 and 2: connect a musical instrument (e.g., guitar) here.
- MIC, LINE & INST – two sets of three red LEDs indicating the input currently selected for Channels 1 and 2. Mic/Line/Inst selection is made from Focusrite Control.
- MIC & LINE – six pairs of red LEDs indicating the input currently selected for Channels 3 to 8. Mic/Line selection is made from Focusrite Control.
- Input gain controls 1 to 8 – eight rotary controls: adjust the input gain for the signals in Channels 1 to 8 respectively.
- 48V – one switch per channel: enables 48 V phantom power at the corresponding rear panel XLR mic input. Each switch has an associated red LED indicating phantom power is selected.
![]() Hi-pass filters – one switch per channel: use to remove unwanted low-frequencies. Filter is -3 dB at 80 Hz with a slope of 12 dB/octave. Each switch has an associated red LED indicating the filter is active.
Hi-pass filters – one switch per channel: use to remove unwanted low-frequencies. Filter is -3 dB at 80 Hz with a slope of 12 dB/octave. Each switch has an associated red LED indicating the filter is active.-
![]() Polarity reverse – one switch per channel. Each switch has an associated red LED indicating the polarity is inverted.
Polarity reverse – one switch per channel. Each switch has an associated red LED indicating the polarity is inverted. - AIR – eight yellow LEDs – one per channel; illuminate when the AIR function is selected from Focusrite Control. AIR modifies the frequency response of the input stage to model the classic, transformer-based Focusrite ISA mic preamps.
- Input signal level meters: eight LED bargraphs, one per channel. Segments indicate -42, -18 & -12 dBFS (green), -6 & -3 dBFS (yellow) and 0 dBFS (red). Input signals are metered post the input gain controls, so you can see the levels being sent to the DAW.
- Output signal level meters: two LED bargraphs indicating the signal level at Outputs 1 and 2. Indications as input meters. Output signals are metered pre the monitor level control, so the volume you have set is independent of the meter indications.
- ANALOG, S/PDIF, ADAT 1 & ADAT 2 – input meter source LEDs. Indicates the current signal source for the input meters. Meter source selection is made from Focusrite Control.
-
![]() (Thunderbolt active) – a green LED which illuminates when the unit has established a connection with the computer to which it is connected.
(Thunderbolt active) – a green LED which illuminates when the unit has established a connection with the computer to which it is connected. - MIDI – a green LED which illuminates when MIDI data is being received at the rear panel MIDI IN port.
-
![]() – a green LED which confirms clock synchronisation, either to the Clarett 8PreX's internal clock or to an external digital input.
– a green LED which confirms clock synchronisation, either to the Clarett 8PreX's internal clock or to an external digital input. - MONITOR – main monitor output level control – this control will normally control the level at the main monitor outputs on the rear panel, but can be configured in Focusrite Control to adjust the level of any of the unit's ten analogue outputs.
- DIM and MUTE – two switches controlling the Clarett 8PreX's monitor outputs; DIM reduces the output levels by 18 dB, while MUTE turns the outputs off. By default, these switches affect the main monitor outputs 1 and 2, but they will also affect any analogue outputs that have been selected for front panel monitor control using Focusrite Control. The switches are internally illuminated (DIM: yellow, MUTE: red) indicating the function is selected.
- Headphones 1 and 2 – connect one or two pairs of stereo headphones at the two ¼" TRS jack sockets below the controls. The headphone outputs always carry the signals that are currently routed to analogue outputs 7/8 and 9/10 in Focusrite Control.
- POWER – AC power switch and LED.
- Rack ears for mounting the Clarett 8PreX in a standard 19" equipment rack.
Rear Panel

The remainder of the Clarett 8PreX's inputs and outputs are on the rear panel.
- MIC INPUTS 1 to 8 – eight balanced mic inputs on 3-pin XLR input sockets - connect microphones via standard XLR mic cables.
- LINE INPUTS 1 to 8 – eight balanced line inputs on ¼" jack sockets. Connect line level signals here; either ¼" TRS (balanced) or TS (unbalanced) jack plugs can be used for line level signals.
- LINE OUTPUTS 3 to 10 – eight balanced analogue line outputs on ¼" jack sockets; use TRS jacks for a balanced connection or TS jacks for unbalanced. The signals routed to these outputs are defined in Focusrite Control, and can typically be used for driving alternative speakers (i.e., midfield, nearfield, etc.), the additional speakers in a multichannel monitoring system, or to send audio to outboard FX processors.
- MONITOR 1 and 2 – two balanced analogue line outputs on ¼" jack sockets; use TRS jacks for a balanced connection or TS jacks for unbalanced. These are also Line Outputs 1 and 2 of the system, and will generally be used for driving the main L and R speakers of your monitoring system. However, the routing of signals to outputs may be customised in Focusrite Control.
- OPTICAL IN and OUT – four TOSLINK connectors (two inputs and two outputs), each carrying eight channels (1 to 8 and 9 to 16) of digital audio in ADAT format at 44.1/48 kHz sample rate, four channels at 88.2/96 kHz or two channels at 176.4/192 kHz. These are additional inputs and outputs (respectively) to/from the Clarett 8PreX. The OPTICAL IN 1-8 connector may alternatively be configured to receive a two-channel S/PDIF signal, up to 96 kHz sample rate, from an external source equipped with an optical S/PDIF output; similarly, the OPTICAL OUT 1-8 connector may be set to carry the signal routed to S/PDIF OUT in optical format. These options are selected from Focusrite Control.
- WORD CLOCK OUT – a BNC connector carrying the Clarett 8PreX's word clock; this may be used to synchronise other digital audio equipment forming part of the recording system. The source of sample clock synchronisation used by the Clarett 8PreX is selected in Focusrite Control.
- WORD CLOCK IN – a BNC connector for the connection of an external word clock signal. Use this input if you have a leader reference clock which provides synchronisation for all the digital audio devices in your studio.
-
![]() – Thunderbolt™ connector; connect the Clarett 8PreX to your computer with a suitable Thunderbolt™ cable.
– Thunderbolt™ connector; connect the Clarett 8PreX to your computer with a suitable Thunderbolt™ cable. - MIDI IN and MIDI OUT – standard 5-pin DIN sockets for connection of external MIDI equipment, allowing MIDI data to/from your computer to be received and distributed to additional MIDI devices.
- SPDIF IN and OUT – two phono (RCA) sockets carrying two-channel digital audio signals in or out of the Clarett 8PreX in S/PDIF format. Like all the other inputs and outputs, the routing of S/PDIF signals may be customised in Focusrite Control. The S/PDIF inputs are functional up to 96 kHz sample rate.
- AC mains – standard IEC receptacle. The Clarett 8PreX is fitted with a "Universal" power supply, and will run from any AC mains voltage from 100 to 240 V, at 50 or 60 Hz.
Connecting your Clarett 8PreX
Before you connect the Clarett 8PreX to your computer, please complete the software installation according to the instructions.
This will ensure the hardware uses the correct drivers, and will prevent unexpected behaviour.
The Clarett 8PreX should be connected to AC mains with the supplied AC power cable. Plug the IEC connector into the rear panel IEC port and turn the unit on with the front panel power switch.
The Clarett 8PreX has a Thunderbolt™ port (on the rear panel). Once the software installation is complete, connect the Clarett 8PreX to your computer using a Thunderbolt™ cable.
Computer audio setup
Your OS should automatically select the Clarett 8PreX as the default audio device. You can check this selection has been made correctly, if you wish. Details of how to do this on various operating systems can be found at focusrite.com/get-started/clarett8PreX.
Audio Setup in your DAW
After installing the drivers and connecting the hardware, you can start using the Clarett 8PreX with the DAW of your choice.
 Please note - your DAW may not automatically select the Clarett 8PreX as its default I/O device. In this case, you must manually select the driver on your DAW's Audio Setup* page, and select the Focusrite Thunderbolt driver. Please refer to your DAW's documentation (or Help files) if you are unsure where to select the Core Audio driver
* Typical name – page names may vary with DAW
Connecting Clarett 8PreX to loudspeakers
The 1/4" jack MONITOR outputs on the rear panel (Line Outputs 1 and 2) will normally be used to drive monitoring speakers. Self-powered monitors (also known as active monitors) incorporate internal amplifiers, and may be connected directly. Passive loudspeakers will require a separate stereo amplifier; in this case, the rear panel outputs should be connected to the amplifier's inputs.
Connecting active speakers

Connecting passive speakers

All the line output connectors are 3-pole (TRS) ¼" jack sockets, and are electronically balanced. Typical consumer (hi-fi) amplifiers and small powered monitors will have unbalanced inputs, either on phono (RCA) sockets, or via a 3.5 mm 3-pole jack plug intended for direct connection to a computer. In either case, use a suitable connecting cable with jack plugs at one end.
Professional power amplifiers will generally have balanced inputs.
When mixing, you can connect several pairs of additional speakers (mid-field. near-field, etc.) to pairs of outputs and use Focusrite Control to route your mix to the different outputs as desired, to check your mix on the different types of speaker.
Examples of Usage
The Clarett 8PreX is an excellent choice for numerous recording and monitoring applications. Some typical configurations are shown below.
Recording a band

This setup shows a typical multitrack recording setup with DAW software on your computer.
A range of sources – microphones, guitars and a keyboard – are connected to the Clarett 8PreX's inputs. Note the guitars are connected to Channels 1 and 2 as they can be configured to accept instruments directly. Ensure INST mode is on for these channels in Focusrite Control, and the INST LEDs are illuminated. Similarly, the stereo keyboard is connected to the line inputs of Channels 4 and 5; set these to LINE from the software.
The connection to the computer running DAW software is via a Thunderbolt™ cable. This will carry all the input and output signals between the DAW and the Clarett 8PreX. Once the audio setup is correctly configured in the DAW, each input source will be automatically routed to its own DAW track for recording.
Project Studio

One of the Clarett 8PreX's advantages is the large number of physical inputs it provides. In a studio, these can be (more or less) permanently committed to specific sound sources, minimising the amount of re-patching required when switching from one instrument to another, as you build up the various tracks making up a song.
In the example, we assume guitar and bass guitar will remain connected to Channels1 and 2 via their INST inputs, while various electronic instruments can be connected to the LINE inputs of all channels. The MIC inputs of all channels would typically be connected to mic input sockets at different locations in the recording space.
If more instruments need to be connected permanently in this way, a patchbay can be introduced into the setup; alternatively, the number of inputs can be expanded with an OctoPre unit (see Example 3).
Using the optical connections to provide additional inputs
In addition to the eight analogue inputs, the Clarett 8PreX has two ADAT input ports (OPTICAL IN) which can each provide an additional 8 audio inputs at 44.1/48 kHz sample rate, 4 at 88.2/96 kHz or 2 at 176.4/192 kHz. Using one or two 8-channel microphone preamplifiers equipped with ADAT outputs – such as a pair of Focusrite OctoPres – provides a way to expand the Clarett 8PreX's input count.

In the example, the OPTICAL OUT ports of the OctoPres are connected to the Clarett 8PreX's OPTICAL IN ports with two TOSLINK optical cables. Although mic inputs are shown in the diagram, this would allow any combination of up to 24 mic or line inputs, of which some could be INST level signals.
To synchronise the three devices set one OctoPre as the sync leader (Internal Clock) and set the Clarett 8PreX's sync source to ADAT. The second OctoPre can then be synchronised by connecting its WORD CLOCK IN to the WORD CLOCK OUT of the Clarett 8PreX with a BNC cable.
NOTE: when connecting two digital devices by any method, always ensure both are set to use the same sample rate.
The additional inputs from the optical port may be routed using Focusrite Control in exactly the same way as the other inputs. The additional inputs can form part of any musician's headphone mix, as required.
Using the optical connections to provide additional outputs
The Clarett 8PreX's two ADAT output ports (OPTICAL OUT) may be used to feed separate D-A converters to provide additional analogue outputs. Some Focusrite OctoPres (Clarett Octopre/ Octopre Dynamic) are a suitable for this purpose. As with the optical inputs, each optical output can carry 8 audio channels at 44.1/48 kHz sample rate, four at 88.2/96 kHz or two at 176.4/192 kHz. This method provides multiple analogue outputs to feed a mixing console, which may be a preferred way of performing a complex mix from a large number of DAW tracks.

In the example, the OPTICAL IN 1-8 ports of the two OctoPre are connected to the Clarett 8PreX's OPTICAL OUT ports with two TOSLINK optical cables. The additional outputs created may be routed within Focusrite Control in the same way as the other outputs.
In this situation, synchronisation is achieved by setting the Clarett 8PreX's sync source to INT (defining it as the sync leader) and setting the sync source for both OctoPre to ADAT. This means all synchronisation is via the optical links and no additional cables are required.
NOTE: when connecting two digital devices by any method, always ensure both are set to use the same sample rate.
Loopback Recording
Focusrite Control's Loopback feature lets you record other audio sources from within your computer (e.g., the audio output from a web browser). Loopback uses the Clarett's "virtual" inputs, which have no physical connectors on the hardware interface itself, but may be selected in the DAW as signal sources for recording.
By routing DAW 1 and 2 to your Loopback mix in Focusrite Control, when you select the Loopback output as the recording source on a mono or stereo DAW track, you can record from another software application into your DAW. Note your computer will assign DAW 1 and DAW 2 as the default sound output channels.
For instructions on how to use the Loopback recording function, please see the Focusrite Control Clarett User Guide available from: focusrite.com/downloads
FOCUSRITE CONTROL - OVERVIEW
Focusrite Control is the software application used with the Clarett 8PreX. It allows you to create a custom monitor mix for each musician, and also to specify the routing of all audio signals to the physical audio outputs. All sample rate selection and digital sync source selection is available from Focusrite Control.
Note: Focusrite Control is also used with other hardware interfaces in the Focusrite range. When you connect an interface to your computer and launch Focusrite Control, the model of interface is automatically detected, and the software configured to suit the number of inputs and outputs, and other features, available on the hardware.
Focusrite Control has its own, dedicated User Guide, which contains detailed operating instructions for all aspects of the software. This may be downloaded from: focusrite/downloads.
TECHNICAL SPECIFICATIONS
Performance Specifications
| Configuration | |
| Inputs | 26: analogue (8), S/PDIF (2), ADAT (16) |
| Outputs | 28: analogue (10), S/PDIF (2), ADAT (16) |
| Mixer | Fully assignable 30-in/16-out mixer |
| Digital Performance | |
| Supported sample rates | 44.1 kHz, 48 kHz, 88.2 kHz, 96 kHz, 176.4 kHz & 192 kHz |
| Microphone Inputs | |
| Frequency Response | 20 Hz - 20 kHz +/-0.1 dB |
| Dynamic Range | 118 dB (A-weighted) |
| THD+N | 0.001% |
| Noise EIN | –128 dBu (A-weighted) |
| Maximum input level | +18 dBu |
| Gain Range | 57 dB |
| Impedance | AIR Off: 6.2k Ω - AIR On: 2.2k Ω |
| Line Inputs | |
| Frequency Response | 20 Hz - 20 kHz +/-0.1 dB |
| Dynamic Range | 116 dB |
| THD+N | 0.005% |
| Maximum input level | +26 dBu |
| Gain Range | 57 dB |
| Impedance | >50k Ω |
| Instrument Inputs | |
| Frequency Response | 20 Hz - 20 kHz +/-0.1 dB |
| Dynamic Range | 111 dB (A-weighted) |
| THD+N | 0.001% |
| Maximum input level | +14 dBu |
| Gain Range | +57 dB |
| Impedance | >2M Ω |
| Line & Monitor Outputs | |
| Frequency Response | 20 Hz - 20 kHz +/-0.1 dB |
| Dynamic Range (line outputs) | 119 dB |
| Dynamic Range (monitor outputs) | 117 dB |
| THD+N | 0.0007% |
| Maximum Output Level (0 dBFS) | +18 dBu, balanced |
| Headphone Outputs | |
| Dynamic Range | 112 dB |
| THD+N | 0.0008% |
| Maximum Output Level | +16 dBu |
Physical and Electrical Characteristics
| Analogue Inputs 1 & 2 | |
| Connectors | Mic: XLR sockets; Line: ¼" TRS jack, both on rear panel. Inst: ¼" TS jack on front panel |
| Mic/Line/Instrument switching | via Focusrite Control |
| Phantom power | +48 V, independently switchable per channel |
| Analogue Inputs 3 to 8 | |
| Connectors | Mic: XLR sockets; Line: ¼" TRS jack, both on rear panel. |
| Mic/Line switching | via Focusrite Control |
| Phantom power | +48 V, independently switchable per channel |
| Analogue Outputs | |
| Main outputs | 10 x balanced ¼" TRS jacks (on rear panel) |
| Stereo headphone outputs | 2 x ¼" TRS jack on front panel |
| Main monitor output level control | On front panel |
| Headphones level controls | |
| Other I/O | |
| ADAT I/O | 4 x TOSLINK optical connectors: 16 channels at 44.1/48 kHz 8 channels at 88.2/96 kHz 4 channels at 176.2/192 kHz |
| S/PDIF I/O | 2 x phono (RCA); can be re-assigned to ADAT ports in software. Supported at 44.1/48/88.2/96 kHz sample rates. |
| Word clock output | BNC connector |
| Data connector (to computer) | 1 x Thunderbolt connector |
| MIDI I/O | 2 x 5-pin DIN sockets |
| Weight and Dimensions | |
| W x H x D | 482.5 mm x 88 mm x 288 mm 19" x 3.46" x 11.34" |
| Weight | 5.25 kg 12.13 lbs |
TROUBLESHOOTING
For all troubleshooting queries, please visit the Focusrite Help Centre at support.focusrite.com.
COPYRIGHT AND LEGAL NOTICES
Focusrite is a registered trade mark and Clarett 8PreX is a trade mark of Focusrite Audio Engineering Limited.
All other trade marks and trade names are the property of their respective owners. 2015 © Focusrite Audio Engineering Limited. All rights reserved.

Documents / Resources
References
Download manual
Here you can download full pdf version of manual, it may contain additional safety instructions, warranty information, FCC rules, etc.
Advertisement
Thank you! Your question has been received!


Need Assistance?
Do you have a question about the Clarett 8PreX that isn't answered in the manual? Leave your question here.