
Related Manuals for Nabtesco ALLUX NE-Z4


Summary of Contents for Nabtesco ALLUX NE-Z4
- Page 1 User’s Guide Product Type : NE-Z4, NE-Z4SH Document Number : 81-SS00099E Date of issue : June 1.2017 CAUTION ■Carefully read the User’s Guide prior to use. ■Keep this User’s Guide for future reference.
- Page 2 This user's guide (hereinafter referred to as this document) was produced by Nabtesco Corporation to ensure safe and comfortable use of the ALLUX™. This document describes matters concerning typical usage such as fitting and walking, maintenance, trouble shooting and cautionary notes that anyone utilizing the ALLUX™...
-
Page 3: Important Information
WARNING Cautions for handling ALLUX safely Nabtesco Corporation (hereinafter, referred to as Nabtesco) cannot foresee all of potential residual risks of ALLUX and risks resulting from human errors and usage environment. Although there are a lot of instructions and prohibitions for handling ALLUX... -
Page 4: About This Document
fit the product for prosthetic users. Copyright Nabtesco owns the copyright for this document. It is not permitted to duplicate any part of drawings and technical documents including this document by any means (copying or recording on electronic media) without our prior authorization. -
Page 5: Structure Of This Document
Structure of This Document This document consists of the following chapters. Title of chapter Contents Introduction Outline and purposes of this document Important information Purpose of use, information for safe handling of ALLUX About This Document Notes on this document Structure of This Document Contents of each chapter in this document 1. -
Page 6: Table Of Contents
Table of Contents Introduction ………………………………………………………………………………………………………… ⅰ Important Information ……………………………………………………………………………………………… ⅱ About This Document ……………………………………………………………………………………………… ⅲ Structure of This Document … …………………………………………………………………………………… ⅳ Table of Contents … ……………………………………………………………………………………………… ⅴ 1 Safety Precautions … …………………………………………………………………………………………………… 1.1 Definitions of symbols ……………………………………………………………………………………………………………………… 1.2 Warning ... - Page 7 Table of Contents 7 States of ALLUX …………………………………………………………………………………………………………… 7.1 States of ALLUX … … ………………………………………………………………………………………………………… 7.2 Normal use state … ……………………………………………………………… 7.2.1 When charger or power OFF cap is disconnected ………………………………………………………………………………… 7.2.2 When power is turned off for charging ...
-
Page 8: 1 Safety Precautions
Safety Precautions 1.1 Definition of symbols Throughout this manual, the following signal words are used to classify and explain the hazards and damages which may be caused by improper usage not conforming to the instructions. Indicates a potentially hazardous situation which, if not WARNING avoided, could result in death or serious injury. -
Page 9: Caution
Safety Precautions 1.3 Caution Strictly observe the following instructions to use the product safely. CAUTION ■The adjustment of ALLUX must be done by a certified prosthetist of ALLUX handling. Incorrect adjustment could impair walking safety and comfort. ■Charge the main body of ALLUX before using it. -
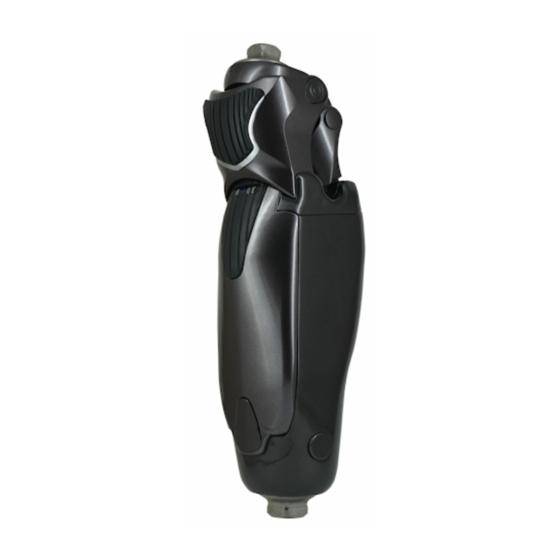
Page 10: 2 Product Overview
Product Overview 2.1 Overview of ALLUX ALLUX is a knee joint with a four-Bar linkage mechanism to electronically control the stance and swing phases. It provides smooth walking according to the walking speed and enables yielding required for descending a slope or stairs. The safety lock function can be used to stop the knee suddenly bending and as an anti-stumbling function for when the toes get stubbed on the ground etc. -
Page 11: Certification Of International Standard
●Declaration of Conformity Nabtesco Corporation, hereby declare that following Class I medical device complies with the essential health and safety requirements of the Medical Devices Directive 93/42/EEC as amended by 2007/42/EC and the R&TTE(Radio and Telecommunications Terminal Equipment) Directive 1999/5/EC. -
Page 12: Specifications
Product Overview 2.4 Specifications ●Type : NE-Z4 (pyramid), NE-Z4SH (threaded) ●Application range & Weight limit: ~K3(MOB3):125kg(275 lb) K4(MOB4):100kg(220 lb) ●Weight: 1510g(NE-Z4)/1500g(NE-Z4SH) ●Maximum flexion angle: 155º ●Water resistance: IP42 ●Internal power supply: Lithium ion battery ●Communication distance: Within 2 m ●Usage temperature: -10℃/+14℉ ~ +40℃/+104℉ ■Note that with the above temperature operating range the hydraulic resistance will decrease at higher temperatures and increase at lower temperatures. -
Page 13: 3 Before Use
Before Use 3.1 Parts list The package of ALLUX contains the following parts. Confirm whether everything is included. 【Main body and accessories】 ALLUX 1 pc. NE-Z4 1 copy Instruction manual 81-SS00098E(for prosthetist) User’s Guide 1 copy 81-SS00099E(this document) Backup battery case 1 pc. -
Page 14: 4 Safe Posture
Safe Posture 4.1 Safe posture and condition ready for communication ‘Safe posture’ refers to the posture taken in order to change the mode before using the remote controller or communicating with the ALLUX software. Be sure to understand the following safe postures before using ALLUX 【Safe posture】... -
Page 15: 5 Selective Modes By Remote Controller
Selective Modes by Remote Controller 5.1 ALLUX operational modes ALLUX has five operational modes. 1.Normal mode 2.Flexion angle limit mode 3.Variable selective flexion lock mode 4.Full extension lock mode 5.Free swing mode Use the remote controller to change the operational modes. The optional buttons on the remote controller can be customized as appropriate. -
Page 16: Normal Mode
Selective Modes by Remote Controller 5.3 Normal Mode 5.3.1 Overview The normal mode is adjusted for normal walking. Judging various walking situations and normal motions with the sensor, ALLUX automatically adjusts the bending or stretching resistance. 5.3.2 Yield Function In the following situations, ALLUX yields, increasing bending resistance and allowing knees to bend slowly. -
Page 17: Flexion Angle Limit Mode
Selective Modes by Remote Controller 5.4 Flexion angle limit mode In flexion angle limit mode, bending resistance is locked at a designated angle while extension resistance remains free. 0° ~ 100° 5.5 Variable selective flexion lock mode ALLUX remembers the angle at which variable selective flexion lock mode is turned on. Bending resistance is locked when it reaches that angle while extension resistance remains free. -
Page 18: 6 Remote Controller Maintenance
Remote controller Maintenance 6.1 How to change batteries When the battery power is depleted, exchange the AAA batteries as below. Please make sure to change the batteries at least once a year. 6.2 How to attach strap You can attach a strap to carry the remote controller with you. To attach a strap to the remote controller, please follow the steps below. -
Page 19: 7 States Of Allux
States of ALLUX 7.1 States of ALLUX ALLUX has charging mode, backup battery connecting mode, high-temperature mode, battery empty mode. When the mode is changed, the vibration will notice the user about the mode change and you can test the vibration patterns while adjusting the mode. The internal power supply of ALLUX was designed to last for 4 days and the number of steps taken by the prosthesis is 5000/day. -
Page 20: Normal Use State
States of ALLUX 7.2 Normal use state 7.2.1 When charger or power OFF cap is disconnected When the charger (NE-BC01) or the power OFF cap (NE-CC02) is disconnected, ALLUX will enter the normal usage condition, and the vibration will activate to indicate the residual capacity of the internal power supply of ALLUX . -
Page 21: Use Of Backup Battery
States of ALLUX 7.2.3 Use of backup battery When the internal battery capacity allows for less than 3 hours of walking, the warning vibration will be activated. When the battery is exhausted, the control of ALLUX will be stopped. Connecting the backup battery (NE-SB01) before the internal battery runs out enables the user to use ALLUX continuously for one day. - Page 22 States of ALLUX ■Do not use the backup battery for any other devices. It may cause damage to the battery or the device. ■Do not use constantly in the normal state. When discharged to a certain level, the backup battery cannot be used. ■Do not charge with any charger other than the specified one.
-
Page 23: Battery Exhaustion (Zero Battery)
States of ALLUX 【Specifications for backup battery】 ■Service temperature: 0℃/+32℉ to +40℃/+104℉ ■Resistance to ambient temperature: -20℃/-4℉ to +60℃/+140℉ ■Resistance to ambient humidity: 10 to 90%RH ■Charger: NE-BC01 ■Applicable device: ALLUX (NE-Z4 or NE-Z4SH) ■Service life: 1 year NE-SB01 7.2.4 Battery exhaustion (zero battery) When the internal power supply has exhausted and ALLUX cannot be used, the warning about battery exhaustion will be given by vibration. -
Page 24: In High-Temperature State
States of ALLUX 0.75 (4 ) : No more walk times+ 0.5 * 3 : Request for safe posture times× times ⇒The knee will be locked even if the user is not in the safe posture after the completion of vibration for 1 minute. ●The user must take the safe posture. -
Page 25: In Case Of Malfunction
States of ALLUX 【When the temperature is increasing】 sec * times with sec interval * Stop walking with the yielding function or take a rest and stay still until the knee joint cools down. 【When the temperature has abnormally increased】 sec * times+... -
Page 26: Vibration Alert Pattern Chart
States of ALLUX 7.4 Vibration alert pattern chart Vibration alert Notification timing Meaning When the charger or Control of the ALLUX™ ① Power OFF cap is has been stopped. connected When the charger or The battery level supports at ② Power OFF cap are least 3 hours ×... - Page 27 States of ALLUX The figure below provides the different types of ALLUX™ status and the transitionary vibration notification patterns. ⑤ ②③ disconnect the charger normal charging ⑥⑦⑧ ⑥detect detect ①connect the charger temperature temperature ④⑥low battery high zero temperature battery battery ⑨malfunction detection...
-
Page 28: 8 Charging Procedures
Charging Procedures 8.1 Charging ALLUX The internal power supply of ALLUX and backup battery shall be charged with the special charger (NE-BC01). When using ALLUX , it is recommended to charge it every day as a rule. ■Remove the prosthesis before charging. ■If the vibration does not sound when the charger is disconnected, discontinue use, and contact the prosthesis manufacturer. -
Page 29: Charging Procedures
Charging Procedures 8.1.2 Charging procedure Connect the charger (NE-BC01) and AC adapter (NE-AD01) to charge from an indoor household power supply outlet. Although the charging time depends on the residual battery capacity, the battery will be fully charged after about 3 hours. Four types of plug adapters are available for the AC adapter. -
Page 30: Charging The Backup Battery
Charging Procedures ●The LED lamp on the charger will light on in orange. * If the temperature of ALLUX is higher than +40℃/+104℉ just after ALLUX is used, the green LED lamp will flash. ●When charging is completed after a certain time, the LED lamp will turn green. * If ALLUX is left for a long time after the completion of charging and the battery capacity becomes lower than a certain level, the battery will be recharged. -
Page 31: Indication By Led Lamp On Charger
Charging Procedures 8.1.4 Indication by LED lamp on charger The LED lamp on the charger has four modes. When it does not light up, recheck the connection referring to 8.1.2 If the LED lamp still does not light up, the charger or the AC adapter may be defective. -
Page 32: 9 Maintenance Parts
Maintenance Parts 9.1 List of maintenance parts During periodic inspection, the following maintenance parts are used. When you want to purchase replacement par ts for maintenance or have to questions about maintenance of ALLUX ,contact your prosthesist. 【Replacement of battery】 If the battery life is coming to an end, receive the main body of ALLUX Main body of... -
Page 33: Troubleshooting List
Troubleshooting 10.1 Troubleshooting list Should you encounter any issues in the use of your ALLUX , please check the following list. If you are encountering an issue not listed in the below list, please contact your prosthesist.. Issue Check item lution Your ALLUX wont charge. - Page 34 Troubleshooting Issue Check item Solution Abnormal noise or Check for foreign substances. Please remove any foreign weakness in joints. Are any screws etc. interfering matter and ensure that normal with the knee joint section? movement takes place. Does vibration sound when Please contact your prosthetist.
-
Page 35: 11 Disposal
The table below shows the materials of the ALLUX knee unit in each component. When disposing of the knee joint, comply with the rules stipulated in the local community. If you return it to Nabtesco after giving such a notification,we will dispose of it for you. Part name... -
Page 36: 12 Periodic Inspection
Periodic Inspection 12.1 Periodic Inspection In ensuring safe use please make sure the ALLUX ™ has a periodic inspection after 2 years of use. The periodic inspection will be performed free of charge within the warranty period. After the warranty period has expired, the periodic inspection will be performed at the user’s expense. -
Page 37: Warranty
■When failure or damage occurs after the warranty period has expired. ■When failure or damage is caused by adjustment by a party other than those certified by Nabtesco or the Distributor. ■When failure or damage is caused by use without periodic inspection. -
Page 38: Warranty Periods Of Designated Devices
Warranty 13.2 Warranty periods of designated devices The warranty periods of the designated devices used for ALLUX , such as the charger, are shown in the following table. Remote controller 1 year NE-RC02 Charging port cap 1 year NE-CC01 Power OFF cap 1 year NE-CC02 Backup battery... -
Page 39: Repair
Warranty 13.3 Repair 1) If the cause of defect is unclear, the measures will be determined through consultation between the customer and the Distributor. 2) Repair of external painting will be performed at the user’s expense. Ask the Distributor for estimation. 3)... - Page 40 Manufacture Authorized representative for EU contries Nabtesco Corporation ORTHO-REHA Neuhof GmbH Accessibility Innovations Company Gundelfinger Straße 6 Assistive Products Department 90451 Nürnberg, GERMANY TEL: +49 911 643 3940 35,Uozakihama-machi,Higashinada-ku FAX: +49 911 660 4124 KOBE,658-0024,JAPAN Phone: +81-78-413-2724 Fax: +81-78-413-2725 http://welfare.nabtesco.com/ Contact Please contact us if you find any page missing or disordered.