Marshall MG250DFX, MG50DFX, MG Series Amplification Manual
- Brochure (3 pages) ,
- Product catalogue (32 pages) ,
- Owner's manual (6 pages)
Advertisement
Important safety instructions

This apparatus must be earthed!
- PLEASE read this instruction manual carefully before switching on.
- ALWAYS use the supplied mains lead, if a replacement is required please contact your authorised Marshall Dealer.
- NEVER attempt to by-pass the fuses or fit ones of the incorrect value.
- DO NOT attempt to remove the amplifier chassis, there are no user serviceable parts.
- Refer all servicing to qualified service personnel.
Servicing is required when the apparatus has been damaged in any way, such as when the power supply cord or plug is damaged, liquid has been spilled or objects have fallen into the apparatus, the apparatus has been exposed to rain or moisture, does not operate normally or has been dropped. - NEVER use an amplifier in damp or wet conditions. No objects filled with liquids should be placed on the apparatus.
- ALWAYS unplug this apparatus during lightning storms or if unused for long periods of time.
- PROTECT the power cord from being walked on or pinched particularly at plugs, convenience receptacles and at the point where they exit from the apparatus.
- DO NOT switch the amplifier on without the loudspeaker(s) connected.
 Note: This equipment has been tested and found to comply with the requirements of the EMC directive (Environments E1, E2 and E3 EN 55103-1/2) and the Low Voltage directive in the E.U.
EUROPE ONLY - Note: The Peak Inrush current for the MG50DFX is 9.6 amps. The Peak Inrush current for the MG250DFX is 19.8 amps.

Any changes or modifications not expressly approved by the party responsible for compliance may void the users authority to operate the equipment.
Note: It is recommended that all audio cables, with the exception of the speaker lead, used to connect to the MG50DFX and MG250DFX are of a high quality screened type. These should not exceed 10 metres in length.
Always use a non-screened Marshall approved speaker lead when connecting an extension cabinet to these units.
Always ensure free movement of air around the amplifier!
USA ONLY - DO NOT defeat the purpose of the polarised or grounding type plug. A polarised plug has two blades with one wider than the other. A grounding type plug has two blades and a third grounding prong. The wide blade or the third prong are provided for your safety. When the provided plug does not fit into your outlet, consult an electrician for replacement of the obsolete outlet.
Follow all instructions and heed all warnings
KEEP THESE INSTRUCTIONS!
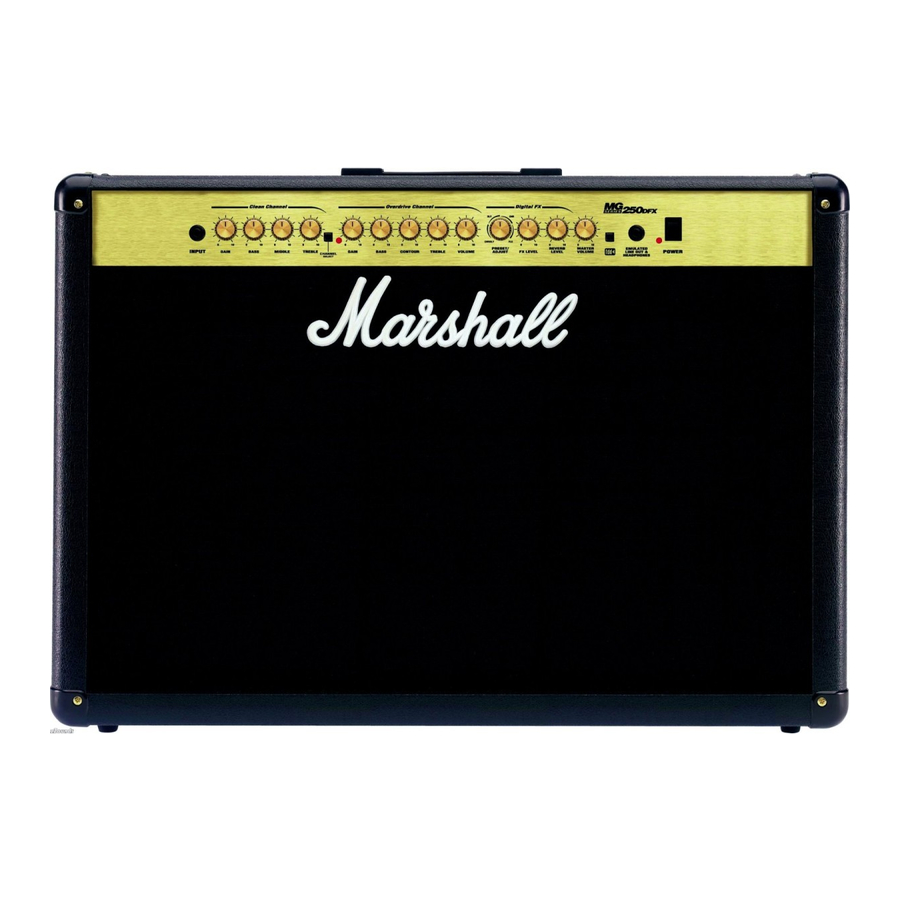
Front Panel Features

- INPUT jack
Use a good quality guitar cable (i.e. one that's This control adjusts the volume of the Overdrive Channel. The louder you turn-up this channel, the screened/shielded) to plug your guitar in here. 'looser' your amp will sound and feel – especially with the FDD switch (17) engaged. This behaviour - Clean Channel GAIN control
When the Clean Channel is selected, this control adjusts its volume. At low settings the sound will be very clean with a pleasing, bell-like ring. Turning this control above half way will introduce a desirable, bluesy distortion as the power amplifier stage is driven into 'crunch mode'. - Clean Channel BASS control
Turning up the Bass control will add warmth and low-end depth to your clean sound. The Bass control can be used in conjunction with the FDD switch (17) to produce deep sounding, valve-like clean tones that are well defined yet still full and round. - Clean Channel MIDDLE control
Adjusting the middle frequencies in your clean channel will vary the amount of body to your sound. Attenuating (decreasing) the middle by turning this control anticlockwise will yield a more hollow sound with the bass and treble frequencies appearing to be more accentuated. Conversely, increasing the middle will add body to the Clean Channel's sound. - Clean Channel TREBLE control
Increasing the Treble will make your clean sounds brighter and more cutting, turning it down will decrease your tones edge and make it sound softer as a result. - CHANNEL SELECT switch
This push switch allows you to change between the amp's two channels, Clean and Overdrive, via the front panel. When this switch is 'out' the Clean channel is engaged, pushing it 'in' switches to the Overdrive Channel. Channel switching can also be done via the included two-way footswitch (when the footswitch is connected the CHANNEL SELECT switch is not functional).
Note: When the Overdrive Channel is selected, the OD LED (7) will light up red.
- OD LED
When illuminated, this LED indicates that the Overdrive Channel has been selected by either the Channel Select switch (6) or the supplied two-way footswitch. - Overdrive Channel GAIN control
Turning up the Gain control will increase the amount of preamp distortion generated in the Overdrive Channel. Low Gain control settings will produce classic rock and blues tones. Crank this control for fat and aggressive sounds that are perfect for soloing or hard rock and nu-metal riffing. - Overdrive Channel BASS control
Turning up this control will add extra low-end 'thump' to high gain riffs and a warm, natural sounding depth to lower gain crunch tones. Using the Bass control in conjunction with the FDD switch (17) will allow you to dial in the exact amount of low-end 'thump' and tightness you are looking for. - Overdrive Channel CONTOUR control
This highly effective tone control works by radically modifying the mid-range (body) of your sound. The tone can vary from traditional and woody sounding (control set at 0), to balls-to-thewall (control set midway), to aggressive, 'scooped' and modern (turned up to 10) and all points inbetween. - Overdrive Channel TREBLE control
This important knob controls the aggressive topend 'sizzle' you have on high gain sounds and the 'cut' and definition of lower gain crunch tones. Experimenting with this control will help you to dial in your own signature tones on your amp. is exactly what a good all-valve amplifier does and is a result of our proprietary FDD circuitry - Overdrive Channel VOLUME control
This control adjusts the volume of the Overdrive Channel. The louder you turn-up this channel, the 'looser' your amp will sound and feel – especially with the FDD switch (17) engaged. This behaviour is exactly what a good all-valve amplifier does and is a result of our proprietary FDD circuitry.
| Effect | Adjustable Parameter | Description |
| Chorus and Delay (CHR/DLY) | Delay Time (from short to long as you turn the Preset/Adjust control clockwise through the CHR/DLY segment) | This multi-effect combines a lush, fixed speed Chorus with a variable time Delay. |
| Delay (DLY) | Delay Time (from short to long as you turn the Preset/Adjust control clockwise through the DLY segment) | Short Delay Times will have less repeats for 'groovy' surf and rockabilly tones. Increasing the Delay Time increases the number of repeats for a much more atmospheric, 'stadium' effect. |
| Chorus (CHR) | Speed (from slow to fast as you turn the Preset/Adjust control clockwise through the CHR segment) | At slow Speeds a mellow, Phase-like sweep occurs. As the Speed is increased a more traditional chorus effect is heard. At maximum Speed, a psychedelic vibrato results. |
| Flange (FLG) | Speed (from slow to fast as you turn the Preset/Adjust control clockwise through the FLG segment) | At slow Speed settings the amount of regeneration is increased for huge 'jet enginelike' sweeps. As the speed is increased the regeneration decreases to produce a lush, natural sounding Flange effect. When the Speed is maxed out, a fast vibrato results. |
- Digital FX PRESET / ADJUST control
This control serves a dual purpose. Not only does it allow you to select one of the four types of effects on offer (Chorus / Delay (CHR/DLY), Delay (DLY), Chorus (CHR) or Flange (FLG)), it also allows you to adjust a parameter as you sweep it through each of the four effect segments. The parameter you can adjust for each of the four effect segments is shown below: - Digital FX LEVEL control
This controls how much of the chosen effect gets mixed in with your unaffected (dry) guitar tone. Want to hear more of the DFX you've just selected? Then simply turn this control up!
![information]() Important Footswitch Note: Using the supplied two-way footswitch, you can switch the selected DFX on/off.
Important Footswitch Note: Using the supplied two-way footswitch, you can switch the selected DFX on/off. - REVERB LEVEL control
This control lets you add a lush Reverb to your sound – from a subtle hint to cavernous and all points in-between. Designed by our in-house digital experts, this custom designed Marshall Reverb is highly musical and always sounds natural – it never gets harsh or 'fake' sounding.
![information]() Important Footswitch Note: The supplied footswitch does NOT switch the Reverb on/off.
Important Footswitch Note: The supplied footswitch does NOT switch the Reverb on/off. - MASTER VOLUME control
As its name suggests, the Master Volume control determines the overall volume of your amplifier. So after setting-up the relative volume of Channels 1 & 2 the overall level can be adjusted without affecting your all-important Clean/Overdrive balance. - FDD (Frequency Dependent Damping) switch
Marshall's proprietary FDD circuit accurately mimics the way an all-valve amplifier interacts with the loudspeaker(s) and adds a width and depth to your sound which has been unachievable in an affordable solid-state amplifier... until now! To engage FDD simply press this switch in. - EMULATED LINE OUT & HEADPHONES jack
This jack can be used as either an Emulated Line Out or as a Headphone output. This means you can use this socket to connect your amp directly to your multi-track recording machine and you'll get a great, speaker emulated guitar sound direct to disk or tape. Alternatively you can plug your headphones in here for a killer, speaker-emulated sound!
TIP: How to practise or record in 'silence': The Clean Channel GAIN control (2) and the Overdrive Channel VOLUME control (12) will control the level of the headphone and line out.
The speaker output can be adjusted independently using the Master VOLUME control(16). Setting the Master VOLUME control(16) to zero will allow silent recording or practice. - POWER Switch & LED
The power switch turns your amplifier on and off. The LED will be lit when your amplifier is on and will not be lit when the amplifier is switched off.
![information]() Note: Before connecting to the mains electricity supply, always ensure that your amplifier is compatible with your electricity supply, as detailed on the rear panel.
Note: Before connecting to the mains electricity supply, always ensure that your amplifier is compatible with your electricity supply, as detailed on the rear panel.
Please ensure the amplifier is switched off and unplugged from the mains electricity supply before being moved.
Rear Panel Features

- MAINS INPUT Connector
The MG amplifier is provided with a detachable mains (power) lead which is connected here. The specific mains input voltage rating that your amplifier requires is clearly indicated on the back panel. Before connecting to the mains for the first time please make sure that your amplifier is compatible with your electricity supply. - LOUDSPEAKER Output(s)
The internal loudspeaker(s) connect here – one in the case of the MG50DFX and two in the case of the MG250DFX.
Always use a non-screened Marshall approved speaker lead when connecting an extension cabinet to these units. - CD IN jack
If you want to jam to your favourite CD or tape, merely connect the headphone output of your CD or tape player here, adjust the CD /tape player's volume to match that of your guitar and you've got the perfect 'play-along' practice system. - FX RETURN(s)
This is where you connect the output of the effects processor you are using in the effects loop. As the MG250DFX is a stereo amplifier it offers two FX Return jacks – LEFT and RIGHT. This allows you to take full advantage of a stereo effects processor. If, however, the effects unit you are using only has a single, mono output then use the LEFT (MONO) FX Return. - FX SEND
If you want to use an external effects processor in your amp's built-in Series effects loop, this is the jack you connect to the INPUT of the unit you are using. For optimum performance, the FX loop is best suited for use with a rack or multi-effects processor which has a manual adjustment for INPUT SIGNAL LEVEL. - FOOTSWITCH
Connect the supplied two-way footswitch here. Its left button (marked Channel) enables you to change channels and its right button (marked DFX) allows you to switch the DFX Section on/off.
Important Footswitch Note: The supplied footswitch does NOT switch the Reverb on/off.
Technical Specification
| MG50DFX | |
| Power Output | 50W RMS into 8Ω |
Main Guitar
| 1MΩ |
CD Input
| 5.6kΩ |
Emulated Output
| +4dBV Nom. |
| Weight | 16kg |
| Size (mm) | 518mm x 498mm x 275mm |
| MG250DFX | |
| Power Output | 2 x 50W RMS into 8Ω |
Main Guitar
| 1MΩ |
CD Input
| 5.6kΩ |
Emulated Output
| +4dBV Nom. |
| Weight | 22kg |
| Size (mm) | 671mm x 498mm x 275mm |
Suggested Settings
Here follows four sample settings to act as starting points from which to develop your own sounds.
N.B. Volume should be adjusted to taste.

Marshall Amplification plc
Denbigh Road, Bletchley, Milton Keynes, MK1 1DQ, England
Tel : [01908] 375411 Fax: [01908] 376118
www.marshallamps.com
Whilst the information contained herein is correct at the time of publication, due to our policy of constant improvement and development, Marshall Amplification plc reserve the right to alter specifications without prior notice.

Documents / Resources
References
Download manual
Here you can download full pdf version of manual, it may contain additional safety instructions, warranty information, FCC rules, etc.
Download Marshall MG250DFX, MG50DFX, MG Series Amplification Manual
Advertisement
Thank you! Your question has been received!


Need Assistance?
Do you have a question about the MG250DFX that isn't answered in the manual? Leave your question here.