Advertisement
Quick Links
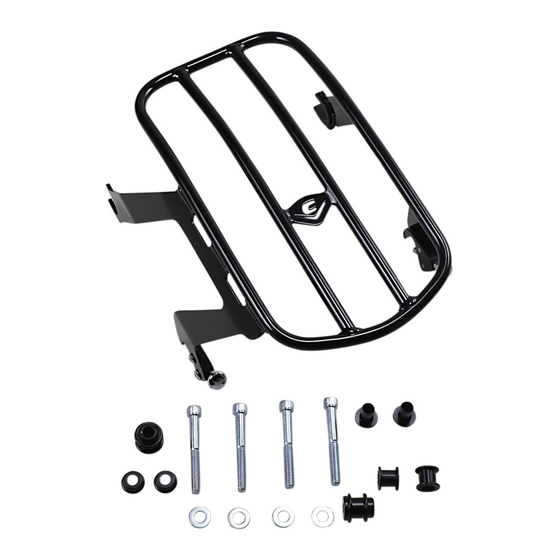
Items Supplied >
1 - Detachable Solo Chrome or Black Rack with
Latches
2 - 3/8" I.D. Front, Mount Bushing, Black
2 - 3/8" I.D. Rear, Outer/Inner/Plastic Bushing, Black
4 - 3/8"-16 x 3.0" Sockethead Screws Zinc
4 - 3/8" Flat Washers
Instruction Manual >
Read all instructions carefully before installing your new Cobra
Prepare a large towel or moving blanket to set the removed saddlebags on. Start on the right side of
1.
the motorcycle. Open the saddlebag lid, Figure 1. The screws and spacers are retained with the bag
by an o-ring on the inner-side of the spacer on the screw, when the screws are fully loose the bag will
be pulled off the motorcycle with the screws and spacers. Have an assistant hold the bag as you
loosen the front and rear screws retaining the saddlebag and spacers. Carefully pull the bag off the
front lower mount and set down on towel. NOTE: Remove only one set of screws right to left on the
motorcycle at a time so the saddlebags or fender do not fall resulting in possible scratches or damage
to the fender, exhaust, saddlebag or paint.
Remove the o-rings from the front and rear screws and remove the stock inner spacers (the one
2.
closer to the fender rail), and stock bolts from the saddlebags. Insert (1) of the supplied 3/8-16 X 3.0"
screws through (1) supplied 3/8" washer, the front saddlebag mount hole and the supplied front
backrest bushing, see Figure 2. Insert (1) of the supplied 3/8-16 X 3.0" screws through (1) supplied
3/8" washer, the rear saddlebag mount hole and the supplied rear backrest bushing. Place sufficient
blue loctite on both screws. Do not install original o-rings. Reinstall the right bag carefully on to the
lower front mount and then thread in the new screws being sure the spacers are in place correctly and
centered in the fender rail. Snug the bolts but do not fully tighten at this time.
STOCK INNER
BUSHINGS / O-
RING, REMOVE
WITH BAG
STOCK SCREW
O-RING
INNER
SPACER
SADDLEBAG /
SPACER
DETAIL VIEW OF STOCK HARDWARE
* Cobra
recommends you always wear a helmet while riding. Please never operate your motorcycle while under
®
the influence of alcohol and/or drugs. Enjoy the new look of your motorcycle and please ride safely.
DOCUMENT NO. 0017
REV. B
01/20
23801 E. La Palma Ave., Yorba Linda, CA 92887 Ph. 714.692.8180 Fax. 714.692.5016
Application(s) >
HARLEY:
SOFTAIL:
602-2514 / 602-2514B
FIGURE 1
CONTINUED ON PAGE 2
www.cobrausa-vtwin.com
FLHC
2018 - 2019
FLHCS
2018 - 2019
Page 1 of 3
product!
®
LOOSEN FRONT
AND REAR
SCREWS FULLY
BUT REMOVE
WITH BAG,
SPACERS & O-
RING
HAVE ASSISTANT
HOLD BAG WHILE
LOOSENING
SCREWS
Advertisement

Related Manuals for Cobra FLHC 2018


Summary of Contents for Cobra FLHC 2018
- Page 1 Instruction Manual > Page 1 of 3 602-2514 / 602-2514B Read all instructions carefully before installing your new Cobra product! ® Prepare a large towel or moving blanket to set the removed saddlebags on. Start on the right side of the motorcycle.
- Page 2 23801 E. La Palma Ave., Yorba Linda, CA 92887 Ph. 714.692.8180 Fax. 714.692.5016 www.cobrausa-vtwin.com Instruction Manual > Page 2 of 3 602-2514 / 602-2514B SOLO RACK (LATCHES PRE-INSTALLED) U-SHAPED GROMMET FRONT MOUNTING BUSHING LEFT SIDE COMPONENTS RIGHT SIDE FENDER RAIL REAR MOUNTING BUSHING SADDLEBAG...
- Page 3 23801 E. La Palma Ave., Yorba Linda, CA 92887 Ph. 714.692.8180 Fax. 714.692.5016 www.cobrausa-vtwin.com Instruction Manual > Page 3 of 3 602-2514 / 602-2514B DETACHABLE DETACHABLE LATCH KNOB LATCH PIN FRONT MOUNTING REAR MOUNTING SCREW / BUSHING SCREW / BUSHING FIGURE 3 7.