Table of Contents
Advertisement
Quick Links
PAC-SDW01RC-1
SIMPLE DUCTLESS WIRED
REMOTE CONTROLLER
OPERATION MANUAL
This manual is designed to help you get
acquainted with your new Simple Ductless
Wired Remote Controller. Check out the table
of contents on page 2 to browse by topic.
Need Help? Get in Touch.
Web: www.MitsubishiComfort.com
Phone: 1-800-433-4822
Advertisement
Table of Contents

Related Manuals for Mitsubishi PAC-SDW01RC-1


Summary of Contents for Mitsubishi PAC-SDW01RC-1
- Page 1 PAC-SDW01RC-1 SIMPLE DUCTLESS WIRED REMOTE CONTROLLER OPERATION MANUAL This manual is designed to help you get acquainted with your new Simple Ductless Wired Remote Controller. Check out the table of contents on page 2 to browse by topic. Need Help? Get in Touch.
-
Page 2: Table Of Contents
Table of Contents Read Before Installing Table of Contents Controller Features ...........3 Controller Overview . -
Page 3: Controller Features
Controller Features Flexible Scheduling: The controller provides 3 preset Auto Changeover: When Auto mode is selected, the scheduling periods (Comfort, Away, Sleep), each of controller automatically determines whether your home which can be fully customized to meet your desired needs heating or cooling to reach the desired temperature. time and temperature settings for every day of the week. -
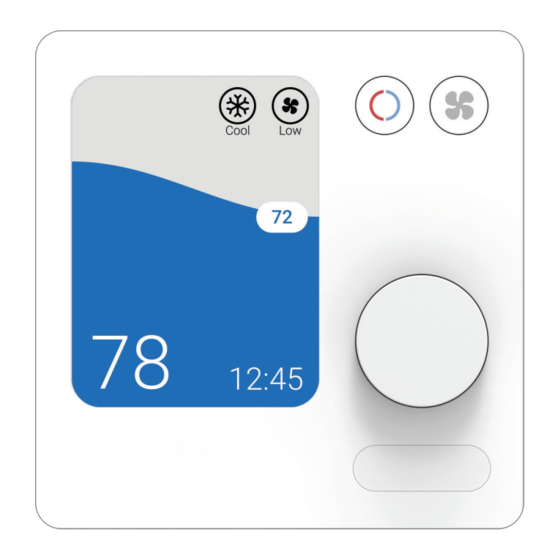
Page 4: Controller Overview
Controller Overview Indoor Temperature/ Temperature Mode Adjust Humidity (RH%) Set Point Touch to select Touch to select Temperature Shows current indoor Shows desired indoor system mode: fan mode: Rotate dial temperature or humidity temperature. • Heat • Auto clockwise or •... -
Page 5: Adjusting The Temperature In Auto Mode
Adjusting the Temperature in Auto Mode Auto mode (when the controller automatically chooses To choose your preferred cooling and heating set points heating or cooling to reach your desired set point) is in Auto mode dual set point, follow the steps below. 1) Set the mode to Auto enabled by default. -
Page 6: Selecting The System Mode
Selecting System Mode Enabling Auto Dry Current system mode (Heat, Cool, Dry, Fan, Auto, Off) is dis- Enabling Auto Dry allows the system to switch played in the upper-right corner of the controller home screen. between Cool and Dry mode automatically in order to Press the Mode button to view the available modes, maintain a comfortable balance between temperature then press the dial to select a preferred mode. -
Page 7: Setting The Fan Speed
Setting the Fan Speed Press the Fan button to view the available fan speeds, then press the dial to select a preferred speed. Available Fan speed settings: • Auto: SDW01 will determine the optimal fan speed to meet the set temperature. -
Page 8: Scheduling Overview
Scheduling Overview By default, scheduling is enabled for both Residential Schedule Periods and Commercial settings. The default schedule for When a scheduling is enabled, the following icons will both settings includes 4 scheduling periods with the appiear in the schedule menu. times and temperatures shown in the tables below. -
Page 9: Setting A Schedule
Setting a Schedule Follow the steps below to edit a schedule: Table of Contents 1) Navigate to the “sched.” menu and press the dial. 2) Select “schedule” from the sched. drop-down menu. 3) If setting up schedules for the first time, follow the on-screen wizard to complete the setup process. -
Page 10: Schedule Override (Hold)
Schedule Override (Hold) Table of Contents A schedule override occurs when the controller is run- Temporary Hold: Overrides the current temperature ning a schedule and the set point is adjusted. During set point for a designated period of time. an override condition, the controller will display “Hold” Permanent Hold: Overrides the current temperature and maintain the set point temporarily or permanently set point permanently until you manually change it or... -
Page 11: Locking The Controller
Locking the Controller To limit or prevent access to the controller, you can enable either of the two lockout settings: Child Lock: No access is allowed without a PIN code. Comfort Lock: Only the temperature can be changed. Selecting a Lock Setting 1) Navigate to the Settings menu. -
Page 12: Setting The Time And The Day Of The Week
Setting the Time and the Day of the Week 1) Navigate to the Settings menu. 2) Navigate to the Time/Day sub-menu. 3) Select between a 24 hour and 12 hour clock. 4) Set the hour of the day. 5) Set the minute of the hour. 6) Set the day of the week. -
Page 13: Choosing Fahrenheit Or Celsius
Choosing Fahrenheit or Celsius To select a temperature scale, follow the steps below. 1) Navigate to the Settings menu. 2) Navigate to the Temperature Format sub-menu. 3) Select between Celsius & Farenheit. 3a) If set to Celsius, select between 1 and 1/2 degree increments.