Icom IC-7850 Instruction Manual
Hide thumbs
Also See for IC-7850:
- Instruction manual (282 pages) ,
- Servise manual (179 pages) ,
- Reference manual (13 pages)

Related Manuals for Icom IC-7850


Summary of Contents for Icom IC-7850
- Page 1 THE TRANSCEIVERS i7850 i7851 Instruction Manual A7205H-1EX-3 Printed in Japan © 2015–2018 Icom Inc.
- Page 2 7851. ABOUT CE AND DOC Hereby, Icom Inc. declares that the versions of IC-7851 which have the “CE” symbol on the product, comply with the essential requirements of the Radio Equipment Directive, 2014/53/EU, and the re- striction of the use of certain hazardous substances in electrical and electronic equipment Directive, 2011/65/EU.
-
Page 3: Explicit Definitions
Recommended for optimum use. No risk of personal injury, NOTE fire or electric shock. TRADEMARKS Icom, Icom Inc. and Icom logo are registered trademarks of Icom Incorporated (Japan) in Japan, the United States, United Kingdom, Germany, France, Spain, Russia, Australia, New Zealand, and/or other countries. - Page 4 OFF and remove the power cable if it emits an DO NOT place the transceiver against walls or abnormal odor, sound or smoke. Contact your Icom putting anything on top of the transceiver. This may dealer or distributor for advice.
-
Page 5: Fcc Information
CAUTION: Changes or modifications to this device, • Reorient or relocate the receiving antenna. not expressly approved by Icom Inc., could void your • Increase the separation between the equipment authority to operate this device under FCC regula- and receiver. - Page 6 ® ® FUNCTIONS AND FEATURES of Adobe Acrobat Reader The following functions and features can be used with Adobe ® Reader ® . • Keyword search Click “Find” (Ctrl+F) or “Advanced • Find screen Search” (Shift+Ctrl+F) in the Edit menu to open the search screen. This is convenient when search- ing for a particular word or phrase in this manual.
- Page 7 Example: Push the Multi-function [METER]() key. (F) Function key Example: Push [SCOPE](F). Mode key Example: Push the Mode key [SSB]. (F) Function keys Mode keys About the LCD monitor display Due to the printing matter, the Display type differs from the IC-7850 default settings.
-
Page 8: Supplied Accessories
SUPPLIED ACCESSORIES q AC power cable † ..........1 w Rack mounting handles ........ 1 pair e Screws for rack mounting handles ....1 set r SD card ..............1 t Feet .............. 1 pair y Spare fuse (2 A) ..........1 u RCA plugs ............ - Page 9 D Rear panel (External keypad and meter) ………………………… 3-6 ■ Linear amplifier connections ………………………………………… 3-7 D Connecting the IC-PW1/EURO …………………………………… 3-7 D Connecting a non-Icom linear amplifier …………………………… 3-7 ■ Transverter jack information …………………………………………… 3-8 ■ FSK and AFSK (SSTV) connections ………………………………… 3-8...
- Page 10 TABLE OF CONTENTS ■ Microphones (optional products) ……………………………………… 3-9 D SM-50 ………………………………………………………………… 3-9 D SM-30 ………………………………………………………………… 3-9 D HM-36 ………………………………………………………………… 3-10 ■ Connecting the RC-28 (Optional product) …………………………… 3-10 BASIC OPERATION Section 4 ■ When first applying power …………………………………………… 4-2 ■...
- Page 11 TABLE OF CONTENTS ■ ■ Electronic keyer functions ……………………………………………… 5-9 D Memory keyer screen ……………………………………………… 5-10 D Editing a Keyer memory …………………………………………… 5-11 D Contest number set mode ………………………………………… 5-12 D Keyer set mode ……………………………………………………… 5-13 ■ ■ Operating RTTY (FSK) ………………………………………………… 5-14 D About the RTTY reverse mode ……………………………………...
- Page 12 TABLE OF CONTENTS Functions for Receive Section 7 ■ Preamplifier ……………………………………………………………… 7-2 ■ Attenuator ……………………………………………………………… 7-2 ■ RIT function ……………………………………………………………… 7-3 ï RIT monitor function ………………………………………………… 7-3 ■ AGC function control …………………………………………………… 7-4 ï Selecting the preset value ………………………………………… 7-4 ï...
- Page 13 TABLE OF CONTENTS ■ Playing back the recorded audio (QSO) ……………………………… 9-4 ■ Operating while playing back ………………………………………… 9-5 ■ Deleting a recorded audio file ………………………………………… 9-6 ■ Deleting a recorded audio folder ……………………………………… 9-6 ■ Instant replay function ………………………………………………… 9-7 ■...
- Page 14 TABLE OF CONTENTS D Editing (programming) memory names …………………………… 11-6 ■ ■ Memory clearing………………………………………………………… 11-6 ■ ■ Memo pads ……………………………………………………………… 11-7 D Entering frequencies and operating modes into Memo pads …… 11-7 D Calling up a frequency and operating mode from Memo pads … 11-8 D Using the Memo pad list screen ……………………………………...
- Page 15 TABLE OF CONTENTS SET MODE Section 15 ■ ■ Set mode description …………………………………………………… 15-2 D Set mode operation ………………………………………………… 15-2 D Screen arrangement ………………………………………………… 15-3 ■ ■ Level set screen ………………………………………………………… 15-4 ■ ■ ACC set screen ………………………………………………………… 15-6 ■ ■ Display set screen …………………………………………………… 15-10 ■...
- Page 16 TABLE OF CONTENTS SPECIFICATIONS AND OPTIONS Section 19 ■ Specifications …………………………………………………………… 19-2 D General ……………………………………………………………… 19-2 D Transmitter …………………………………………………………… 19-2 D Receiver ……………………………………………………………… 19-3 D Antenna tuner ………………………………………………………… 19-3 ■ Options ………………………………………………………………… 19-4 CONNECTOR INFORMATION Section 20 ■ ACC socket ……………………………………………………………… 20-2 ■...
-
Page 17: Panel Description
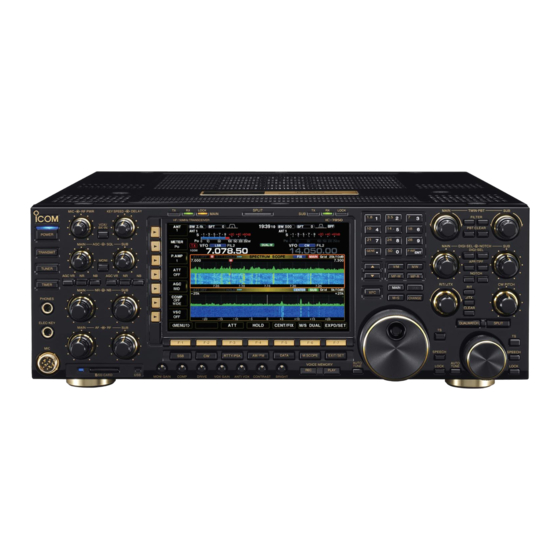
PANEL DESCRIPTION Section ■ Front panel ……………………………………………………………… 1-2 ■ Rear panel ……………………………………………………………… 1-12 ■ Display …………………………………………………………………… 1-14 ■ Screen menu arrangement …………………………………………… 1-16... - Page 18 PANEL DESCRIPTION ■ Front panel q POWER KEY [POWER] r TIMER KEY [TIMER] (pp. 4-3, 14-6) (p. 14-5) ➥ Push to turn ON or OFF the sleep or daily timer First, turn ON the internal power supply. The internal function. power supply switch is located on the rear panel.
- Page 19 PANEL DESCRIPTION u MICROPHONE CONNECTOR [MIC] !9 ELECTRONIC CW KEYER SPEED CONTROL Connect an optional microphone. [KEY SPEED] (p. 5-7) • See page 3-4 for appropriate microphones. Rotate to adjust the internal electronic CW keyer’s • See page 20-3 for microphone connector information. speed to between 6 wpm (minimum) and 48 wpm (maximum).
- Page 20 PANEL DESCRIPTION ■ Front panel (Continued) @3 AGC CONTROL [AGC] @8 MODE KEYS (p. 7-4) ■ ■ Rotate to adjust the continuously-variable AGC cir- Selects the desired mode. (p. 4-10) • The Voice synthesizer announces the selected mode. cuit time constant. (p.
- Page 21 PANEL DESCRIPTION #0 MULTI-FUNCTION KEYS Push to select the functions indicated in the display to the right of these keys. • Functions vary, depending on the operating mode. ➥ Push to select the ANT1, ANT2, ANT3 or ➥ Push to activate and then select the ANT4 antenna connector.
- Page 22 INSTALLATION NOTES For amateur base station installations it is recom- EIRP clearance heights by frequency band mended that the forwards clearance in front of the an- 1 Watts 2.1 m tenna array is calculated relative to the EIRP (Effective 10 Watts 2.8 m Isotropic Radiated Power).
- Page 23 Please record the serial number of your transceiver below for future servicing reference: Serial Number Date of purchase Place where purchased :...
- Page 24 1-1-32 Kamiminami, Hirano-ku, Osaka 547-0003, Japan...