Advertisement
- 1 GMR3050-2C HARDWARE
- 2 WHAT'S IN THE BOX
- 3 INSTALL THE BATTERIES
- 4 CHARGING THE RADIO
-
5
USING THE RADIO
- 5.1 Turning the Radio On and Adjusting the Volume
- 5.2 Using Headphones
- 5.3 Using the Menu
- 5.4 Choosing a Channel
- 5.5 VOX Feature
- 5.6 Channel Scan Feature
- 5.7 Using channel scan
- 5.8 Silent Mode
- 5.9 Talking on Your Radio
- 5.10 Transmitting
- 5.11 Transmitting a Call Alert Tone
- 5.12 Auto Squelch Feature
- 5.13 Monitor Mode Feature
- 5.14 Backlight
- 5.15 Key Lock
- 6 SPECIFICATIONS
- 7 Documents / Resources
Congratulations on your purchase of a Uniden FRS radio. This lightweight, palm-sized radio is a state-of-the-art device, equipped with many valuable features. Use it at sporting events, to stay in contact with family and friends, hiking, skiing, outdoors, or in a neighborhood watch for vital communication.
- 22 FRS Channels
- 121 Privacy Codes
- Up to 30-Mile Range*
- Channel Scan
- VOX Headset Jack
- Roger Beep
- Battery Charger
- Silent Mode
- microUSB charging jack
- 10 Selectable Call Tone Alerts
- Auto Squelch
* Range may vary depending on environmental and/or topographical conditions.
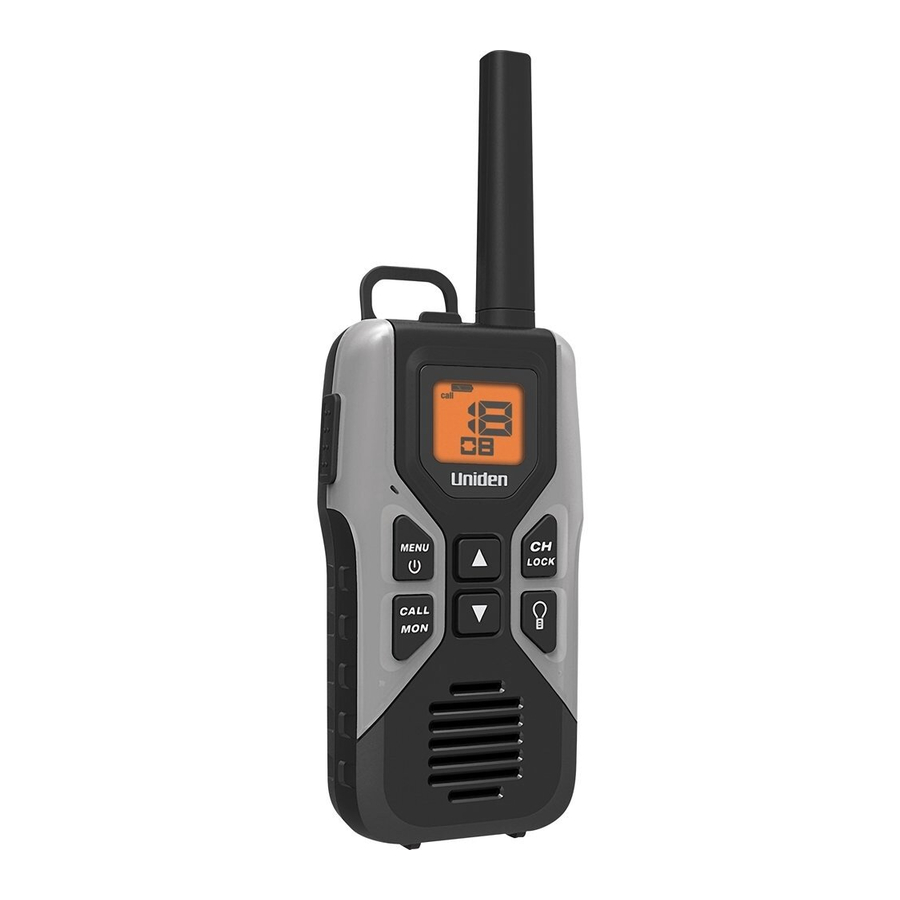
GMR3050-2C HARDWARE

| 1 | Antenna | 7 | Speaker |
| 2 | USB Charge Port/ Headphone Jack | 8 | Channel and Volume |
| 3 | Push to Talk | 9 | Backlight |
| 4 | Microphone | 10 | CH/LOCK |
| 5 | MENU/Power | 11 | Screen |
| 6 | CALL/MON |
WHAT'S IN THE BOX
Your package contains 2 radios, 6 AA rechargeable NiMH batteries, one AC adapter/ Y-Split microUSB charge cable, 2 belt clips, and this reference guide.
Visit our web site at www.uniden.com to order accessories.
Use only Uniden accessories.
INSTALL THE BATTERIES
Each radio uses 3 AA rechargeable NiMH batteries (included).
To install the batteries:
- If installed, remove the belt clip.
- Remove the battery compartment door by pressing on the latch and releasing the cover. Remove it.
- Install the supplied 3 AA NiMH batteries into the battery compartment. Be certain to follow the + and – symbols in the compartment. Installing the batteries incorrectly will prevent the unit from operating.
- Replace the battery compartment door.
- Replace the belt clip if necessary.
- Repeat for each radio.
Note:
You may also use 3 AA non-rechargeable alkaline batteries in each radio.
However, do not mix NiMH and alkaline batteries in the same radio.
CHARGING THE RADIO
Review the following tips before charging your radios:

Do not attempt to recharge alkaline batteries. Doing so can create a safety hazard or damage the radio.
- Install the batteries before connecting the AC adapter to the radio and power source.
- The battery icon flashes while the radio charges, whether the radio is turned on or not. The charge stops after 14 hours of continuous charging. If there is a power interruption, the charging timer resets to 14 hours. If the radio is off and charging stops, the battery icon stops flashing.
- Charge time may vary depending on the battery life remaining. For fastest charging, turn off the radio before charging.
- If battery power is low, you cannot operate the radio even using external power. If you try to transmit while power is low, the radio will automatically turn off. Recharge the batteries.
GMR3050-2C charges through a microUSB Y-branch cable (provided) with an AC adapter end that plugs into an AC power source.
- Plug one branch of the microUSB Y-Cable into each radio's microUSB charge port.
- Insert the AC adapter end into an AC power source (wall plug).
- The radio is fully charged when the battery charging icon stops flashing.
USING THE RADIO
Turning the Radio On and Adjusting the Volume
- Press and hold the MENU /
![]() key to turn the radio ON.
key to turn the radio ON. - To change the volume level, press the ▲ or ▼ key to increase or decrease the volume level. There are 8 volume levels (L1- L8) plus volume off (L0)
- Press and hold the MENU /
![]() key to turn the radio OFF.
key to turn the radio OFF.
Using Headphones
Your radio has a headphone jack to support earphones/earbuds (not included). Using the earbuds lets you have more private communications. To use headphones/earbuds, lift the rubber cover from the headset jack, then plug in the headphones/earbuds.

Your radio is not weather resistant when using the headset jack. When you remove the headphones/earbuds, be sure to fully press the cover into place to restore the radio's weather resistant capability.
Using the Menu
Press MENU /  to access the three menu options:
- Privacy Code (121 codes). The privacy codes display underneath the channel number on the screen.
- Call Tone (10 call tone options plus Off)
- VOX (5 levels plus Off)
Each menu option is discussed later in the manual with the feature that uses it.
Choosing a Channel
Your radio has 22 channels you can use to talk to others. In order to speak to someone, each of you must be set to the same channel and privacy code.
Each of the channels 1-22 may have any one of the privacy codes, 0 (OFF), or 1-121 selected. Code oF (OFF) indicates no privacy code selected and your radio can receive a signal regardless of the code settings of the transmitting radio.
To choose a privacy code:
- Press MENU /
![]() until the privacy code number flashes below the channel number.
until the privacy code number flashes below the channel number. - Press ▲ or ▼ to cycle through the privacy codes.
- The radio returns to its normal state after about 5 seconds.
To choose a channel:
- Press the CH/LOCK key to access the channel function; the channel number flashes.
- Press ▲ or ▼ to manually cycle through the channels.
You can only manually cycle through channels when the channel numbers are flashing.
- Press CH/LOCK to set the channel.
VOX Feature
Insert headphones into the radio BEFORE turning on the radio.
Your radio is equipped with a user selectable Voice Operated Transmitter (VOX) that can be used for automatic voice transmissions. The VOX feature is designed to be used with or without a headset with a microphone.
Transmission is initiated by speaking into the microphone instead of pressing PTT.
To select a VOX level:
- Press MENU /
![]() repeatedly until the vox icon and the VOX sensitivity level (OFF, 1-5) blink.
repeatedly until the vox icon and the VOX sensitivity level (OFF, 1-5) blink. - Press ▲ or ▼ to change the VOX sensitivity levels. Use level 5 for increased sensitivity to voice in normally quiet environments, and use a higher level to reduce undesired activation in very noisy environments.
Channel Scan Feature
Your radio has a channel scan feature that allows you to easily scan all 22 channels. When an active channel is detected, the unit pauses on that channel until the channel is clear. Then, after a 2 second delay, the radio continues scanning. Press CH/LOCK to resume scanning while the radio is stopped on an active channel.
When it stops on an active channel, press the PTT button to transmit on that channel.
Using channel scan
Press CH/LOCK then hold ▼ or ▲ for 3 seconds. The radio will repeatedly cycle through all 22 channels. To reverse scan direction, press the other directional icon. Press MENU/ or CALL/MON to stop scanning.
Silent Mode
Silent mode turns off all key beeps when it is turned on. It does NOT mute call or voice signals received.
Change Silent mode status (OFF or ON) by first turning OFF the radio.
- Turn Silent mode off by pressing the MENU /
![]() key to turn the radio ON. Silent mode is off and key beeps sound. (Default)
key to turn the radio ON. Silent mode is off and key beeps sound. (Default) - Turn Silent mode on by pressing the CALL/ MON and MENU /
![]() keys to turn the radio back ON. Silent mode turns on and no key beeps sound.
keys to turn the radio back ON. Silent mode turns on and no key beeps sound.
Talking on Your Radio
When the radio stops on a channel that is transmitting, you can talk to others on that channel:
Transmitting
- Press and hold the PTT button and speak in a clear, normal voice about 2-3 inches away from the microphone on the earbud cord. (The tx icon displays while you are transmitting. Pause slightly after pressing the PTT button before you start talking to prevent cutting off your transmission.)
- When you are finished speaking, release the PTT button. You can now receive incoming calls. While receiving, the rx icon displays.
Transmitting a Call Alert Tone
Your radio is equipped with a call tone that will be transmitted when the CALL/MON key is pressed. You can select from 10 call tones.
- Press MENU/
![]() until call displays on the screen and the call tone number displays.
until call displays on the screen and the call tone number displays. - Press ▲ or ▼ to cycle through the call tones. A sample of the tone sounds as you move through them
- The radio returns to its normal state after about 5 seconds.
 until call displays on the screen and the call tone number displays.
To transmit the call tone, press the CALL/MON key.
Auto Squelch Feature
The radio is equipped with an automatic squelch system which shuts off weak transmissions and unwanted noise due to terrain conditions or range limitations.
Monitor Mode Feature
Your radio allows you to listen for weak signals on the current channel at the press of a key.
To turn ON Monitor Mode:
Press and hold CALL/MON for 2 seconds. On a channel that does not have activity, you will hear only an open-squelch hissing noise and rx displays.
To turn OFF Monitor Mode:
Press the CALL/MON key for 2 seconds again. rx does not display.
Backlight
Press and hold  to turn on the LCD backlight. The screen stays illuminated for 10 seconds before the backlight turns off.
Key Lock
- Press and hold CH/LOCK;
![]() displays. The following functions are not affected by Key Lock:
displays. The following functions are not affected by Key Lock:
 displays. The following functions are not affected by Key Lock:
- Volume adjust
- Enter monitor mode
- PTT transmission
- Backlight
- Power off
- Press and hold CH/LOCK again;
![]() disappears.
disappears.
SPECIFICATIONS
| Channels | 22 FRS |
| Privacy Codes | 38 Sub-Codes 83 DCS Codes |
| Operating Frequency | UHF 462.5500 - 467.7125 MHz |
| Power Source | 3 AA NiMH Batteries per radio |
FREQUENCY CHART
| CH | Freq.[MHz] - Cross Ref. | CH | Freq.[MHz] - Cross Ref. |
| 1 | 462.5625 - FRS & GMRS 1 | 12 | 467.6625 - FRS 12 |
| 2 | 462.5875 - FRS & GMRS 2 | 13 | 467.6875 - FRS 13 |
| 3 | 462.6125 - FRS & GMRS 3 | 14 | 467.7125 - FRS 14 |
| 4 | 462.6375 - FRS & GMRS 4 | 15 | 462.5500 - GMRS 11 |
| 5 | 462.6625 - FRS & GMRS 5 | 16 | 462.5750 - GMRS 8 |
| 6 | 462.6875- FRS & GMRS 6 | 17 | 462.6000 - GMRS 12 |
| 7 | 462.7125 - FRS & GMRS 7 | 18 | 462.6250 - GMRS 9 |
| 8 | 467.5625 - FRS 8 | 19 | 462.6500 - GMRS 13 |
| 9 | 467.5875 - FRS 9 | 20 | 462.6750 - GMRS 10 |
| 10 | 467.6125 - FRS 10 | 21 | 462.7000 - GMRS 14 |
| 11 | 467.6375 - FRS 11 | 22 | 462.7250 - GMRS 15 |
Note:
This product is considered FRS only with 22 FRS channels in the US market. It is considered a GMRS product in the Canadian market.
Documents / Resources
References
Download manual
Here you can download full pdf version of manual, it may contain additional safety instructions, warranty information, FCC rules, etc.
Advertisement
Thank you! Your question has been received!


Need Assistance?
Do you have a question about the GMR3050-2C that isn't answered in the manual? Leave your question here.