Table of Contents
Advertisement
Quick Links
TABLE OF CONTENTS
INTRODUCTION........................................................................................................... 35
INVENTORY OF CONTENTS....................................................................................... 35
FEATURES:.................................................................................................................. 36
WIRELESS DISPLAY ................................................................................................ 36
THERMO-HYGRO SENSOR ..................................................................................... 36
WIND SENSOR ......................................................................................................... 36
RAIN SENSOR .......................................................................................................... 37
SETTING UP: ............................................................................................................... 37
IDLE MODE ............................................................................................................... 38
STOP MODE ............................................................................................................. 38
WIND SENSOR ......................................................................................................... 40
RAIN SENSOR .......................................................................................................... 40
THERMO-HYGRO SENSOR ..................................................................................... 40
HEAVY WEATHER PC SOFTWARE......................................................................... 40
FUNCTION KEYS:........................................................................................................ 41
SET KEY.................................................................................................................... 41
▲UP ARROW KEY.................................................................................................... 41
▼DOWN ARROW KEY ............................................................................................. 41
ALARM KEY .............................................................................................................. 41
MIN/MAX KEY ........................................................................................................... 41
LCD SCREEN............................................................................................................... 42
MODE 1 DISPLAY: .................................................................................................... 42
MODE 2 DISPLAY: .................................................................................................... 42
MANUAL SETTINGS.................................................................................................... 43
LCD CONTRAST SETTING....................................................................................... 43
MANUAL TIME SETTING .......................................................................................... 43
WS-2801-IT
Wireless Professional Weather Center
Instructions Manual
32
Advertisement
Table of Contents

Related Manuals for La Crosse Technology WS-2801-IT


Summary of Contents for La Crosse Technology WS-2801-IT
-
Page 1: Table Of Contents
WS-2801-IT Wireless Professional Weather Center Instructions Manual TABLE OF CONTENTS INTRODUCTION......................35 INVENTORY OF CONTENTS..................35 FEATURES:........................36 WIRELESS DISPLAY ....................36 THERMO-HYGRO SENSOR ..................36 WIND SENSOR ......................36 RAIN SENSOR ......................37 SETTING UP: ....................... 37 ADDITIONAL NOTES FOR THE SOLAR WIND AND RAIN SENSORS MODES:..38 IDLE MODE ....................... - Page 2 12/24 HOUR TIME DISPLAY SETTING ..............44 CALENDAR SETTING ....................44 °F/°C TEMPERATURE UNIT SETTING ..............45 WIND SPEED UNIT SETTING .................. 45 RAINFALL UNIT SETTING ..................45 RELATIVE AIR PRESSURE UNIT SETTING ............46 RELATIVE PRESSURE REFERENCE VALUE SETTING......... 46 WEATHER TENDENCY SENSITIVITY LEVEL SETTING .........
- Page 3 VIEWING THE MIN/MAX WEATHER DATA.............. 57 RESET THE MINIMUM AND MAXIMUM WEATHER DATA........57 TOTAL RAINFALL AMOUNT..................57 CARE AND MAINTENANCE:..................57 SPECIFICATIONS: ....................... 58 INDOOR TEMPERATURE..................58 OUTDOOR TEMPERATURE / DEW POINT ............. 58 INDOOR HUMIDITY ....................58 OUTDOOR HUMIDITY ....................58 WIND SPEED/ GUST ....................
-
Page 4: Introduction
INTRODUCTION ongratulations on purchasing this state-of-the-art weather station. Featuring time, date, calendar, weather forecast, wind gust and wind speed, indoor/outdoor temperature and humidity, air pressure and rainfall, this weather station will provide you with various weather information and weather forecasts. Heavy Weather Pro software allows you to use a PC to monitor and record weather data received from your wireless weather station via a proprietary USB device that was provided with your 2800 series weather station. -
Page 5: Features
FEATURES: WIRELESS DISPLAY • Time display in 12/24 hour time format • Automatic time and date (PC time) update from USB transceiver if connected • Calendar display (date, month, year) • Weather forecast with 3 weather icons (sunny, cloudy, and rainy) with weather tendency indicator •... -
Page 6: Rain Sensor
RAIN SENSOR • 100% solar-powered with built-in rechargeable alkaline power cell • High-efficient solar panels maintain operation throughout all seasons • Self-emptying bucket • Transmission range: about 100 meters (Open field, free of obstructions). SETTING UP: IMPORTANT: Make sure to observe the correct polarity when inserting batteries. The "+"... -
Page 7: Additional Notes For The Solar Wind And Rain Sensors Modes
3. Insert two "C" size batteries into the thermo-hygro sensor with the correct polarity. 4. Insert two "C" size batteries into the wireless display with the correct polarity. NOTE: Every time the wireless display receives data from the sensors, the wireless icons will blink once and then return to solid if the last transmission was successful. -
Page 8: Mounting The Sensors And Placement Of The Wireless Display
enters the IDLE mode. User should place the sensor(s) under a bright environment in order to charge up the rechargeable batteries. MOUNTING THE SENSORS AND PLACEMENT OF THE WIRELESS DISPLAY: IMPORTANT: Ensure that all of the sensor data can be received at the intended mounting locations before you drill mounting holes. -
Page 9: Wind Sensor
sensors or the wireless display, press and hold the ▲UP ARROW key for 2 seconds to re-synchronize the wireless display with the sensors. WIND SENSOR The wind sensor must be installed with the front of the sensor (the solar panel) facing true South, or the reported wind direction will not be accurate. -
Page 10: Function Keys
FUNCTION KEYS: SET KEY • Press and hold for 3 seconds to enter the SET mode, where the following can be changed: LCD contrast, Manual time setting, 12/24 hour time display, Calendar setting, ºF/ ºC temperature unit, Wind speed unit, Rainfall unit, Pressure unit, Relative pressure reference setting, Weather tendency threshold setting, Storm warning threshold setting and Storm Alarm On/ Off setting, Wind direction display type, Factory reset... -
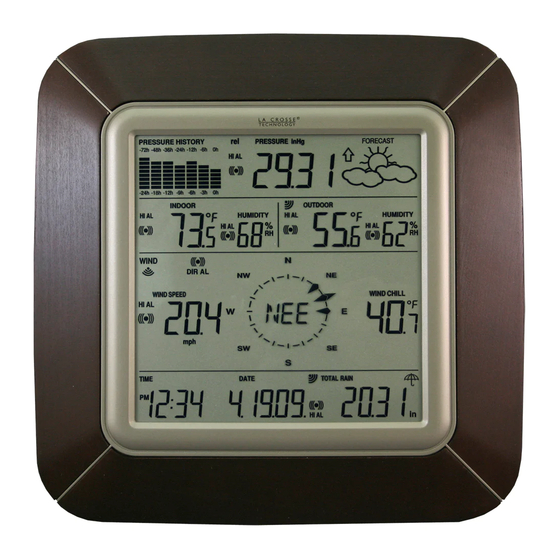
Page 11: Lcd Screen
LCD SCREEN When the signal from the transmitter is successfully received by the Weather Station, icon will be switched on. (If not successful, the icon will not be shown on the LCD). User can see whether the last reception was successful ( icon is on) or not icon is off). -
Page 12: Manual Settings
MANUAL SETTINGS Press and hold the SET key for 3 seconds to enter the SET mode. If you wait 30 seconds without pressing any keys while in SET mode, the display will automatically return to Mode 1 display. While in SET mode, each press of the SET key will advance to the next SET mode item. 1. -
Page 13: 12/24 Hour Time Display Setting
4. Press the ▲UP ARROW key or ▼DOWN ARROW key to set the minute. Continually holding the key will increase the digit faster. 5. Press the SET key to confirm and to enter the 12/24 HOUR TIME DISPLAY SETTING. 12/24 HOUR TIME DISPLAY SETTING The time can be set to view as 12-hour or 24-hour format. -
Page 14: F/°C Temperature Unit Setting
°F/°C TEMPERATURE UNIT SETTING The temperature can be displayed in °C or °F. (default °C). 1. The temperature unit is flashing 2. Press the ▲UP ARROW key or ▼DOWN ARROW key to toggle between “°F” or “°C”. 3. Press the SET key to confirm and to enter the WIND SPEED UNIT SETTING. -
Page 15: Relative Air Pressure Unit Setting
RELATIVE AIR PRESSURE UNIT SETTING The relative air pressure can be set as inHg or hPa. The default unit is hPa. 1. The relative air pressure unit is flashing. 2. Press the ▲UP ARROW key or ▼DOWN ARROW key to toggle between the unit “inHg" or “hPa” 3. -
Page 16: Storm Warning Threshold Value Setting
1. The sensitivity value and tendency arrow will start flashing 2. Press the ▲UP ARROW key or ▼DOWN ARROW key to select the value. 3. Press the SET key to confirm and to enter the STORM WARNING SENSITIVITY SETTING. STORM WARNING THRESHOLD VALUE SETTING Define a switching sensitivity value for the Storm warning display at a decrease of air pressure from 3hPa to 9hPa (.09 inHg to .27 inHg) over 6 hours. -
Page 17: Wind Direction Display Type Setting
WIND DIRECTION DISPLAY TYPE SETTING The wind direction can be displayed using either compass directions or degree measurements (default setting is compass directions). 1. The wind direction will start flashing. 2. Press the ▲UP ARROW key or ▼DOWN ARROW key to toggle from compass directions to degree measurements. -
Page 18: To Exit The Manual Setting Mode
5. Within 2 minutes of inserting the batteries into the thermo-hygro sensor, insert the batteries into the display, making sure to align the "+" symbol on the batteries with the markings inside the battery compartment. 6. Wait 5 minutes for the outdoor weather data to display. If any of the outdoor data displays "--"... -
Page 19: Default Weather Alarm Values
DEFAULT WEATHER ALARM VALUES Pressure 960 hPa Wind gust High 100 km/h High 1040 hPa Rainfall in 24 hours High 50 mm Temperature (In or 0°C Out) High 40°C Relative Humidity (In or Out) High 70% PRESSURE ALARMS 1. In the normal display mode, press the ALARM key once. -
Page 20: Indoor Humidity Alarms
7. Press and hold the SET key for about 2 seconds. The temperature digit will start flashing. 8. Press the ▲UP ARROW key or ▼DOWN ARROW key to set the low indoor temperature alarm value. Hold the arrow key in to change the value faster. 9. -
Page 21: Outdoor Humidity Alarms
7. Press and hold the SET key for about 2 seconds. The temperature digit will start flashing. 8. Press the ▲UP ARROW key or ▼DOWN ARROW key to set the low outdoor temperature alarm value. Hold the arrow key in to change the value faster. 9. -
Page 22: Wind Direction Alarm
WIND DIRECTION ALARM Note: Multiple wind direction alarms can be set simultaneously if desired. 1. The wind direction alarm display will be shown. 2. Press and hold the SET key for about 2 seconds. The wind direction arrow on the outside of the compass circle will start flashing with the corresponding compass direction or degrees reading displayed in the center of the compass. -
Page 23: Hysteresis
HYSTERESIS To compensate for fluctuation of the measured data, which may cause the weather alarm to sound constantly if the measured reading is Weather data Hysteresis close to your set level, a hysteresis function has Temperature 1°C been implemented for each weather alarm. For Humidity 3% RH example, if the high temperature alarm is set to... -
Page 24: Weather Tendency Indicator
because it is not raining. It simply means that the air pressure has dropped and the weather is expected to get worse but not necessarily rainy. Note: After setting up, readings for weather forecasts should be disregarded for the next 48-60 hours. This will allow sufficient time for the Weather station to collect air pressure data at a constant altitude and therefore result in a more accurate forecast. -
Page 25: Wind Direction And Wind Speed Measurement
The vertical bars are plotted at each of the nine steps and give the trend over the recorded period. The 0 hour vertical bar will always display at the midline height to indicate the current air pressure. The varying height of bars inn other columns on the graph indicate a relative change in air pressure up or down from the previous measurement. - Page 26 2. Last 1 hour rainfall – it shows the sum of last 15 entries of four minutes rainfall 3. Last 24 hours rainfall - it shows the sum of last 24 entries of hourly rainfall 4. Weekly rainfall - it shows the weekly rainfall. The rainfall measurement starts counting on the second day after the first time power up or factory reset.
- Page 27 heat, corrosive materials or explosives. The batteries shall be taken out from the unit before the product is to be stored for a long period of time. • Immediately remove all low powered batteries to avoid leakage and damage. Replace only with new batteries of the recommended type. •...
- Page 28 RAINFALL (24H, TOTAL) 0 to 9999.9 mm with 0.1mm resolution 0" to 393.7" with 0.01” resolution (displays "OF.L" when > 9999.9mm) OUTDOOR DATA RECEPTION Temperature and humidity data received every 13 seconds Wind data received every 17 seconds Rain data received every 19 seconds AIR PRESSURE Relative pressure pre-set range: 920 to 1080 hpa...
- Page 29 • As stated on the gift box and labeled on the product, reading the “User manual” is highly recommended for the benefit of the user. This product should not be thrown in general rubbish collection points. • The manufacturer and supplier cannot accept any responsibility for any incorrect readings and any consequences that occur should an inaccurate reading take place.