Table of Contents
Advertisement
Quick Links
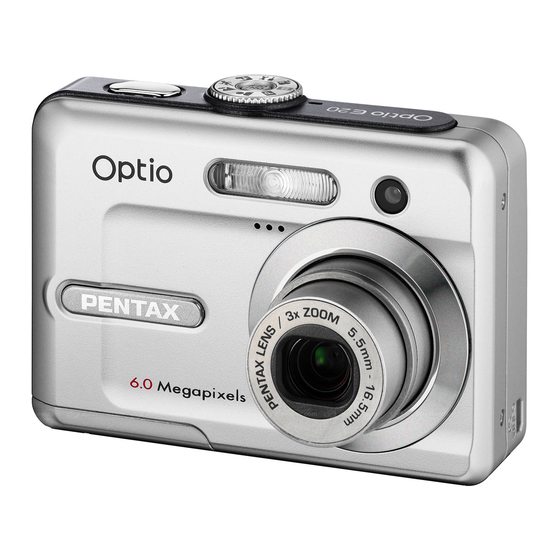
GETTING TO KNOW YOUR CAMERA
Front View
Name
Shutter release
button
Flash
Power switch
Mode dial
Self-timer LED
Microphone
PC/VIDEO terminal
Lens
Description
Focuses and locks the exposure of the camera when
pressed halfway down, and takes the picture when
pressed all the way down.
Provides flash illumination.
Turns the camera power on and off.
Sets the camera mode.
Blinks blue during self-timer mode until picture is taken.
Allows you to record sound when recording movie clips.
Allows you to connect a USB cable or a video cable to the
camera.
3x optical zoom lens allows you to take telephoto and
wide-angle pictures.
Shutter release button
Power switch
Mode dial
Flash
Self-timer LED
Microphone
PC/VIDEO terminal
Lens
EN-1
Advertisement
Table of Contents

Related Manuals for Pentax Optio E20


Summary of Contents for Pentax Optio E20
- Page 1 GETTING TO KNOW YOUR CAMERA Front View Shutter release button Power switch Mode dial Flash Self-timer LED Microphone PC/VIDEO terminal Lens Name Description Shutter release Focuses and locks the exposure of the camera when button pressed halfway down, and takes the picture when pressed all the way down.
-
Page 2: Rear View
Rear View button LED indicator button Strap lug button button Four-way controller button MENU button DC coupler cable cover LCD monitor Tripod socket Battery/card cover Name Description LED indicator Indicates the camera’s current state. Zooms the lens to wide-angle position. During zoom playback, it button makes the enlarged image smaller on the LCD monitor. -
Page 3: Mode Dial
Mode Dial Mode dial Mode Description Lets you take still pictures without having to set Simple special functions or manual adjustments. The camera sets the optimal focusing and exposure. The basic picture-taking mode. You can let the Program camera set the functions or choose various functions yourself. -
Page 4: Getting Started
GETTING STARTED Attaching the Camera Strap Attach the camera strap as shown in the illustration. Inserting the Batteries 1. Open the battery/card cover. 2. Insert the batteries in the correct orientation as shown on the right. 3. Close the battery/card cover. You can use 2 AA size batteries (Ni-MH rechargeable or alkaline ) to power the camera. -
Page 5: Turning The Power On
Inserting the SD Memory Card (Optional Accessory) 1. Open the battery/card cover. 2. Insert the SD memory card in the correct orientation as shown on the right. Hold the SD memory card with its metal contact end surface facing the rear side of the camera, and then insert the card as far as it can go. - Page 6 Choosing On-Screen Display Language 1. Rotate the mode dial to and turn your camera on by pressing the power switch. 2. [Set-up1] is displayed. Set-up1 Set-up1 Set-up1 Set-up2 Set-up2 Set-up2 Set-up3 Set-up3 Set-up3 3. Use the four-way controller ( ) to Format Format Format...
-
Page 7: Setting The Date And Time
Setting the Date and Time Follow the steps below to set the date display style, current date and time. 1. Rotate the mode dial to and turn Set-up1 Set-up1 Set-up1 Set-up2 Set-up2 Set-up2 Set-up3 Set-up3 Set-up3 your camera on by pressing the Format Format Format... -
Page 8: Taking Still Pictures
Taking Still Pictures Shutter release button Power switch Mode dial button LCD monitor OK button 1. Set the mode dial to 2. Press the power switch to turn on the camera. 3. Compose the image on the LCD monitor screen so that the main subject is within the center frame (focus frame). -
Page 9: Recording Movie Clips
Recording Movie Clips Movie mode allows you to record movie clips with sound via built-in microphone. 1. Rotate the mode dial to and turn your camera on by pressing the power switch. 2. Press the shutter release button to start recording. 3. -
Page 10: Deleting Images
Deleting Images 1. Rotate the mode dial to any mode other than and press the button. The last image will be displayed on the screen. 2. Use the four-way controller ( ) to select the image you want to delete. 3. -
Page 11: Setting Up Your Digital Camera
TRANSFERRING RECORDED IMAGES AND MOVIES TO YOUR COMPUTER Setting Up Your Digital Camera After installing the necessary software on your computer, you must now set up your digital camera to transfer images from the camera to your computer. The USB driver included in the CD-ROM (S-SW60) is exclusively for Windows 98/98SE. -
Page 12: Connecting The Camera To Your Computer
Connecting the Camera to Your Computer PC/VIDEO terminal 1. Connect the camera to the PC with the USB cable, making sure the shapes of input and output terminals match each other. If there is no SD memory card in the camera, the images stored in the internal memory will be transmitted to the computer. - Page 13 Downloading Images/Movie Clips When the camera is turned on and connected to your computer, it is considered to be a disk drive, just like a floppy disk. You can download (transfer) images by copying them from the “removable disk” (“Untitled” disk on a Macintosh) to your computer hard disk drive.