Table of Contents
Advertisement
Advertisement
Table of Contents

Related Manuals for Compaq IPAQ iPAQ H3000


Summary of Contents for Compaq IPAQ iPAQ H3000
- Page 1 PAQ H3000 P OCKET EFERENCE UIDE...
- Page 2 Corporation. © 2000 Compaq Computer Corporation. Compaq and the Compaq logo Registered in the U.S. Patent and Trademark Office. iPAQ is a trademark of Compaq Information Technologies Group, L.P. Microsoft, ActiveSync, Outlook, Pocket Outlook, Expedia, AutoRoute Express, MapPoint, Windows, Windows NT, and the Win- dows logo are either registered trademarks or trademarks of Microsoft Corporation in the United States and/or other countries.
-
Page 3: Table Of Contents
Chapter 2: Basic Skills _____________________________________ 2-1 Front Panel Components_________________________________________ 2-1 Bottom Edge Components _______________________________________ 2-3 Cradle and AC Adapter __________________________________________ 2-4 Compaq iPAQ Expansion Pack System_______________________________ 2-6 The Stylus ___________________________________________________ 2-9 Today Screen_________________________________________________ 2-10 Programs____________________________________________________ 2-11 Navigation Bar and Command Bar__________________________________ 2-13... - Page 4 Chapter 3: Microsoft ActiveSync ______________________________ 3-1 Chapter 4: Microsoft Pocket Outlook ___________________________ 4-1 Calendar: Scheduling Appointments and Meetings ______________________ 4-2 Contacts: Tracking Friends and Colleagues ___________________________ 4-6 Tasks: Keeping a To Do List ______________________________________ 4-9 Notes: Capturing Thoughts and Ideas _______________________________ 4-12 Inbox: Sending and Receiving E-mail Messages________________________ 4-14 Chapter 5: Companion Programs _____________________________ 5-1 Pocket Word _________________________________________________ 5-1...
- Page 5 Chapter 7: Getting Connected ________________________________ 7-1 Transfer Items Using Infrared _____________________________________ 7-2 Connect to an ISP______________________________________________ 7-3 Connect to Your Network ________________________________________ 7-4 End a Connection ______________________________________________ 7-7 Connect Directly to an E-mail Server ________________________________ 7-7 Get Help on Connecting _________________________________________ 7-8 Appendix A: Tips and Troubleshooting__________________________ A-1 Reset the iPAQ H3000 and Clear Memory ____________________________ A-1 Battery Loses Power____________________________________________ A-3...
- Page 6 Appendix C: Regulatory Notices ______________________________ C-1 Regulatory Agency Identification Numbers ____________________________ C-1 Federal Communications Commission Notice__________________________ C-2 Canadian Notice_______________________________________________ C-3 Avis Canadien ________________________________________________ C-3 European Union Notice __________________________________________ C-3 Battery Warning _______________________________________________ C-3 Airline Travel Notice ____________________________________________ C-3 Power Cords _________________________________________________ C-4 Appendix D: Hardware Specifications __________________________ D-1 System Specifications __________________________________________ D-1 Physical Specifications __________________________________________ D-2...
-
Page 7: Chapter 1: Getting Started
TARTED Welcome Congratulations on purchasing a Compaq iPAQ H3000 Windows Powered Pocket PC. Due to the size and capabilities of your iPAQ H3000 Pocket PC, you can keep your most important business and personal information up-to-date and close at hand. Microsoft ActiveSync increases the power of your iPAQ H3000 Pocket PC by allowing you to synchronize the information on your desktop or laptop computer with your Pocket PC. -
Page 8: Where To Find Information
Help, tap then Help. The Extras folder, located on the ActiveSync CD. -or- The Virtual Tour, located on the Compaq Software and Reference Guide CD. The ActiveSync booklet or online ActiveSync Help on your computer. To view online Help, open Microsoft ActiveSync on your computer, then select Help, Microsoft ActiveSync Help. -
Page 9: Symbols And Conventions
You can receive the latest information on your iPAQ H3000 Pocket PC, as well as special offers on iPAQ H3000 accessories and software, by registering with Compaq by completing and mailing the Register Now* card included in the shipping box or the online registration. -
Page 10: How To Transfer Palm-Size Pc Data
How to Transfer Palm-size PC Data If you are currently using a Windows CE-based Palm-size PC and want to transfer your data to your iPAQ H3000 Pocket PC, follow this upgrade procedure: 1. Install Microsoft ActiveSync 3.1 on your computer. For information on installing ActiveSync, see the booklet accompanying the ActiveSync CD. -
Page 11: Chapter 2: Basic Skills
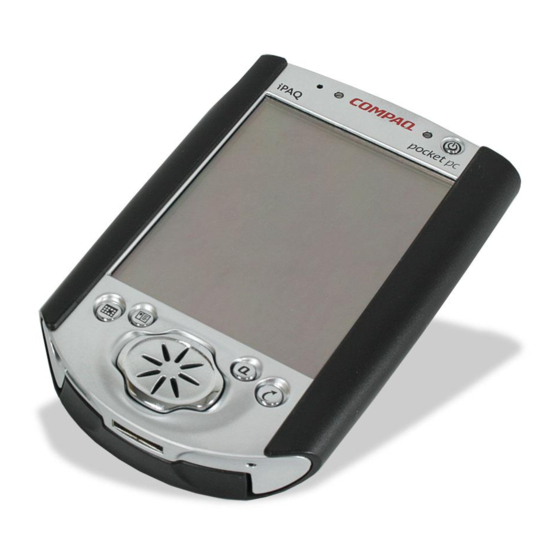
chapter 2 ASIC KILLS Learning to use your iPAQ H3000 Pocket PC is easy. This chapter describes the basic con- cepts of using and customizing your iPAQ H3000 Pocket PC. Front Panel Components Item Component Stylus Power Button Function Allows you to tap or write on the screen. Push the stylus release button ( w ) to release it from the compartment. - Page 12 Item Component Alarm/Charge Light Light Sensor Speaker iPAQ Navigator/ Action Button Application Buttons Record Button Microphone Headphone Jack Infrared Port Stylus Release Button Basic Skills Function Serves as both a battery charge indicator and a visual alarm indicator. • Flashing green: Notification alarm signal. •...
-
Page 13: Bottom Edge Components
Bottom Edge Components Item Component Communications Port Reset Button On/Off Switch DC Jack iPAQ Expansion Pack Connector Function Connects your iPAQ H3000 to the cradle or auto- sync cable. Lets you reset your iPAQ H3000. For more infor- mation, see “Reset the iPAQ H3000 and Clear Memory”... -
Page 14: Cradle And Ac Adapter
Cradle and AC Adapter Your iPAQ H3000 comes with either a cradle or auto-sync cable, and an AC adapter. This allows you to recharge your iPAQ H3000, as well as synchronize the information between your iPAQ H3000 and a computer using ActiveSync. For more information on synchroni- zation, see ActiveSync Help on your computer. -
Page 15: Recharging The Battery
Recharging the Battery Your iPAQ H3000 contains a rechargeable Lithium Polymer battery that is recharged each time you place your iPAQ H3000 in the cradle and connect the cradle to an external power source with the AC adapter. You never need to replace the battery. Just place your iPAQ H3000 in the cradle for three to four hours for an initial charge before you use it the first time. -
Page 16: Compaq Ipaq Expansion Pack System
Pocket PC without having to power off your Pocket PC. NOTE: For information on ordering Compaq iPAQ Expansion Packs, see the Accessories Informa- tion card included in the shipping box, or visit the Compaq iPAQ H3000 home page at www.compaq.com/products/handhelds/ To add a Compaq iPAQ Expansion Pack: 1. - Page 17 Slide the Expansion Pack down and off your iPAQ H3000. Compaq iPAQ CF Card Expansion Pack The optional Compaq iPAQ CF Card Expansion Pack supports Type I and Type II Com- pactFlash cards. The CompactFlash slot allows you to install storage cards for backup and storage of data and applications.
- Page 18 2. Push the card, connector-side first into the slot until it stops. NOTE: Do not force the card into the slot. If the card does not seem to fit, verify that it is facing the correct direction and that you are not inserting the card at an angle. To remove a CompactFlash card: 1.
-
Page 19: The Stylus
The Stylus Your iPAQ H3000 has a stylus for selecting items and entering information. To use the stylus, press and hold the stylus release button while pulling the stylus upward out of its compartment. To replace the stylus, just insert it back into the compartment, then push it until it clicks into place. -
Page 20: Today Screen
Today Screen When you turn on your iPAQ H3000 for the first time each day (or after 4 hours of inactiv- ity), you’ll see the Today screen. You can also display it by tapping the Today screen, you can see at a glance important information for the day. You may see the following status icons on the command bar in the Today screen. -
Page 21: Programs
Programs You can switch from one program to another by selecting it from the customize which programs you see on this menu. For information, see tings”, later in this chapter.) You can also use QStart to switch between programs. See “QStart”... - Page 22 The following table contains a partial list of programs that are on your iPAQ H3000. Look in the Compaq CD and the Extras folder on the ActiveSync CD for additional programs that you can install onto your iPAQ H3000. Icon...
-
Page 23: Navigation Bar And Command Bar
Navigation Bar and Command Bar The navigation bar is located at the top of the screen and displays the title of the active program and current time. It also allows you to switch to programs and close screens. Use the command bar at the bottom of the screen to perform tasks in programs. The com- mand bar includes menu names, buttons, and the input panel button. -
Page 24: Pop-Up Menus
Pop-up Menus With pop-up menus, you can quickly choose an action for an item. For example, you can use the pop-up menu in the contact list to quickly delete a contact, make a copy of a con- tact, or send an e-mail message to a contact. The actions in the pop-up menus vary from program to program. -
Page 25: Typing Using The Input Panel
Enter Information on Your iPAQ You have several options for entering new information: • Enter typed text in the input panel by using the soft keyboard or Character Recognizer. • Write or draw pictures directly on the screen. • Speak into your iPAQ H3000 microphone to record a message. •... - Page 26 When you use the input panel, your iPAQ H3000 anticipates the word you are typing or writing and displays it above the input panel. When you tap the displayed word, it is inserted into your text at the insertion point. The more you use your iPAQ H3000, the more words it learns to anticipate.
-
Page 27: Writing On The Screen
Writing on the Screen In any program that accepts writing, such as the Notes program and the Notes tab in Cal- endar, Contacts, and Tasks, you can use your stylus to write directly on the screen. Write the way you do on paper. You can edit and format what you’ve written and convert the information to text at a later time. - Page 28 You can cut, copy, and paste written text in the same way you work with typed text: tap and hold the selected words then tap an editing command on the pop-up menu, or tap the command on the Edit menu. To convert writing to text: •...
- Page 29 If the conversion is incorrect, you can select different words from a list of alternates or return to the original writing. To do so, tap and hold the incorrect word (tap one word at a time). On the pop-up menu, tap Alternates. A menu with a list of alternate words appears. Tap the word you want to use, or tap the writing at the top of the menu to return to the original writing.
-
Page 30: Drawing On The Screen
Drawing on the Screen You can draw on the screen in the same way that you write on the screen. The difference between writing and drawing on the screen is how you select items and how they can be edited. For example, selected drawings can be resized, while writing cannot. To create a drawing: •... -
Page 31: Recording A Message
Recording a Message In any program where you can write or draw on the screen, you can also quickly capture thoughts, reminders, and phone numbers by recording a message. In Calendar, Tasks, and Contacts, you can include a recording in the Notes tab. In the Notes program, you can either create a stand-alone recording or include a recording in a written note. -
Page 32: Find Information
Find Information The Find feature on your iPAQ H3000 helps you quickly locate information. On the menu, tap Find. Enter the text you want to find, select a data type, then tap Go to start the search. NOTE: To quickly find information that is taking up storage space on your iPAQ H3000, select Larger than 64 KB in Type. -
Page 33: Setting A Password
Password security is provided to help protect against unauthorized use of your iPAQ H3000. For immediate protection, Compaq recommends setting up the password security through the Password utility in the Settings of your iPAQ H3000 as soon as possible. If set, your login password must be entered each time you turn on your iPAQ H3000. -
Page 34: Adding Or Removing Programs
Adding or Removing Programs Programs added to your iPAQ H3000 at the factory are stored in ROM (read-only mem- ory). You cannot remove or modify this software, and you’ll never accidentally lose ROM contents. Programs and data files added to your iPAQ H3000 after factory installation are stored in RAM (random access memory). - Page 35 Using File Explorer on your iPAQ: 1. Tap , Programs, File Explorer, and locate the program (tap the folder list, labeled My Documents by default, then My Device to see a list of all folders on your iPAQ). 2. Tap and hold the program and tap Cut on the pop-up menu. 3.
- Page 36 Power When you are working with your iPAQ H3000 and using battery power, you can monitor the charge held in the battery by using the Power window. To conserve battery power, your iPAQ H3000 automatically powers off whenever it is idle for a continuous period of time. If you are running on battery power, you can conserve charge if you shorten the idle time before your iPAQ H3000 automatically powers off.
-
Page 37: Adjusting The Backlight
Adjusting the Backlight The backlight on your iPAQ H3000 lets you view text and graphics clearly whether you're indoors or outdoors, in a dim study or at a brightly lit worksite. NOTE: The iPAQ H3600 Series features a built-in light sensor that allows the iPAQ to automati- cally adjust the backlight brightness according to the ambient lighting level. -
Page 38: Qstart
To adjust the backlight time-out: 1. Press the QMenu button, then tap Backlight, Properties. 2. Use the drop-down menus to set the amount of idle time before the backlight turns off when your iPAQ is using battery power and external power. QStart QStart allows you to quickly access programs on your iPAQ Pocket PC. -
Page 39: Qutilities And Qmenu
QUtilities and QMenu Customizing your iPAQ Pocket PC is both convenient and easy when you use the QMenu and the QUtilities. The QMenu and QUtilities let you quickly access several important setting controls. The QMenu also lets you switch between, or close, open applications. The QUtilities are located on the QMenu. -
Page 40: File Explorer
File Explorer You can use the File Explorer to find files on your iPAQ and to organize these files into folders. Press the QMenu button, then tap File Explorer. NOTE: You can move files in File Explorer by tapping and holding the item you want to move then tapping Cut or Copy and Paste on the pop-up menu. - Page 41 3. Press the QMenu button, then tap QUtilities, then Self Test. 4. Tap the check boxes to select the items you want to test, then tap Next. NOTE: The "IR transfer" test item is an internal infrared functionality test. You do not need to set up another IR iPAQ to test this item.
- Page 42 Controlling Volume The Volume utility provides an easy way to adjust the volume of your iPAQ H3000. 1. Press the QMenu button, then tap Volume. - or- , Settings, System, then Sounds & Reminders. 2. Adjust the volume level on the slider. 3.
-
Page 43: Backup And Restore Data
H3000's RAM (Random Access Memory) size, e.g., 16 or 24 MB. For information on ordering a CompactFlash storage card, see the Accessories Information included in the shipping box. For a list of other Compaq-tested CompactFlash cards, visit the Compaq iPAQ H3000 home page at www.compaq.com/products/handhelds. - Page 44 6. When backup is complete, remove the CompactFlash storage card and keep it close for easy retrieval. To restore a backup onto your iPAQ Pocket PC: 1. Install the optional Compaq iPAQ CF Card Expansion Pack and CompactFlash storage card on your iPAQ. 2. Turn on your iPAQ.
- Page 45 chapter 3 ICROSOFT Using Microsoft ActiveSync, you can synchronize the information on your computer with the information on your iPAQ H3000 Pocket PC. Synchronization compares the data on your iPAQ H3000 Pocket PC with your computer and updates both computers with the most recent information.
-
Page 46: Chapter 3: Microsoft Activesync
Microsoft ActiveSync... -
Page 47: Chapter 4: Microsoft Pocket Outlook
chapter 4 ICROSOFT Microsoft Pocket Outlook includes Calendar, Contacts, Tasks, Inbox, and Notes. You can use these programs individually or together. For example, e-mail addresses stored in Con- tacts can be used to address e-mail messages in Inbox. Using ActiveSync, you can synchronize information in Microsoft Outlook, Microsoft Schedule+, or Microsoft Exchange on your computer with your iPAQ H3000. -
Page 48: Calendar: Scheduling Appointments And Meetings
Calendar: Scheduling Appointments and Meetings Use Calendar to schedule appointments, including meetings and other events. You can check your appointments in one of several views (Agenda, Day, Week, Month, and Year) and easily switch views by using the View menu. Tap to create a new appointment. - Page 49 To create an appointment: 1. Tap the desired date and time for the appointment if you are in Day or Week view. 2. Tap New. 3. Enter a description and a location using the input panel. Tap first to select the field. 4.
-
Page 50: Using The Summary Screen
Using the Summary Screen When you tap an appointment in Calendar, a summary screen is displayed. Tap the top portion of the summary screen to change the appointment. Microsoft Pocket Outlook Tap to edit the appointment details. Tap to enter or edit notes. -
Page 51: Creating Meeting Requests
Creating Meeting Requests You can use Calendar to set up meetings with users of Outlook, Pocket Outlook, or Sched- ule+. The meeting notice will be created automatically and sent either when you synchro- nize Inbox or when you connect to your e-mail server. Indicate how you want meeting requests sent by tapping Tools then Options. -
Page 52: Contacts: Tracking Friends And Colleagues
Contacts: Tracking Friends and Colleagues Contacts maintains a list of your friends and colleagues so that you can easily find the information you’re looking for, whether you’re at home or on the road. Using the iPAQ H3000 infrared port, you can quickly share Contacts information with other Windows- powered device users. - Page 53 To create a contact: 1. Tap New. 2. Enter a name and other contact information using the input panel. You will need to scroll down to see all available fields. 3. Scroll to and tap Categories and select a category from the list to assign the contact to a category.
- Page 54 Using the Summary Screen When you tap a contact in the contact list, a summary screen is displayed. Microsoft Pocket Outlook Tap to edit the contact details. Tap to enter or edit notes.
-
Page 55: Tasks: Keeping A To Do List
Tasks: Keeping a To Do List Use Tasks to keep track of what you have to do. In the task list, overdue tasks are dis- played in bold (and in red on the color iPAQ H3000 and 3000). Select the category of tasks you want displayed in the list. Tap to create a new task. - Page 56 To create a task: 1. Tap New. 2. Enter a description using the input panel. 3. Enter a start date and due date or enter other information by first tapping the field. If the input panel is open, you will need to hide it to see all available fields. 4.
- Page 57 Using the Summary Screen When you tap a task in the task list, a summary screen is displayed. Tap to edit the task details. Tap to show and hide additional summary information. Tap to enter or edit notes. Microsoft Pocket Outlook 4-11...
-
Page 58: Notes: Capturing Thoughts And Ideas
Notes: Capturing Thoughts and Ideas Quickly capture thoughts, reminders, ideas, drawings, and phone numbers with Notes. You can create a written note or a recording. You can also include a recording in a note. If a note is open when you create the recording, it will be included in the note as an icon. If the note list is displayed, it will be created as a stand-alone recording. - Page 59 To create a note: 1. Tap New. 2. Create your note by writing, drawing, typing, and recording. For more information about using the input panel, writing and drawing on the screen, and creating record- ings, see Chapter 2 (Basic Tap to add a recording Tap to write on to the note.
-
Page 60: Inbox: Sending And Receiving E-Mail Messages
Inbox: Sending and Receiving E-mail Messages Use Inbox to send and receive e-mail messages in either of these ways: 1. Synchronize e-mail messages with Microsoft Exchange or Outlook on your computer. 2. Send and receive e-mail messages by connecting directly to an e-mail server through an Internet service provider (ISP) or a network. -
Page 61: Using The Message List
Using the Message List Messages you receive are displayed in the message list. By default, the most recently received messages are displayed first in the list. Select the service and folder you want to display. Tap to connect to the selected service. - Page 62 When you receive a message, tap it in the list to open it. Unread messages are displayed in bold. Tap to reply to or for- ward this message. When you connect to your e-mail server or synchronize with your computer, Inbox down- loads only the first 100 lines of each new message by default.
- Page 63 Composing E-mail Messages To compose an e-mail message: 1. Tap New. 2. Enter an e-mail address in To, or select a name from the contact list by tapping the Address Book button. All e-mail addresses entered in the e-mail fields in Contacts appear in the Address Book.
- Page 64 Managing E-mail Messages and Folders By default, messages are displayed in one of four folders for each service you’ve created: Inbox, Deleted (local), Outbox, and Sent. The Deleted folder contains messages that have been deleted on the iPAQ H3000. If you are using IMAP4, you may see a Deleted Items folder.
-
Page 65: Chapter 5: Companion Programs
chapter 5 OMPANION The companion programs consist of Microsoft Pocket Word, Microsoft Pocket Excel, Microsoft Money*, Windows Media Player for Pocket PC, Microsoft Reader, and Microsoft Pocket Streets*. * Available for English operating systems only. To switch to a companion program on your iPAQ H3000 Pocket PC, tap Programs on the menu, then tap the program name, or press the QStart button, select a category from the pop-up menu at the bottom of the screen, then tap the program icon. - Page 66 Pocket Word contains a list of the files stored on your iPAQ H3000. Tap a file in the list to open it. To delete, make copies of, and send files, tap and hold a file in the list. Then, select the appropriate action on the pop-up menu. Select the type of folder you want displayed in the list.
-
Page 67: Typing Mode
Typing Mode Using the input panel, enter typed text into the document. For more information on enter- ing typed text, see Chapter 2 (Basic To format existing text and to edit text, first select the text. You can select text as you do in a Word document, using your stylus instead of the mouse to drag through the text you want to select. -
Page 68: Writing Mode
Writing Mode In writing mode, use your stylus to write directly on the screen. Ruled lines are displayed as a guide, and the zoom magnification is greater than in typing mode to allow you to write more easily. For more information on writing and selecting writing, see (Basic Skills). -
Page 69: Drawing Mode
Drawing Mode In drawing mode, use your stylus to draw on the screen. Gridlines appear as a guide. When you lift your stylus off the screen after the first stroke, you’ll see a drawing box indicating the boundaries of the drawing. Every subsequent stroke within or touching the drawing box becomes part of the drawing. -
Page 70: Pocket Excel
Pocket Excel Pocket Excel works with Microsoft Excel on your computer to give you easy access to copies of your workbooks. You can create new workbooks on your iPAQ H3000, or you can copy workbooks from your computer to your iPAQ H3000. Synchronize workbooks between your computer and your iPAQ H3000 so that you have the most up-to-date con- tent in both locations. -
Page 71: Tips For Working In Pocket Excel
Tips for Working in Pocket Excel Note the following when working in large worksheets in Pocket Excel: • View in full-screen mode to see as much of your worksheet as possible. Tap View then Full Screen. To exit full-screen mode, tap Restore. •... -
Page 72: Getting Started
Getting Started To create a new account: 1. Tap , Programs, Microsoft Money, then New. A screen for entering account details with a Required and an Optional tab appears. 2. Enter the name and type of the account on the Required tab and the other information you want to record on the Optional tab then tap OK. -
Page 73: Using The Account Register
Using the Account Register To view the Account Register for an account, tap it in the Account Manager. The Account Register displays all transactions for that account that are stored on your iPAQ H3000. For each transaction, you will see the date, the payee, the amount, and the running balance of your account as a result of the transaction. -
Page 74: Entering Transactions
Entering Transactions Once you have the Account Register open, tap New to create a new transaction. On the Required tab, Microsoft Money automatically creates a withdrawal and enters today’s date. If you are not entering a withdrawal, tap the Type box and select Deposit or Transfer. -
Page 75: Entering And Tracking Investments
Entering and Tracking Investments In the Investments screen, you can track the value of the investments in your portfolio. The Investments screen displays each investment with the current number of shares, their price, and market value. The total market value for all of your investments is displayed at the bottom of the screen. -
Page 76: Windows Media Player For Pocket Pc
Windows Media Player for Pocket PC Use Windows Media Player for Pocket PC to listen to digital audio files. To switch to Windows Media Player, tap Active playlist Track information Skip back Shuffle playlist Stop Using Windows Media Manager for Pocket PC Use Windows Media Manager for Pocket PC on the computer to create digital audio files in Windows Media format and to transfer audio content to your iPAQ H3000 or storage card. -
Page 77: What Is Packaged Content
Windows Media Manager is included in the Extras folder on the ActiveSync CD. You must install Windows Media Manager on your computer to copy and convert digital audio files. What is Packaged Content? Packaged content is digital music that has been encrypted for distribution to prevent unau- thorized access to copyrighted content. -
Page 78: Using The Playlist Manager
Using the Playlist Manager Use the playlist manager to set the track playback order. All My Music is the default play- list. It contains all digital audio files available for playback on your iPAQ H3000 and stor- age card. To see a list of recently selected playlists, tap Select Playlist. To create or edit playlists, tap All Playlists. -
Page 79: Using The Library
Getting Books on Your iPAQ H3000 You can download book files from the Web. Just visit your favorite eBook retailer and fol- low the instructions to download the book files. Sample books and a dictionary are also included in the MSReader folder in the Extras folder on the ActiveSync CD. Use Active- Sync to download the files from your computer to your iPAQ H3000 as described in the Read Me file in the MSReader folder. -
Page 80: Using Reader Features
In addition to the text, each book page includes a page number and book title. You can also page through a book by using the Navigation button on your iPAQ H3000. Using Reader Features Reading a book electronically gives you several options not available with paper books. These options are available from any book page. -
Page 81: Removing A Book
• Drawings. When you add a drawing, a drawing icon appears in the bottom-left corner of the page, and drawing tools appear across the bottom of the page. Draw by dragging your stylus. NOTE: To see a list of a book’s annotations, including bookmarks, highlights, text notes, and drawings, tap Annotations Index on the book’s cover page. -
Page 82: Viewing Maps
Creating Map and Pushpin Files for Your iPAQ H3000 1. Draw a box around the area you want to save as a map in Microsoft Expedia Streets and Trips 2000, AutoRoute Express Great Britain 2000, or Microsoft MapPoint 2000. 2. Click Create Map For Pocket Streets on the Tools menu. 3. -
Page 83: I Nternet E Xplorer
chapter 6 OCKET NTERNET Use Pocket Internet Explorer to view Web pages in either of these ways: • During synchronization with your computer, download your favorite links, mobile favorites, and mobile channels that are stored in the Mobile Favorites subfolder in Internet Explorer on the computer. -
Page 84: Mobile Favorites
Mobile Favorites If you are using Microsoft Internet Explorer 5 on your computer, you can download mobile favorites. (You can install Microsoft Internet Explorer 5 from the Extras folder on the ActiveSync CD.) Synchronizing mobile favorites downloads Web content to your iPAQ H3000 so that you can view Web pages while you are disconnected from your ISP and computer. -
Page 85: Channels
Channels Channels are websites designed specifically for offline viewing on your iPAQ H3000. You can subscribe to two types of channels at no fee: AvantGo Channels (Available for English operating systems only.) and mobile channels. Using AvantGo Channels* * Available for English operating systems only. AvantGo is a free interactive service that gives you access to personalized content and thousands of popular websites. -
Page 86: Using Mobile Channels
Using Mobile Channels Mobile channels are sites you subscribe to on your computer. They are stored in the Chan- nels subfolder in the Mobile Favorites folder in Internet Explorer 4.0 or later and are downloaded to your iPAQ H3000 during synchronization. To see a list of mobile channels you can subscribe to at no fee, visit the Pocket PC Mobile Channel List Web page (www.microsoft.com/pocketpc). - Page 87 To view mobile favorites and channels: 1. Tap the Favorites button to display your list of favorites. 2. Tap the mobile favorite or channel you want to view. You’ll see the page that was downloaded the last time you synchronized with your com- puter.
- Page 88 To browse the Web: 1. Connect to the Internet or your network in either of the following ways: 2. Connect using Connections, as described in switch to Pocket Internet Explorer by tapping it on the 3. Connect in Pocket Internet Explorer. To select a service or type of connection, tap Tools then Options.
-
Page 89: Chapter 7: Getting Connected
chapter 7 ETTING ONNECTED You can use your iPAQ H3000 to exchange information with other Windows-powered devices as well as your computer, a network, or the Internet. Use the Infrared (IR) port on your iPAQ H3000 to send and receive files between two devices. In addition to using a cradle, cable, or IR port to connect your iPAQ H3000 to your computer, you can connect to your computer while away from the office by using a remote connection. -
Page 90: Transfer Items Using Infrared
Transfer Items Using Infrared Using the IR port on your iPAQ H3000, you can send and receive information, such as contacts and appointments, with another Windows-powered device at speeds of up to 115.2Kbps. To send information: 1. Switch to the program where you created the item you want to send and locate the item in the list. -
Page 91: Connect To An Isp
PCMCIA modem card using the optional iPAQ PC Card Expansion Pack. NOTE: For information on ordering Compaq iPAQ Expansion Packs, see the Accessories Informa- tion card included in the shipping box, or visit the Compaq iPAQ H3000 home page at www.compaq.com/products/handhelds/. -
Page 92: Connect To Your Network
5. Enter a name for the connection, such as “ISP Connection”. 6. Select your modem type in the Select a modem list. If your modem type does not appear, try re-inserting the modem card. NOTE: You should not need to change any settings in Advanced. Most ISPs now use a server- assigned address. - Page 93 PCMCIA modem card using the optional iPAQ PC Card Expansion Pack. NOTE: For information on ordering Compaq iPAQ Expansion Packs, see the Accessories Informa- tion card included in the shipping box, or visit the Compaq iPAQ H3000 home page at www.compaq.com/products/handhelds/.
- Page 94 NOTE: For information on ordering Compaq iPAQ Expansion Packs, see the Accessories Informa- tion card included in the shipping box, or visit the Compaq iPAQ H3000 home page at www.compaq.com/products/handhelds/. Network Settings will appear automatically the first time you insert the card, so that you can configure the Ethernet card.
-
Page 95: End A Connection
End a Connection If you started the connection from a program, such as Inbox or Pocket Internet Explorer, disconnect from that program first. Then, tap of the screen then Disconnect. To end a network connection, remove the card from your iPAQ H3000. -
Page 96: Get Help On Connecting
3. Select a connection from the Connection list. If you have not created a connection, select Create new connection and follow the steps in the wizard. When you return to this screen at the end of the wizard, select the connection you created from the Con- nection list. -
Page 97: Appendix A: Tips And Troubleshooting
Press the QMenu button, then tap QUtilities, Self Test. For more information, see "Self If you encounter a problem that you cannot solve, contact Compaq technical support or your service provider for assistance. Reset the iPAQ H3000 and Clear Memory Resetting the iPAQ If your iPAQ H3000 responds slowly, stops responding as expected, or “freezes,”... -
Page 98: Clearing Memory
NOTE: Do not turn off your iPAQ as it must remain on in order to reset. Clearing memory If you want to clear all data from your iPAQ H3000 and return it to the factory settings, you should clear the memory. Clearing memory deletes all data and restores the iPAQ H3000 to its default set- tings. -
Page 99: Battery Loses Power
3. Close the Battery On/Off door using the stylus. NOTE: Use CF Backup/Restore or ActiveSync to keep a backup of your iPAQ data so that if you need to clear memory, you can restore the data on your iPAQ. For more information, see “Backup and Restore Battery Loses Power When the battery is low, you will see a battery icon in the status bar of the Today screen. -
Page 100: If You Forget Your Password
Turn off sounds you don’t need The iPAQ H3000 produces sounds in response to a number of events, such as warnings, appointments, and screen taps or hardware-button presses. To optimize battery life, turn off any sounds you don’t need. Tap Reminders and clear check boxes on the Volume and Reminders tabs. -
Page 101: Storage Memory
Storage memory Do not delete files of which the function is unknown. This can cause programs or features to malfunction. It may be appropriate to make a backup before deleting files. • Move data to a storage card. • , Programs, then File Explorer. Tap and hold the file you want to move, and tap Cut. -
Page 102: Program Memory
Program memory • Stop programs you are not currently using. In most cases, programs automatically stop to free needed memory. However, in some situations, such as when confirmation dia- log boxes are waiting for a user response, the program may not be able to automati- cally stop. -
Page 103: Screen Is Hard To Read
Screen is Hard to Read • Turn on the backlight, by holding down the Power button for one second. • Adjust the backlight brightness level. Press the QMenu button, then tap Backlight, Super Bright. • Position a lamp so that the light shines directly on the screen. •... -
Page 104: Modem Connection Problems
Modem Connection Problems You may encounter the following problems when using a modem. Additional trouble- shooting information is available in Connections Help on the iPAQ H3000 and Active- Sync Help on the computer. Can’t dial out • Remove your iPAQ H3000 from the cradle. You cannot connect using a modem if your iPAQ H3000 has an active connection with the computer. - Page 105 Can dial out but can’t make a proper connection • Make sure the network to which you are trying to connect supports the Point-to-Point Protocol (PPP). Your Internet service provider or network administrator can verify this. • Verify that the location is correct. Tap Modem.
-
Page 106: Network Connection Problems
Network Connection Problems • The following solutions may help if you encounter problems when using a network card for network connections. Additional troubleshooting information is available in Connections Help on the iPAQ H3000 and ActiveSync Help on the computer. • Verify that you have an Ethernet card that is compatible with your iPAQ H3000. -
Page 107: Routine Maintenance
Because of the type of battery used in your iPAQ H3000, follow local regulations regard- ing the safe disposal of your iPAQ H3000. Your Compaq vendor can advise you on local regulations, and/or the existence of any battery disposal programs in operation. -
Page 108: Travel Guidelines
There are three types of airport security devices: X-ray machines, magnetic detec- tors (the device you walk through), and security magnetic wands. You can send your device through airport X-ray machines. However, Compaq recommends that you do not send your iPAQ through magnetic detectors or expose it to security magnetic wands. -
Page 109: Appendix B: Character Recognizer
appendix b HARACTER Using Character Recognizer, you can write characters directly on your iPAQ H3000 screen with your stylus, just as you would on a piece of paper. The characters you write are translated into typed text. Use Character Recognizer anywhere you want to enter text, for example, to write a note or to fill in fields in a dialog box. - Page 110 The Character Recognizer input panel is divided into three writing areas. Letters written in the left area (labeled ABC) creates uppercase letters, and letters written in the middle area (labeled abc) creates lowercase letters. Use the right area (labeled 123) for writing num- bers, symbols, special characters, and punctuation.
- Page 111 The following chart is a partial display of the characters you can write while in lowercase mode (the dot on each character is the starting point for writing). Remember that even though you write a letter in its lowercase form, the case of the text that is displayed depends on where you write the letter.
- Page 112 Character Recognizer...
-
Page 113: Appendix C: Regulatory Notices
The Agency Series number for this product is Series PE2030*. This series number should not be confused with the marketing name (Compaq iPAQ H3000 Pocket PC). The following accessories have been evaluated for use with your iPAQ H3000 Pocket PC. -
Page 114: Federal Communications Commission Notice
Consult the dealer or an experienced radio or television technician for help. Modifications The FCC requires the user to be notified that any changes or modifications made to this device that are not expressly approved by Compaq Computer Corporation may void the Reference authority to operate the equipment. Cables Connections to this device must be made with shielded cables with metallic RFI/EMI con- nector hoods in order to maintain compliance with FCC Rules and Regulations. -
Page 115: Canadian Notice
This computer contains an internal lithium polymer battery pack. To reduce the risk of fire or burns, do not disassemble, crush, puncture, short external contacts, or dispose of in fire or water. Replacement should only be done by a Compaq autho- rized service provider using the Compaq spare part for this computer. -
Page 116: Power Cords
5 feet (1.5 m) and 6.5 feet (2 m). If you have questions about the type of power cord to use, contact your Compaq authorized service provider. A power cord should be routed so that it is not likely to be walked on or pinched by items placed upon it or against it. -
Page 117: Appendix D: Hardware Specifications
appendix d ARDWARE System Specifications Feature Processor Memory Display Backlight Audio Infrared Communications Indicators Battery PECIFICATIONS iPAQ H3600 Series StrongARM SA-1110 32-MB SDRAM or greater Color TFT, 240 x 320 pixels, 4K-color support, .24-dot pitch 5-level brightness, light sensor for automatic adjustment of brightness level Speaker, 3.5 mm stereo head- phone jack... -
Page 118: Physical Specifications
Physical Specifications iPAQ H3600 Pocket PC Height 5.1 in Width 3.3 in Depth .63 in Weight 5.8 oz Operating Environment Temperature Relative humidity (non-condensing) Maximum altitude (un-pressurized) Hardware Specifications iPAQ H3600 with Basic Style Pack Metric Metric 130 mm 5.2 in 131.6 mm 5.1 in 83.5 mm 3.4 in...