Advertisement
Safety Information

To reduce the risk of injury, user must read and understand the operator's manual for their pressure washer before using this accessory.
To reduce the risk of injury or property damage, spray the pressure stream in a safe direction to ensure proper connection of all accessories before starting any cleaning project. Fits most pressure washers.
Ensure compatibility and proper fit before using this accessory. Wear eye protection with side shields marked to comply with ANSI Z87.1.
Risk of fluid injections; do not point at people, pets, electrical devices or the unit itself. Turn off the pressure washer before changing or adjusting accessories. For cold water use only. Save these instructions.
Refer to them frequently and use them to instruct other users. If you loan someone this tool, loan them these instructions also.
SYMBOLS
Some of the following symbols may be used on this product. Please study them and learn their meaning. Proper interpretation of these symbols will allow you to operate the product better and safer.
| SYMBOL | NAME | DESIGNATION/EXPLANATION |
 | Safety Alert | Indicates a potential personal injury hazard. |
 | Read Operator's Manual | To reduce the risk of injury, user must read and understand operator's manual before using this product. |
 | Eye Protection | Always wear eye protection with side shields marked to comply with ANSI Z87.1. |
 | Risk of Injection | To reduce the risk of injection or injury, never direct a water stream towards people or pets or place any body part in the stream. Leaking hoses and fittings are also capable of causing injection injury. Do not hold hoses or fittings. |
 | Kickback | To reduce the risk of injury from kickback, hold the spray wand securely with both hands when the machine is on. |
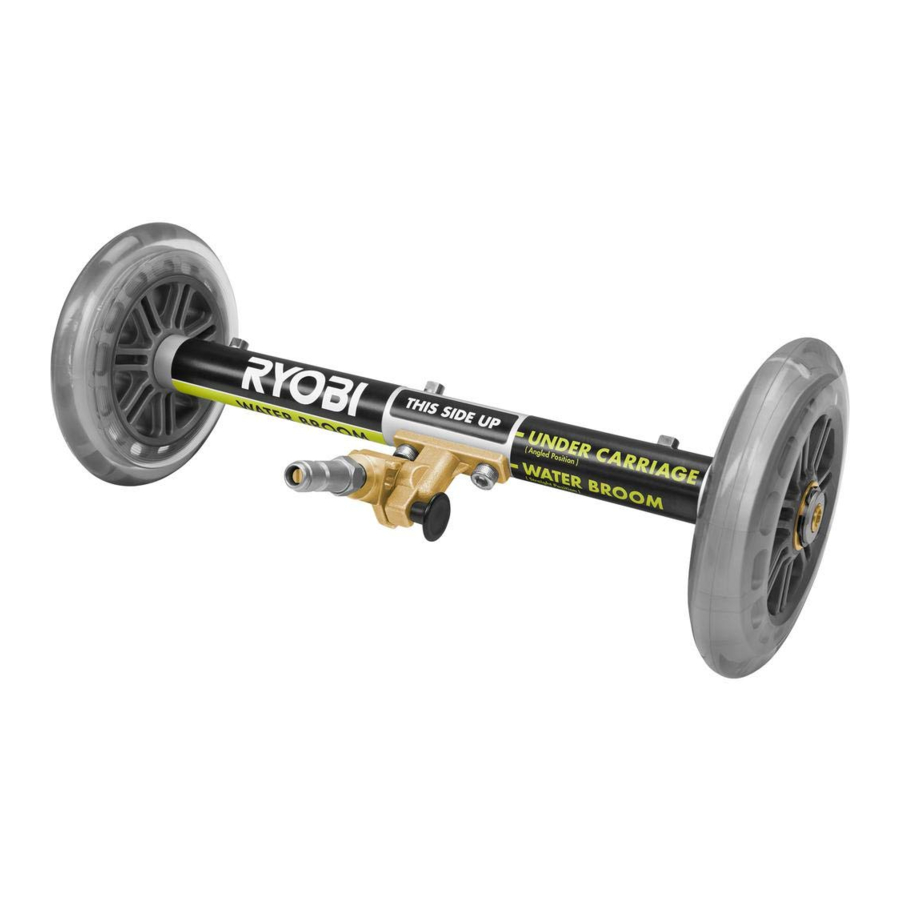
INSTALLING THE WATER BROOM ON THE SPRAY WAND
Insert the water broom inlet plug into the spray wand quick connect coupler and secure.

- Inlet plug
- Quick connect coupler
USING THE WATER BROOM
- Once the water broom is installed, connect the hose to the pressure washer as described in your pressure washer manual.
- Start the pressure washer as described in your pressure washer manual.
- Pull the pivot knob out and move the pivot coupler back or forward to achieve the desired nozzle orientation.


- Pivot knob
- Pivot coupler
- Use with the nozzles pointed down and forward (pivot coupler in back position) to wash large flat surfaces like sidewalks or driveways. Walk slowly behind the water broom, cleaning as you go.


To reduce the risk of injection or injury, never lift the water broom while operating the pressure washer.
- Pivot so the nozzles are pointed upward (pivot coupler in forward position) to clean the underside of raised items like your car's undercarriage.


To reduce the risk of injection or injury, do not depress the trigger until the water broom nozzles are completely underneath the surface being cleaned, and always release the trigger before removing the water broom from underneath the surface
NOZZLE MAINTENANCE
When shipped, the nozzles are pre-assembled to the water broom. These nozzles are appropriate for use with pressure washers operating at 2300 to 3300 psi with a maximum flow rate of 3.0 gpm.
Excessive pump pressure (a pulsing sensation felt while squeezing the trigger and/or a higher vibration in the water broom) may be the result of a clogged or dirty nozzle.
NOTE: Never point the nozzles at your face.
- Turn off the pressure washer and shut off the water supply. With the water broom on the ground, pull trigger to release water pressure.
- Disconnect water broom from spray wand.
- Using a straightened paper clip or fine needle, free any foreign materials clogging or restricting the nozzle.

- Remove high pressure filter as described in the next section, then use a garden hose to flush any debris out of nozzles by running the water through the nozzle openings into the water broom and allowing debris to drain out through the water broom's inlet plug.
- Reinstall high pressure filter as described in the next section and tighten securely.
- Reconnect the water broom to the spray wand.
- Turn on the water supply and start the pressure washer.

CHANGING THE HIGH PRESSURE FILTER
Once you have cleaned the nozzles, if the water still doesn't flow freely, it may be necessary to replace the high pressure filter.
To replace the filter:
- Disconnect the water broom from the spray wand.
- Place a flat head screwdriver in the slot in the water broom's inlet plug and turn counterclockwise. This will allow the filter to be lifted out of the machine.


- Inlet plug
- High pressure filter
- Once the filter is removed from the inlet plug, replace it with a new filter (not included).
- Using a flat head screwdriver, turn the filter clockwise until it can no longer be seen over the top of the inlet plug.
PRODUCT SPECIFICATIONS
REPLACEMENT PARTS
The following replacement parts may be ordered by calling our customer service department at 1-800-860-4050:
| High Pressure Filter | 308103010 | |
| 3/4 in. Retaining Ring (2) | 694723003 | |
| O-Ring (4.5 mm ID x 1.8 mm CS) | 570742132 | |
TECHTRONIC INDUSTRIES
POWER EQUIPMENT
1428 Pearman Dairy Road, Anderson, SC 29625, USA
1-800-860-4050
www.ryobitools.com

Documents / Resources
References
Download manual
Here you can download full pdf version of manual, it may contain additional safety instructions, warranty information, FCC rules, etc.
Advertisement
Thank you! Your question has been received!


Need Assistance?
Do you have a question about the RY31211 that isn't answered in the manual? Leave your question here.