Advertisement
Available languages
Available languages
Quick Links
Model: PDR-065
User Manual
EASY DAB+/FM radio with battery charging station
Gebruikshandleiding
EASY DAB+/FM-radio met oplaadstation voor batterijen
Bedienungsanleitung
EINFACHES DAB+-/ UKW-Radio mit Akkuladestation
Guide d'utilisation
Radio DAB+/FM simple avec station de chargement
Manual del usuario
Radio sencilla DAB+/FM con estación de carga de baterías
1
Advertisement

Related Manuals for LENCO PDR-065


Summary of Contents for LENCO PDR-065
- Page 1 Model: PDR-065 User Manual EASY DAB+/FM radio with battery charging station Gebruikshandleiding EASY DAB+/FM-radio met oplaadstation voor batterijen Bedienungsanleitung EINFACHES DAB+-/ UKW-Radio mit Akkuladestation Guide d’utilisation Radio DAB+/FM simple avec station de chargement Manual del usuario Radio sencilla DAB+/FM con estación de carga de baterías...
-
Page 2: Table Of Contents
Index English ........................................3 Nederlands ....................................... 17 Deutsch ........................................32 Français ........................................48 Español ........................................63 Version: 1.0... -
Page 3: English
English CAUTION: Usage of controls or adjustments or performance of procedures other than those specified herein may result in hazardous radiation exposure. PRECAUTIONS BEFORE USE KEEP THESE INSTRUCTIONS IN MIND: Do not cover or block any ventilation openings. When placing the device on a shelf, leave 5 cm (2”) free space around the whole device. - Page 4 27. If the product is delivered with power cable or AC power adaptor: • If any trouble occur, disconnect the AC power cord and refer servicing to qualified personnel. • Don’t step on or pinch the power adaptor. Be very careful, particularly near the plugs and the cable’s exit point.
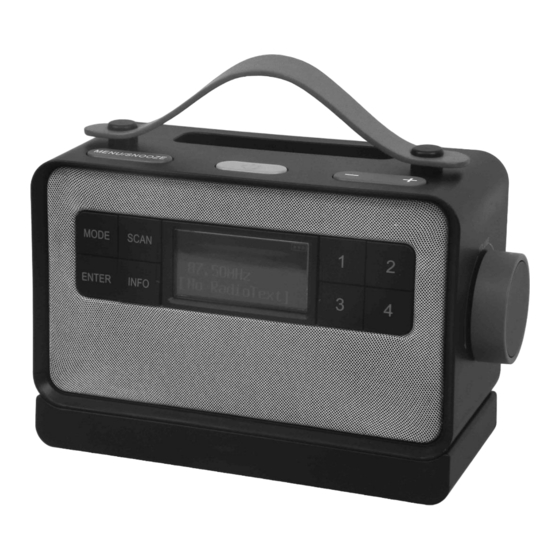
- Page 5 Accessories ● Remote Control ● User manual ● Power Adapter LOCATION OF CONTROL 1) Remote / Mobile Holder 2) Menu / Snooze button 3) On/Off button 4) Tune + / - button 5) Volume knob 6) Scan button 7) Mode button 8) Enter button 9) Info button 10) Remote control sensor...
- Page 6 Caution: Use of controls or procedures other than those specified herein may result in hazardous radiation exposure. This unit should not be adjusted or repaired by anyone except qualified service personnel. Important: Since the sensitive circuitry may cause interference to a radio tuner nearby, switch this unit off while operating other radio devices.
- Page 7 Setting the Time & Date The clock will synchronize to RDS/DAB clock once receiving the RDS/DAB signal if the clock was not set in advance. Follow the below steps to set the time and date manually. 1. Turn on the unit by pressing the On/Off button (3.), then press the Mode button (7.) to select FM or DAB mode.
- Page 8 Hints for reception:- Extend the tele-scopic antenna for best reception. FM scan setting After auto tuning if too many unwanted weak radio stations are received, you can select strong stations only by filtering out the weaker signals. 1. In FM mode, press Menu button (2.) and the display will show <Scan setting>, then press Enter button (8.).
- Page 9 Digital audio broadcasting (DAB) radio 1. Turn on the unit by pressing On/Off button (3.), then press the Mode button (7.) to select DAB mode. 2. Unit will automatically scan all available stations in DAB mode. 3. Or press the Menu button (2.) once, the display will show < Full scan >. Press Enter button (8.) to confirm and unit will start a full scan and all the received station will be kept in station list after scan.
- Page 10 2. “Bluetooth” will be shown on the LCD display. It means the Bluetooth is in searching mode. 3. Switch on the Bluetooth feature of your Bluetooth device (such as mobile phone) and select “Lenco PDR- 065” Bluetooth equipment to connect.
- Page 11 (8.) to enter the Timer setting mode. LCD will show Timer On time, Moreover, the timer clock will flash the hour digit, this means the unit is all ready to enter timer setting mode. 1) Alarm 1 Set up : Press the Alarm key to select the set up of Alarm 1. Press OK key to start the set up.
- Page 12 D. Easy – Normal mode switch This system has built-in easy-normal mode switch at the rear panel. Switch on Easy Mode to simplify the interface of the device, making it easy to use for seniors. Slide the Easy- Normal mode switch to the Easy mode position – Only Power On/Off (3), Preset 1 – 4 buttons (12 –...
- Page 13 Efficiency at low Declared by the 71,9% load (10%) manufacturer based on the value calculated at load condition 5. External power supplies with a nameplate output power of 10 W or less shall be exempted from this requirement. No load Power Declared by the ≤...
- Page 14 Remote control transmitter Battery installation (battery not provided) The infra-red transmitter requires 2 pc AAA size battery for operation Button description Power on/Standby Press to power on/standby the system Mode Press to select the function modes Menu Press to enter the menu setting - / + Press to choose the options ENTER...
- Page 15 15 minutes. Guarantee Lenco offers service and warranty in accordance to European law, which means that in case of repairs (both during and after the warranty period) you should contact your local dealer.
- Page 16 Electronic Equipment Directive). DECLARATION OF CONFORMITY Hereby, Commaxx declares that the radio equipment type [Lenco PDR-065] is in compliance with directive 2014/53/EU. The full text of the EU declaration of conformity is available at the following internet address: https://commaxx-certificates.com/doc/pdr-065_doc.pdf...
-
Page 17: Nederlands
Nederlands VOORZICHTIG: Het gebruik van bedieningen of afstellingen of het uitvoeren van procedures anders dan hierin gespecificeerd, kan leiden tot blootstelling aan gevaarlijke straling. VOORZORGSMAATREGELEN VÓÓR GEBRUIK NEEM MET DE VOLGENDE INSTRUCTIES IN ACHT: Bedek of blokkeer geen van de ventilatieopeningen. Als u het apparaat op een schap plaatst, dient u voor 5 cm (2”) vrije ruimte rondom het gehele apparaat te zorgen. - Page 18 20. Zorg ervoor dit apparaat op een stabiele plek te plaatsen. Beschadigingen veroorzaakt door het gebruik van dit apparaat in een onstabiele positie, trillingen of schokken of door het niet opvolgen van andere waarschuwingen of voorzorgsmaatregelen beschreven in deze gebruikshandleiding, worden niet gedekt door de garantie.
- Page 19 INSTALLATIE • Pak alle onderdelen uit en verwijder het beschermende materiaal. • Sluit het apparaat niet aan op het lichtnet voordat de correcte netspanning is geverifieerd en alle andere aansluitingen tot stand zijn gebracht. Accessoires ● Afstandsbediening ● Gebruikershandleiding ● Voedingsadapter LOCATIE VAN BEDIENINGEN 1) Houder afstandsbediening/mobiel 2) Toets Menu/Sluimer...
- Page 20 13) Toets Voorkeuzestation nr. 2 14) Toets Voorkeuzestation nr. 3 15) Toets Voorkeuzestation nr. 4 16) Luidspreker 17) FM-antenne 18) Type C-aansluiting 19) 3,5 mm hoofdtelefoonaansluiting 20) Aansluiting Lijn uit 21) Schakelaar Eenvoudig-Normaal-modus 22) DC-aansluiting van oplaaddockingstation 23) AC/DC-adapter 24) DC-stekker Voorzichtig: Het gebruik van bedieningen of procedures anders dan hierin gespecificeerd kan leiden tot blootstelling aan gevaarlijke straling.
- Page 21 Aansluiting 1. Steek de DC-stekker (24.) in de DC-aansluiting (22.) van het oplaaddockingstation en sluit vervolgens de AC/DC-adapter (23.) aan op het stopcontact. 2. Plaats het hoofdapparaat op het oplaaddockingstation om op te laden. 3. Zet het apparaat aan door op de aan-/uittoets (3.) te drukken. Als het LCD-display aan staat met tekst, dan betekent dit dat de voeding normaal is.
- Page 22 De tijd en datum instellen De klok wordt gesynchroniseerd met de RDS/DAB-klok zodra het RDS/DAB-signaal is ontvangen als de klok niet van tevoren was ingesteld. Volg de onderstaande stappen om de tijd en datum handmatig in te stellen. 1. Zet het apparaat aan door op de aan-/uittoets (3.) te drukken en druk vervolgens op de modustoets (7.) om de FM- of DAB-modus te selecteren.
- Page 23 Naar de radio luisteren FM-bediening Handmatig afstemmen 1. Zet het apparaat aan door op de aan-/uittoets (3.) te drukken en druk vervolgens op de modustoets (7.) om de FM-modus te selecteren. 2. Druk op de toets Afstemmen + / - (4) om op uw gewenste station af te stemmen. 3.
- Page 24 Geheugen voorkeuzestations U kunt 10 FM-stations in het geheugen opslaan 1. Draai naar het gewenste radiostation met de “handmatige” of “automatische” afstemmethode. 2. Houd de toets Voorkeuze op de afstandsbediening 2-3 seconden ingedrukt, het display toont “Preset Store (Voorkeuze opslaan)” <1: (Empty (leeg)) >. 3.
- Page 25 Waarde DRC (Dynamische bereikcompressie) U kunt het compressieniveau van het station instellen om het verschil in dynamisch bereik of geluidsniveau tussen radiostations te elimineren. 1. Instellen in DAB-modus. Druk op de toets Menu (2.) en druk vervolgens op de toets Afstemmen + / - (4) om <...
- Page 26 2. “Bluetooth” wordt weergegeven op het LCD-display. Dit betekent dat de Bluetooth in de zoekmodus staat. 3. Schakel de Bluetooth-functie van uw Bluetooth-apparaat (zoals mobiele telefoon) in en selecteer “Lenco PDR-065” Bluetooth-apparatuur om verbinding te maken. 4. Het LCD-scherm “BT Connected (BT verbonden)” zodra met succes is verbonden.
- Page 27 4) Bron : Druk op de toets omhoog/omlaag om de wekmodus te selecteren tussen: Zoemer, FM, DAB. FM/DAB: worden gekozen tussen laatst beluisterde voorkeuzestationslijst. Druk op de toets + /- om te selecteren en druk vervolgens op de toets OK om de instelling te bevestigen.
- Page 28 EASY MODE EENVOUDIGE MODUS NORMAL MODE NORMALE MODUS Informatie Opmerkingen Naam of handelsmerk Shenzhen ABP Technology Co. Ltd. van de fabrikant, Adres: 2 floor, B2 Building, Xin hao sheng handelsregistratie en Industrial zone, Yonghe Road, Qiaotou, Fuhai adres Street, Bao an District, Shenzhen City, Guangdong 518103, P.R.
- Page 29 Zender afstandsbediening: Batterij plaatsen (batterij niet meegeleverd) De infraroodzender heeft 2 AAA-batterijen nodig voor gebruik Beschrijving van de toetsen Aanzetten/Stand-by Indrukken om het systeem aan/stand-by te zetten Modus Indrukken om de functiemodi te selecteren Menu Indrukken de menu-instellingen te openen - / + Indrukken om de opties te kiezen ENTER...
- Page 30 (zowel tijdens als na de garantieperiode) contact dient op te nemen met uw lokale dealer. Belangrijke opmerking: Het is niet mogelijk om te repareren producten direct naar Lenco te sturen. Belangrijke opmerking: Als dit apparaat op enigerlei wijze wordt geopend door de gebruiker of een niet-officieel servicecentrum, komt de garantie te vervallen.
- Page 31 (richtlijn afgedankte elektrische en elektronische apparatuur). VERKLARING VAN CONFORMITEIT Hierbij verklaar ik, Commaxx, dat het type radioapparatuur [Lenco PDR-065] conform is met Richtlijn 2014/53/EU. De volledige tekst van de EU-conformiteitsverklaring kan worden geraadpleegd op het volgende internetadres: https://commaxx-certificates.com/doc/pdr-065_doc.pdf...
-
Page 32: Deutsch
Deutsch VORSICHT: Eine andere als die hier beschriebene Benutzung der Bedienelemente oder Einstellung oder Durchführung von Abläufen kann zu einer Aussetzung gefährlicher Strahlung führen. VORSICHTSMASSNAHMEN VOR DER BENUTZUNG BEFOLGEN SIE IMMER FOLGENDE ANWEISUNGEN: Blockieren oder bedecken Sie keine Lüftungsöffnungen. Wenn Sie das Gerät auf ein Regal stellen, lassen Sie um das gesamte Gerät 5 cm (2”) Freiraum. - Page 33 20. Stellen Sie sicher, dass das Gerät in einer stabilen Position aufgestellt ist. Schäden, die durch Verwendung dieses Produkts in einer instabilen Position, durch Vibrationen, Stöße oder Nichtbeachtung der anderen in diesem Handbuch enthaltenen Warnungen und Sicherheitsmaßnahmen entstehen, werden nicht durch die Garantie abgedeckt. 21.
- Page 34 • Eine einem sehr niedrigen Luftdruck ausgesetzte Batterie kann explodieren oder es kann aus einer einem sehr niedrigen Luftdruck ausgesetzten Batterie entflammbares Gas entweichen oder entflammbare Flüssigkeit auslaufen. • Legen Sie besonderes Augenmerk auf den ökologischen Aspekt der Batterieentsorgung. INSTALLATION •...
- Page 35 Zubehör ● Fernbedienung ● Bedienungsanleitung ● Netzteil BEDIENELEMENTE IM ÜBERBLICK 1) Fernbedienung / Handyhalterung 2) Menü/Schlummer-Taste 3) Ein/Aus-Taste 4) Einstellen + / - Taste 5) Lautstärkeknopf 6) Scan-Taste 7) Modus-Taste 8) Eingabetaste 9) Info-Taste 10) Fernbedienungssensor 11) LCD-Display 12) Taste für Senderspeicherung Nr. 1 13) Taste für Senderspeicherung Nr.
- Page 36 Vorsicht: Die Verwendung anderer als der hier angegebenen Bedienelemente oder Verfahren kann zu einer gefährlichen Strahlenbelastung führen. Dieses Gerät darf nur von qualifiziertem Servicepersonal eingestellt oder repariert werden. Wichtig: Da die empfindlichen Schaltkreise Störungen bei einem Radiotuner in der Nähe verursachen können, schalten Sie das Gerät aus, wenn Sie andere Funkgeräte betreiben.
- Page 37 Uhrzeit und Datum einstellen Die Uhr wird mit der RDS/DAB-Uhr synchronisiert, sobald sie das RDS/DAB-Signal empfängt, wenn die Uhr nicht vorher eingestellt wurde. Führen Sie die folgenden Schritte aus, um die Uhrzeit und das Datum manuell einzustellen. 1. Schalten Sie das Gerät durch Drücken der Ein/Aus-Taste (3.) ein und drücken Sie dann die Mode-Taste (7.), um den FM- oder DAB-Modus auszuwählen.
- Page 38 • Die voreingestellte Zeit wird vollständig zurückgesetzt, wenn die Hauptstromversorgung unterbrochen wird. Es wird empfohlen, das System in den Standby-Modus zu schalten, um die Bedienung zu erleichtern. Radiohören FM-Betrieb Manuelles Einstellen 1. Schalten Sie das Gerät durch Drücken der Ein/Aus-Taste (3.) ein und drücken Sie dann die Mode-Taste (7.), um den FM-Modus auszuwählen.
- Page 39 Radio text (Radiotext) → program type (Programmtyp) → frequency (Frequenz) → mono/stereo (Mono/Stereo) → time (Zeit) → date (Datum) Gespeicherte Sender Sie können bis zu 10 FM-Sender im Speicher ablegen 1. Stellen Sie den gewünschten Radiosender mit der manuellen oder automatischen Suchlaufmethode ein. 2.
- Page 40 Anzeigeinformationen Diese Funktion zeigt die Informationen aus dem Radioprogramm an und wird auf dem LCD-Display schrittweise wie unten beschrieben angezeigt, wenn Sie die Info-Taste (9.) kontinuierlich drücken. Radio text (Radiotext) → program type (Programmtyp) → frequency (Frequenz) → mono/stereo (Mono/Stereo) → time (Zeit) → date (Datum) DRC-Wert (Dynamic Range Control) Sie können den Komprimierungspegel des Senders einstellen, um die Unterschiede im Dynamikbereich oder im Tonpegel zwischen den Radiosendern zu beseitigen.
- Page 41 3. Schalten Sie die Bluetooth-Funktion Ihres Bluetooth-Geräts (z. B. Handy) ein und wählen Sie das Bluetooth-Gerät „Lenco PDR-065“ aus, um sich damit zu verbinden. 4. Nach erfolgreicher Verbindung wird auf dem LCD-Display „BT Connected“ („BT verbunden“) angezeigt. 5. Starten Sie die Wiedergabe von Ihrem Bluetooth-Gerät und genießen Sie die Musik.
- Page 42 8. Um die Bluetooth-Verbindung zu trennen, drücken Sie die Mode-Taste (7.), um in einen anderen Modus zu wechseln, oder schalten Sie die Bluetooth-Funktion Ihres Bluetooth-Geräts aus. Auf dem LCD-Display wird erneut „Bluetooth“ angezeigt. Sie können jetzt ein neues Gerät koppeln oder das Gerät ausschalten. Wiederholen Sie die oben beschriebenen Schritte 3-5, um ein weiteres Bluetooth-Gerät zu verbinden.
- Page 43 Hinweis: – • Bei der FM/DAB-Weckfunktion stellt sich das System auf die zuletzt gehörte Radiofrequenz ein, bevor es sich ausschaltet. • Wenn die Weckfunktion über einen Summer aktiviert ist, gibt das Gerät zur gewählten Zeit einen „Piep- Piep“-Ton ab. • Die Weckzeit beträgt ca.
- Page 44 Eingangsspannung Wird vom Hersteller angegeben. 100 – 240 V Sollte ein Wert oder ein Bereich sein. Wechselstromfrequenz des Wird vom Hersteller angegeben. 50/60 Hz AC-Eingangs Sollte ein Wert oder ein Bereich sein Ausgangsspannung Auf dem Typenschild angegebene 5,5 V Ausgangsspannung. Sollte angeben, ob es sich um Wechsel- oder Gleichstrom handelt.
- Page 45 Fernbedienungssender Batterieinstallation (Batterie nicht mitgeliefert) Der Infrarotsender benötigt zum Betrieb 2 Stück Batterien der Größe AAA Tastenbeschreibung Einschalten/Standby Drücken Sie diese Taste, um das System einzuschalten bzw. in den Standby-Modus zu wechseln Modus Drücken Sie diese Taste, um die Funktionsmodi auszuwählen Menü...
- Page 46 Standby-Modus, wenn nach 15 Minuten keine Musik abgespielt wird. Garantie Lenco bietet Leistungen und Garantien im Einklang mit Europäischem Recht. Setzen Sie sich deshalb im Falle von Reparaturen (sowohl während als auch nach Ablauf der Garantiezeit) mit Ihrem Fachhändler in Verbindung.
- Page 47 Verwertung und Entsorgung von Altgeräten aufrecht zu halten (Richtlinie über Entsorgung Elektrischer und Elektronischer Altgeräte). ÜBEREINSTIMMUNGSERKLÄRUNG Hiermit erklärt Commaxx, dass der Funkanlagentyp [Lenco PDR-065] der Richtlinie 2014/53/EU entspricht. Der vollständige Text der EU-Konformitätserklärung ist unter der folgenden Internetadresse verfügbar: https://commaxx-certificates.com/doc/pdr-065_doc.pdf...
-
Page 48: Français
Français ATTENTION : L’utilisation de commandes ou de réglages ou l’exécution de procédures autres que celles spécifiées dans ce manuel peut entraîner une exposition à des rayonnements dangereux. PRÉCAUTIONS AVANT UTILISATION GARDEZ CES INSTRUCTIONS À L'ESPRIT : Ne couvrez pas et n’obturez pas les ouvertures de ventilation. Lorsque l'appareil est placé sur une étagère, laissez un espace libre de 5 cm (2”) tout autour. - Page 49 23. Ne laissez pas les sacs en plastique à la portée des enfants. 24. N'utilisez que des pièces/accessoires recommandés par le fabricant. 25. Confiez tout entretien à un personnel de service qualifié. Une réparation est nécessaire lorsque l'appareil a été endommagé de quelque façon que ce soit, par exemple lorsque le cordon d'alimentation ou sa fiche est endommagée, lorsqu'un liquide a été...
- Page 50 Accessoires ● Télécommande ● Mode d'emploi ● Adaptateur d'alimentation POSITION DES COMMANDES 1) Support pour télécommande/dispositif mobile 2) Touche de menu/répétition 3) Touche marche/arrêt 4) Touche de syntonisation +/- 5) Molette de volume 6) Touche de recherche 7) Touche de mode 8) Touche de validation 9) Touche d'informations 10) Capteur de la télécommande...
- Page 51 Attention : L'utilisation de commandes ou l'exécution de procédures autres que celles spécifiées dans ce manuel peut entraîner une exposition à des rayonnements dangereux. Cet appareil ne doit être réglé ou réparé que par un personnel qualifié. Important : Comme les circuits sensibles peuvent provoquer des interférences avec un syntoniseur radio situé à proximité, mettez cet appareil hors tension lorsque vous utilisez d'autres appareils radio.
- Page 52 Réglage de la date et de l'heure L'horloge se synchronise sur l'horloge RDS/DAB dès réception d'un signal RDS/DAB si l'horloge n'a pas été réglée au préalable. Suivez les étapes ci-dessous pour régler manuellement l'heure et la date. 1. Allumez l'appareil en appuyant sur la touche marche/arrêt (3.), puis appuyez sur la touche de Mode (7.) pour sélectionner le mode FM ou DAB.
- Page 53 Écouter la radio Mode FM Syntonisation manuelle 1. Allumez l'appareil en appuyant sur la touche marche/arrêt (3.), puis appuyez sur la touche de Mode (7.) pour sélectionner le mode FM. 2. Appuyez sur la touche de syntonisation +/- (4) pour syntoniser la station désirée. 3.
- Page 54 Mémoire des stations préréglées Vous pouvez mémoriser 10 stations FM. 1. Syntonisez manuellement ou automatiquement la station de radio désirée. 2. Appuyez et maintenez la touche de la station préréglée enfoncée pendant 2 à 3 s, l'écran affiche « Preset Store »...
- Page 55 Affichage des informations Cette fonction affiche les informations provenant de l'émission radio sur l'écran LCD l'une après l'autre comme ci-dessous en appuyant de manière continue sur la touche Info (9.). Nom de la radio→Type de programme→Fréquence→ mono/stéreo→Heure→Date Valeur DRC (Contrôle de plage dynamique) Vous pouvez régler le niveau de compression de la station pour éliminer les écarts de gamme dynamique ou de niveau sonore entre les stations de radio.
- Page 56 3. Activez la fonction Bluetooth sur votre dispositif Bluetooth (comme un téléphone mobile), puis sélectionnez l'équipement Bluetooh « Lenco PDR-065 » pour la connexion. 4. Une fois la connexion correctement établie, l'écran LCD affiche « BT Connected » (BT connecté).
- Page 57 Autres fonctions A. Réglage de l'heure de réveil Cette fonction permet d'allumer automatiquement l'appareil ou de vous réveiller grâce à l'avertisseur, la radio FM ou DAB. Réglez l'appareil en mode DAB/FM. Appuyez sur la touche Menu (2.), puis sur les touches de syntonisation +/- (4) pour sélectionner <System>...
- Page 58 B. RÉPÉTITION Appuyez sur la touche de répétition de l'appareil pour reporter le réveil de 5 min chaque fois. C. Utilisation des écouteurs Insérez la fiche des écouteurs dans la prise pour casque d'écoute pour écouter la radio en privé. LIRE ATTENTIVEMENT SES MISES EN GARDE AVANT D'UTILISER VOS ÉCOUTEURS Évitez une écoute prolongée à...
- Page 59 Puissance de sortie Puissance de sortie indiquée 13,75 W sur la plaque signalétique. Efficacité active Déclaré par le fabricant sur la 87,403 % moyenne base de la valeur calculée comme moyenne arithmétique du rendement aux conditions de charge 1 à 4. Efficacité...
- Page 60 Émetteur-récepteur de la télécommande Installation des piles (piles non fournies) L'émetteur-récepteur doit être alimenté par 2 piles de type AAA. Description des touches Mise en marche/veille Appuyez sur cette touche pour mettre en marche/veille l'appareil. Mode Appuyez sur cette touche pour sélectionner le mode de fonctionnement.
- Page 61 15 min. Garantie Lenco propose un service et une garantie conformément à la législation européenne, ce qui signifie qu'en cas de besoin de réparation (aussi bien pendant et après la période de garantie), vous pouvez contacter le revendeur le plus proche.
- Page 62 électriques (Directive sur les déchets d'équipements électriques et électroniques). DECLARATION DE CONFORMITE Le soussigné, Commaxx, déclare que l'équipement radioélectrique du type [Lenoc PDR-065] est conforme à la directive 2014/53/UE. Le texte complet de la déclaration UE de conformité est disponible à l'adresse internet suivante: https://commaxx-certificates.com/doc/pdr-065_doc.pdf...
-
Page 63: Español
Español PRECAUCIÓN: Un uso de los controles, unos ajustes o un rendimiento de los procedimientos distintos a los especificados aquí puede resultar en una exposición peligrosa a la radiación. PRECAUCIONES PREVIAS AL USO TENGA ESTAS INSTRUCCIONES EN CUENTA: No cubra ni obstruya las aberturas de ventilación. Si coloca el dispositivo sobre una estantería, deje una separación de 5 cm (2”) alrededor de todo el dispositivo. - Page 64 24. Utilice solo los accesorios especificados por el fabricante. 25. Solicite todo el trabajo de mantenimiento a personal de servicio cualificado. El dispositivo deberá ser reparado cuando quede dañado de cualquier forma, por ejemplo, si el cable de alimentación o el enchufe están dañados, se ha derramado líquido o han caído objetos sobre él, ha quedado expuesto a la lluvia o a la humedad, no funciona con normalidad, o se ha caído al suelo.
- Page 65 Accesorios ● Mando a distancia ● Manual de usuario ● Adaptador de corriente UBICACIÓN DE LOS CONTROLES 1) Soporte para el mando / móvil 2) Botón de menú / repetición 3) Botón de encendido / apagado 4) Botón de sintonía + / - 5) Rueda de volumen 6) Botón de búsqueda 7) Botón de modo...
- Page 66 Precaución: El uso de los controles o los procedimientos distintos a los especificados aquí puede resultar en una exposición peligrosa a la radiación. Solo el personal de servicio cualificado debe ajustar o reparar este aparato. Importante: Puesto que los circuitos sensibles puede causar interferencia con un sintonizador de radio cercano, apague el aparato mientras utiliza otros dispositivos de radio.
- Page 67 Ajuste de la hora y la fecha El reloj se sincronizará con la hora de RDS/DAB después de recibir la señal si no se ha ajustado anteriormente. Siga las siguientes instrucciones para ajustar la hora y la fecha manualmente. 1. Encienda el aparato pulsando el botón de encendido/apagado (3), luego pulse el botón MODE (7) para seleccionar el modo FM o DAB.
- Page 68 Escuchar la radio Funcionamiento en FM Sintonización manual 1. Encienda el aparato pulsando el botón de encendido/apagado (3), luego pulse el botón MODE (7) para seleccionar el modo FM. 2. Pulse el botón de sintonía + / - (4) para sintonizar la emisora deseada. 3.
- Page 69 Memoria de estaciones presintonizadas Puede almacenar hasta 10 emisoras FM en la memoria 1. Cambie a la emisora deseada con los métodos de sintonización «manual» o «automática». 2. Mantenga pulsado el botón PRESINTONÍA en el mando durante 2-3 segundos, la pantalla mostrará «Preset Store»...
- Page 70 Valor de DRC (Control de rango dinámico) Puede ajustar el nivel de compresión de una emisora para eliminar la diferencia en el rango dinámico o el nivel de sonido entre las emisoras. 1. Ajuste en el modo DAB. Pulse el botón MENU (2) y el botón de sintonía + / - (4) para seleccionar <DRC>. Pulse el botón ENTER (8) para acceder al ajuste.
- Page 71 Bluetooth. 2. «Bluetooth» aparecerá en la pantalla LCD. Eso significa que el Bluetooth está en modo de búsqueda. 3. Active el Bluetooth en su dispositivo (como un teléfono móvil) y seleccione «Lenco PDR-065» para conectarse. 4. Cuando se haya conectado con éxito, la pantalla LCD mostrará «BT Connected» (Bluetooth conectado).
- Page 72 3) Duración : Luego pulse el botón + / - para seleccionar la duración de la alarma entre: 15, 30, 45, 60, 90, 120 (minutos). Pulse el botón de sintonía + / - (4) para seleccionar el modo de encendido del temporizador.
- Page 73 EASY MODE MODO FÁCIL NORMAL MODE MODO NORMAL «Information Notas (Información)» Nombre de los Shenzhen ABP Technology Co. Ltd. fabricantes o marcas Dirección: 2 floor, B2 Building, Xin hao sheng registradas, registro Industrial zone, Yonghe Road, Qiaotou, Fuhai comercial y dirección Street, Bao an District, Shenzhen City, Guangdong 518103, P.R.
- Page 74 Eficiencia con carga Declarada por el fabricante 71,9 % baja (10 %) en base al valor calculado en la condición de carga 5. Las fuentes de alimentación externas con una potencia de salida en placa de 10 W o menos estarán exentas de este requisito.
- Page 75 Transmisor del mando a distancia Instalación de las pilas (no incluidas) El transmisor de infrarrojos funciona con 2 pilas AAA Descripción de los botones Encendido / modo de Pulse para encender el sistema o ponerlo en el suspensión modo de suspensión Modo Pulse para elegir los modos de funcionamiento Menú...
- Page 76 15 minutos. Garantía Lenco ofrece servicio y garantía en conformidad con las leyes europeas, por lo que en caso de requerir una reparación (tanto durante como después del periodo de garantía) debe ponerse en contacto con su distribuidor local.
- Page 77 DECLARACIÓN DE CONFORMIDAD Por la presente, Commaxx declara que el tipo de equipo radioeléctrico [Lenco PDR-065] es conforme con la Directiva 2014/53/UE. El texto completo de la declaración UE de conformidad está disponible en la dirección Internet siguiente: https://commaxx-certificates.com/doc/pdr-065_doc.pdf...