Advertisement
Available languages
Available languages
Quick Links
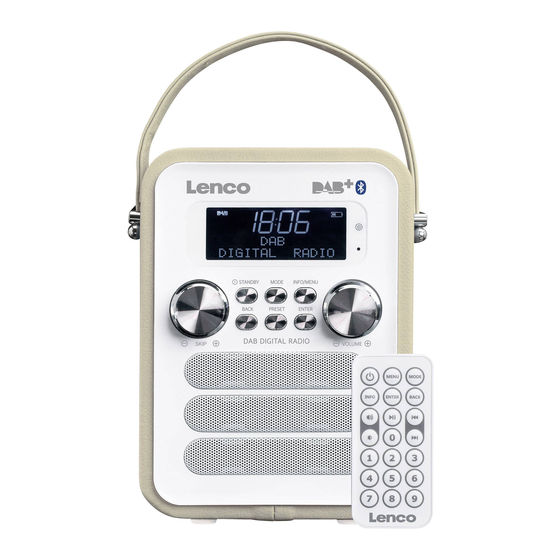
Model No.: PDR-050
User Manual
DAB+, FM radio with BT and rechargeable battery
Gebruiksaanwijzing
DAB+, FM-radio met BT en oplaadbare batterij
Bedienungsanleitung
DAB+, FM-Radio mit Bluetooth und wiederaufladbarer Batterie
Mode d'emploi
Radio DAB+, FM avec BT et batterie rechargeable
Manual del usuario
Radio DAB+, FM con BT y batería recargable
1
Advertisement

Related Manuals for LENCO PDR-050


Summary of Contents for LENCO PDR-050
- Page 1 Model No.: PDR-050 User Manual DAB+, FM radio with BT and rechargeable battery Gebruiksaanwijzing DAB+, FM-radio met BT en oplaadbare batterij Bedienungsanleitung DAB+, FM-Radio mit Bluetooth und wiederaufladbarer Batterie Mode d'emploi Radio DAB+, FM avec BT et batterie rechargeable Manual del usuario...
- Page 2 Index English ......................................3 Nederlands ....................................14 Deutsch ......................................25 Français ......................................37 Español ......................................48...
-
Page 3: English
English PDR-050 CAUTION: Usage of controls or adjustments or performance of procedures other than those specified herein may result in hazardous radiation exposure. This unit should not be adjusted or repaired by anyone except qualified service personnel. PRECAUTIONS BEFORE USE KEEP THESE INSTRUCTIONS IN MIND: Do not use this device near water. - Page 4 37. Do not use or store this product in a place where it is subject to direct sunlight, heat, excessive dust or vibration. 38. Do not allow children access to plastic bags. 39. Only use attachments/accessories specified by the manufacturer. 40.
- Page 5 PRODUCT VIEW 01. MODE 02. STANDBY 03. SKIP-/SKIP+ 04. BACK 05. PRESET 06. LCD DISPLAY 07. REMOTE CONTROL RECEIVER 08. MIC 09. INFO/MENU 10. VOLUME-/VOLUME+ 11. ENTER 12. SPEAKERS 13. AUX IN SOCKET (3,5MM) 14. RESET BUTTON 15. CHARGE INDICATOR 16.
- Page 6 Panel Keys introduction: Control Function/usage Standby Toggle between 'On' or 'Standby' mode (showing time and date). Cancels sleep function and a sounding alarm. When running on batteries the “standby” button turns the unit off Volume/Mute Turn to adjust volume, Press to mute on/off SKIP-/SKIP+ Turn to cycle through menus and options.
- Page 7 Specification 01: DAB/DAB+ Digital radio frequency: 174.928-239.200MHz 02: FM radio Frequency: 87.5-108MHz 03: Bluetooth version: CSR4.0 04: Total power output: 3W RMS 05: Battery capacity: DC 3.7V 1800mAh 06: Charge power: DC 5.0V≥600mA 07: Working time: 4-6 hours 08: Charging time: ~4 hours Display The screen is a graphic matrix display capable of emulating either a 2 line 16 text character layout or an 8 character Starburst display layout.
- Page 8 System settings The System settings allow you to tailor the radio with a variety of options to suit you. To access system settings from any mode Select Menu > System >, then choose from the various options as described in the menu map. The System Setting Menu options are: •...
- Page 9 Parameters • On time – hours and minutes • Duration –15, 30, 45, 60, 90 minutes if the alarm is not cancelled Venus returns to standby after this time period. • Source – DAB | FM |Buzzer If DAB or FM is chosen as the audio source you will also be prompted to select the Last played station or one of the preset stations (if there are any presets).
- Page 10 Operation DAB radio mode DAB radio mode receives DAB/DAB+ digital radio and displays information about the actual station, program/track broadcasted. To enter DAB radio mode, short press the MODE button until the display shows DAB Scanning for stations. The first time you use the radio, or if the station list is empty, the radio automatically performs a full scan to see what stations are available.
- Page 11 4. Now playing information While a station is playing, the screen shows its name and DLS (Dynamic Label Segment) information transmitted by the radio station such as program name, track title and contact details. Long DLS info, over 16 characters will scroll across the display. Short press INFO/MENU Each time you press Info, the next set of information is displayed, cycling through: DLS text, DL Plus information (this is only displayed when transmitted by the station), signal strength, program, type, ensemble name, channel number/frequency, signal error rate, bit rate, codec/DAB variant, power status (Mains/Battery), time and date.
- Page 12 2. To Connect your Bluetooth device, first open the Bluetooth on mobile phone or other Bluetooth device, then scan or search the device “Lenco PDR-050”, click to connect with “Lenco PDR-050”, at the same time you will hear a sound, Bluetooth connection is made and mobile phone or other Bluetooth device can be used with your Lenco PDR-050.
- Page 13 2. When the radio is charging, An animated battery icon appears at the top right hand corner in screen. Guarantee Lenco offers service and warranty in accordance to European law, which means that in case of repairs (both during and after the warranty period) you should contact you local dealer.
-
Page 14: Nederlands
Nederlands PDR-050 LET OP: Gebruik van bedieningen of afstellingen of uitvoer van procedures anders dan gespecificeerd in deze documentatie kan leiden tot blootstelling aan schadelijke straling. Dit apparaat dient uitsluitend te worden aangepast of gerepareerd door gekwalificeerd onderhoudspersoneel. VOORZORGSMAATREGELEN VOOR GEBRUIK ONTHOUD DE VOLGENDE INSTRUCTIES: Gebruik dit apparaat niet in de buurt van water. - Page 15 32. Dit apparaat is niet bestemd voor gebruik door mensen (inclusief kinderen) met fysieke, zintuiglijke of geestelijke gebreken of gebrek aan kennis en ervaring, tenzij zij onder toezicht staan of instructies hebben over het juiste gebruik van het apparaat hebben gekregen van de persoon die verantwoordelijk is voor hun veiligheid. 33.
- Page 16 PRODUCTOVERZICHT 01. MODUS 02. STAND-BY 03. VORIGE-/VOLGENDE+ 04. ACHTERKANT 05. VOORKEUZE 06. LCD-SCHERM 07. ONTVANGER VOOR AFSTANDSBEDIENING 08. MIC 09. INFO/MENU 10. VOLUME-/VOLUME+ 11. INVOEREN 12. LUIDSPREKERS 13. AUX-INGANG (3,5MM) 14. RESETTOETS 15. LAADINDICATOR 16. DC 5V MICRO-USB-LADERINGANG 17. SUBWOOFER...
- Page 17 Introductie van de paneeltoetsen: Bediening Functie/gebruik Stand-by Wisselt tussen de modi 'Aan' en 'Stand-by' (tijd- en datumweergave). Annuleert de slaapfunctie en stopt het alarmgeluid. Wanneer de batterijen als voeding worden gebruikt, dan schakelt de toets “stand-by” het apparaat uit Volume/Demp Draaien om het volume aan te passen, indrukken om de dempfunctie in/uit te schakelen VORIGE-/VOLGENDE+ Draaien om menu's en opties te doorlopen.
- Page 18 Specificaties 01: Digitale radiofrequentie DAB/DAB+: 174,928-239,200MHz 02: FM-radiofrequentie: 87,5-108MHz 03: Bluetooth-versie: CSR4.0 04: Totaal uitgangsvermogen: 3W RMS 05: Accu vermogen: DC 3,7V 1800mAh 06: Laadvermogen: DC 5,0V≥600mA 07: Werkingstijd: 4 tot 6 uur 08: Oplaadtijd: ~4 uur Scherm Het scherm is een grafische matrix-display die of een lay-out met 2 regels en 16 tekstkarakters kan weergeven of een Startburst-weergave met 8 karakters.
- Page 19 Systeeminstellingen U kunt via de systeeminstellingen de radio met verschillende opties naar wens instellen. Om de systeeminstellingen vanuit een willekeurige modus te openen, selecteer Menu > Systeem > en kies vervolgens uit de verschillende opties zoals beschreven in de menustructuur. De systeeminstellingen bieden de volgende menufuncties: •...
- Page 20 Parameters • Inschakeltijd – uren en minuten • Tijdsduur –15, 30, 45, 60, 90 minute. Als het alarm niet wordt geannuleerd, dan schakelt het apparaat na deze tijdsduur terug op stand-by. • Bron – DAB | FM |Zoemer. Als DAB of FM als de audiobron is gekozen, dan zult u ook worden gevraagd om het laatst beluisterde station of een van de voorkeuzestations te selecteren (vooropgesteld dat voorkeuzestations zijn opgeslagen).
- Page 21 Bediening DAB-radiomodus De DAB-radiomodus ontvangt digitale DAB/DAB+ radio en toont uitgezonden informatie over het actuele station, het programma/de track. U kunt de DAB-radiomodus openen door kort op de toets MODE te drukken totdat de display aangeeft dat naar DAB-stations wordt gezocht. Als u de radio voor het eerst gebruikt of als de stationslijst leeg is, dan zal de radio automatische een volledige scan uitvoeren om te bepalen welke stations beschikbaar zijn.
- Page 22 4. Afspeelinformatie Terwijl er een station wordt afgespeeld, zal de display de naam en DLS-informatie (Dynamisch Labelsegment) ervan weergeven, zoals een programmanaam, een tracktitel en contactinformatie. Als de DLS-informatie langer is dan 16 karakters, dan zal deze over de display scrollen. Telkens wanneer u kort op de toets INFO/MENU drukt, dan zal de volgende set informatie achtereenvolgens worden weergegeven: DLS-tekst, DL Plus informatie (dit wordt alleen weergegeven wanneer uitgezonden door het station), signaalsterkte, programmatype, groepsnaam, kanaalnummer/frequentie, foutenpercentage van het signaal, bitsnelheid,...
- Page 23 2. Sluit de externe audiobron aan op de 3,5 mm stereo AUX-ingang. 3. Druk kort op Mode totdat de display 'Auxiliary Input' (AUX-ingang) weergeeft. 4. Stel het volume van de PDR-050 naar wens in en eventueel ook het volume van de externe audiobron. Afspeelinformatie Het scherm zal in de Aux-ingangsmodus 'Auxiliary Input;...
- Page 24 Garantie Lenco biedt service en garantie aan overeenkomstig met de Europese wetgeving. Dit houdt in dat u, in het geval van reparaties (zowel tijdens als na de garantieperiode), uw lokale handelaar moet contacteren. Belangrijke opmerking: het is niet mogelijk om producten die moeten worden gerepareerd rechtstreeks naar Lenco te sturen.
-
Page 25: Deutsch
Deutsch PDR-050 ACHTUNG: Die zweckentfremdete Bedienung, Benutzung oder Einstellung der Prozeduren kann zu gefährlichen Unfällen durch Strahlen führen. Dieses Gerät darf außer von qualifizierten Fachleuten von niemand anderem repariert oder eingestellt werden. VORSICHTSMASSNAHMEN VOR DER BENUTZUNG BEFOLGEN SIE IMMER FOLGENDE ANWEISUNGEN: Benutzen Sie das Gerät nicht in der Nähe von Wasser. - Page 26 31. Das Typenschild befindet sich an der Unter- oder Rückseite des Gerätes. 32. Dieses Gerät ist nicht zur Benutzung durch Personen (auch Kinder) mit physischen, sensorischen oder mentalen Beeinträchtigungen oder ohne ausreichender Erfahrung vorgesehen, es sei denn, sie werden durch eine verantwortliche Person beaufsichtigt oder wurden in die ordnungsgemäße Bedienung des Gerätes durch eine für ihre Sicherheit verantwortlichen Person eingewiesen.
- Page 27 PRODUKTANSICHT 01. MODUS 02. STANDBY 03. ZURÜCKSPRINGEN/WEITERSPRINGEN 04. RÜCKSEITE 05. SPEICHERPLATZ 06. LCD-ANZEIGE 07. EMPFÄNGER FERNBEDIENUNG 08. MIC-Anschluss 09. INFO/MENÜ 10. LAUTSTÄRKE–/LAUTSTÄRKE+ 11. EINGABE 12. LAUTSPRECHER 13. AUX-EINGANGSBUCHSE (3,5 mm) 14. ZURÜCKSETZTASTE 15. LADEANZEIGE 16. USB-LADEGERÄTEINGANG 5 V DC 17. SUBWOOFER...
- Page 28 Vorstellung der Bedienfeldtasten: Steuerung Funktion/Verwendung Standby Umschalten zwischen den Modi „Ein“ und „Standby“ (Anzeige von Datum und Uhrzeit). Abbrechen der Schlaffunktion und Abschalten eines ertönenden Weckalarms. Bei Batteriebetrieb schaltet die Taste „Standby“ das Gerät ab. Zur Einstellung der Lautstärke drehen; Zum Stummschalten oder Aufheben Lautstärke/Stummschaltung der Stummschaltung drücken ZURÜCKSPRINGEN/WEITERSPRINGEN...
- Page 29 Technische Daten 01: DAB/DAB+-Digitalradiofrequenz: 174,928-239,200 MHz 02: FM-Radiofrequenz: 87,5 – 108 MHz 03: Bluetooth-Version: CSR4.0 04: Maximale Ausgangsleistung: 3 W RMS 05: Batteriekapazität: 3,7 V 1800 mAh 06: Ladestrom: 5,0 V DC/≥600 mA 07: Sendezeit: 4 - -6 Stunden: 08: Ladezeit: ~4 Stunde Anzeige Der Bildschirm ist ein Matrix-Grafikdisplay, der in der Lage ist, entweder ein zweizeiliges 16-Zeichen-Layout oder eine Vierzehnsegment-Anzeige für 8 Zeichen zu emulieren.
- Page 30 Systemeinstellungen Die Systemeinstellungen ermöglichen es Ihnen, das Radio mit einer Vielzahl an Optionen auf Ihre Vorlieben abzustimmen. In jedem beliebigen Modus können Sie auf die Systemeinstellungen zugreifen, indem Sie Menu > System > auswählen und dann wie in der Menü-Übersicht beschrieben eine der zahlreichen Optionen auswählen. Die Optionen des Systemeinstellungsmenüs sind: •...
- Page 31 Wecker und Schlaf Neben einer Uhr/Kalender gibt es weiterhin 4 Weckalarme mit Schlummerfunktion und Schlaffunktion, um das System nach einer einstellbaren Zeitdauer (15, 30, 45, 60 und 90 Minuten) auszuschalten. Der Wecksound für jeden der Wecker kann der Summer oder eine der auswählbaren Audioquellen sein. 1.
- Page 32 3. Equalizer Hier befinden sich eine Anzahl voreingestellter Einstellungen sowie eine Option My Equaliser (benutzerdef. EQ), die es Ihnen erlaubt, Ihre eigene EQ-Einstellung zu erzeugen. Benutzerdef. EQ... | Normal | Classic | Jazz | Pop | Rock | Speech (/normal/Klassik/Jazz/Pop/Rock/Sprache) Benutzerdef.
- Page 33 Bedienung DAB-Radiomodus Im DAB-Radiomodus wird DAB/DAB+-Digitalradio empfangen und es werden Informationen über den aktuellen Sender sowie das ausgestrahlte Programm/den ausgestrahlten Titel angezeigt. Drücken Sie kurz solange die Taste MODE, bis auf dem Display DAB Scanning for stations (Scanne nach DAB-Radiosender) angezeigt wird, um in den DAB-Radiomodus zu wechseln. Bei der Erstbenutzung des Radios oder bei leerer Radiosenderliste führt das Radio automatisch einen vollständigen Scan durch, um herauszufinden, welche Radiosender verfügbar sind.
- Page 34 4. Informationen zur aktuellen Wiedergabe Während der Wiedergabe eines Radiosenders zeigt der Bildschirm dessen Namen und DLS-Informationen (Dynamic Label Segment Information) wie beispielsweise Programmname, Titelname und Kontaktdetails an, die über den Radiosender ausgestrahlt werden. Long DLS info (lange DLS-Informationen)– bei mehr als 16 Zeichen als Lauftext auf dem Display. Bei jedem kurzen Druck auf INFO/MENU erscheint der nächste Satz von Informationen auf dem Display in der Reihenfolge: DLS-Text, DL-Plus-Information (wird nur angezeigt, wenn vom Radiosender übertragen), Signalstärke, Programmtyp, Ensemblename, Kanalnummer/Frequenz, Signalfehlerrate, Bitrate, Codec/DAB-Variante, Stromversorgung (Netz/Batterie),...
- Page 35 2. Aktivieren Sie für eine Verbindung mit Ihrem Bluetooth-Gerät zuerst Bluetooth auf Ihrem Mobiltelefon oder einem anderen Bluetooth-Gerät und scannen oder suchen Sie dann nach „Lenco PDR-050“. Klicken Sie es an, um eine Verbindung mit „Lenco PDR-050“ herzustellen. Zur gleichen Zeit, wenn Sie einen Sound hören, wurde die Bluetooth-Verbindung hergestellt und Sie können Ihr Mobiltelefon oder Ihr anderes Bluetooth-Gerät mit dem „Lenco...
- Page 36 2. Wenn das Radio geladen wird, wird oben rechts auf dem Bildschirm ein animiertes Batteriesymbol angezeigt. Garantie Lenco bietet Leistungen und Garantien im Einklang mit Europäischem Recht. Im Falle von Reparaturen (sowohl während als auch nach Ablauf der Garantiezeit) sollten Sie deshalb Ihren Einzelhändler kontaktieren.
-
Page 37: Français
Français PDR-050 ATTENTION : L’utilisation de commandes ou de réglages ou l’exécution de procédures autres que ceux spécifiés dans ce manuel peut entraîner une exposition à des rayonnements dangereux. Cet appareil ne doit pas être réglé ou réparé par quiconque d’autre que du personnel qualifié. - Page 38 30. L’appareil doit être utilisé uniquement sous des conditions climatiques modérées, évitez un environnement extrêmement froid ou chaud. 31. La plaque signalétique se situe en dessous ou à l’arriére de l'appareil. 32. Cet appareil n’est pas destiné à être utilisé par des personnes (enfants compris) souffrant de handicaps physiques, sensoriels ou mentaux, ou manquant d’expérience et de connaissances, sauf si elles sont sous surveillance ou ont reçu des instructions sur l’utilisation correcte de l’appareil par la personne qui est responsable de leur sécurité.
- Page 39 PRÉSENTATION DE L’APPAREIL 01. MODE 02. MISE EN VEILLE 03. PISTE PRÉCÉDENTE/PISTE SUIVANTE 04. ARRIÈRE 05. PRÉSELECTION 06. ÉCRAN LCD 07. RÉCEPTEUR DE LA TÉLÉCOMMANDE 08. MICRO 09. INFO/MENU 10. VOLUME-/VOLUME+ 11. ENTRÉE 12. ENCEINTES 13. PRISE AUX IN (3,5 MM) 14.
- Page 40 Présentation des touches de la façade : Commande Fonction/usage Mise en veille Alterne entre les modes « Allumé » ou « Veille » (affichage de la date et de l’heure). Arrête la fonction sommeil et les sonneries d’alarme. Lorsque l’alimentation se fait par batteries, la touche « STANDBY » éteint l’appareil Volume/Mise en sourdine Tournez pour régler le volume, appuyez dessus pour couper/remettre le son SKIP-/SKIP+...
- Page 41 Caractéristiques 01: Fréquence radio numérique DAB/DAB+ : 174,928 à 239,200 MHz 02: Plage de fréquences de la radio FM : 87,5 à 108 MHz 03: Version Bluetooth : CSR4.0 04: Puissance de sortie totale : 3 W RMS 05: Capacité batterie : 3.7V 1800mAh 06: Puissance de charge : 5,0 VCC ≥...
- Page 42 Réglages système Les paramètres du système vous permettent d’adapter la radio à une variété d’options qui vous conviennent. Pour y accéder à partir de n’importe quel mode, sélectionnez Menu> Système> (Menu > System), puis effectuez votre choix parmi les différentes options décrites dans la carte du menu. Les options du menu System Setting (Paramétrage du système) sont les suivantes : •...
- Page 43 Paramètres • On time (Heure d’activation) – heures et minutes • Duration (Durée) –15, 30, 45, 60, 90 minutes si l’alarme n’est pas annulée, l’appareil se met en veille après cette période. • Source – DAB | FM | Buzzer (Source – DAB | FM | Sonnerie) Si la source audio choisie est DAB ou FM, vous serez invité à sélectionner la dernière station écoutée ou l’une des stations préréglées (le cas échéant).
- Page 44 Utilisation Mode radio DAB Le mode radio DAB reçoit la radio numérique DAB/DAB + et affiche des informations sur la station écoutée, le programme ou la piste diffusé. Pour passer en mode radio DAB, appuyez brièvement sur la touche MODE jusqu’à ce que l’affichage indique «...
- Page 45 4. Informations sur la station écoutée Pendant l’écoute d’une station, son nom et le texte radio (Dynamic Label Segment) diffusés par la station comme le nom du programme, le titre du morceau et les coordonnées sont affichés sur l’écran. Longue information DLS, plus de 16 caractères défileront sur l’affichage.
- Page 46 2. Pour connecter votre appareil Bluetooth, activez d’abord Bluetooth sur votre téléphone portable ou autre appareil Bluetooth, puis recherchez l’appareil « Lenco PDR-050 », cliquez pour vous connecter avec le « Lenco PDR-050 », en même temps qu’un son retentit, la connexion Bluetooth est établie et un téléphone portable ou tout autre appareil Bluetooth peut être utilisé...
- Page 47 2. Lorsque la radio se charge, une icône de batterie animée apparaît dans le coin supérieur droit de l’écran. Garantie Lenco propose un service et une garantie conformément à la législation européenne, ce qui signifie qu’en cas de besoin de réparation (aussi bien pendant et après la période de garantie), vous pouvez contacter votre revendeur le plus proche.
-
Page 48: Español
Español PDR-050 PRECAUCIÓN: El uso de los controles o ajustes o el funcionamiento de los procedimientos excepto a aquellos especificados aquí pueden provocar una exposición peligrosa a la radiación. Esta unidad no debe ajustarse o repararse por ninguna persona salvo personal de servicio cualificado. - Page 49 32. Este aparato no está diseñado para su uso por personas (incluyendo niños) con discapacidades físicas, sensoriales o mentales o con falta de experiencia o conocimientos, salvo que estén bajo la supervisión o hayan recibido formación sobre el uso correcto del dispositivo por parte de una persona responsable de su seguridad. 33.
- Page 50 VISTA DEL PRDOUCTO 01. MODE 02. ESPERA 03. SALTAR-/SALTAR+ 04. ATRÁ 05. PREDEFINIDA 06. PANTALLA LCD 07. RECEPTOR DEL MANDO A DISTANCIA 08. MICRÓFONO 09. INFO/MENÚ 10. VOLUMEN-/VOLUMEN+ 11. ENTRAR 12. ALTAVOCES 13. TOMA DE ENTRADA AUXILIAR (3,5MM) 14. BOTÓN EDE REINICIO 15.
- Page 51 Instrucciones sobre las teclas del panel: Control Función/uso En espera Cambia entre el modo “On” o “En espera” (mostrando la fecha y la hora). Cancela la función retardo y el sonido de la alarma. Cuando funciona con pilas, el botón “standby” apaga la unidad Volumen/Silenciar Gírelo para ajustar el volumen;...
- Page 52 Especificaciones 01: Frecuencia de radio digital DAB/DAB+: 174,928-239,200MHz 02: Frecuencia de radio FM: 87,5-108 MHz 03: Versión Bluetooth: CSR4.0 04: Salida de potencia total: RMS3W 05: Capacitad dela batteria : 3.7V 1800mAh 06: Potencia de carga: CC 5.0V≥600mA 07: Tiempo func.: 4-6 horas 08: Tiempo de carga: 4 horas Pantalla La pantalla es una pantalla de matriz gráfica capaz de emular bien un diseño de 16 caracteres de texto en 2 líneas o un diseño...
- Page 53 Configuración del sistema La configuración del sistema le permite personalizar la radio con una amplia variedad de opciones para satisfacerle. Para acceder a la configuración del Sistema desde cualquier modo, seleccione Menu > System >, y después elija las diversas opciones tal y como se describen en el mapa del menú.
- Page 54 Parámetros • A la hora – horas y minutos • Duración –15, 30, 45, 60, 90 minutos si la alarma no se cancela Venus vuelve al modo en espera tras este periodo de tiempo. • Fuente – DAB | FM |Pitido. Si se elige DAB o FM como la fuente de audio se le requerirá que seleccione la última emisora reproducida o una de las emisoras presintonizadas (s hay alguna emisora presintonizada).
- Page 55 Funcionamiento Modo radio DAB El modo radio DAB recibe radio digital DAB/DAB+ y muestra información acerca de la emisora actual, programa / pista emitida. Para entrar en el modo radio DAB, pulse brevemente el botón MODE hasta que la pantalla muestre búsqueda DAB para emisoras.
- Page 56 4. Información sobre lo que se está reproduciendo ahora Mientras se reproduce una emisora, la pantalla muestra su nombre y la información DLS (Segmento de Etiqueta Dinámica) transmitida por la emisora de radio como el nombre del programa, título de pista y detalles de contacto. La información DLS larga, superior a 16 caracteres, se desplazará...
- Page 57 Bluetooth, se puede usar el teléfono móvil u otros dispositivo Bluetooth con su Lenco PDR-050. Si apaga el Bluetooth en el teléfono móvil u otro dispositivo Bluetooth, el reproductor sonará para notificarle que la conexión Bluetooth está rota.
- Page 58 Garantía Lenco ofrece servicio y garantía en cumplimiento con las leyes de la Unión Europea, lo cual implica que, en caso de que su producto precise ser reparado (tanto durante como después del periodo de garantía), deberá contactar directamente con su distribuidor.